Friday, November 19, 2010

Michael Kors dress - Vogue 1117

The holidays are fast approaching and I have resolved to have a new dress for a holiday party or two.  Last year I was like the proverbial cobbler's children who had no shoes.  In my case - the busy dressmaker with no dress.  This year I am staying in CA for the holidays so I have a bit more time.  Also, I am waiting for fabric that I ordered last week to make some children's jumpers, hopefully it will arrive tomorrow but I am not counting on it.  


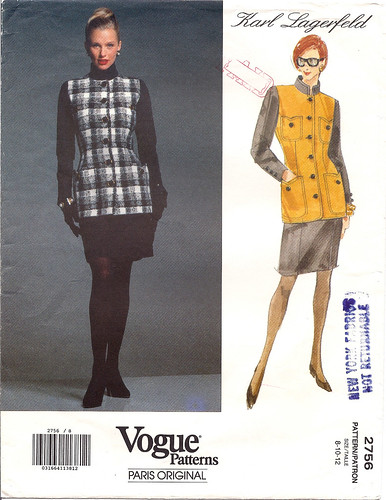
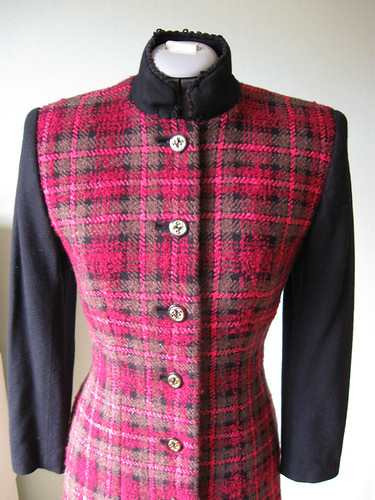
So I was rummaging through my file boxes looking for something to make, and came across this pattern which I bought last year but had never made.  Perfect time to try it out.  The suggested fabrics are men's suiting, crepe, and lightweight tweed.  Having none of these in my stash I pulled out a fabric that I bought at an estate sale months ago. I would call it a twill or a kind of denim.  The threads are magenta and black, which combine into a smokey merlot color (if that is a color).  Very easy to work with and presses well.  No stretch which would be nice, but for one dollar at an estate sale I am not complaining.  


MKdresspatternandfabric

This pattern is a rated average but  I would definitely call it advanced.  Lots of pieces and plenty of marking to do.  
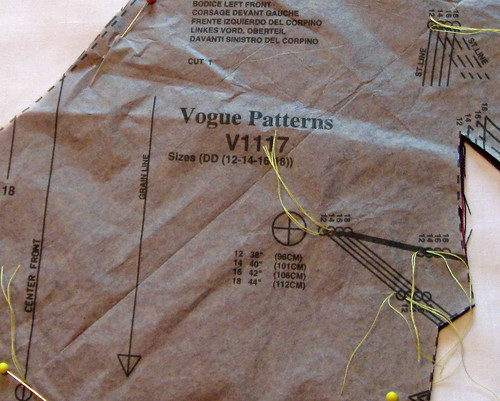
The question of size is one I am still playing with.  I usually start with a size 12 bodice and then play around with the actual measurements.  Lately the patterns seem to add way more ease than is necessary or flattering.  For example, the size 12 pattern is for a 34" bust.  See the circle with the X in it on the pattern below, the pattern it shows a finished bust measurement of 38" which would be 4" total of ease.   I always use these finished measurement indicators which convention dictates are printed on the front pattern pieces, usually bust, waist and hip although depending on the style they can omit the waist, hip or both.  For a multi-size pattern they can help you decide which size to use or how to choose a different size for top and bottom and grade the difference.  Quick method of checking is to hold the measure tape around you at the measurement, for this one bust at 38", and imagine that as the garment.  Does it stand too far away from your body?  or too tight to sit down?  
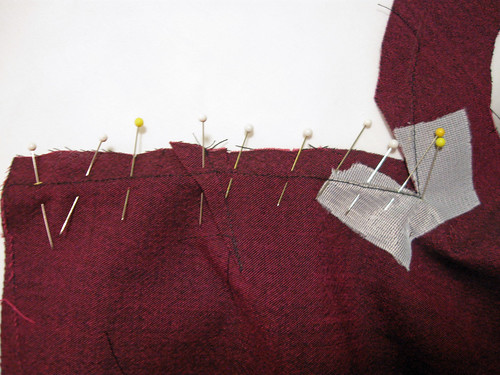
I think for a sleeveless dress that 4" of ease in the bodice will be way too much, and I will probably end up taking it in about 2" but I am going to baste together the front and back and then see how it fits.  This is one more reason that I rarely assemble dresses as the pattern instructs, for me it works better to sew side seams as the last for fitting purposes.

Mkdresspatternfront

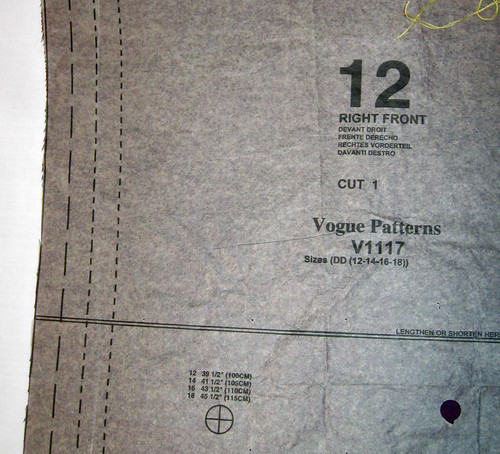
Here is the front skirt piece, same circle with X indicating the finished measurements for hip for the various sizes.  You can see that I was lazy and just cut it out as the largest size on the pattern paper, so I will use it as an extra-large seam allowance.  

MKdresspatternskirt

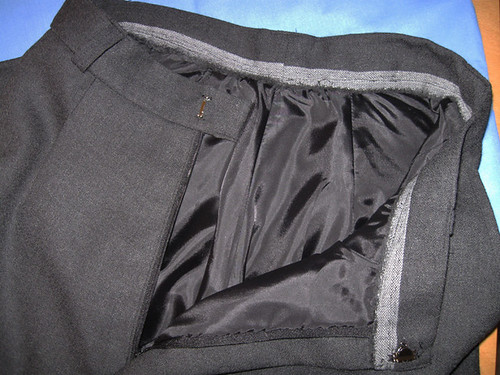
Lastly, here is a look at the inside of the front bodice.  The pattern instructions have you sew a small piece of bias fabric on the right side over that inside corner and then slash, turn to inside and then attach the side bodice.  I understand that they are creating a seam allowance where none exists at the inside point of that corner, but thank goodness for fusible interfacing.  Last year I saw this post on a great sewing blog, Erica B's DIY Style,  Vogue 1117 - Michael Kors Starlet Dress all about making this dress, she gave a lot of great tips on sewing it including this one on step 8 in the instructions.  If you are making this dress read her post first.  So I did as she instructed with the fusible and it worked fine.  


Mkdress corner fusible

Today I hope to finish a couple of muslins that I have started, finish a dress I am making for a client, get to the gym for a serious workout, and who knows what else.  MUST turn off computer!   Expecting our first big storm here so no gardening (whew, relief) 


Here is today's SunnyGal garden photo, took this about 2 weeks ago after a quick rain shower.  Mini roses in a pot that have stayed alive and blooming for 6 years.  I was in the parking garage elevator in Union Square in San Francisco, leaving the shopping district and a woman got on the elevator with what appeared to be a table centerpiece.  I said it was pretty and she said "will you take it, I don't even want it."   I never turn down a plant so I came home with it and it has bloomed ever since. 

MiniRoses

Thursday, November 11, 2010

Never can say goodbye

What do you do with items you have sewn but no longer wear?  I have a few treasured pieces that remain hanging in the closet, despite not being worn for ages.  Here is the prime example.


KLplaid suit

Vogue Paris Original 2756 Karl Lagerfeld Suit.  I made this sometime in the 90's when I started work in the corporate world.  I loved this suit and probably wore it way too often. But as I recall, these were my first bound buttonholes. The sleeves and collar are wool jersey and there is a small bit of braid trim on the collar.  The skirt is the same black wool jersey.  If you are noticing the pleat perfection in the skirt, I can't take credit.   At the time I made this I was taking a class on pleated garments at the Sewing Workshop in SF (no longer there) and part of the project was the opportunity to send some fabric out to be professionally pleated.  The buttons came from Britex, a downtown San Francisco fabric store that I recommend if you are in the city.

I still have the pattern, I think my jacket looks similar to Karl's.  However I didn't go with the ultra European 90's red hair or the very Karl glasses shown on the line drawing model.

KLVogue2756

I still wear the skirt once in a while, and I would maybe wear the jacket, except as you can see it does have rather large shoulder pads - at the time they looked good.
Maybe I should operate on this jacket - change the shoulder pads, although who knows what that would do to the sleeves.  Hmmm.   


KLjacket close up

So this suit still hangs in my closet.  I have plenty of other suits I made, leftover from my crazy corporate days and I wear them on occasion but this one is very dear.  I saw a post a few months ago by the Slapdash Sewist,  bye-bye-baby-baby-goodbye and she discussed donating or otherwise getting rid of things she had sewn.  In particular I noted her comment about the lack of size labels in handmade clothes, something I had never thought about.  

This dress is another creation that I just can't part with.  I confess that this no longer fits like it did.  A bit tight in the hip area.  I made this to wear to a friend's wedding.   Self designed, in that I took a basic sheath dress and played around with the ruffles until I had the type of ruffle effect that I wanted.    I made the belt and used a covered buckle kit, those kits are great and are become more difficult to find.

pinkdress ruffles

Digging around in my photo books I did find this blast from the past.  That  is my friend Ashley on the left,  we have switched hairstyles these days as I have the short hair now and she has the shoulder length. But she is just as tiny as ever. It was for her that I made some plaid Bermuda shorts earlier this year, wrote about it in this post.

me&Ashleypink dress

The wedding was in Portland, Oregon and I forgot to pack the belt in my suitcase - so the dress looks a bit long.  But I did not forget my matching shoes!  

There are a few more gems hanging in the closet.  My sister, who is a professional organizer, recommends that for each new item you bring into your house, you should get rid of one like item.  Sorry sis, not going to happen here.  (Although she recently organized my garage and now it is perfection - just have to keep it that way).

So the question to you - what handmade but no longer worn clothes are you still keeping?
and why?


Tuesday, November 2, 2010

Wool Crepe Jacket and Pants - done!

This afternoon I finished the wool suit that I have been working on in my last 2 posts.   Lots of intentions to do the hemming and hand sewing these past two evenings in front of the TV - but the World Series was too exciting for a San Francisco Giants baseball fan and for once I actually watched instead of just listening as I sew.  Victory in 5 games and now "back to our regularly scheduled programming".


Here is the finished jacket, which is New Look 6633.  A very simple pattern that sews up extremely well, and can be a matching jacket for a dress, a stand alone jacket, or as I have done part of a wool suit with pants.   I used this pattern last year for a 2 piece outfit in silk dupioni that the same person wore to a wedding,  pictured in a previous post .


Ellenjacket2

Here is a close up of the collar.   Sort of an asian inspired shape to the collar, and so simple to sew.  I also think the sleeves/armholes are very well drafted on this pattern, the sleeves go in very smoothly, with just the right amount of ease.   Note to beginning sewers - don't presume sleeve issues are to do with your sewing skills - I have realized over time that some sleeves are perfectly designed and sew beautifully with almost any fabric - and some sleeves are a nightmare that should never have made it out of the design department.  But the mystery is figuring out which is which. 


Ellenjacketcollar

I also made a pair of pants to complete this outfit.  Last year I copied a pair of existing pants which is not as tricky as it sounds.  Making a pattern from a well-fitting pair of pants you already own can be less frustrating than dealing with a new pattern and trying to get the fit right.  I suggest for a first try using a fairly loose pant, something like a trouser style.
Maybe I will do a post after the holidays on how I do this.  


Here is the inside of the pants,  I cut the waistband on the selvedge of the fabric and used that as the seam finish, stitching in the ditch on the right side to secure it.  Doing this eliminates turning the waistband seam allowance over and creating one more fabric layer.  On men's trousers you always see the waistband done this way, often with a contrast binding over the edge of the waistband.  I put a center back seam in the waistband, which makes for easy alterations.  Have you noticed that some ready to wear women's pants are constructed this way?  I have seen this at Banana Republic and a few other brands.  Wonder why the pattern companies don't do this.  SO much easier to make tiny adjustments to the waistband at the end of assembling a pair of pants.   For the zipper I used the Sandra Betzina fly front zipper method, video instruction on Threads magazine website. - foolproof.  

Ellentrouserwaistband

Here is today's SunnyGal garden photo.  I looked outside today around noon and the leaves on the crepe myrtle tree seemed to turn orange overnight.  Maybe in honor of the SF Giants?
Time to enjoy as next week they will be on the ground.


crepemyrtleleavesNov