Showing posts with label bootstrap fashion. Show all posts

Friday, April 6, 2018

Random Threads # 31: Darts, detergent and Bootstrap Fashion Custom Dress Form

It seems like I have been trying to write this Random Threads post for about 2 weeks, but never quite had the time. We are having a glorious weather week now in the Bay Area and I just came in from planting a bunch of annuals, some weed pulling and some attempts to get the climbing roses to trail where I want them to. Sitting in front of my laptop seems like a relaxation by comparison. It also seems like I've been sewing nonstop for weeks, so it's good to take a break and get outside for some yard work. The nonstop sewing included finishing a couple of things that were winter items - and I might get a couple of wearings before the it is just too warm.

I've been making a few versions of a dress from Tessuti patterns, their Bondi dress. We are doing a class at Hello Stitch in April to sew this dress, and the pattern is included in the class. We also will have one of each size sewn up so you can come into the studio and try on to find your perfect size. More on my other classes below but let's get to Random Threads!

New Pattern Releases: every time there is a new pattern release I tend to think "hmm...not at all interesting" and then a few weeks/months/years later I buy the patterns. Do you jump on the new patterns or let them marinate a while? Even the new Burda magazines, I'm just now finding things I would like to make from the Dec. and Jan. issues and the spring issues are kind of bland. Which means in about 3 months I will find all kinds of stuff to sew in them :)  Late breaking edit: I just looked at the Burda May issue preview and line drawings and meh, nothing interesting. Just saw the new Vogue Summer release, and again, not so much. With the exception of Vogue 1584 Tracy Reese knit dress which is all kinds of interesting and I hope to get to that this summer.

How do you Pin? Now that I have lots of students I am fascinated to see how people pin when they are sewing. Generally I can only do it one way, it's not necessarily right or wrong, but based on the fact that I am right-handed, and it seems the sewing machine is set up to favor a particular way.
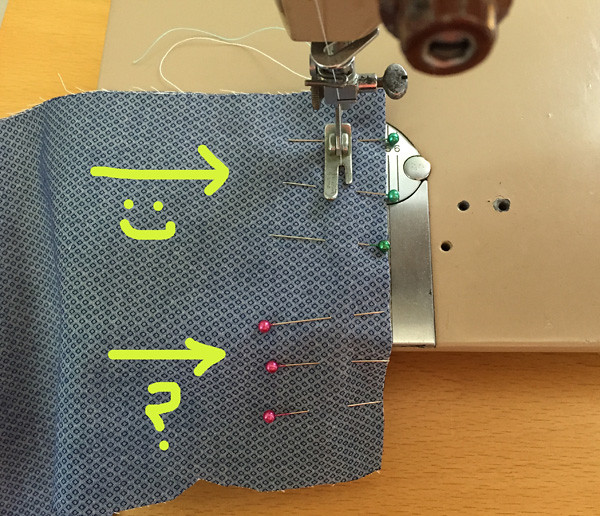
how to pin

I put the heads of the pins on the edge of the fabric, as this makes it easier to remove them with my right hand and also easier to pin them in. But so many people put them in with the heads of the pins towards the garment. Do you do it a specific way, or have you even thought about it. Note that the photo above is exaggerated - I am always trying to get students to use fewer pins. I think newish garment sewers tend to put too many pins which is cumbersome and probably not needed but it does take some practice to use few or no pins.

Direction and angle of darts: Oh this is my obsession of the week. Bust darts that are completely horizontal just drive me crazy. I think they look so odd. But perhaps this is a question of personal preference and it is not something anyone else notices. We all have our own little obsessions, things that just bug, yours could be collar shape, or pocket placement, and mine is dart position.
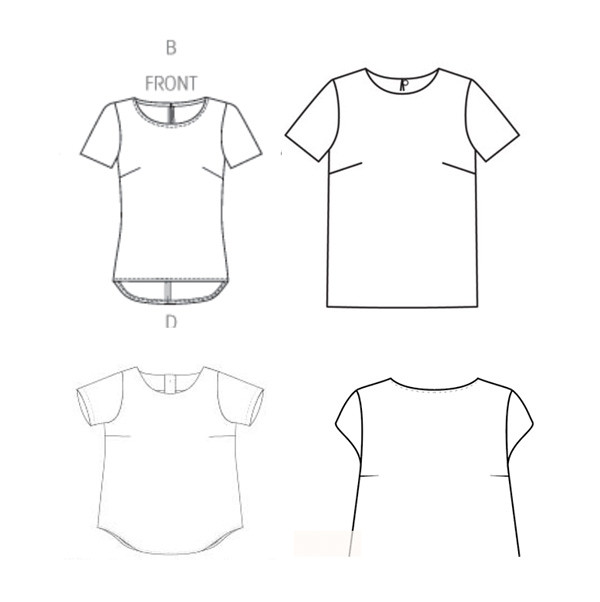
dart angles

To me the bust darts that are completely horizontal look cartoony. I didn't want to include finished garments as I haven't sewn anything that I could recall with this feature, but here are a few line drawings to illustrate this. Have you noticed this? What is your irrational annoyance in pattern design?

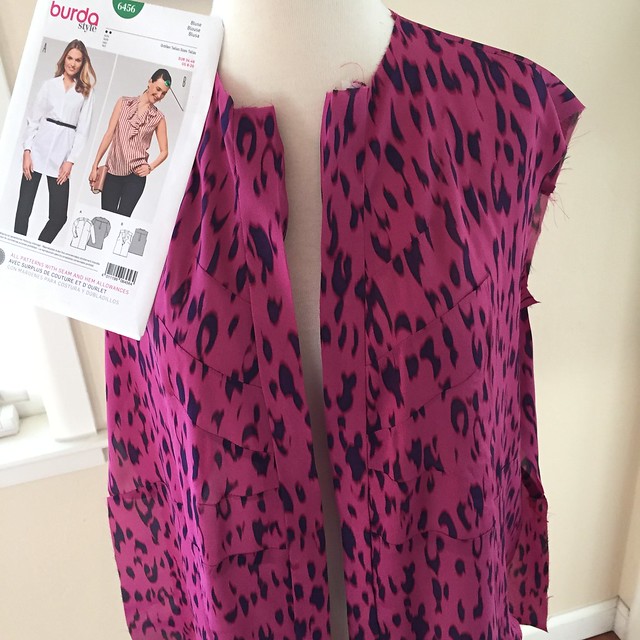
Changing your mind mid-project: I'm in the middle of making a shirt from a recent Burda magazine and about half way through decided that the fabric was all wrong for the style. Or not really so bad but it would be better as something else. Plus our weather is heading towards hot so what was I thinking making a long sleeve shirt?
IMG_3636

I had been making this shirt from the April issue (see, trying to make something right away does not work out for me :)  It's a cute shirt and I will revisit it in the fall. Meanwhile I just bought this envelope pattern, which I'm sure I saw in a magazine in the last year or two. Anyway I had not cut out the sleeves for the shirt, sometimes I do that when sewing, just cut out the pieces that I need to start and wait on the other details like sleeves. Consequently I will use the back as is and then I can eke out the front and ruffle from my remaining fabric. This silk almost-chiffon is more suited to a ruffle top than a darted one.

My new favorite blog: Sea of Teal.  Here's a link to a great outfit post. There is something about her style that I find really appealing. And I'm always glad to find a new to me blog with someone making coats or jackets in addition to all the other wardrobe components.

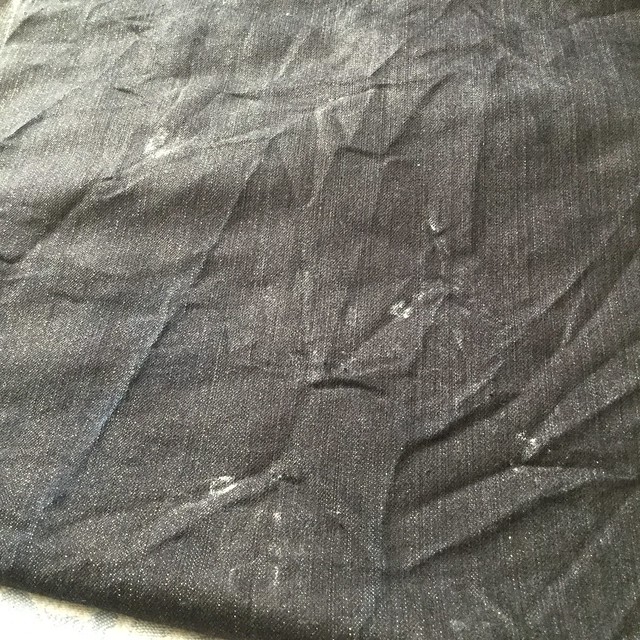
Dark fabrics in the laundry: Are HE (high efficiency) washing machines actually lower in efficiency? I ask because mine is causing all kinds of frustration when I follow all the guidelines and wash dark fabrics, particularly denim.
IMG_0604

I washed this piece of black denim, which has gold metallic threads, very cool and will be turned into a summer little black dress of the casual variety. But boo hoo, I put it in the wash with other dark garments, used the minimal liquid laundry detergent, set the machine for 2 rinses, and STILL have some white blobs of detergent. I get this all the time with jeans and other dark clothes. I think the high efficiency is somewhat of a joke as it does not rinse properly. SO less water allegedly but sometimes I have to rinse and spin a 2nd time. Any suggestions? I did rinse and spin again and the spots are gone but :(

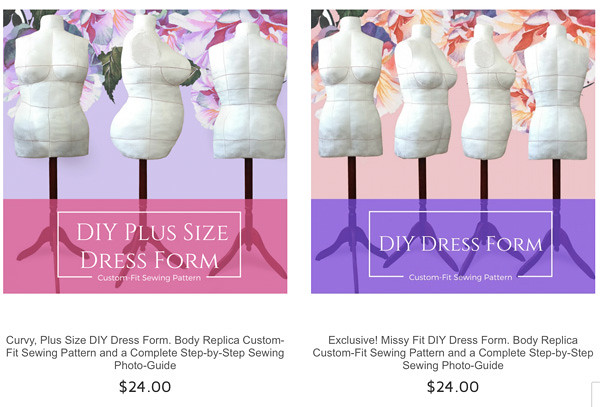
Custom Dressforms: So often people ask me about sewing and ask the usual questions such as "do you have a super fancy sewing machine" my answer is no (pretty much the opposite.) Do you have to use a dress form? Again my answer is no. It's nice to have but something I sewed for myself without for most of my life. I do have a couple of form now, one adjustable one was a Christmas gift, a couple that I bought at garage sales, and now people have given me a couple. In fact I kind of have too many! But last year Yuliya from Bootstrap Fashion Patterns contacted me and asked me if I would try out her new patterns for sewing a custom sized dress form. I was interested but to my slight embarrassment it has taken me up to now to get it completed.

My verdict is that is amazing! and like anything else in the sewing world, takes a bit of effort, might need some adjusting here or there but on the whole it is a great option if you want a dress form for your figure.

Here's the image from their website and the link to this pattern page.
Bootstrap custom dress form patterns

Let's dive into the details.   For starters I suggest you look at the Bootstrap Fashion page, and watch the video to see if it's something you would want to do. I have been planning to do this for months, ordered the pattern last year and finally printed it out and sewed it up. I didn't take all that many photos as I was constructing but a few so you can get the idea of the process.  So I'm adding those photos here, with some details however I just wrote an extensive review on PatternReview.com so read that for more info. I will put the highlights and some of my advice here but definitely click over to that review as well. I made this using the measurements of someone I sew for regularly and it's pretty close to their shape.

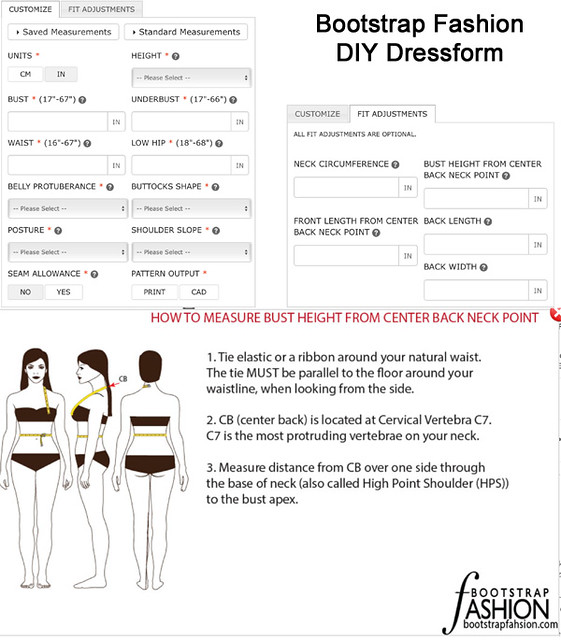
First thing - get a friend to help with the measurements. Some of them are quite specific and it's not really possible to do them on yourself. Here is the input screen, on each measurement there is a little question mark and red asterisk, if you click on that you get the little illustration to show how to measure which is really helpful. I printed out these screens so I could make notes of the measurements and then put them in the order when I had time to concentrate on it.


The info about what fabric to use and the interfacing was invaluable, and I suggest following it. I followed their advice to create my paper pattern pieces, lay them out on fabric to determine just how much was needed. Saved some $ on the amount of fabric and interfacing which was less than I anticipated and then I could buy just what I needed. And also fuse just what was needed.
Bootstrap measurement info
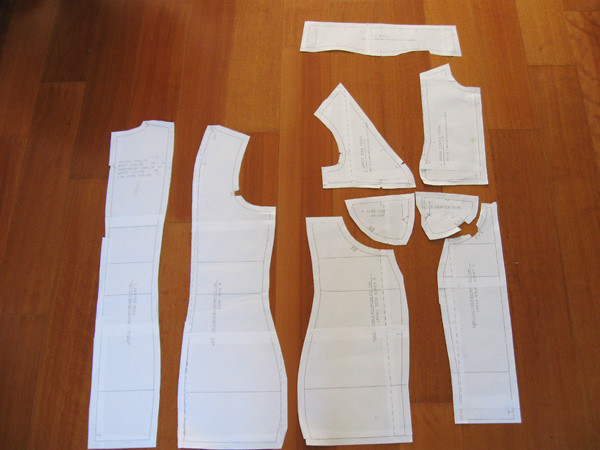
dress form pieces

Here are the main body pattern pieces. Not too difficult to assemble, sewing-wise.
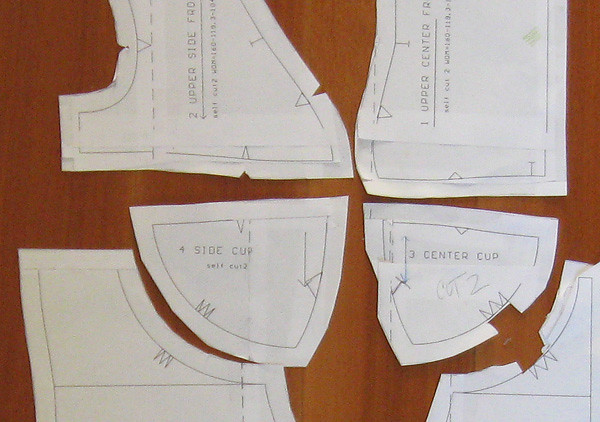
close up pattern pieces dress form

Here's a closer look at the pattern pieces. See all the different shape and size notches. Quite helpful and they matched up perfectly. I added 1/2" seam allowance - not sure why I chose that, probably 3/8" might be even easier to sew.
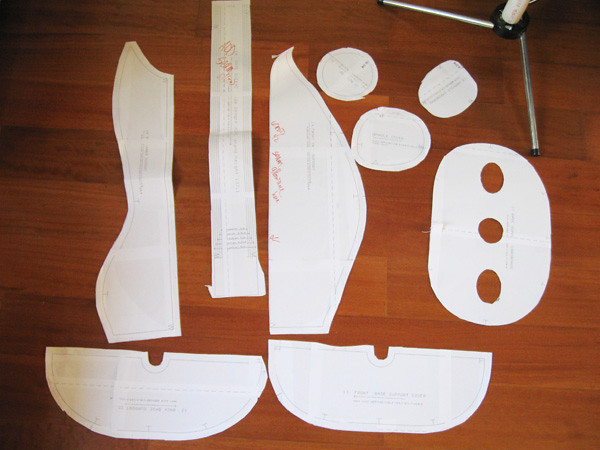
dress form support pieces

This array above shows the pattern pieces for all the structure and internal support pieces, and the cardboard pieces. They look like kind of an odd shape, but how it goes together is that the body cavity is in half and supported down the center by two very firm pieces of fabric, so actually when you go to stuff it you are stuffing two the separate sides.
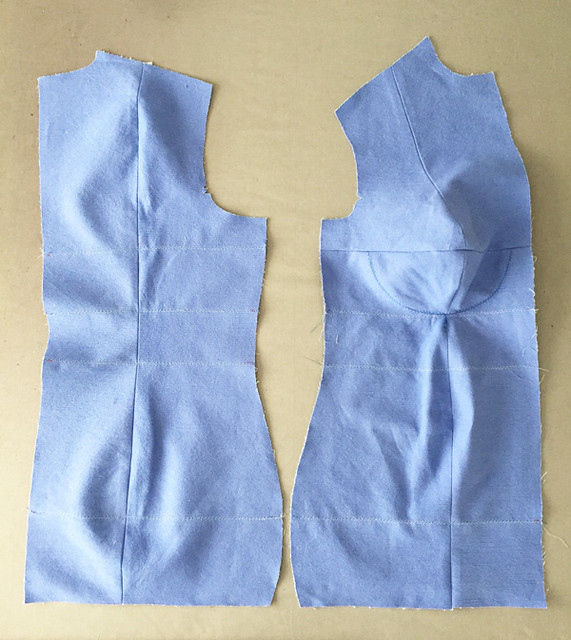
sewn together dress form pieces

Here is one half of each front and back side by side so you can see how it looks prior to sewing it into a body shape. The horizontal lines are clever, at hip, waist, underbust and bust. I did them in a not too contrasty thread color - and skipped the one that goes across the bust cup, not sure why and I regret that now. I think the zig-zag stitching both gives you the horizontal lines, tames the seam allowances inside somewhat, and stabilizes the fabric in the horizontal direction so you don't over stuff.
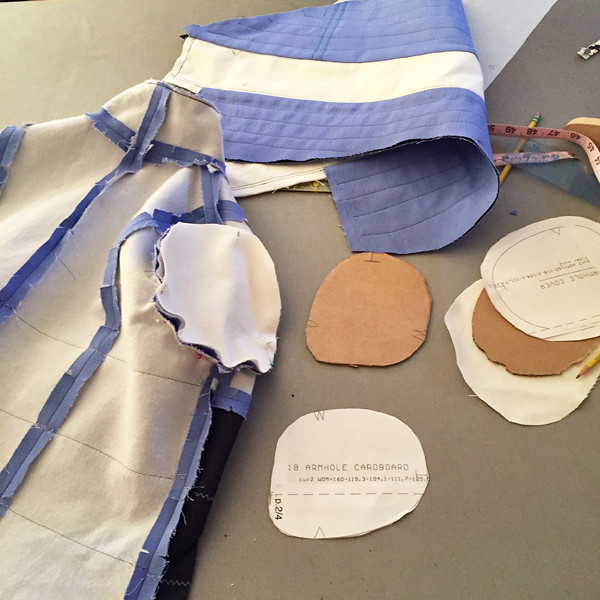
dress form support cardboard

Here's a look at almost finished construction. You create pockets at the armhole where a piece of cardboard is slipped in, to reinforce that area. Clever! The piece at the top with the rows of stitching is the internal vertical support. You can see it has a fabric tube in the center where the PVC pipe goes to hold the thing upright.

This one is a bit sad looking - during the stuffing process it has the look of a deflated balloon when you are part of the way through. Read the details on my review to see what mistakes I made during these stages. But to sum up - you could do it on your own but having a helper is a plus. Stuff it all on one session. Measure as you go (which the video tells you to do) Don't over stuff.
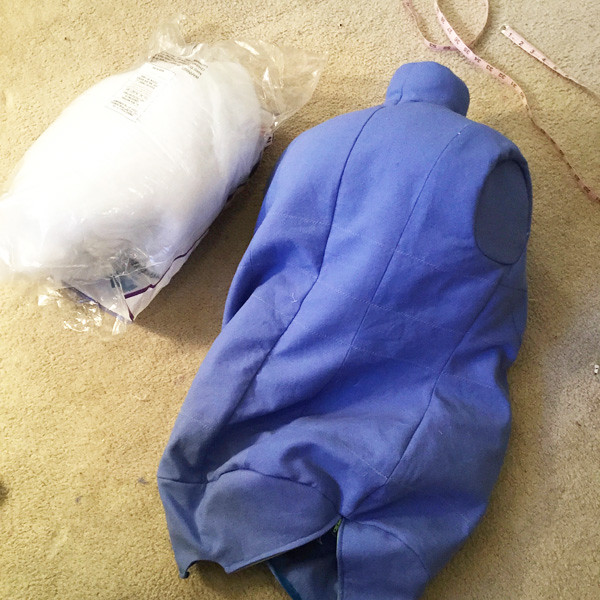
dress form partial

I put a few more photos on the review. You can see my stuffing is a tiny bit lumpy in places. I found that if you work with it, almost knead it a bit like you would with other things you stuff (pillows etc) it smooths out and gets the shape you want.
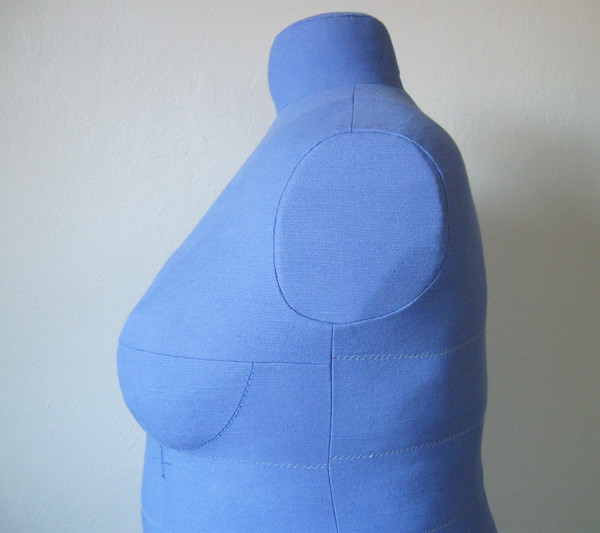
dress form side view


So to summarize a few of my thoughts and observations.

  • The instructions are really good. I suggest watching the video, reading through thoroughly and then assembling all your supplies before you start.
  • The whole thing takes a good amount of time. I am a really fast sewer (and at cutting out) but between printing the pattern pages, assembling, adding seam allowances, fusing interfacing, then cutting out, marking precisely, and then stitching up it is a good bit of time. Maybe 10-15 hours? This portion of the whole project can be done in lots of small increments as your time permits.
  • Stuffing - have a LOT of the stuffing available. Buy more than you need and return if too much. Have someone help you - it gets a bit awkward to wrangle as it gets more stuffed. Do the stuffing in one session and close 'er up 😅. Measure the circumference at hip. waist, bust etc which helps you get it stuffed correctly.
  • Cost:  the pattern is about $ 25. Supplies include the PVC pipe, glue, sponge, fabric, fusible interfacing... stuffing, Lots of Stuffing! I think I spent about $ 70. So the total is closing in on $ 100. I was able to put the form on the base of an old broken form. I read an idea about taking an old desk chair, removing the chair part and using the wheeled base - clever! Having wheels on a dress form is the best. I have one with wheels and it so handy. Measure carefully the base, pipe diameter etc.  All that info in included in the instructions.  
  • Fit: the pattern pieces did sew up to the correct measurements that I input. I especially like how the shoulders, neckline etc are the correct size, i.e. a body double. The shape of the bust is a bit generic but that was to be expected. I think I might input measurements that are slightly smaller than the actual body I was trying to do, and then have some wiggle room to pad out in places as needed. 
I hope this helps any of you who are interested in doing this. While it was a good amount of work it has a nice result. I'm generally not a person who does fitting on the dress form which a lot of people seem to think is the answer to everything (prefer to do by measuring the pattern) but having a dress form is nice, helps visualize things, get proportions right, is great for placing items on during construction. And if you can use it for fitting then that is a bonus. 

Up next - I am thinking spring although I have plenty of end of winter items still to blog. I posted a few peeks at my McCalls 7549 jacket so that might be next here. 

Classes I'm teaching in the upcoming months at Hello Stitch Studio in Berkeley are a mix of one's we offered before such as Garment Copy, Pattern Reading, and Knit T-shirt, plus some new ones which are Pencil Skirt class and a Pants fit clinic. And next weekend's Jacket class has spots open so if you want to see me construct a jacket and see demos of all kinds of tips and tricks for fast tailoring please join us.

Edit for Sat. April 7: thanks for all the info on the HE washing machine, I will try using a very small amount of detergent.
And what? few comments on the custom dress form - that's what I thought would be the item of interest on this Random Threads 😄.

Happy Spring Sewing, 
Beth


Today's garden photo - it's tulip time!!
IMG_3618


Sunday, February 7, 2016

My shirt obsession continues, and a Bootstrap Fashion custom jeans pattern is a nice suprise

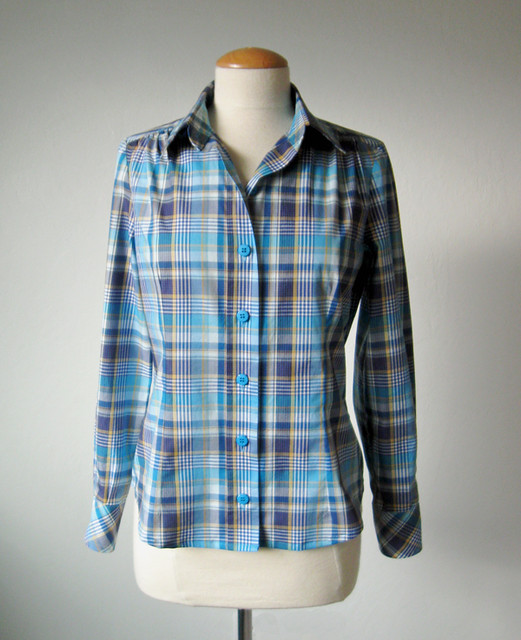
That title pretty much encapsulates my sewing of late. I don't know why I am making so many shirts lately, although a shirt is a reasonably quick item to sew. And very satisfying to do all that precise work. I have this Simplicity pattern adjusted to perfection (S2339). Plus I have a file folder filled with alternate pattern pieces, to rotate the darts into gathers, or choose from various buttonhole plackets. This might be the closest I have ever come to creating a TNT pattern. While I have made some dress patterns and a few skirts over and over, this is the one pattern that I would reliably use to design something new. I have a yearning for a shirtdress for spring, and even bought the famous McCalls shirtdress pattern (MC 6696) however the other day the idea popped into my head to just use this shirt pattern and create a skirt. Hmmm.
So shirt details first and then the Bootstrap jeans custom size pattern details.

Back to this new shirt. Since it is plaid I decided to use my version where the horizontal bust darts are converted into shoulder gathers. Here's a link to a shirt with that detail, and here's a link to a post I did on Craftsy showing how to convert the dart to gathers.


Plaid shirt front1

This is one of the few fabrics that I have ever purchased at Fabrix in San Francisco on Clement St.  When I lived in the city I would stop in there once in while but now I rarely go to this store. I think Shams finds some treasures there periodically. It's one of those places that are hit or miss but lots of bargains. Although the parking in that neighborhood is insanely difficult. So it has been marinating on my fabric rack for a while - maybe 4-5 years. Which is unusual as I don't keep stuff all that long but it finally made it onto my cutting table.

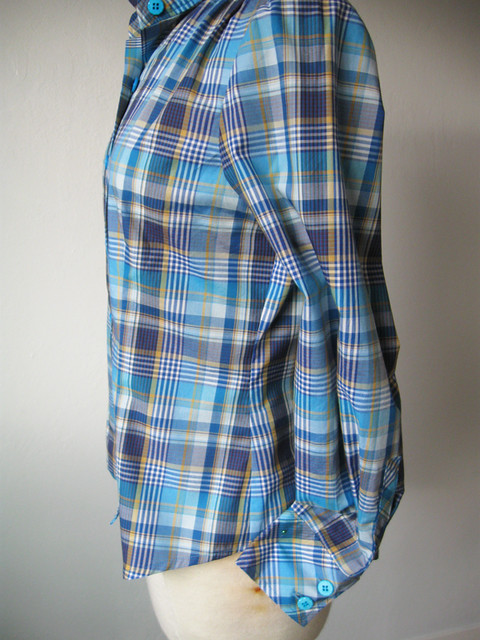
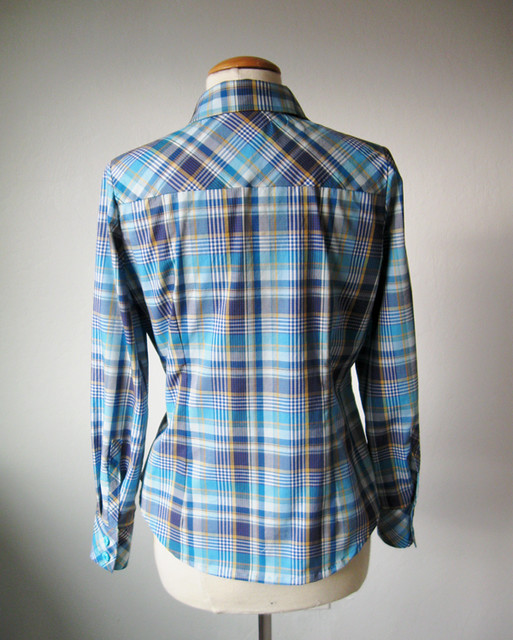
The main reason I decided to use the shoulder gathers instead of the dart is for the plaid matching. Which worked a treat and I'm quite satisfied if I do say so myself :)  No pesky bust dart to throw off the side seam matching, thus the sleeves are matched too. Score!

blue plaid shirt side seam

That is a scorch mark on the side of my dress form (another garage sale purchase) I think it got too close to someone's wall heater in its previous life.

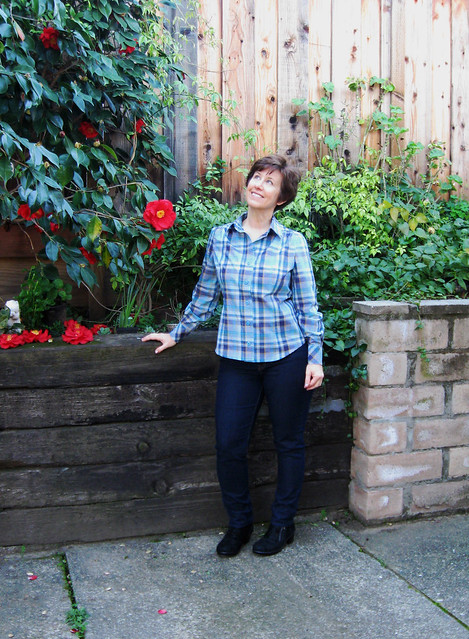
What am I looking at?  Bees!  so many honeybees already in the garden. Swarming all over this camellia. Which is the only one of its type in my garden, so sticky with nectar that the bees love it. And of course in most all the pictures my front button alignment is off a teensy bit. Oh that makes me crazy.

blue plaid cotton shirt on me2

But here it looks OK. The buttons were also in my button box. I don't think I would have picked these particular ones out if I had been in the store choosing buttons for this shirt, but I had plenty, enough for shirt front and cuffs so it seemed like a good reuse.


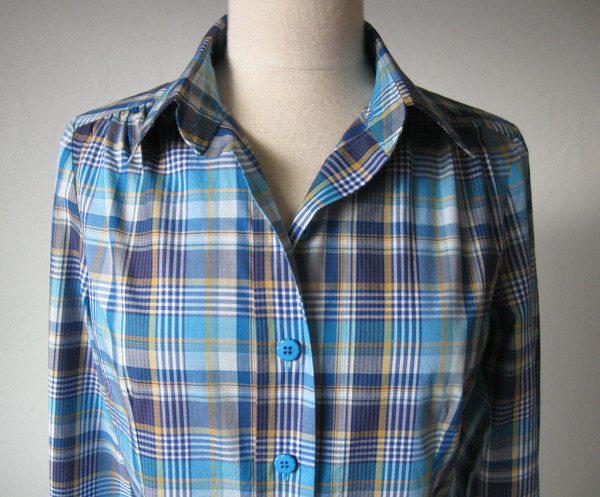
blue plaid shirt collar

A few touches of bias.

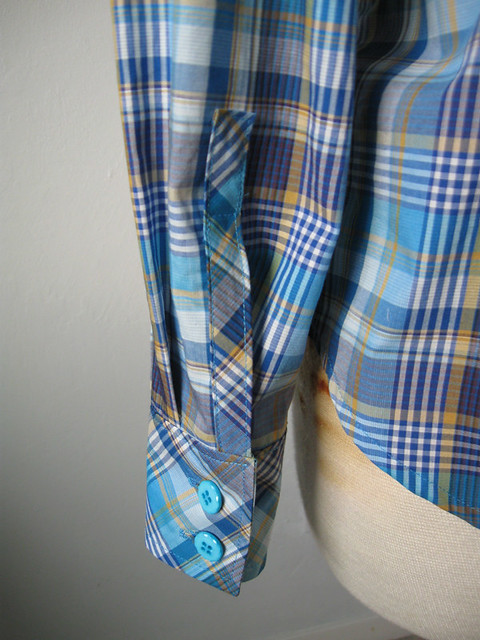
blue plaid shirt cuff blue plaid shirt back

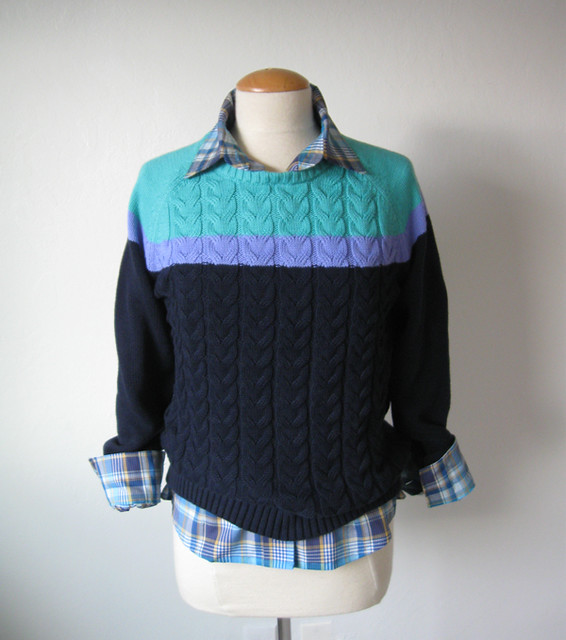
I received this sweater as a Christmas gift, so that is mostly what prompted me to use this fabric for a shirt.  Also why I tend to make shirtsleeves a bit on the long side, so I can flip up the cuffs when I am wearing a long sleeve sweater, just a habit. The colors are not exactly the same, but I think complementary. So far I have not worn either piece despite finishing about two weeks ago - maybe tomorrow.

blue sweater with plaid shirt


Now for the Bootstrap Fashion Patterns jeans adventure. 
To sum up the experience - I am impressed!
I have sewed a Bootstrap Fashion pattern previously, a dress and the fit was very good. And since pants are my achilles heel of fitting - I figured why not try their new custom jeans pattern? Actually I am not at all interested in making jeans per se. I have lots of ready-to-wear jeans and I just find it way easier to buy them than to source the just right denim - do all that topstitching - tweak the fit etc. So jeans sewing - a phrase that my grandmother used to use comes to mind - I just can't be bothered. But pants in general - those I would like to sew more often. And a well fitting jeans pattern I could use to make pants in other fabrics, like cotton sateen for summer or corduroy for winter. On Bootstrap there are 3 different custom jeans patterns, listed in their Indie designer section. All by the same designer Vado, she created a skinny jeans pattern, an at-waist bootcut pattern and a loose boyfriend jeans style.
Skinny jeans are super cute on lots of people but I just never feel right in them - and having a very long rise a higher waist jean usually fits better so I picked that one.

Bootstrap Fashion custom jeans choices

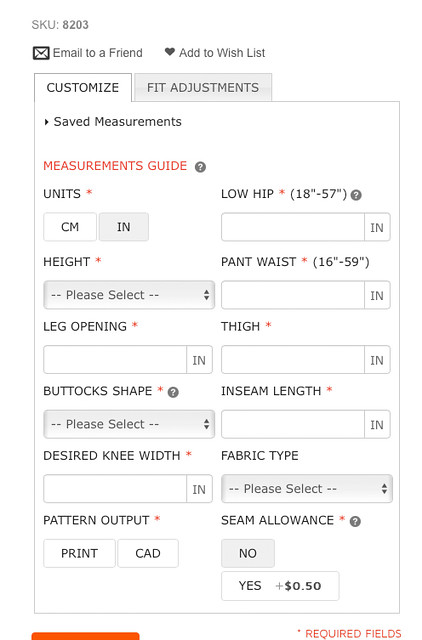
As usual with Bootstrap patterns you enter your measurements for a custom fit. I was pretty exact with my measurements as I wanted to see how they came out, what kind of ease etc was designed in the pattern.

Jeans measurement input


For the knee width I used the measurements from an existing pair of jeans that I have, also the leg opening (which is the bottom hem opening). Thinking about it later you could change those to obtain straight leg or any other variation. Much like their other patterns where you can choose belly shape (which I like to categorize as choosing anywhere between flat-abs up to 2nd trimester) on the jeans pattern it's not belly shape but you can indicate the shape of your bum. Useful! I picked average but for next time I might choose curvy.  The other change I will make next time (oh yeah, there will be a next time) is to increase the waist measurement entry. My waist is rather high, so my smallest natural waist point is probably 2 inches higher than where the top of the pants landed. I think if I add about 2 or 3 inches then the fit will be better around that spot and I can always take them in if needed.
Now for the result. I chose no-stretch for this version as I had a piece of 100% cotton corduroy to use for the test. Also I thought a non-stretch fabric would be a better indicator of fit. You can select fabric type, no stretch or various %'s of stretch which is clever.

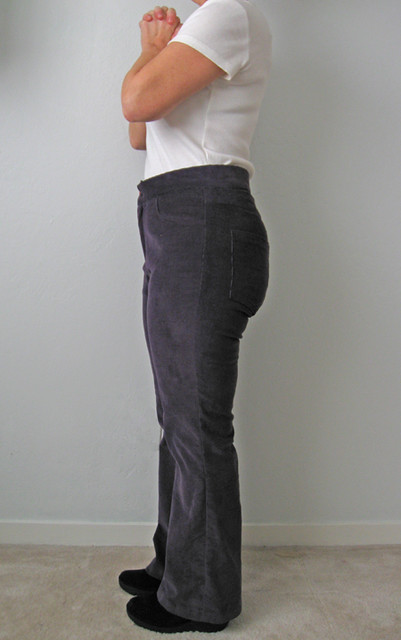
Not bad huh?  The part that really amazed me was that the knee was in the right place, the length was correct, the back rise was just about right and the fit around the thighs felt like ready to wear jeans.

purple cords side view

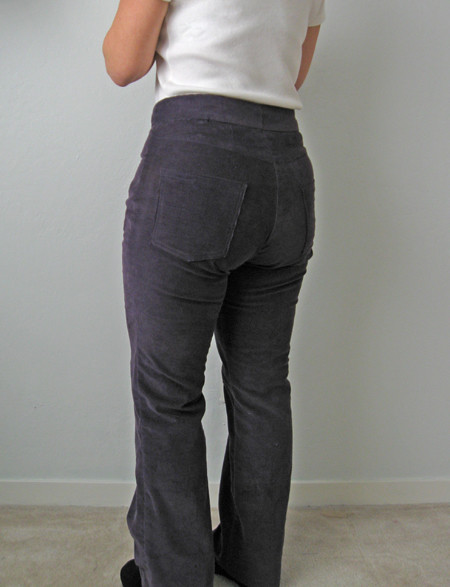
In the interest of science - sewing science :)   I am putting these fairly awkward photos of my rear view up here.  You can see the waist is a bit tight but in the right spot. I think the pockets are a bit oversized and low, I don't like jeans pockets to be at all on the thigh but that is easily changed. I left off the belt loops for this test version. Although maybe I will leave them off future versions depending on the fabric. On the other hand I wear belts a lot. Buying jeans/pants to fit my bum means the waist is so often too big. Perhaps it's time to fix that.

purple cords back view

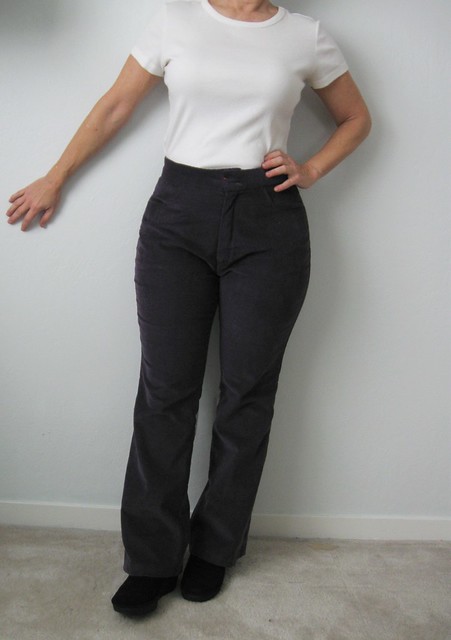
Front view.

purple cords on me5

In the front rise I think there is a bit too much length, generally pants that fit me best have a lower front and then are higher at the back waist. Also I think I used a too long zipper which messes up the front a bit. These were not ever gonna be real pants  (something I would wear out of the house) but I figured maybe usable, but then I went and cut a hole in the front under the zipper. So no, not wearable now.

That's the scoop on my Bootstrap fashion jeans experiment. Getting very near success. I think I will try another pattern, with the changes I noted about and also use a 1% or 2% stretch fabric. Because walking around in those corduroy pants made me realize how much I love a little bit of lycra.

Earlier this week I started another silk blouse - a version with the hidden buttonhole placket as several people left comments on my previous post that they would like to see how to do it. That will be coming up soon and it gave me an idea for a Craftsy post as well. (lately I am coming up blank on topics for my Craftsy blog posts - any suggestions would be welcome :) Do you read the Craftsy sewing blog? Some interesting stuff there. Where I have really learned some nice tips and tricks are by reading their other blog subcategories - cooking, gardening, photography are the ones I find useful.

So Super Bowl Sunday is just about over - despite having zero interest in either team it's fun to watch especially since it was here in the bay area. It has been madness all week. The city was crazy!
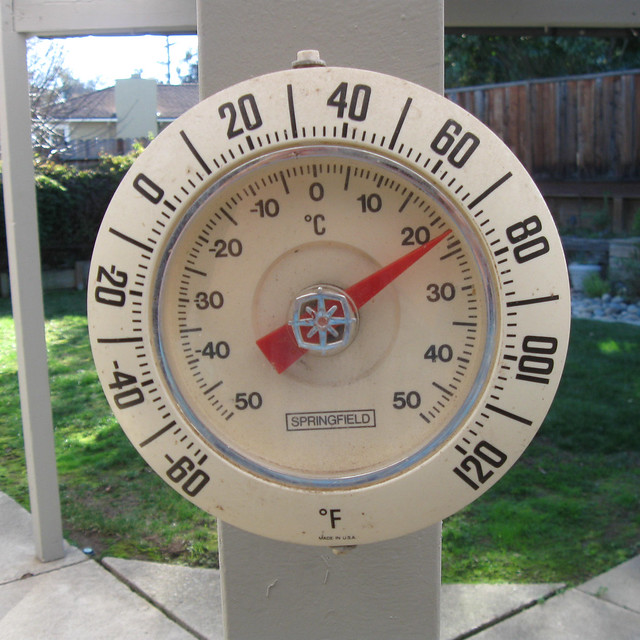
Also this happened today. Yep, spring is here. Although we are seriously hoping for more - more -  more rain. My new roses need it!

thermometer sunday feb

Happy Sunday sewing, Beth

Wednesday, January 14, 2015

New twisty knit top and result for the book drawing

To my surprise there are a lot of you interested in Home Dec sewing. Which maybe shouldn't be a surprise. After all if we have a typical wardrobe we don't wear the same clothes every day, but those sofa pillows, duvet covers and curtains are right there in front of us, day in and day out. So even if they are not well liked they are still right there in front of our noses. Better to buy some fabric you really like and sew up something that makes you happy.

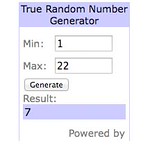
So the drawing result out of 22 who were interested is # 7 which is Stella, so please email me and let me know where to send.

Home Dec book drawing

Now back to sewing clothing. Each winter I make a knit top for a friend of mine who wears the same size as me (does that could as only slightly unselfish sewing?).
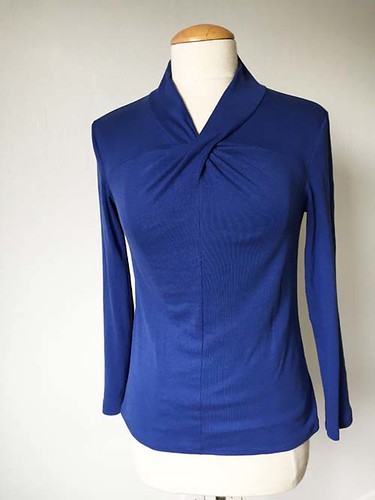
I have had my eye on this twisty knit top for a while, I believe I saw it on Pattern Review some time in the past year done in stripes and it looked really great. But not stripes this time, I decided to give it a try in a cotton interlock knit I had to test it out.
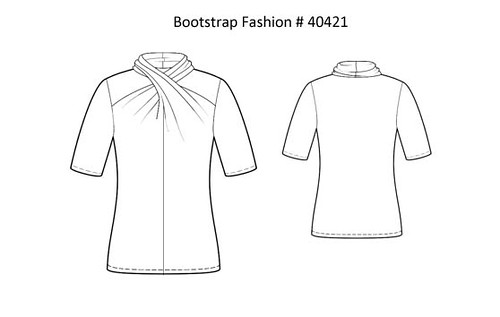
Here is the pattern drawing, which is a Bootstrap Fashion pattern, where you input your measurements and they send you a customized PDF. So far I have had really good luck with these patterns, the fit has been very nice for me. Granted I am kind of a averaged sized in most areas so not the most difficult person to fit. 
edit on 1/15/15:  based on the comments below, some are curious about Bootstrap Fashion patterns and the similarities to Lekala.  I wrote a post in November with my first pattern from this company, so if you are interested in more details and want to see what measurements adjustments are available check out this post

Bootstrap diagram twist front tee
Here is the test version for me in cotton interlock. Very cosy and it actually looks better in the picture than in real life. The fabric is not all that great, but fine for testing and resulting in a warm top to wear around the house. 

blue twist front top

Here is the second one for my friend Michelle. Fabric is rayon jersey. 

purple twist front top

I am sold on this pattern so you will be seeing it in the spring made from a cotton jersey stripe. Sleeveless most likely, with the front on the bias so the stripes will give a chevron effect. Maybe I should revisit my stripes on the bias skirt. Or too stripey?  time will tell. 

So a new pattern and a repeat so far in 2015. Next up is another new to me pattern, a Burda shirt which I wasn't sure about in the middle of sewing but have already worn twice. 

Happy "is it spring yet" sewing, Beth

Saturday, November 8, 2014

Bootstrap Fashion - a new custom sizing pattern company

The calendar says November, but wow, it still feels like summer here. I went outside for a workout the last few days in a tank top and shorts. OK, you know I love summer but it's getting a bit weird - and we SO need some rain here in sunny California. That means a new coat is off the table for the time being, it just seems silly to make another coat that won't get much wear.
Instead I will think about spring, Ha Ha! like I need encouragement for that one. And I still have some summer stuff remaining to write about.
A few months ago I had the opportunity to try a few patterns from a new pattern company that offers custom-sized patterns called Bootstrap Fashion.

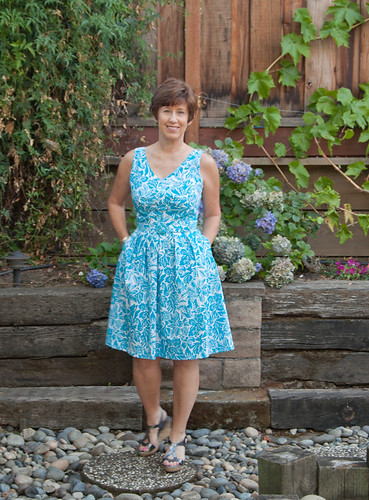
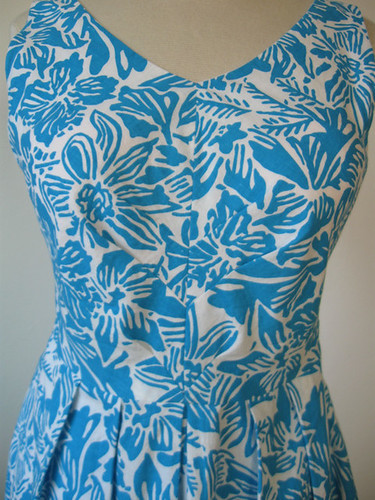
turquoise dress front

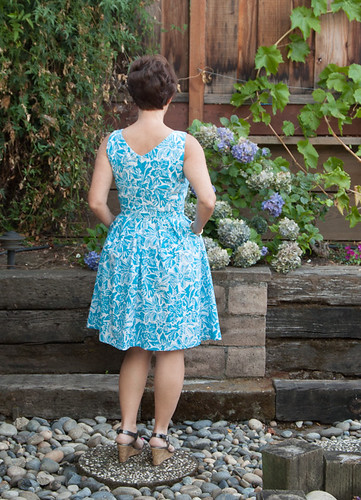
It was very intriguing once I took a look around their website and I did have a lot of questions which I will discuss further down in this post - but to get to the important stuff - yes, it fit with minimal alterations.  An important caveat - I fully acknowledge that in general I fit into the middle sizes of most current patterns, so I might not be a super difficult person to fit. However - I very often have complaints about things like armhole depth, or excessively wide necklines and I was so very pleasantly surprised that the neckline and armholes of this pattern fit me perfectly. It is a very rare instance that I don't have to shorten at the shoulder, or perhaps take in at the upper back. So no neckline gaposis - at least not for me. 
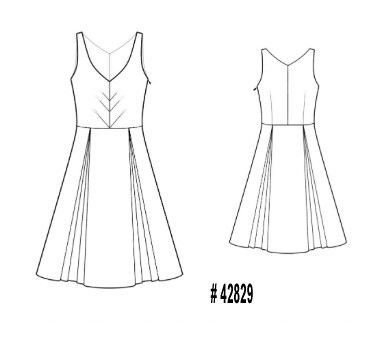
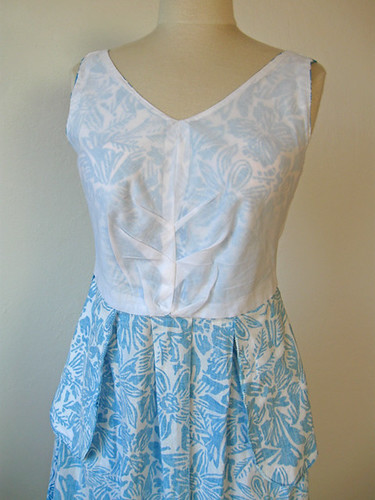
The one change I had to make was to add a bit of bodice length in the front, very similar to the adjustment I made on this pattern. I could have gotten away with not doing it but I could tell that the front waist would be just a teeny bit high without. Because of the design with radiating star dart/pleats in the center front it would have been a pain to add at the bottom of the bodice. The horizontal slice was easy since those aforementioned darts could be avoided.
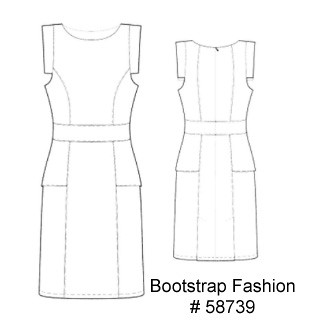
Here is the tech drawing of the pattern I made.


Bootstrap tech drawing
One change that I made was to swap out the skirt on the pattern to a different pleated skirt. This design with the cartridge style pleating in the skirt is cute but I thought it would get lost in my print fabric. I used the skirt portion from an old New Look pattern. By the way this fabric is something I bought at a rummage sale, for about $ 2. It is a really nice cotton, not a quilting cotton but an apparel weight, and a slightly slubby linen-like texture, just right for a dress. Another score! 

turquoise dress back

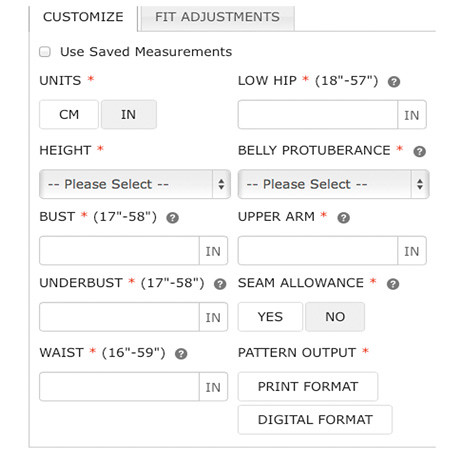
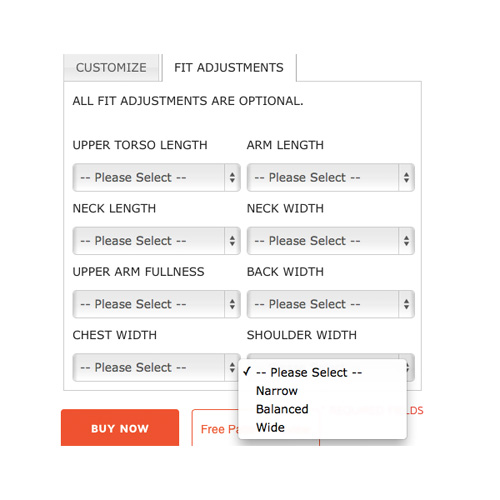
So Bootstrap patterns are kind of interesting. The first thing I noticed was the similarity to Lekala so I asked about that. They told me that they have purchased the same design software so that is why many of the styles are similar or the same. The difference is in their website which is much more elaborate. Their patterns are available to use for apparel manufacturers so they seem to be targeting that market as well as the home sewer. There are additional fit adjustments options seen on the second tab below which I have only played around with a bit. I did fill in all the numbers on the Customize tab, and no seam allowance. I suggest no seam allowance as you will get a printable PDF, so you will probably be tracing and then adding whatever seam allowance you like to use. It is easier to flat-pattern measure the pieces for a double check if you have no seam allowances. 


Bootstrap adjustment choices


What I think might be their standout feature is "Belly protuberance" which is a very matter of fact term for something that is exactly that. They have 6 choices which range from super flat abs to 7 months pregnant.  OK maybe not quite but I don't know how else to describe it. However it's described it is darn clever if it works. And so far I think it does. I ordered patterns for two other people I sew for and chose from the various selections, then made muslins to test. So far I did not have to make any sort of adjustment in the tummy area so I give that feature a thumbs up! As for size range, you can see that the circumference measurements have a very broad range so anyone from a petite to plus size can customize these patterns.

On the second Fit Adjustments Tab they have some more adjustments that have to do with proportion, such as Torso length and arm length which could be very useful. I clicked on the Shoulder Width so you can see the options they are giving, which are Narrow, Balanced or Wide. These are all pretty subjective but if you know you always have too much fabric in the upper back then giving Back width a "narrow" adjustment couldn't hurt. I will note that I have to do that adjustment on most Vogue patterns but on this one I didn't - perhaps because they are creating a custom proportioned pattern based on bust and underbust. I think that underbust is a very useful measurement because it indicates how big someone's ribcage or torso is and I kind of wish more pattern companies would have that measure. I may be grasping at straws but I use that underbust measure as an intuitive part of my overall fit assessment when I measure someone - just to get an impression on their body frame. The arm measurements could be quite helpful too, a lot of people mentioned wanting sleeves in my Pattern whisperer posts and if you have a full bicep it would be nice to let someone else do the pattern modifications.


Bootstrap adjustment 2nd tab
What else? Their PDF are reasonable, not an excessive number of pages, nothing is nested so you could tape together and cut out the pieces. There is a layout page so I use that to figure out how to print out, and also to find the page which has that square which you print and then measure to make sure it is printing out on the right size. Does anyone else have an issue with their printer? I have to print that page, measure the square and often have to change the settings on my printer, as my printer seems to always want to print PDFs at some other % scale. Anyway - so worth it to test with that print square page and get the setting right before printing 30 pages or whatever.
The other pattern I have in the works is this one for a sewing client, who happens to have a very full bust and the princess seams fit very well - I would say about 80% there (if I could give a ratio of how close the proper fit was). So some minor adjustments but nothing like I would have had to do with a standard pattern. And the bust was in the right place! hurrah! that alone is a testimonial.

Bootstrap # 58739

I do notice their website is a bit busy - lots of moving parts and you have to scroll through a bit to find things. If you are open to choosing patterns just by the tech drawings then it will be perfect for you. I go by the drawings so that is great for me, I tend to ignore all styling on any pattern company - other than to notice a lack of pressing or hideous fabric choices. Prices are $ 7.00 per pattern with discounts if you order more than one. 

Some more details on my dress. Those star burst pleats really get lost in this fabric but reminds me of this dress pattern which I love. Although this pleats are at the neckline, but the effect is similar. You can actually see it better in the lining. 


                 turquoise dress darts Bootstrap fashion patternturquoise dress lining Bootstrap fashion pattern
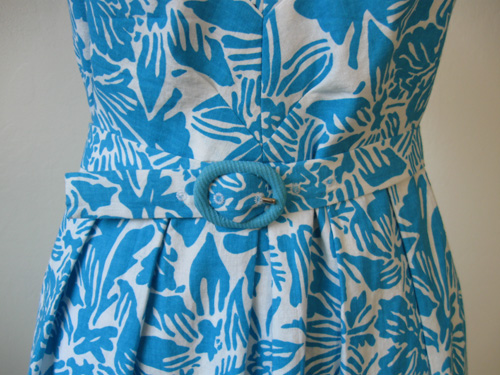
I like to have a belt for these fit and flare style dresses so I made one and reused an old covered buckle from a previous dress - which is long gone but I kept the belt with an idea to reuse someday. The color is not an exact match but close enough.

turquoise dress w/ belt Bootstrap fashion pattern


turquoise dress belt Bootstrap fashion pattern

I even used the old belting that was inside the previous belting. I sewed a fabric tube and then hand stitched it on. Nothing fancy, and finally used one of the fancy (read: utilitarian) stitches on my modern Singer machine to make the holes. Remember to use a denim needle when sewing through the belting which is kind of thick.

One more look at this one in action. My photographer was making me crack up here. 

Turquoise dress on vacay

Thanks for all the great feedback on my Pattern Whisperer posts and I will be picking that up again soon with some ideas for jackets and coats. You can be in cute outerwear even if I am not due to our excessive sunshine  - yeah, boo hoo for us here in NorCal, right?

Happy November sewing, Beth