Friday, August 28, 2015

Vintage pattern nostalgia with McCalls 6544

Having learned to sew as a young child means that once in a while I come across a pattern now listed as vintage that I recall making when it was new. I am sure half of those reading know what I mean and the other half will just have to wait a few years to see their current cute styles listed as "vintage" on Etsy (which has a very loose description of vintage).

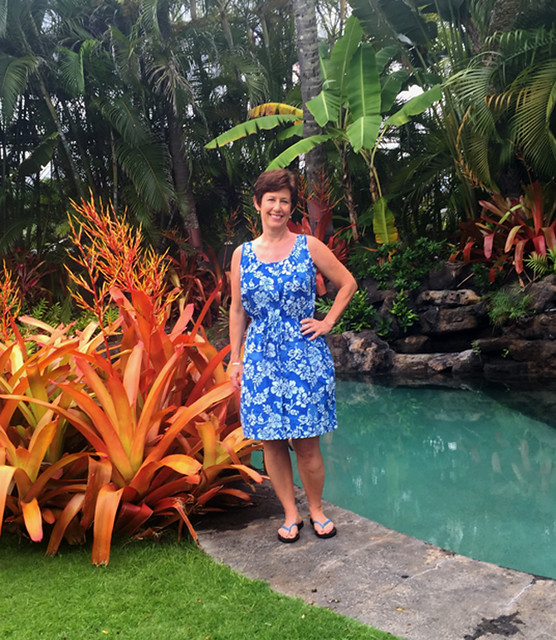
I am feeling nostalgic this week for all kinds of reasons. Back in Hawaii on vacation and thinking about travel, family and sewing across the years. Nostalgic because I am here with my family and some very good friends, recalling previous trips, and remembering those who aren't with us anymore. A little sad, a little sweet but good memories. I have mentioned before that my parents were not ones for camping or car trips, but a beach house, some palm trees and spending the day swimming in the ocean was their idea of a vacation idyll. I love being a native Californian but Hawaii is my second home, over the years some family members have lived here for extended periods and I have lost count of the number of trips taken over here but it must be around 100. Family vacations, romantic trips, girlfriend getaways, there were times that it took less time to fly to Hawaii and be on the beach than it took to get up to Tahoe for a ski weekend (if you have driven to Tahoe on a Friday night in snowstorm you know what I mean).

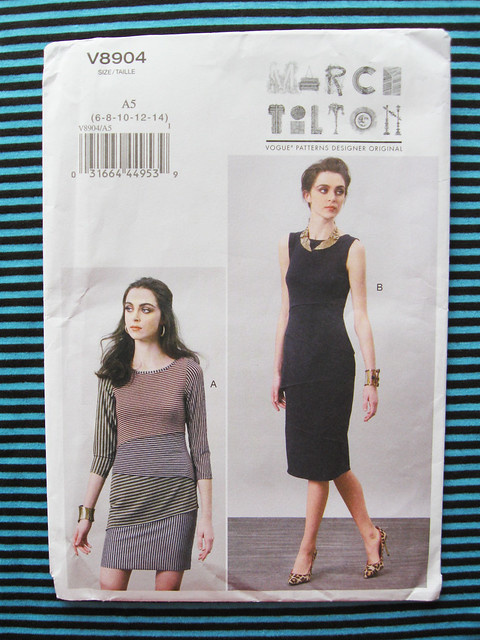
So all those vacations photos tucked away somewhere, the funny thing is if I look at them I can recall most every item I sewed, particularly the fabric if not the pattern. One night I was browsing on Etsy and came across a pattern that I knew I had sewn, and even that I had made it twice! So I ordered it and then promptly set it aside for a "sometime sew". A few weeks ago I came across it in my vintage pattern box and figured why not now?

blue batik on me2

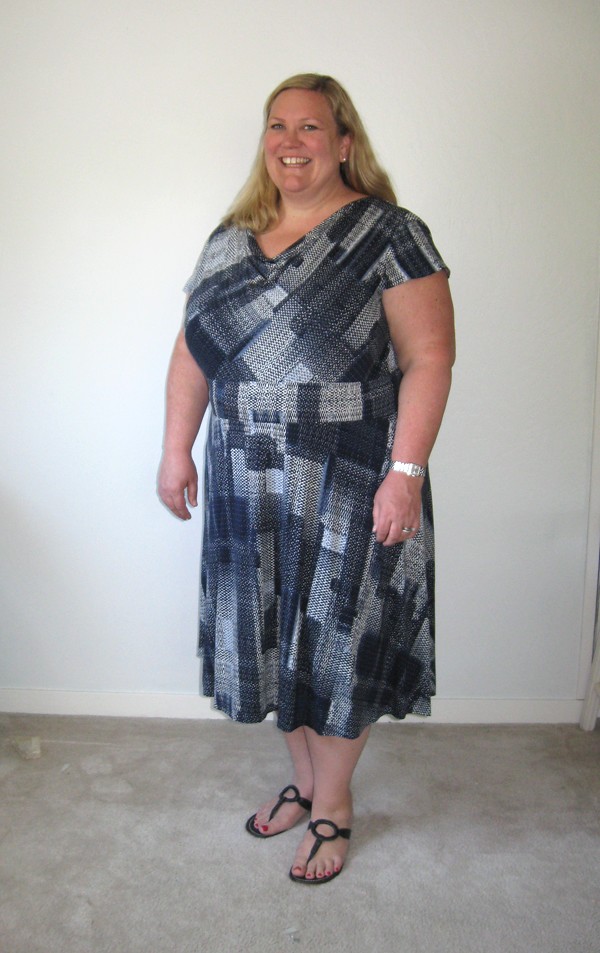
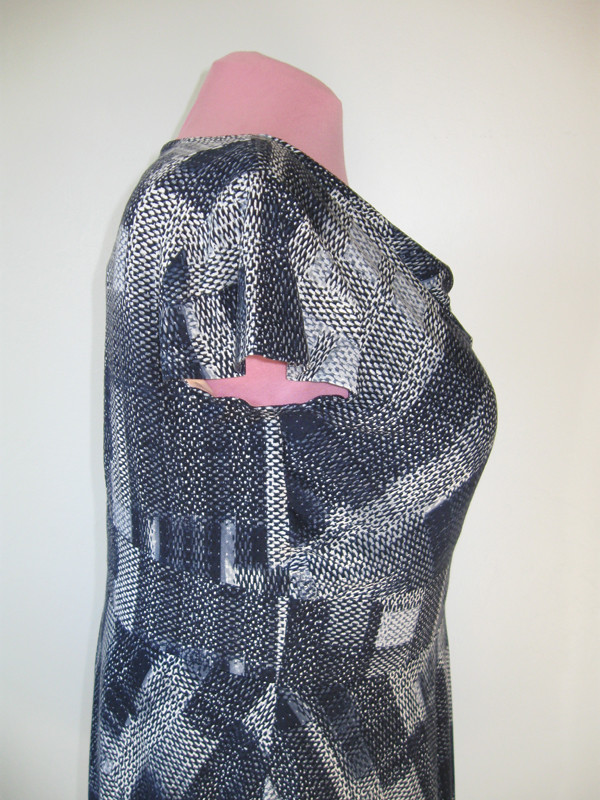
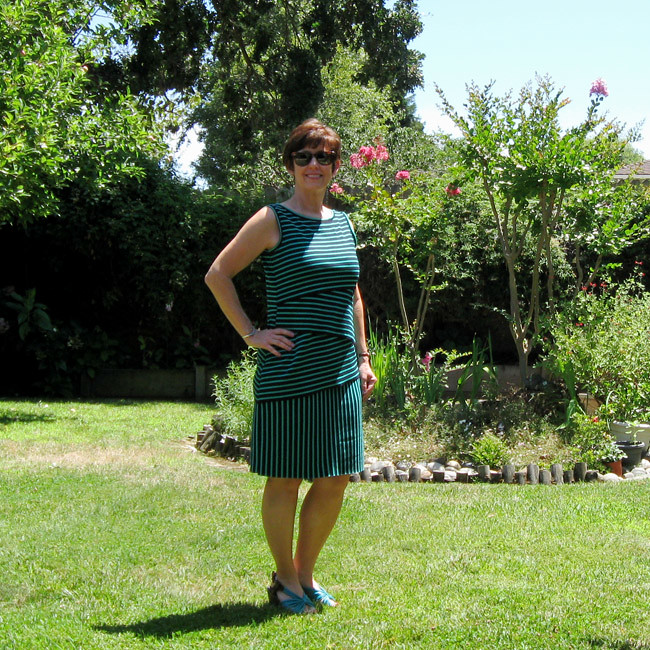
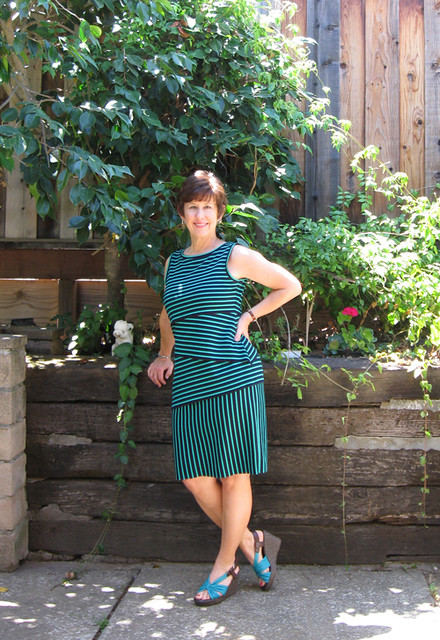
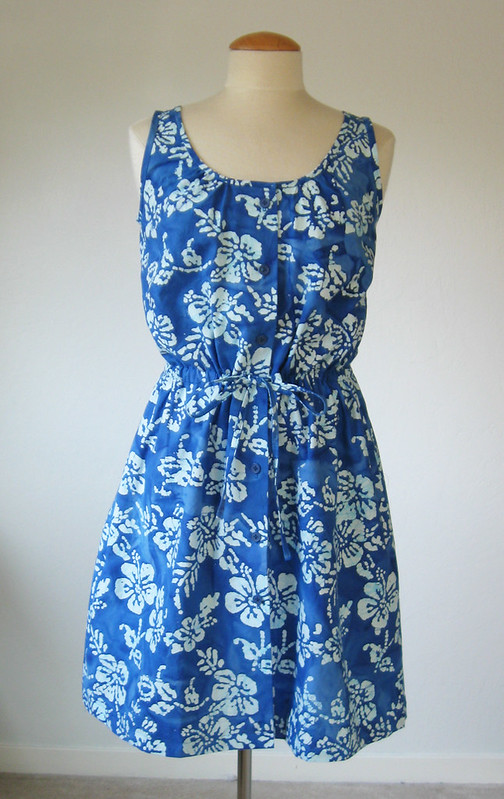
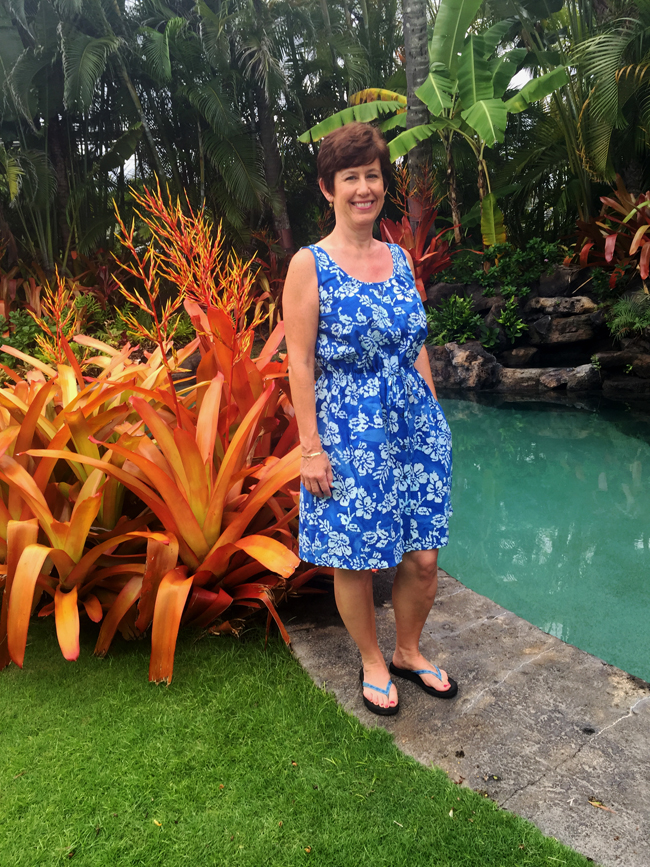
I bought this batik fabric last year over here, and while it is a tiny bit too stiff for a dress that is supposed to be a bit drapey but it works and I love the color. Other than shortening I cut it out as is.

McCalls 6544 vintage pattern envelope

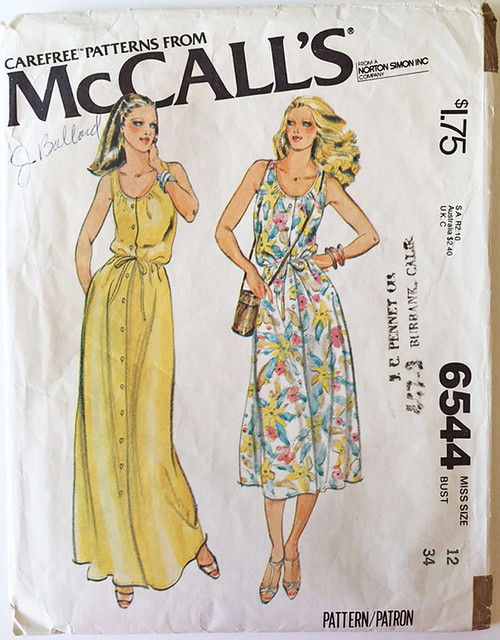
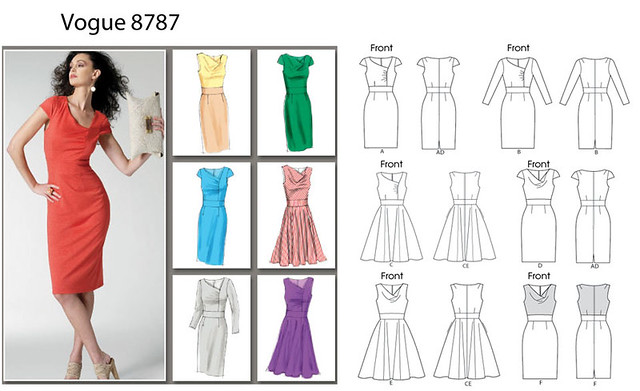
Now is my moment to repeat that there are no new patterns - sewn for a long time and seen it all. Recently I saw a few versions of the True Bias Southport dress and noticed it was quite similar to this pattern. What I like about this McCalls pattern (and a lot of older patterns in general) is that they include the pattern pieces to make the armhole and neckline bindings. Another detail I like is the waistline casing is on the inside and the ties are threaded to the outside via buttonholes at the center front.

blue batik front on form

It doesn't have bust darts, what would be bust darts are rotated into gathers at the neckline which is very pretty. And probably would lay better in a softer fabric. I remember the two versions I made were both rayon challis, one royal blue with black flowers and the other was emerald green (love those jewel tones:)

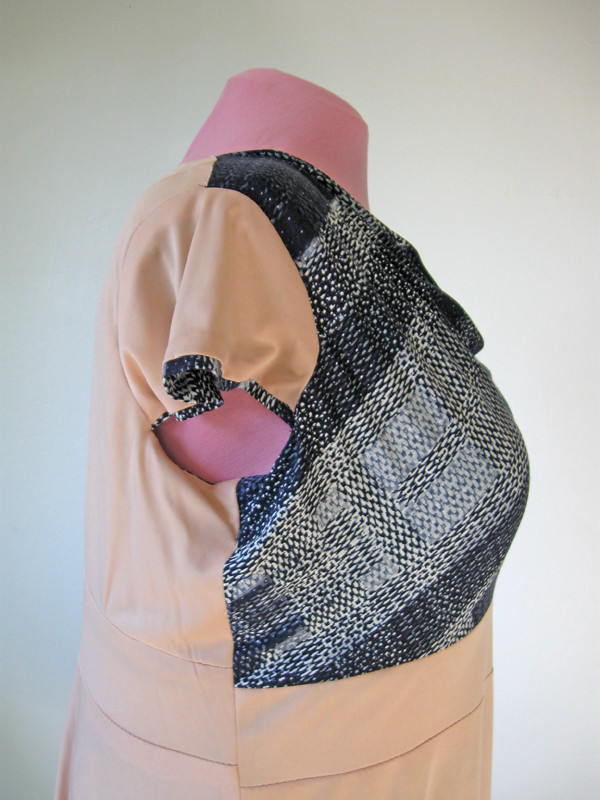
To fit this I added some length in the front bodice and created horizontal bust darts. If I had not done this then the waist casing would have been pulling upwards. So in this instance the neckline gathers become more for style and less for fit. Other fit changes, pinched out 1.5 inches of length in the middle back tapering to zero at the size seams, as I do with almost all McVoguerick patterns.

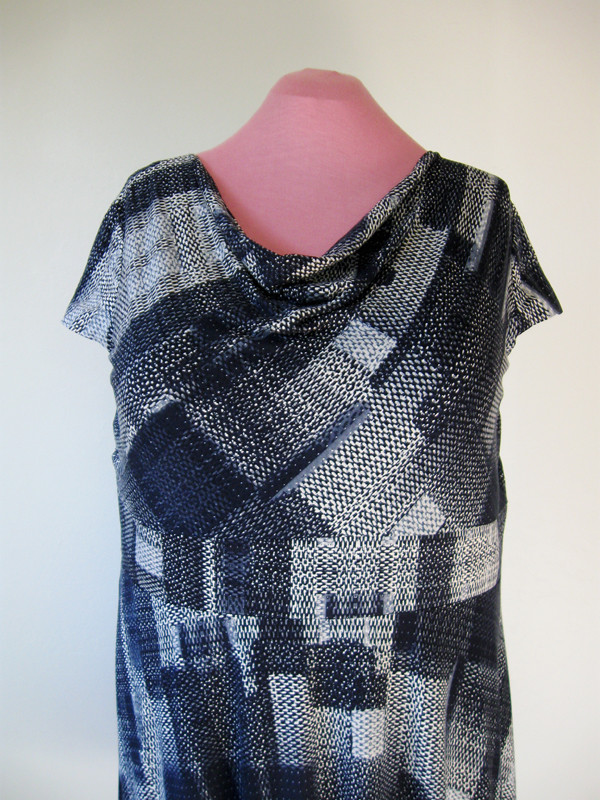
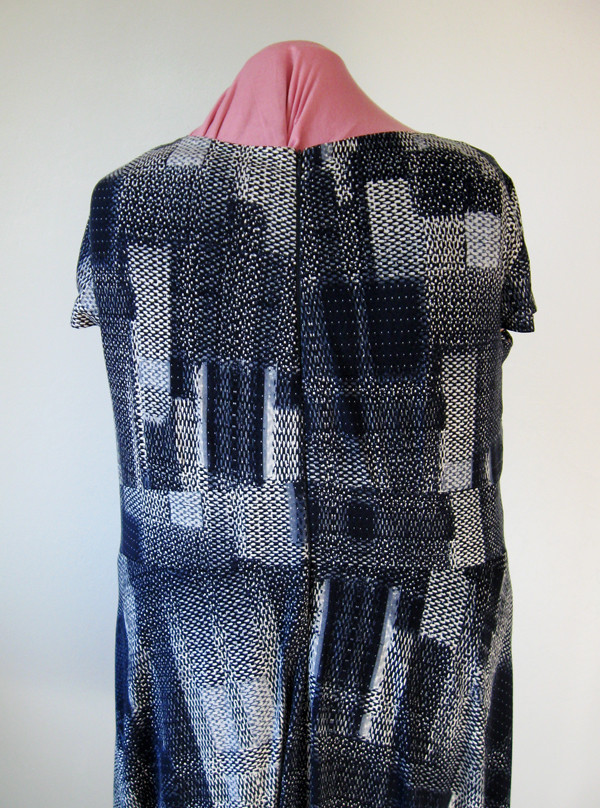
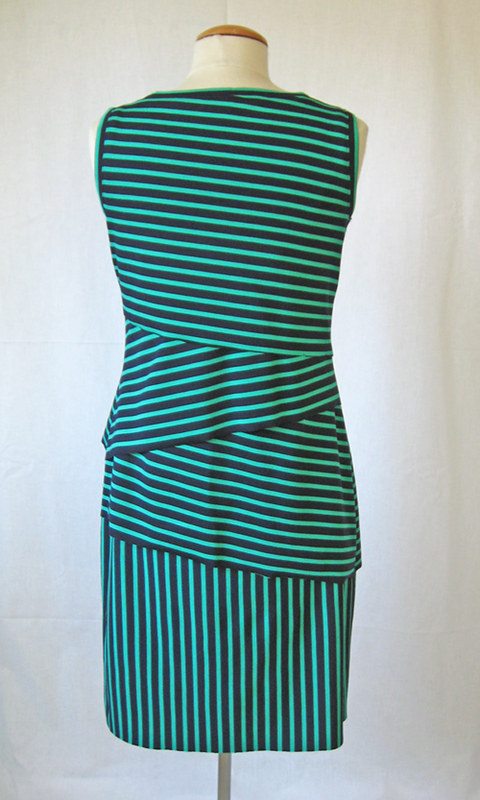
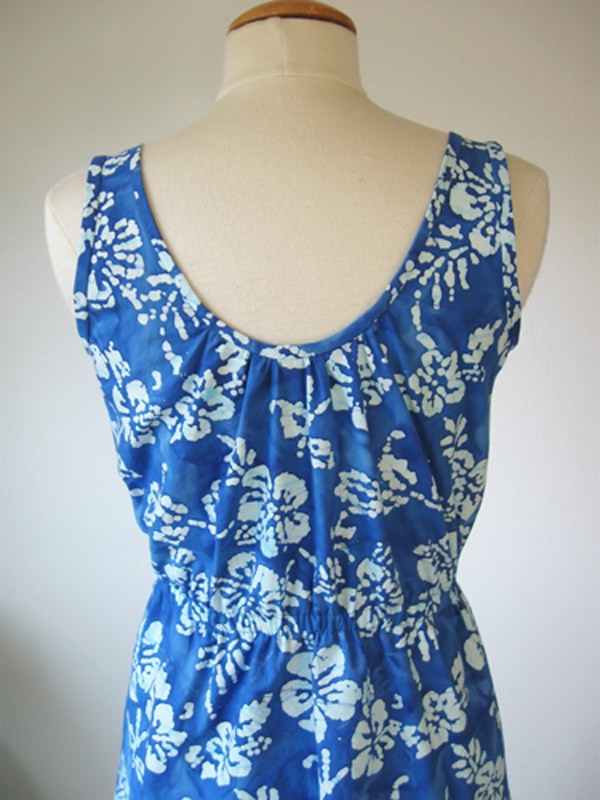
The back has a pretty neckline and the same gathers there.

blue batik back neckline

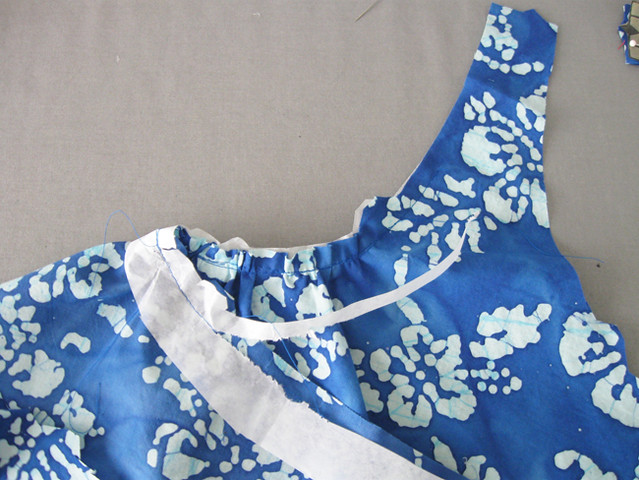
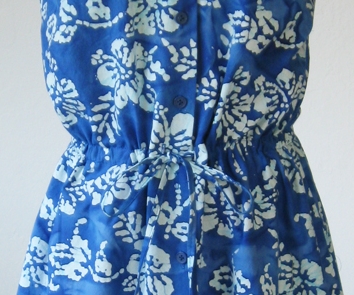
Close up of the front neckline. The pattern has a bias binding that is in the same fabric, that is sewn on and then folded. The pattern says to fold, press under and hand stitch inside - which I like to do but I bet on a current pattern this would not go over very well! Hand sewing seems to be minimized which is understandable, but there are times when it gives a nice result. I suppose it could have been finished with topstitching but for a change I like to see a binding without stitching. In a silk it is especially pretty and I think you have more control with hand sewing tiny bindings.

blue batik front neckline

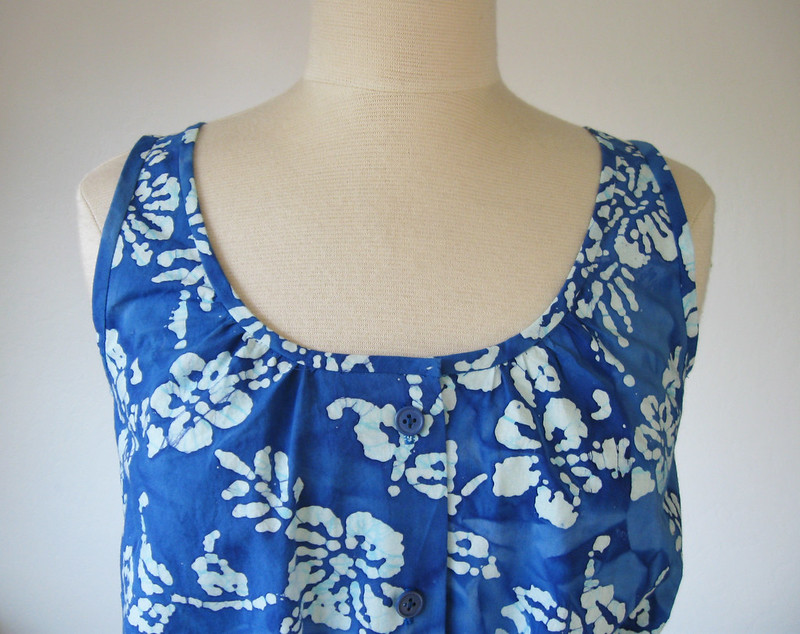
However the best part of this pattern is that there are pattern pieces included for placing the gathers.
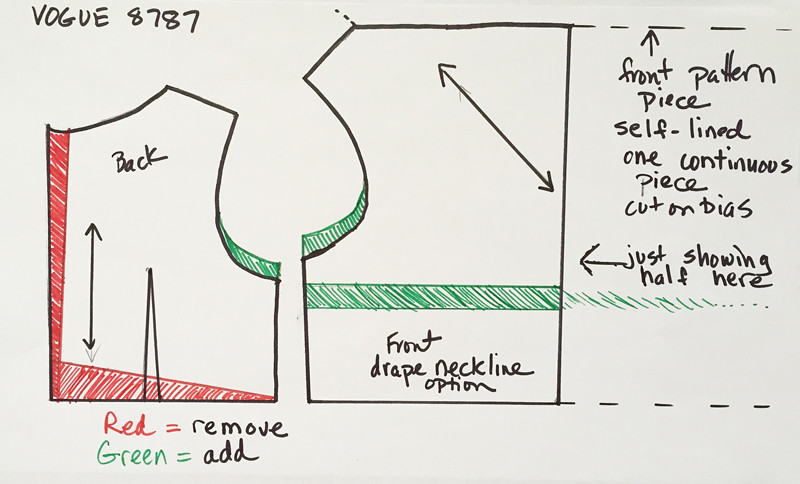
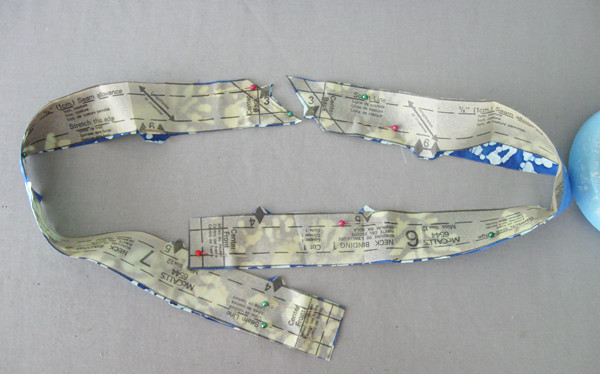
Here are the neckline binding pieces, they give the complete pieces, with that nice diagonal seam in the center back. That is one benefit of the single size older patterns, they could and did include all the pieces for bindings, facings etc and didn't have to create one pattern piece that included all the sizes. It certainly makes working with the pattern a lot easier - not having to hunt for your size among all the pieces. Also the printing was bolder - just a tiny thing but it really makes them clearer. This bias neckline has 3/8" seam allowance, which is clearly marked, plus all the notches, front and back, shoulder seams, etc.

blue batik neck band

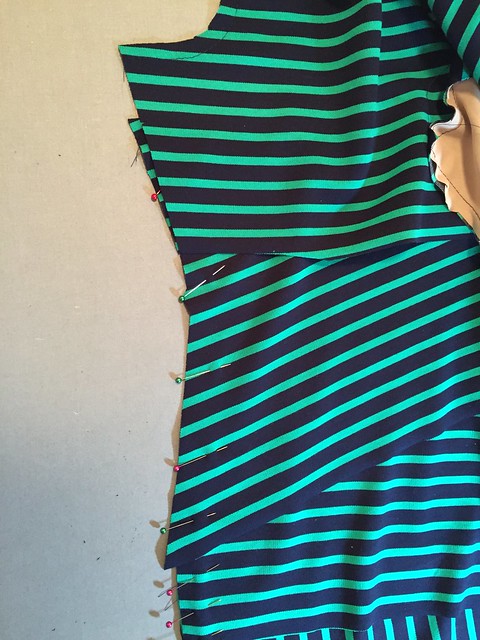
This is the clever bit, the guide for placement of the gathers. Shown here the piece for the back neckline. You cut it out of paper and then can use it as a guide to place the gathers, then stitch them into place before you apply the neckline binding.

blue batik stitching guide

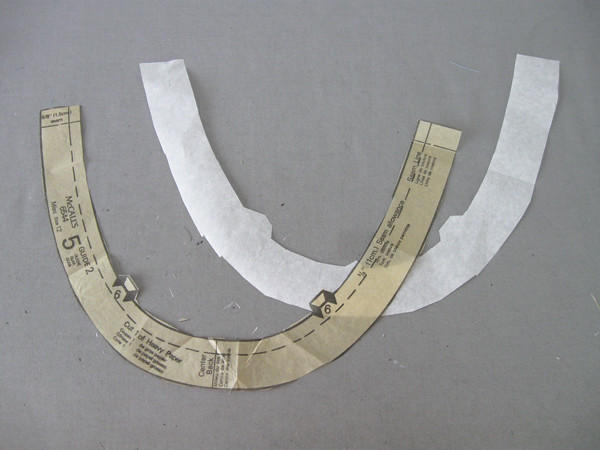
Here is the paper guide sewn onto the dress back neckline. And the stitching perforations make it easy to pull it away. Now the neckline is gathered nicely and you don't have to fiddle with any gathering stitches, trying to make them fit while applying the bias neckline binding. It is especially nice for the bodice front, as the placement of those gathers is more crucial to the fit over the bust.
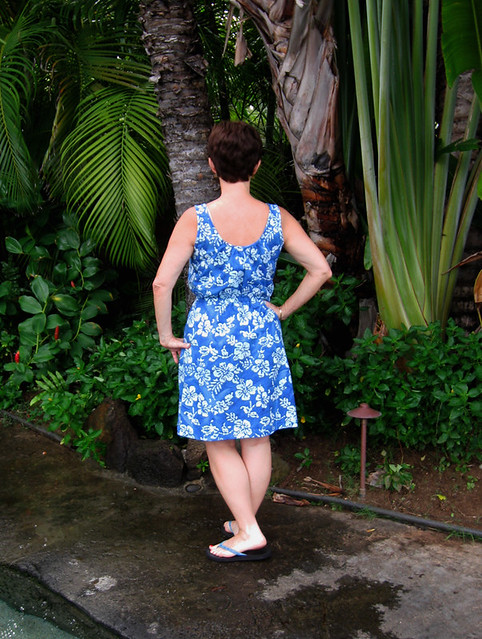
blue batik gathering guide

Back view on me

back on me blue batik

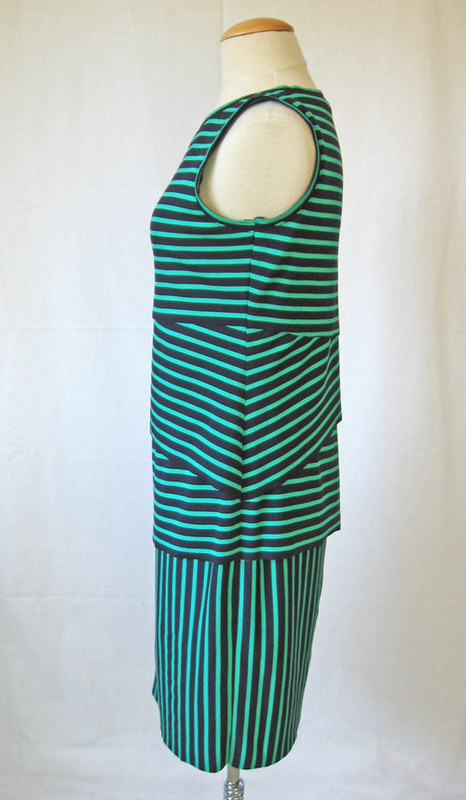
Here is the waist tie, made by sewing a casing on the inside, and making a buttonhole on either side of the center front. The fabric tie is sewn to elastic which makes it very comfortable. And of course pockets in the side seams - as any good pattern should have!  Late night sewing means I scrounged around in my button box and came up with a few cards of these plain blue buttons. Matching well enough and just the right size. It pays to accumulate a lot of button cards when they go on sale.

blue batik front closeup tie

Last fit note, once the neckline was finished I basted up the side seams and decided that 80's shaping (in a word - voluminous!) was not right for me now.  I lopped off a lot of circumference by taking it in about 2 inches at each side seam at the upper bodice and a good 5 inches by the time I got to the hem. It would have been a very full skirt otherwise. I think the finished bust was intended to be about 40 inches - way too much fabric for my 2015 eyes but otherwise a timeless pattern with a lot of good details.

blue batik on me 1

Ok that's all for this one - time to hit the beach. By the way I am participating in the #sewphotohop on Instagram  which has been a lot of fun. A great way to find new-to-me sewing fanatics all over the globe. True confession - I am extra happy when I find some new-to-me blogs this way - I really like reading all the extra details that a blog post can provide.

Up next a few more new items that made it into my suitcase, including a lot of Girl Charlee fabrics. I told you I could not resist a tropical novelty print....

Happy Sewing, Beth


Thursday, August 20, 2015

Fitting facts ahead: Vogue 8787 dress in rayon jersey

Fitting details ahead! Including my hand drawn illustration of pattern adjustments. I have written before that fitting is the final frontier for many a seamstress/sewist/stitcher (take your choice). I am seriously considering doing a post this fall with a before and after approach. Making two muslins, a non-fitted and a fitted version to highlight all the changes I might make. Which sounds like a lot of work. But for some reason the idea is stuck in my head. We'll see how things go in the fall, when summer is waning and I can't face the idea of fall sewing - yes I am the odd one out, fall sewing is not my thing.  (#summer forever) ha ha.
Anyway, onto today's project.

Back in June my friend and sewing client Heather spent a couple of weeks in NYC. There was fabric shopping involved with long distance consultations and a flurry of photos and texts. The grand total being fabric for 7 garments purchased at Mood and some other spots. How long it will take me to sew up these items time will tell.
Some of the fabrics are for specific items, more fall/winter in season so they can wait. I will definitely be repeating this Burda dress as it is a fantastic pattern. One silk fabric is perfect for wearing on a tropical vacation so we will set that aside until needed. A couple of the fabrics were jersey knits which are ideal for dresses most all year round here, so I started with a pattern that I have made twice before for Heather, Vogue 8787, view E with the cowl drape neckline. I like this pattern as it has a lot of options.

Vogue 8787

The dress on Heather. When fall arrives we will have to do a better photo shoot than standing in front of my blank wall but it was way too scorching to go outside that day. The fabric is a lot more blue that it appears here - and looks so nice with her blue eyes/blonde hair. I am so happy with the fit. Waistband in exactly the right spot!

Heather in dress

Here is the finished dress, on the dress form. The fabric is from Mood in NY and it is still available on their website here.  I was a bit doubtful when I first saw it because it has a print that could read or need to be worked with as a stripe but actually this pattern was just right. Nice how the bodice is on the bias giving a bit of motion to the print. And the slight pattern matching creating a flow across the right and left sleeve was a very happy accident. (I should take credit for these things so you can think I'm a wizard - ha ha, not at all, just luck.) This pattern calls for woven or knit so the upper pattern piece has to be on the bias.

V8787 dress closeup on form

Ok fitting details shown here with my slightly comic-book illustration but you get the idea.


V8787 pattern adjustments

Starting with the front pattern piece. I have only drawn one quarter of it here, it is actually the entire front and is doubled so that you cut it on a single layer, on the bias, and it creates its own lining. So the adjustments in green have to be done on both halves and/or side of the pattern piece.

  1. I choose the pattern size based on her circumference measurements. I added to the seam allowance 3/8" to make a full 1" seam allowance on all side seams, which I think of as fitting insurance. That makes the dress likely to be too big but I find it best to sculpt or fit the side seams on the body. Granted it is quite easy to do this on someone else instead of for yourself. But I do it when sewing for myself as well. Just involves a lot of on and off and flitting around in my sewing room in my undies. Worth it in the end. No seam ripping needed :) 
  2. Add length in front bodice. Perhaps a bit unorthodox in terms of an FBA, but it will work. Really works in jersey, a bit more tricky in a woven. Anyway...I added about 1.25" I think. This is to counteract that waistband seam rising up and bisecting the bust. If you are in the full-bust category you know what I mean, anything ready to wear is likely to hit at the wrong spot and pull upwards. Just geometry, folks.  We will deal with the difference between back and front in a minute. 
  3. Raise armholes. She is about 5ft. 3in. and I find that if you are sewing at the high end of the bust range the patterns of course get bigger everywhere - so the height or depth of everything is too much. I use size 12 in Vogue for myself, am about 5 ft. 3.5in. tall and even then the shoulders are too long, the armholes are often too big. I don't like seeing an armhole that is too big on a sleeveless dress, and just tightening it up at the underarm seam is not the answer. You have to adjust the actual armhole, luckily this is one of the easier pattern adjustments. I raised this one about 1 inch. My words to sew by "you can take away but you can't add".
  4. Back bodice. Raise the armholes there also. Then on to my number one fitting mania, the back waist seam. See red section removed. Which I have squawked about before. Here is my primo example with photos from April 2014, A Fiting Post: Watch your Back!   I think this adjustment is more common than I every realized, and often sewing students say something to the effect of "I didn't know I could just cut off there". You can cut off the extra fabric anywhere!  BIG note on this one, I have made this pattern for Heather 3 times now so the pattern is all adjusted, however on the first version I did this adjustment on the body, thread traced my adjustments on the dress, sewed it and then transferred all those adjustments to the pattern for posterity. I will say that every fabric behaves a bit differently so the amount of adjustments can vary with fabric. (Jersey is heavy and pulls more than a woven might).  Also note; the length of the back bodice bottom edge gets a little longer when it is cut on an angle like shown (again geometry:) but I have some fit insurance on the side seams of all my pieces so we are Ok there. But keep that in mind if you do this type of adjustment. A simple sheath dress with a waist seam, where you do this adjustment will need some more length across the upper part of the back skirt to match the back bodice. Hope that makes sense!
  5. Center back. Even with a full bust a person can have very narrow shoulders or just be a small frame carrying a lot of, shall we say, frontage? So the pattern size that accommodates bust and high bust is way too big for the shoulders, even if you don't pick a size by bust but instead choose by high bust and then do an FBA. Anyway - The center back seam is an easy place to adjust and if you do the zipper last as I do then it is really a good spot to get that final fit worked out. In this pattern with the cowl front it is idea, on a more structured style you would have to be more precise in the fit of the front and back. 
  6. What about that difference between front and back side seam? I just treat it like an invisible dart, in that I gather the section that would be a dart on the front side and ease it into the back. A lot of knit t-shirts have this type of easing and even some woven patterns. If the difference is about 1-2 inches more in the front I think that can be eased into the back with little problem. 
Here is a look at the dress from the side, and just imagine that extra 2 inches of length along that back bodice. The waistband looks reasonably horizontal here, maybe a bit tilted but a dress form is not a human and would be a lot lower if that section had not been removed. Also she has extremely good posture which is another contributor to having too much length in the bodice. People who slump over get longer in that dimension, so they can use the extra length but if you stand up nice and straight then your dress might end up bunching around the waist.

Heather dress side view

I lined the dress in a jersey as well. I get a lot of questions as to what I use to line knit dresses and it is not particularly special fabric, after some experimentation I have settled on some poly knit fabric that I buy at Joanns. 100% poly, they call it Jet Set knit fabric, it comes in a lot of colors, washes easily and makes a really good lining for these rayon knit dresses. They have a lot of other types of knits that I have used for lining, check the dance wear aisle. I think some of the nylons or poly that you use for inside dance/gym costumes are ideal for using as lining in knit dresses. My biggest tip is to check the slipperiness factor - you want something that won't stick and grab the outer fabric. But this Jet Set stuff works well and is darn cheap (like between $ 3 to 6 dollars/yard depending on sales or coupons.
I go bonkers when I buy it and the sales associate says Oh what are you making with this. Like I would make a 100% poly thin knit item in that color. Yikes. Although they must be bored and I would ask every customer that if I worked there as well. But I can't tell you the number of times I have bought lining - like actual lining and they ask what I am making with it. Sad lack of sewing info at those places - gripe for another time.

V8787 inside out dress lining

And you can see my seaming is a bit off in the inside. Which makes no difference to wearability so it stays :)

Back view. Oh by the way - I didn't use the skirt that came with this pattern. Never have. I think it has seaming, 3 piece front and back. I was making something else for Heather when I made this first dress, and also muslining a different Vogue pattern which we ended up never sewing in real fabric but the skirt was all adjusted so I frankenpatterned it onto this one. Same basic shape and no seaming.

V8787 dress back on form

I hope this fitting info is helpful, and my explanation makes sense! My biggest fitting tip is to consider the up and down measurements along with the circumference.

Onward with more summer sewing for me, I have a backlog of summer items to post so those will be coming up soon. Including a semi-vintage pattern that is totally timeless. (is it vintage if I made it when it was new, in the 80's when I was, ahem, younger?) Let's just take this moment to remember that I have been sewing since age 8 so I could have been in elementary school. (not!)  Best not to dwell, right?  And speaking of time passing, I have my annual new dress for my birthday, I try to make something fun or different. This year is is a pattern repeat sewn many times but never for myself. Wait and see:)

Stay cool if summer is in full force wherever you are, and happy sewing.
Beth

Today's SunnyGal garden photo, what else for the heat of the summer but this fantastic sunflower.

Sunflower

Saturday, August 8, 2015

Peak pattern perfection, 2nd time with Vogue 8904, the shingle dress

Prepare for Stripe-a-palooza! I just made that up. I have stripe-itis this summer. For some reason I have acquired a bunch of striped fabrics and and am sewing up a stripe-y storm. Which is so weird, as I don't think I had anything striped before I made this outfit. That one was kind of a tour de force of stripe-ishness and won't be repeated. Although I told myself to make the skirt again, as it was very fun. Uh, wait. My first stripe item precedes the bias stripe one, and it is this very pattern we are discussing today. Vogue 8904.
Wow, I am rambling this morning. I got 8.5 hours of sleep last night so ENERGY! And it is Saturday morning! woo hoo!  Slight aside, I usually write my blog posts throughout the week, finish them up and hit post on Friday but today you have Saturday morning stream of consciousness blog post. We'll see how that goes :)
Back to the topic at hand, Vogue 8904, a.k.a The Shingle Dress. which I think was coined by my friend Shams. This pattern is a couple of years old now, and there were a flurry of versions that first year but I finally got around to it last year. And was barely satisfied with that one, which was kind of a test version in my mind.
And now the latest version.

shingle dress on form front


Pattern Love !  This one is a winner and maybe I should retire it as I finally found the exact fabric and color way that I had envisioned. I guess this is a ponte knit? Or something like that. I rarely sew with ponte knits so I am not that familiar. In any case a beefier knit that rayon jersey or cotton interlock. Which is really perfect for this dress, it gives it a little more shape and body than a thin knit.
I bought it at Stone Mountain a couple of months ago so I am sure it is long gone. Not sure if you can tell but it is navy blue with emerald green. A very Kate Spade combo.

Sewing details, not that many. If you are interested in sewing this pattern I have details in the first version post. Including how to adjust the shingles so that in the back they don't crumple across your back or bottom (which if you have a substantial backside and are on the short side as I am is quite likely) a genius solution which I didn't come up with. Read that post and see how it is helpful to have sewing friends examine your rear view :)

Yes, I am so hot I have to wear shades. Ha ha,  more like it is 100˚F and time to change into my swimsuit for a dip. Now I know why dusk is the magic time for blog photos. less sweating and glare :)

shingle dress on me

Back view. My slim-hipped form does not fill out a dress like I do. Annoying.


shingle dress on form back

I was quite stumped when I first used this pattern how to get the stripes to match on the side but Shams to the rescue, in one of our conversations she said the trick was to put the bottom cutting edge of the shingle on the same spot on every pattern piece. And that works perfectly. Although see top back shingle here - I evidently didn't finish cutting that piece so could not figure out why it didn't match up correctly on the other side. Duh! fixed now. But I could not see the problem looking at it closely for a couple of days. Example of "can't see the forest for the trees".

shingle dress on form side

I love how the binding turned out on this version. I plotted, planned and carefully pressed to have that green stripe on the edge everywhere. I think it ties the whole look together.  Also on the previous version of this dress, I made the stripe binding at right angles to the dress body. While it looks great it was terrible to sew and proved why knit bindings need to be on the cross grain.


shingle dress neckline

Not sure why this is, perhaps by pattern alterations  - grading between sizes from top to bottom on both versions of this dress I have some triangle-y stick out bits on the edge of the shingles. which I just chop off and it seems to work perfectly. After this version I have concluded that it is the difference in stretch factor between the inner knit lining and the outer fabric. Whatever, even with that little adjustment the stripes still match and that is all that matters.

Edge of Shingle dress

Here is the pattern for this dress. I think the envelope versions are awful, and they look like they belong in a stylish vampire movie. If I had not seen this pattern sewn up by others I would not have given it a chance. thank you internet!

V8904 pattern envelope

A look at my dress in the slightly better lighting. This is one of the most comfortable dresses in my wardrobe. A great twist on the classic sheath dress. Plus a chance to wear my green sandals. Too matchy? too bad I like them :)

Stripe dress edited

So that's the latest stripe update. More bulletins to come. I posted another stripe item on my Instagram a few days ago for the #sewphotohop,  day 3: Colorful. and the fabric was a winner. So that one will be coming up soon.
I am enjoying the #sewphotohop - typically I am not much for blog tours or hops or whatever but it is a fun way to find out what is going on and hopefully discover some new to me blogs (a few weeks in and I still wish people blogged more instead of just instagrammed but that's probably just me. Reading long form sewing posts - I like to get the details!)

Ok, off to savor the weekend. Happy sewing, Beth

and today's SunnyGal garden photo. This is a really interesting Salvia I bought at the local junior college horticultural department's plant sale. I have gotten some great stuff there, such a good resource. The tag says "salvia darcyi" and it has curly stalks and stems so I have not quite decided on a spot for it. Still in the pot but it needs a sunny spot.

Garden may 2015