Showing posts with label ponte. Show all posts

Sunday, January 5, 2025

Zipper pocket Blazer for travel

In October I took a trip to Italy, a place I love and had not been to in quite a few years. Along with brushing up on my Italian all summer I did sew a few items to take on the trip. Top of my sewing list was a multi-purpose and all-season jacket I could dress up or down.  Once I decided to make a jacket I thought about fabric and then pockets - who doesn't love a plentitude of pockets when traveling? 

While at home I don't wear many garments of ponte knit but it is an ideal fabric for a travel wardrobe. I ordered some swatches from Mood and ended up using this fabric  which is their version and comes in a lot of colors. Way before I decided to make a ponte blazer for travel I had seen this Veronica Beard jacket (which they call iconic and travel ready). I loved the idea of the zipper pockets and saved it to my ideas board. Here's a look at the jacket after 3 weeks of travel and many times being folded into my suitcase when not needed. 

Navy jackt1 copy

I am sold on this fabric for travel pieces. I also took denim jeans as well as a pair of ponte pants so I had travel outfits based on navy blue with plenty of different color tops and sweaters. I buttoned it so you can see the lapels and center front but I don't think I ever wore it buttoned like that. 

Looking at the ready to wear version it had several features that I really liked. Of course the zipper pockets, but it also had a peak lapel which I really like these days. But single breasted, not double. You very often see a peak lapel jacket which has that double breasted front (where the front edges cross over the center front line and have 2 or buttons horizontally placed. I didn't want that so I had to figure out how to change an existing pattern.  I used a pattern I have previously used here and here. The inspiration idea is from this jacket (images from their website)

Blue jacket composite example

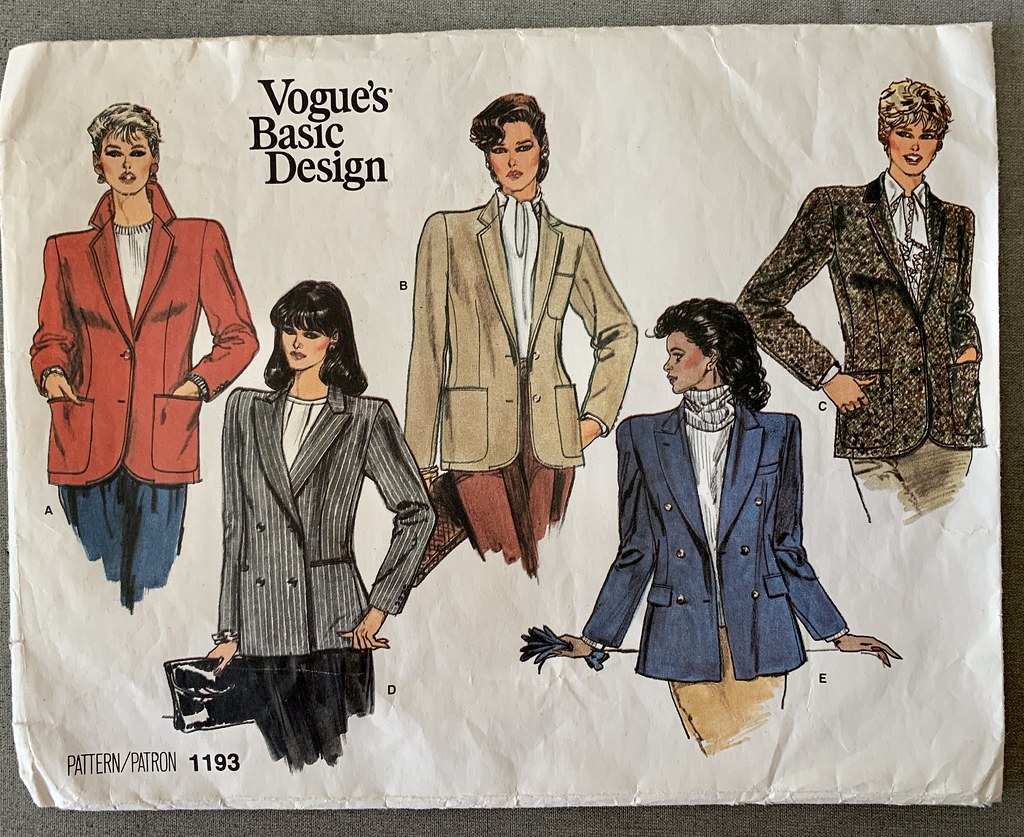
So I went to work altering that quasi-vintage Vogue jacket pattern to have the peak lapel on the single breasted version. Now that I have made it twice I think the lapels are a bit skimpy in Versions A, B, C but perhaps that was the look then. 

Vogue 1193 Pattern envelope

Here's a look at the different lapels on the 2 versions, you can see there is a big difference in the lapel width and shape.  Below is my traced pattern  piece and the changes I made to blend the two versions. 

Lapel piece comparison

Actually this is a combo of info on my fit adjustments as well as the lapel design detail. I grafted the shape of the peak lapel onto the jacket front for Version A,B.C and then made new facings from that redesigned front. 

Blazer pattern piece adj

Instead of welt pockets I made a facing using lining fabric, and created a rectangular opening for the zipper, which I then basted into place and sewed in (after a LOT of basting to make sure it was in just the right place.) Then once both zippers were looking reasonably even and centered I stitched them in by machine. Then I created a pocket bag on the bag attached to the edges of the rectangle. That was later covered by the lining. 

IMG_2068

At first it bugged my how the zipper pulls hang down instead of remaining horizontal but now I think it looks fine. These pockets did their job and I could go out to dinner without carrying an extra bag for sunglasses etc.  Here's a look at the jacket on the dress form before putting in the lining or hemming.  Once I had done the lining I got the idea to include more inside pockets, so I added breast pockets as well, they were also very functional but not very beautiful so I won't show you those :) 

Navy ponte jacket in progress

This fabric presses really well and I did use a silk organza press cloth to prevent shine on the fabric. 
But it is also springy - the same feature that gives it the wrinkle resistance means you have to press it well to get the creases. I basted the lapel and then pressed it with steam to get a good crease. I used weft interfacing on the body of the jacket front and then knit fusible on the lapel and collar facings. 

Navy ponte lapel detail

I was really pleased with this jacket, it was the right weight for the trip. And the weather was strange in a global warming kind of way - much warmer in October in Italy than any other time I have been there. Which often required scarf and gloves at night and a wool jacket - but this trip it was really warm almost no sweaters required.  Here I am on a high tower overlooking the cathedral in Siena - it was a bit chilly that time although we warmed up quickly with aperitivi in the Campo. 

Navy jacket Siena

And just a week later in Florence it was back to short sleeve tops and barely a jacket required. Definitely odd weather but I wasn't complaining! 

Bg ponte vecchio

Buon Anno a tutti!   Happy New Year to all. Thanks for reading and I wish everyone a great year with health, happiness, great travels and fantastic fabric choices!

Beth


Saturday, December 21, 2019

A festive new dress ๐ŸŽ„ Burda 09-2019-104

Happy Holidays! It's that time of year when I'm filled with gratitude and love for the sewing community. Thank you all for sharing your creations, providing inspiration, ideas, advice, humor, personal stories and friendship. The sewing internet is vast and I will never catch up with everything yet every day I discover someone new to me who is doing beautiful and interesting things.

This year has been so great, I've had the opportunity to meet some of my far away sewing friends in person and to meet many new stitchers in my classes. Next year will likely have some new adventures that I can't even imagine right now.

And so as usual I've made a new dress in a festive color. Plus gone a bit silly with adding the holiday border and turned it into my Christmas greeting to you. Keep reading for all the sewing and pattern details.


Holiday red dress with garland

The pattern is Burda Magazine 104-September-2019. This dress is a ponte knit with a subtle print - probably not visible in the photo above but it shows more in the following images. I'm not a fan of ponte - they sometimes seem a bit clammy so as I was sewing this I thought "well I will finish it as I like the color but I'm probably not going to wear it". Famous last words, right? As I can get over the slight poly feel since the color is so nice and it holds it's shape with not a wrinkle in sight.

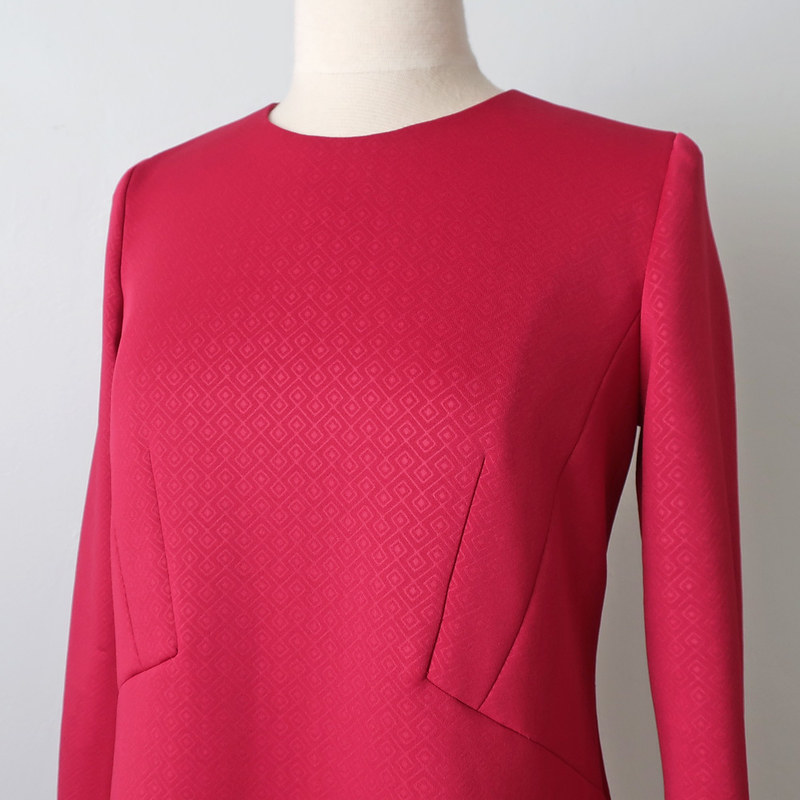
red ponte dress front close up on form

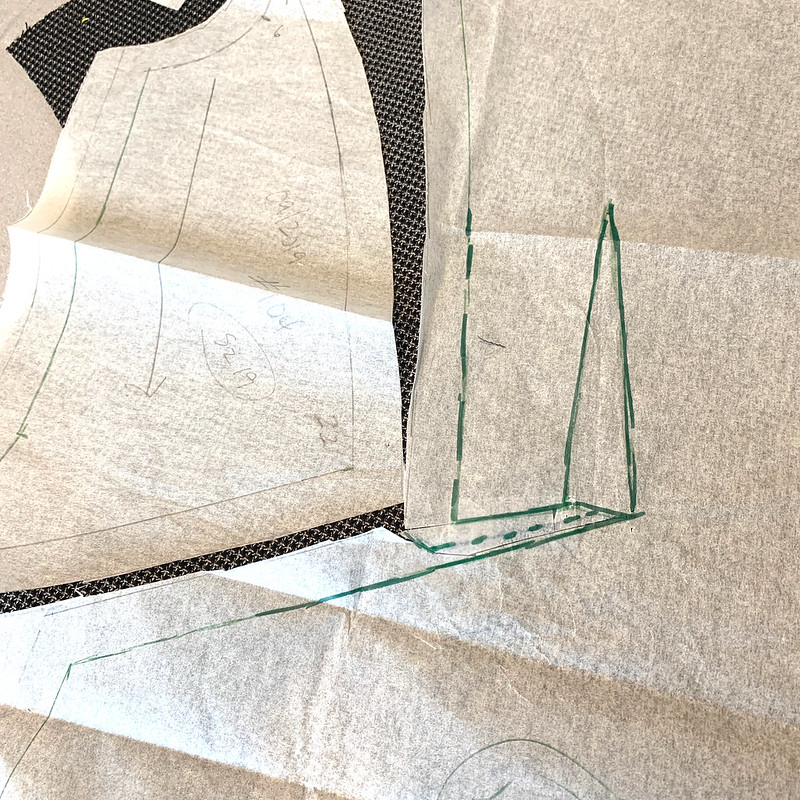
A closer look so you can see the print and also the seam plus dart details. This dress is quite simple to make, it went together very well once I figured out how to sew that darts/seam situation. Here's a look at that section of the front pattern piece plus the side inset.


Red dress dart detail

I couldn't figure out how the dart plus waist seam worked, and since I never look at the instructions I tried to puzzle through. However I thought perhaps they had some of their usual jumble of words describing how to sew - but no! a holiday miracle - there was a little diagram complete with scissors showing where to cut (on that dotted line) and then it worked perfectly. I guess I should follow my own advice sometimes and just read through in case :)


Red ponte dress 2

Here's something new to me - this dress was in Burda Petite sizes 17-21 which according to the measurement page in the magazine are the same as sizes 34-42 other than the height difference. (5'3" for petite and 5'6" for regular)  So not really any difference other than I didn't have to remove an extra  6 inches at the hem. Actually that was nice! I also have short arms so the sleeve was full length on me and as you can see in the magazine photo it is more a wrist length sleeve.


Sept 19 mod dress burda mag

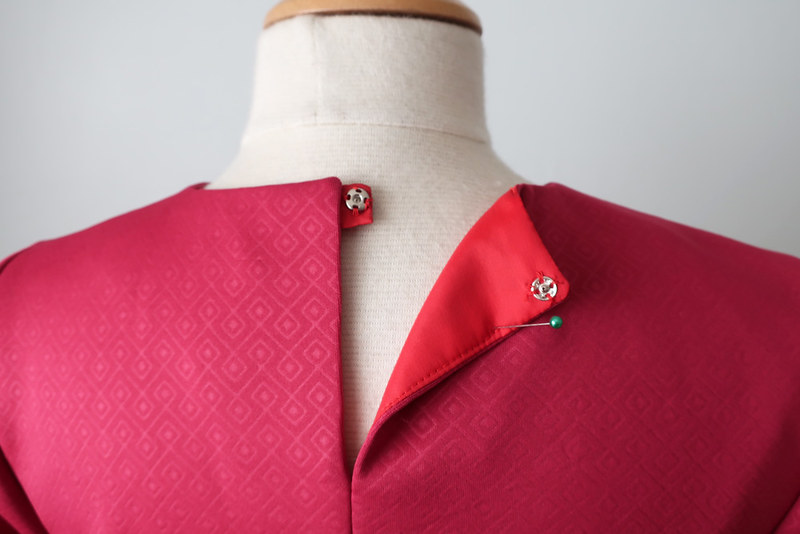
This type of fabric makes it super quick to sew, no seam finishes needed as it is a stable knit. I also decided that a zipper was not needed so I changed the back to a short opening with a snap.


red ponte dress back closure

I made a facing for the neckline and had it continue down about 5 inches so I could make the back neck opening.

red ponte dress side and back


red ponte dress back view


red ponte back view1

This dress also has darts at the elbow which is nice feature I guess - it does make the sleeve conform more to the arm and the sleeves are nice and narrow. So often I make jackets or dresses and the sleeves are way too wide for me all over the arm.  What do you think of my sneaky back neck closure? I don't like a button with loop, it's too fussy to make and to fasten. Or I'm just lazy :)


red ponte dress front on form

This dress would be fantastic in wool crepe or even a sweater knit. I think I might keep this in the active file - I can see making it sleeveless in a cotton sateen as a summer dress. Here I am contemplating summer sewing on the shortest day of the year. My words to live by - when winter is here then spring is on its way ๐ŸŒž.

So that's the seasonal sewing accomplished. Up next I just cut out some pants in a wool, as I had fabric leftover when I made this jacket. No I don't really need a business-y suit like that but it seemed like a fun way to use the rest of that fabric and work on my pants fit. And warm pants are always nice to have in the wardrobe.

This won't be the last post of 2019, after finishing my shopping/wrapping/baking and the actual Christmas celebrating, I plan to do a big clean up of my sewing space (resolutions, right?) and get ready for a few sewing challenges in the new year.

Plus a look back at my sewing for 2019 with a bit of analysis plus some ideas for 2020.

red ponte dress 1

Time to run - those presents won't wrap themselves!

Merry Christmas to everyone ๐ŸŽ„๐ŸŽ„๐ŸŽ„

Beth

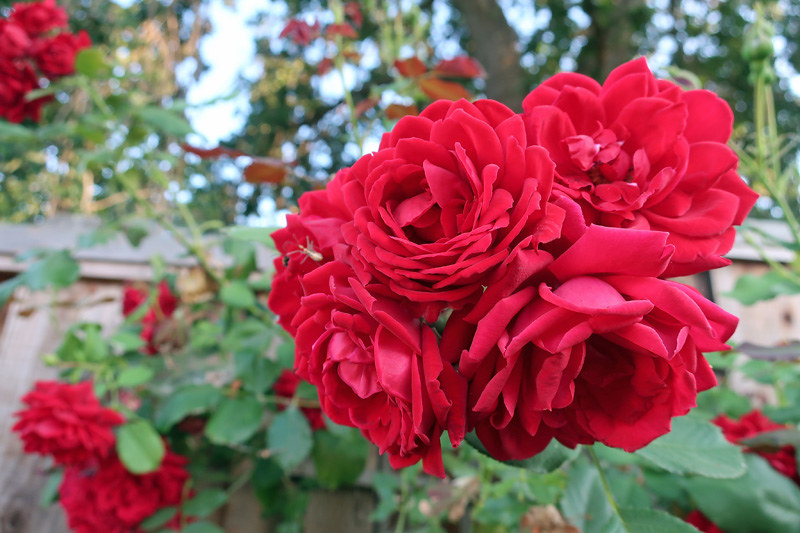
Today's garden photo, taken back in July and I wish I had some of these roses right now, I could make a perfect holiday table arrangement. But they are all gone and with just the rose hips left on the bush. This is a climbing rose that I put in to fill in the space after getting the fence replaced where the pink jasmine was looking a bit sparse. It has exceeded my expectations with masses of flowers all summer and I will be on the lookout for another one in January. 

red climbing rose

Friday, June 30, 2017

Simplicity 1654 in green ponte, also knows as Plenty of Pattern Pieces

Here's another thing I recently sewed for someone else, that I thought might interest everyone out there who like to see the pattern manipulations for fit on a somewhat crazy pattern. Sometimes I think the simple patterns are more difficult to alter for fit - as they require you to choose a path and pursue it, whereas the pattern with lots of little pieces affords opportunity for many small adjustments. However the sewing does take some with this type of dress, a bodice with multiple shapes, front and back, and then an 8 panel skirt.

Here's the finished dress so you can see what I'm talking about. To my eye it looks a little lumpy bumpy but I have the dress form padded out to fit the size with all manner of stuffing - not exactly smooth and sleek under there.
The pattern is Simplicity 1654, and a quick search turns up no reviews - did anyone make it? It was released in 2013.

green ponte front full view

Here's the pattern envelope and tech drawing. Cute, huh? and I would definitely take a 2nd look if I saw it in a store. The blue version is very striking although when I look at the drawing that stitching on Version A makes me think of a baseball :). We decided against the stitching.
This dress is for the same person who recently had me make the plaid coat. A tall person (some envy) who can wear this style well.

Simplicity 1654 pattern envelope

S1654 tech drawing

Where to start on the fitting? I use a size 14 as the starting point although I know it will be a bit big in some places. Based on other things I have made for her (blouses) I needed to add some length over the bust, but not really much in the way of circumference.

Now the fun part for those of you who like to look at sewing pattern adjustments. I want to say sewing nerds but really you are my people!!  Some people like to talk about their cookware or their newest olive oil find, some people are obsessed with their cars, there are those geeks who pore over the latest tech gadgets, and we love nothing more than a good analysis of a sewing pattern, right?

Here's my slightly unorthodox method for adding length to the bust in these princess seam patterns. This picture is missing one pattern piece which is a curved one, that attaches to the side princess panel and also to the center front piece creating the armhole and shoulder portion. But I forgot to add it to my tableau of bodice pieces. You get the idea. The main adjustment is the lengthening of the princess seam right over the bust, which is that triangle section opened up along the seam. The key is to add just the right amount, and then to make sure the seam sews together smoothly. Which for me is a bit of intuition and measuring of the stitching line.

bodice pieces Simplicity 1654dress

So this pattern has a lot of pieces. On other dresses with pieces above the midriff I have added at the bottom of the upper pieces (if that makes sense) and then what that does is make sure that the waistband piece always stays at the waist, horizontal, and doesn't pull up towards the bust. Here's an example of that change, scroll through post to see the adjustment.

There are separate lining pieces included with this pattern (oh happy day!) so they need the adjustment also. I added the darts so you can see how they take care of the shaping that is inherent in all those princess seam pieces on the dress bodice. My adjustment for length is there on the bodice front, added to the bottom on the lining piece. I think about 3/4" of addition.

lining pieces S1654

I did these adjustments on the flat pattern and then sewed up a quick muslin in a scrap of ponte that I had. While I typically use muslin it's helpful to use a similar fabric to the final one to get a really good feel for fit. But I don't buy anything extra - this was literally a scrap from some other project.


test adjustments S1654 SaveSave

The fit was really good, the only further adjustments after the muslin were to take it up at the shoulders about 1/2" total and then to pinch in that shoulder princess seam a bit, the wearer has a very narrow upper chest relative to pattern size. You can also see that this dress is fairly low cut and open - so you are warned in case that is not the look you are going for!
After that it was onward to sewing.

See how the waistband is perfectly horizontal -whew!  I think it looks good. It's really annoying me that it looks a bit puckered on the form, on the body it's fairly form fitting.

green ponte dress front close up

Back view. Oooooh I am happy with that zipper/seam alignment :) for which I have a trick which I will have to show one of these days.

green ponte back full view


green ponte side full view

With the side view you can really get an idea of how full that skirt is. Actually I am just putting the finishing touches on a 2nd version of this dress for the same person so I decided to measure the skirt circumference: 134". Of hand hemming! That is what episodes of Granchester are for, hand sewing...

So that's the scoop on this interesting Simplicity dress which it appears few people sewed, or at least shared online. Actually I just searched again and found one version on Kollabora. That is not many for a Simplicity designer pattern. Interesting, maybe all that seaming put people off. By the way, I rarely sew with ponte knit, this was a very nice weight and while it's not my favorite fabric I can see the appeal, it's certainly easy to sew and presses nicely.

And what's next? I have several things to make for my friend Heather - including some shirt dresses, for which I am using Butterick 6333 which is a really good pattern. Shoulder princess seams and smooth lines (unlike that McCalls 6696 shirtdress which was really popular but had that oddball poof in the center back that kind of took away from the crisp shirtdress-ness of it).

Also maybe a new top for me, I bought some kelly green eyelet yesterday which I have been eyeing for weeks and it might be quickly make up into a summer top to wear immediately.

The Hello Stitch Studio in Berkeley where I'm teaching classes will be closed the next week for the 4th of July holiday week but you can still register online for any classes - mid-July we have the Tunic top class, Skirt class and starting at the end of the month is the Button Front shirt class. Plus we're doing another all-day Dress class on July 30. I hope to meet some of you there.

Have a great 4th of July weekend, stay safe and enjoy the fireworks. Also the barbecues, ours will include fresh corn on the cob among other yummy things. There's a little farm stand not far from my house, where they grow corn, tomatoes, peppers, sunflowers, and bring in peaches from their sister farm in Brentwood. It's a precious gem and I hope it lasts there for another 100 years.

Happy Sewing, Beth 

today's garden photo - the flower that most resembles a firework. I've been waiting for weeks for my dahlias to bloom and this one did not disappoint. Love it!

dahlias etc

Wednesday, September 2, 2015

Butterick 5455 for this year's Birthday Dress

That last post was slightly serious - even though I am very happy with that blue dress - so it's time to switch gears and indulge in something frivolous, a completely unnecessary floral frock. Say that 5 times fast.  I like that word frock, it seems to be used mostly by Australians as far as I can tell. Do you say that in the UK?  Here is the US we only have the word "dress" for this garment. Maybe frock will catch on. It sounds quaint to me, like something from a movie set in the 20's or 30's. Although Frocktails - that is something I can get behind. Perhaps I should organize for the bay area. Anyone interested?

But this post is all about me, and my birthday. Aaagh, how narcissistic that sounds. but after all a sewing blog is sometimes a bit narcissistic - or at least self indulgent, filled with photos of one's self modeling the latest creations. I do admire the people who can make their photos very interesting, sadly I am not one of them, and have to hope that I can get some shots that are at a minimum in focus and the garment is visible. But for my birthday I am usually on vacation so the background is at least improved:)

Butterick dress on me front

I have mentioned my pattern love for this one before and decided to make a version for myself, as I have sewn this pattern at least 10 times but never once made it for me. It is Butterick 5455 which is sadly OOP. I have mentioned before that I think this is a stellar pattern, looks good on lots of figures, has pockets! and a very pretty neckline front and back. Here is my previous post with a number of versions pictured.

Front and back on the dress form. I mentioned in my previous post that this is a sleeveless dress which is designed as a sleeveless dress. One of my pet peeves is patterns which have sleeved and sleeveless versions, when you take off the sleeves I find the armhole and shoulder to be a bit clunky which this pattern avoids.
Butterick front on form4Butterick back on form

The fabric is a remnant that I found at Stone Mountain earlier this summer. I actually bought it as my sister mentioned wanting a ponte dresses, then I found a dress in her size on sale in just her colors (navy blue and white) My sis and I have a challenge of finding things for each other on the super sale rack. She started it years ago and now we hunt for some perfect item with a price limit of $ 10 in summer and $ 15 in winter. Anything is fair game from exercise wear to tops, dresses, pants and even shoes. You would be surprised how fun it is to shop for someone else with no pressure, with just the potential to find something perfect. I think we are even so far (sisterly competition of course :).

price tag ponte

I am not the biggest fan of ponte and the colors might be too bright for some - although not for me. Turquoise and coral in one print, how could I resist?

back view on me Butterick dress

I didn't really try to match anything however now I see that the print kind of flows across the back skirt. so yay! and eek I need to get to the gym after this vacation - great meals going right to my hips. Oh well, that's what vacations are for.

How about a little inside view and some fitting info?
I made a size 12 which is my typical Vogue/Butterick/McCalls size and this dress is well proportioned so I would not say there is any excessive ease. I always cut things out with a 1 inch side seam allowance at the hip and then fit it as I go on the body, to create just the right fit and hip curve. This metal ruler is something I've had for ages and so useful for long curved seams. And Frixon pens.

Butterick dress side seam

I don't usually take fitting photos in the mirror but I was working on this one and realized it would illustrate one of my fitting mantras which is "pinch an inch". Reading other blogs and feedback on pattern fit I think the preference is very close fitting garments but I prefer a slight difference between the body and the garment measurements makes it so much more pleasant to wear, and actually hangs better on the figure, with no drag lines or pulling. So this dress is fitted but I can "pinch an inch" at the side seam, meaning that it might measure about 2 inches more than my measurement. Of course with knits you can have less ease but with a woven that 2 inches in circumference is really necessary.
and ignore my messy floor - plus my footwear :) those are my sewing clogs. Never step on a pin with those on my feet.

Butterick pinch an inch

Other fit adjustments, I added a bit of length in the upper part of the bodice, about 1 inch at the center.
The yellow line marks where the pattern piece would have been without the addition. Look at the above photo and imagine if I had not added that front bodice length, the seam would have been too high and bisecting at an awkward spot. Interestingly I didn't need to shorten the back bodice which I typically do. I also took it up at the shoulder seam about an extra 1/2 inch which is also typical.

Butterick on form close up

Inside view, lined the bodice with a white poly lining and left the skirt unlined. It's kind of hard to see but the hem mark is thread traced. Once I decide on the hem I usually run a thread trade along the fold and then I can unpin and finish the dress without having pins come out or losing the hem place. It takes a couple of minutes but actually makes the garment easier to handle for the last few steps.

Butterick inside view

So that's the scoop on this year's birthday dress. The weather has been great despite the state being in the path of 3 hurricanes in a row - which all have taken a turn and moved their direction away from the islands. A little more rain than usual, and very hot and humid. But the alternative could have been a lot worse! And we are all saying that it will seem extra brown and dry when we get home to drought stricken California.

Butterick dress on me5

Beach day tomorrow and then dinner at one of my favorite restaurants - what a perfect way to spend a birthday.

Aloha, Beth

Monday, December 31, 2012

Happy New Year with a Lekala Dress Pattern

Fit...the final frontier.  You buy a new pattern, bring it home. Stare at the envelope, that technical drawing taunting you with its many pattern pieces all begging to be sewn. But before you get to the fun part, the actual stitching, you have to consider the fit. No chance to stomp on that pedal, hear the soothing roar of the machine until you do some measuring, slicing, pivoting, math calculations, a few little swear words, and then cross your fingers and hope for success.  What, you don't do that?  You open the envelope, pick a size, cut it out and then pray it will button or zip or be able to pull it over your head?

True confession, I actually like fitting and feel comfortable with most challenges, but that is after many classes, and years of practice. If I were learning to sew today I would not think it is fun, although there are so many resources for learning and I recommend them all, from DVD's and blog posts to high-level classes.

Have you looked at the Lekala patterns website?  I have always been intrigued by this pattern company and periodically scanned through their selection, noting a few dresses I might like. Recently I was contacted by Natalia of Lekala Patterns who asked me if I would give their patterns a try and then blog about them. Their website had been revamped since the last time I had looked at it, with a variety of language options and payment methods. I chose a dress and here is the result.

Lekala dress front

But I have buried the headline on this one - It Fit ! Repeat, It Fit Perfectly!  With no adjustments. For Lekala patterns you provide your measurements (bust, underbust, waist, hip and height) and then they provide a PDF pattern custom sized to your measurements.  I was a bit skeptical but figured it was worth a try.  Taping together printer pages is not my idea of fun, however I will happily use a roll of tape and reams of paper if I don't have to mess around fit adjustments. 

I taped the printer pages together and then traced out the pattern pieces on tracing paper, adding seam allowances which are not included.  Once I did that I gave some thought to doing some verifying with the tape measure but decided against that because the back pattern pieces looked fine (at this point I can eyeball my size) and I also thought it was a good test of this pattern company to sew it up just as I received it to see how the custom sizing worked out. 

           Lekala dress backLekala dress front 2
I did make a muslin, just for the main pieces, front and back and omitting the sleeves and collar. Mostly because I am not such a whiz with the pattern tracing (remember - no Burda or other magazine patterns for me)  and wanted to make sure I did it right before I cut into my nice fabric. This fabric is a ponte knit from Stone Mountain.  Not very original as it is a virtual copy of the Lekala image but I wanted a holiday dress.  This is Lekala Pattern # 4060.

Lekala dress 4060Lekala_4060_drawing

A little analysis on this pattern.  Maybe I could make it a bit more fitted in the waist but I probably won't. It is very comfortable, I really like that drape effect across the front that gives shaping and allows you to hit the buffet at a party without fear. I don't think the dress looks perfect when I am standing mannequin still as in the photos above, but everyone who has seen it in action thought it was perfect. Do you have a dress that looks better "in action"? I think this is one that does. The fit through the shoulders and neckline is what really sold me. It could be that I just happen to fit the Lekala sloper or they are magicians with the fit, but either way I am very happy with the result.  I did add a couple of inches in the length when I cut it out and did need that. The instructions are a bit confusing, not entirely sure what they were referring to in some instances but if you are not a beginner I think you could figure out how to sew up the pattern on your own. The markings (notches, pleats etc) were very well marked, all matched exactly.  Looking at these photos below I could use some improvement on my hem stitches on ponte knit - any tips?  I don't like machine hems so I did hand stitch, or maybe I am being too fussy.

Lekala dress on form side   Lekala dress on form front

In summary, I am very happy with my first Lekala pattern and will definitely use them again. There are other dress patterns on their site that are calling out to me (I know, more dresses that I don't need).  I do have a jacket pattern from them with a peplum design - yes time for me to get on the peplum trend - so I plan to get to the jacket in January.

Note: I received 3 patterns at no charge from Lekala. Their prices are very reasonable and I would be happy to purchase others in the future.

Good wishes to everyone for happiness, health and fantastic fabric finds in 2013.
Happy New Year,  Beth