Friday, September 27, 2013

A Marfy pattern for my birthday dress - finale

Based on the incredibly nice comments left for the two previous posts (thank you very much!) I hope this very simple dress is not a letdown. Considering the style I did have to make a lot of adjustments, or maybe it just seemed that way because I am so familiar with my personal adjustments on Vogue patterns. There are links at the bottom of this post to my two previous ones which contain all the details on fitting and pattern alteration.
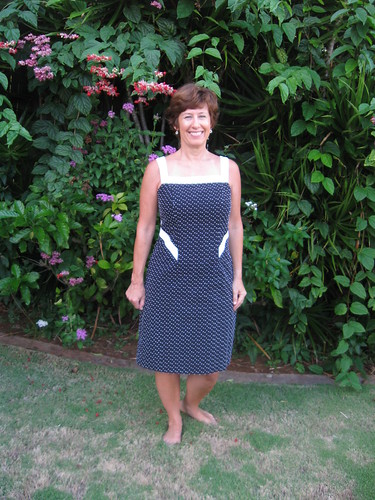
OK, enough stalling, right?  Here it is.

Marfy front view2
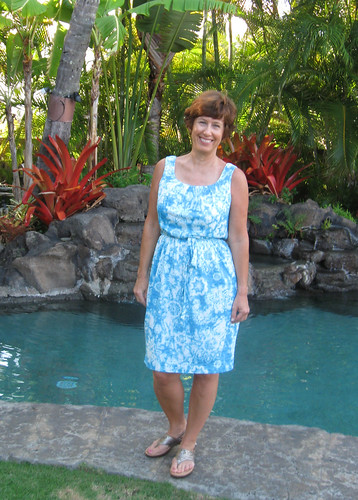
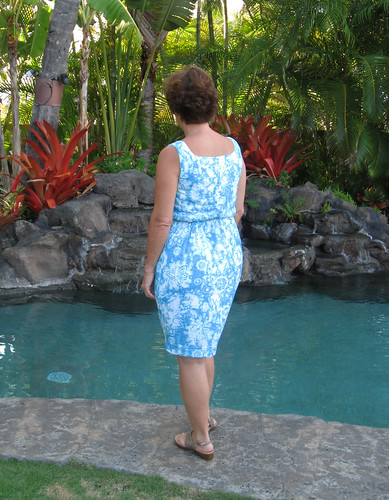
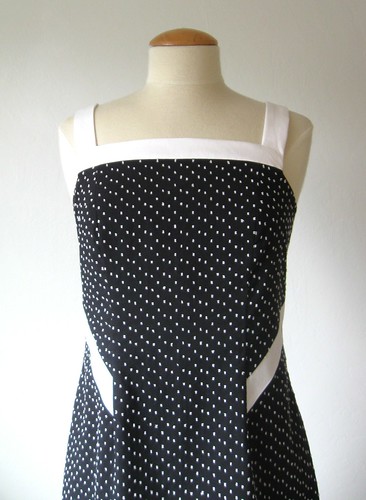
This was pre-vacation sewing at its usual quickness, so I rummaged through my stash and came upon this lightweight black cotton dotted swiss. I originally bought it thinking I would make a floaty skirt but never got around to that, and the contrast is white cotton sateen. All my outdoor photos look a bit washed out (or perhaps hard to compete with that background) and also the ever so slightly three dimensional dots do something kind of optical-illusion-y with the image. 
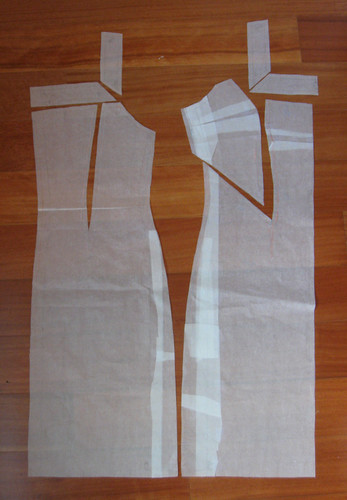
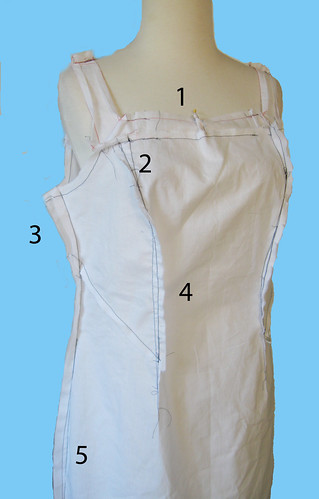
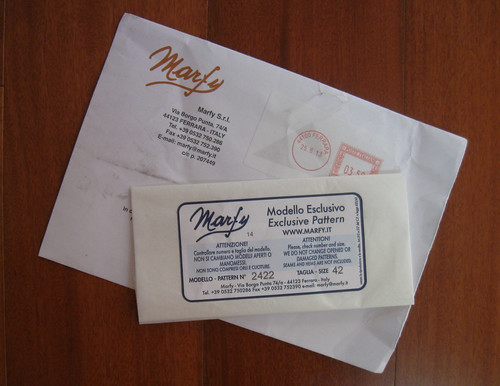
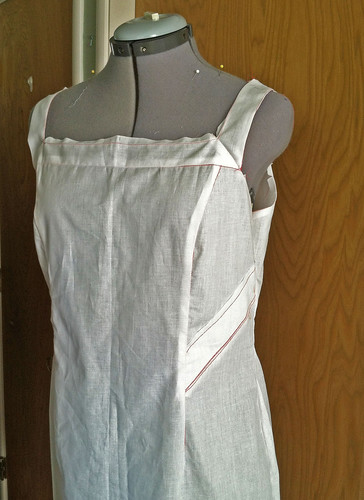
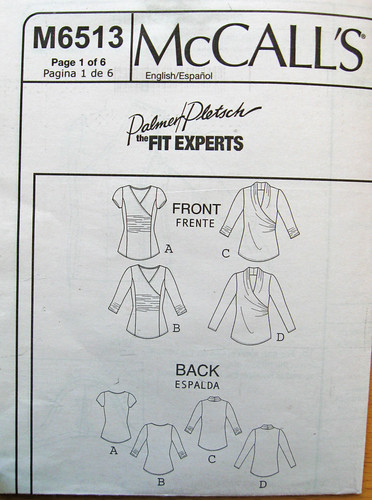
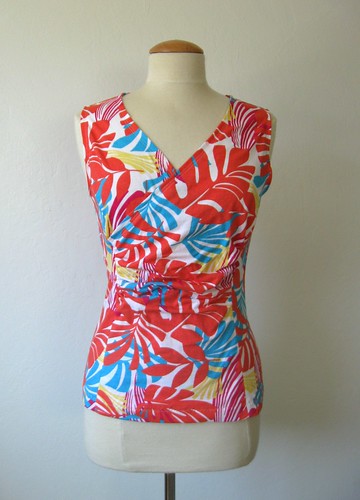
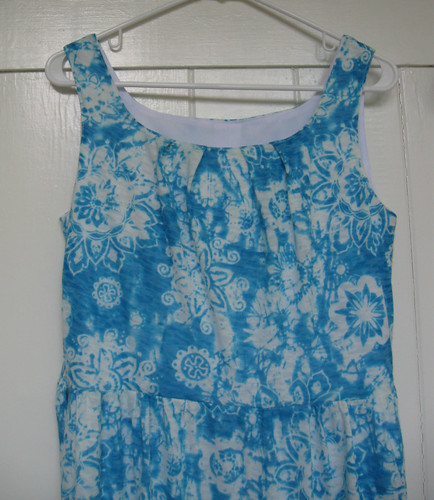
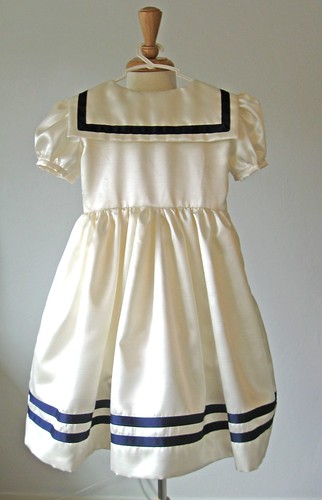
For reference, I made Marfy pattern F2422. This is my best dressform view that shows the details.

Marfy front waist
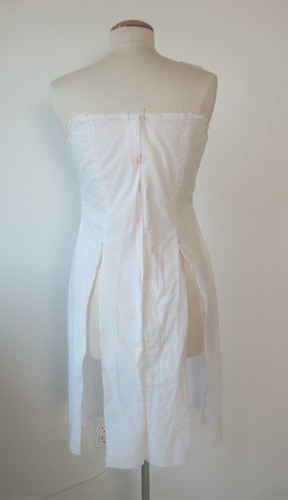
I am very happy with the final fit of the bodice and especially across the back which is always a place I have to do a lot fiddling.

Marfy back on me
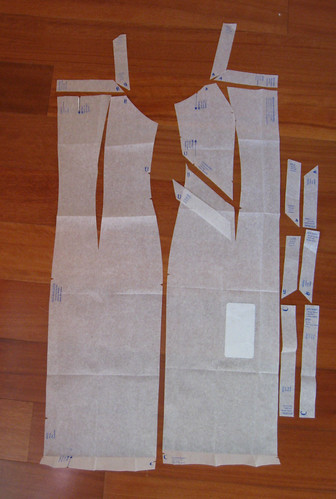
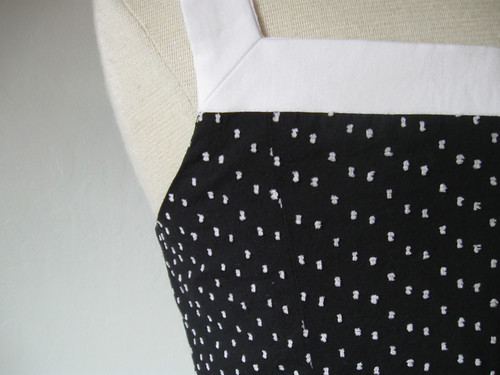
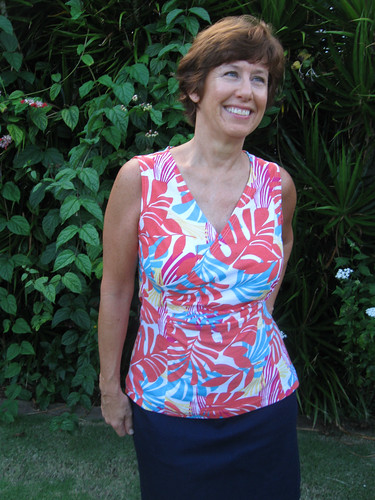
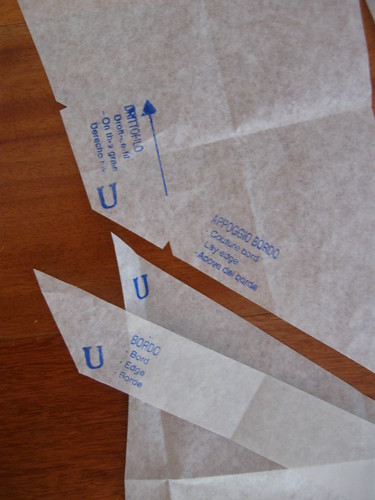
A few thoughts on this pattern and Marfy in general. It is nice to get pattern pieces instead of a sheet and I don't mind adding the seam allowances, but the labeling is minimal. They say all pieces are marked and labeled however it was a bit tricky to figure them out and I speak Italian - although admittedly I don't "sew" in Italian. The biggest issue I had was where to put that contrast piece at the waist. Here is that section, and an example of their labeling. After putting the diagonal contrast piece below the seam  - which looked totally weird on my muslin - I figured it must go above the seam. (It fit either way).  And how about that little notch - goes with nothing. Now that I look at it I see that it says to lay the edge there but it actually fit better below, but worked out OK. Actually that is the only little dissatisfaction I do have with this dress as there is a tiny bit of rippling at those pieces which show in this photo below. I think that is due to the difference in weight between the fabrics, the black is very light, almost a voile and the sateen is a bit heavier and has a touch of lycra, although I did put some interfacing and was very careful not to distort when sewing. Its one of those things that I see in photos but I imagine when worn is not even noticeable. 

Marfy pattern pieces close up2Marfy dress front 8

I really like how this turned out, the serendipitous fabric choices made it perfect for a crisp cool summer dress. I put a black cotton voile lining and a black invisible zip which stops at the top of the black part in the back. For the closure I thought a white invisible zip would be good at the top but might show down the center back and the little tail of a black one would drive me nuts at the top of the white band so I extended one side of the white band, stopped there with the black zip and then the band closes with  a flat hook and eye.  Oh yeah, I am particular, or as my family says, crazy!

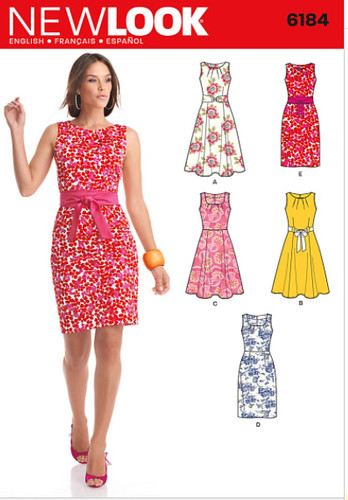
More Marfy impressions. Very nice quality patterns however I am unlikely to try one again. The styles don't wow me, the sizing is not really suited for me, and I think the cost is too high for what you get. I am basing my comparison on Vogue patterns which I find more interesting and much easier to use. I can buy them for under four dollars and they have seam allowances which I am used to. Many Vogue patterns have multiple versions so that is useful and economical. They have styles from designers that I am a fan of. Some of the choices on Marfy are comparable to styles I have seen on Lekala (PDF patterns from Russia that send you a custom size based on your measurements) So two ends of the spectrum pattern-wise but I would pick a Lekala over a Marfy in the future.

I did two previous posts on making this pattern:
Pattern info and first muslin
Second muslin and details on adjustment and alteration

As for my tropical photo shoots - why don't I put on some cute sandals? For your entertainment, seeing this one all I could think of is that song "Walk like an Egyptian"

Marfy front view4

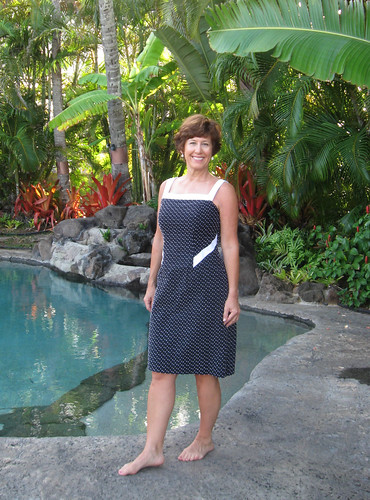
This one is I spy a Mai Tai out of the corner of my eye!  wait for me, it's my birthday after all. Or at least it was...

Marfy front on me6

Wishing every one a paradise on your birthday, tropical or otherwise,
Happy sewing, Beth

Thursday, September 26, 2013

A Marfy pattern for my birthday dress - part 2

Based on the comments left for my previous post there is a never ending level of interest in fitting patterns. Which makes sense as I think sewing is a technical skill that improves with practice but fitting is really a mixture of art and science. Concealed zippers, a welt pocket, plaid matching or perfect topstitching are techniques you can repeat and rehearse until you get them just right. But fitting, once you cut out that garment the pieces are fixed and then there is only the seam allowance to play with.

There are a lot of resources to study fitting now, from on-line classes to DVD's, books and tutorials. I have mentioned before that my favorite fitting book is the Palmer and Pletsch Fit for Real People, because they cover pattern alteration from neck to hem and everything in between and then show real life examples. I don't use their method of pinning the pattern tissue together into shape and adjusting but that is just my preference, instead I use more of a flat pattern measure approach. I think of fitting examples whether in a book or on a blog as the word problems the fitting world. Remember those pesky word problems in math class? First you learn the concepts, then you can do the calculation worksheets and then the book would have that page of word problems. How about this sewing example?

Jane has a hip measure of 42.5 with a hip length of 9.5" and the pattern measures 39"with 2" of ease and a hip length of 8". How many inches do you add to each front and back skirt piece, and where, in order to look good and not like a sausage in a casing? 
aaaagh, flashback to school nightmares, right? Without trying to frighten them away I always tell my school age sewing students that sewing is math. Pay attention when they do the sessions on fractions!
Onward with my real life fit example for this Marfy pattern. As a quick review, I am making this pattern which is their F2422 dress, and here is a look at the front pattern pieces.

       Marfy F2422 pattern illustrationMarfy pattern pieces close up3
My first muslin I made up almost as is and I found that the pattern shaping was really boxy. Not much in the way of shaping with the darts or the princess seam. Certainly not at all like the illustration.
I did some adjusting on my pattern pieces and here I can show you side by side the changes. I did trace the pattern pieces and the adjusted pieces on the left are a bit bigger as they have the 3/8 inch seam allowance I added. Adjusting a dress like this is a 2-stage process, I do what I can on the paper pattern and then fine-tune on the muslin.

Marfy pieces alteredMarfy all pattern pieces1
      Adjustments on my paper pattern

  • dress back, added 1.5 inches at hip tapering to zero at waist
  • back, took a small swayback tuck, about 3/8 inch removed. 
  • side upper front piece, slashed and spread horizontally about 1/2 inch, added about 1/2 inch at side seam
  • center front piece, slashed and spread 1/2 inch horizontally to match the side princess piece. added a little at the side waist increasing to about 1.5 inches at the hip. 
Then sewed up the muslin, including the zipper and gave it a try. As frequently happens I ended up removing some of the extra that I added at the side seam but I consider those additions as fit insurance there to play with. 
Here is the finished muslin where I have numbered the adjustments and explain them below. Note I wasn't thinking about it and photographed this on my small dress form so it doesn't fit on this form but I think the adjustments are clear. I sew all muslins in contrasting thread so I can see what the heck I am doing and often change the color for subsequent adjustments which takes only a second but is really helpful at the end. 

Marfy muslin with adjustment notes
  1. Folded out a small dart in the center front line of the band piece because the dress was just a bit too loose there. 1/4" at the top and tapered to zero at the bottom. this was kind of tricky as it created a V in that piece which I had to smooth out later.  still a bit of a V there but it not apparent to the eye.
  2. While I did that adjustment on the princess seam it was now too big across the upper bust. You can see where the numeral 2 is that I shifted the center front piece over about a half inch, tapering to the bust point, but only on the center front piece, not the side princess piece. this gives more curve over the bust. I also had to take out the matching amount on the upper band.
  3. Side seam, I took out about 5/8 inch from the upper back at the side seam (only the back).
  4. Waist shaping, I took in the princess seam (which acts as a waist dart a bit, about 3/8 inch at the most so that reduces the waist a total of 3/4 inch. I also made the princess seam/dart a bit longer, they stopped at an odd point and left some extra over the tummy which was not a good look.
  5. Took in about 3/8 inch on the seam at the hip for a total reduction of 1.5 inches in circumference. Also lengthened the back darts as per the front, and I think I took in the back darts to add more waist shaping.
Oddly enough the one part of this dress that fit perfectly is the length and placement of the shoulder straps and where the armhole hit, which is so odd as most patterns are too long/low for me in this area.
Some other observations on fitting. Small adjustments can make a big difference (resisting the urge to say "duh" here...oh I just did).  Note that in some places I adjusted only one side of the seam, in my mind I call this sliding or shifting, in that I am not taking in the seam but only taking away from one side of the seam, if that makes sense. Also I want to point out that in some cases I added and then took away some or all, but I find it better to have that buffer or fit insurance as it is often called.
After this adjusting on the muslin I made the changes on my paper pattern pieces and then sewed up the dress with only some minor adjustments in the sewing. I was making this dress in a rush before my vacation and so used fabrics I had that would be easy to sew and not give me any trouble. I hope you are not let down by the finished garment :)  Here is a sneak peek.

Marfy close up corner

Thank you to everyone for your happy birthday wishes. I am so late in my blog posting so my birthday has come and gone already ( September, Labor Day weekend - oh the irony according to my mom who was in labor for 48 hours and never lets me forget it :) but I did finish my dress and wore it on vacation in Hawaii. And took pictures. So next post, finished Marfy dress.

Happy late September sewing,  Beth

Here is my SunnyGal garden photo, morning glories, seems there are even more this year tumbling over the fence, such a great color.

morning glories

Tuesday, September 24, 2013

A Marfy pattern for my Birthday Dress - part 1

Each year I make something special to wear for my birthday, usually a Vogue designer pattern if there is one that grabs me. This year I tried something different and chose a Marfy pattern. These patterns are hand made in Italy and come in specific sizes, with no seam allowances or instructions. Here is a link to their website with background on their philosophy and history.
Marfy sewing patterns have a very low profile in the sewing blogisphere, at least among the blogs and sites I visit. My interest in them was sparked last year when someone at a sewing group asked me if I had made one and was surprised that I had not. A selection of them are sold on the Vogue patterns website so I kept checking to see if there was one I might try. The actual Marfy website has their full offering, but in both cases they provide illustrations only, with no technical drawings. It took me while to choose one for a lot of reasons but I finally put in my order for model F2422. If you look at this link on that site you can see the size chart below the illustration.


Marfy F2422 pattern illustration
The next decision was the size. Their patterns come in specific individual sizes so I ordered a size 42, described as B 34.5". W 27" H 36" which is close to a Vogue pattern 12 that I always start with.
Here is my pattern as received. The outer envelope is about 6" x 9" and the pattern pieces are all folded up as shown here. It seemed so minimalist as compared to the usual Vogue pattern stuffed with tissue and instructions. Not necessarily a plus or minus, just interesting.

Marfy pattern envelope

It actually took me a while to figure out what all the pieces were, partly due to the very limited labeling and partly because there were a lot of pieces that were almost the same shape. The pieces on the right are the mirror images of the neckline pieces, labeled as facings, and then a hem facing, which kind of puzzled me and I didn't use.
Marfy all pattern pieces1
Abandoning my "I rarely make muslins" philosophy I figured it was a necessity here, particularly since I was trying a new pattern company and had no idea about their fit. I knew it would be too small in the waist and hip so in my lazy late night haze I decided to add 1 inch to the center front and center back seam. I figured that would give me the bit of extra room needed which turned out to be a bad idea.
Here is the first muslin, shown on a dress form that is adjusted to be pretty close to my measurements.
Marfy muslin version 1 front
Notable problems are the bust area is too big, there is gaping across the front and back border pieces, not enough shaping at the waist and too tight in the hips (which I anticipated) and the whole thing is a bit boxy for my taste.
I have stated before that fit is the final frontier in home sewing, the topic where I see the most angst-ridden comments or painful confessions so here we go with all the gory details of fitting this dress. And speaking of gory, I have become quite a slasher lately - not anything too grisly, just slashing away on test versions of things to release the fabric and see what adjustments are needed. So I will show you the result of my slashing here, on the dress form. Nobody needs to see this on the live model - me, eek! But even my slim hipped dressform needed a bit more space for her backside :).  By slashing I could see how much extra was needed and where. 
Marfy first muslin back view
Once I made this up I had a better feel for their shaping, ease and other features so I was able to modify the pattern, sew a second muslin, do a few adjustments on that and get the fit accomplished. I will show all those details in the next post. 
Seeing the backside on this muslin combined with the fact that Marfy is an Italian pattern company reminded me of a shopping day I had in Italy. I was buying a wool suit, the jacket fit perfectly but the pants were a touch snug. The very snooty sales girl looked me up and down and then pointing to my backside said "La problema é la" which I bet I don't even need to translate. Despite her I found a gorgeous charcoal grey suit with a great fit which I wore endlessly and always looked good. Made in Italy - the real thing, is certainly worth it if you can find something in your budget. Shoes, gloves, scarves, sweaters, lingerie, handbags - those are the items I always shop for when in Rome :) No plans to travel there soon but a girl can dream, right?  

Late September in northern California - a few swirling leaves, slight chill at night but shorts and a tee weather today. I hope it holds up so I can wear my summer dresses a few more times before a jacket is needed. Still picking plenty of Sun Sugar tomatoes and thinking of planting some lettuce for a fall crop.
Did I show you this one? I am crazy for these teddy bear sunflowers, only about 18" tall but so cute. 

Happy sewing,  Beth

Teddy bear sunflowers

Tuesday, September 17, 2013

McCalls 6513 in Girl Charlee knit makes me smile

Girl Charlee fabrics are my new obsession.  I look at their website all the time but have only ordered 2 fabrics, so far. Truth be told even though I like to make tailored jackets, use challenging fabrics and create fancy dresses I am really more of a beach dress and bikini kind of girl. Cute cotton t-shirts, denim skirts, this is my actual everyday style. I know I have mentioned before that if it were summer 12 months of the year I would be very very happy. So Girl Charlee suits me perfectly as they have lots of great knit prints in bright colors. My latest knit top is McCalls 6513, shown with the best skirt pattern ever (V1247 blogged here and here). The color is a bit washed out due to the light in this photo, the colors are more accurate in the dress form photo below.

Mc6513 knit top
This is a Palmer and Pletsch pattern, with lots of built in fitting adjustment and instruction. I was impressed with this pattern as I am with all their info (Palmer and Pletsch fitting books are invaluable). The pattern has the lines already drawn in for an FBA and some other adjustments so it really is a great way to learn how to do the FBA and then you can apply it to other garment patterns. Although now thinking about it, is it a bit odd to do a regular FBA on a princess seamed pattern? I suppose it depends on the size and individual measurements. In any case, the adjustment I did was to narrow the shoulders and also tighten up the shoulder seams by about a half inch. 
Pattern envelope and illustration:

    Mc6513 patternMc6513 top pattern illustration
The long sleeve version is very similar to New Look 6150 pattern which I made in four different versions last winter. When this winter comes I may try this McCalls version out as the New Look was strangely big for me in the shoulders. I think in a sweater knit it would work nicely.
On the dress form. Ok this fabric is a bit wacky but it a tropical print, has my two favorite colors (coral and turquoise) and was on sale...how could I resist?
Mc6513 top

One more view, my photographer said "look relaxed, don't stare at the camera". Not sure that is working.  By the way the other top I made with Girl Charlee fabric was my 4th of July top which I wear all the time. I saw that fabric in black/white ponte on their website but I can't think what to make with it. A dress but I am trying to maintain my dress moratorium. So readers indulge me, one of you order it :)
Mc6513 knit top close up
That is all for my frivolous pre-vacation sewing, I will get back to my intended posts soon (Marfy dress and denim jacket).  
Here is today's SunnyGal garden photo, a red hibiscus. A friend gave my mom this houseplant and then it went through a bad period, lost all its blooms and looked done for. I took it home and gave it some TLC, really benign neglect but plenty of water and it has revived nicely. Now I just have to find a spot where it can survive the winter chill. 
Happy sewing, Beth

red hibiscus

Saturday, September 14, 2013

Aloha and New Look 6184 dress in knit fabric

Aloha from paradise. Let's jump ahead, shall we? By that I mean posting an item out of order. My self imposed order. I almost always blog things in the sequence I sew them, thus imposing a bit of order on myself and discipline to finish things and then blog. That helps me to complete something, stay motivated to take photos and then onward to the next thing. However I have a few longer posts in the works. My denim jacket (final version) and a Marfy pattern so here is a something else entirely.

NL6184 knit dress front
The fabric is a rayon knit in a slighly tie-dye-ish pattern of turquoise and white. My favorite color combo and oh so soft. I bought 1 and 1/8 yards at Stone Mountain in Berkeley intending to make a t-shirt or some type of top but every time I looked at it I thought "easy breezy summer dress" so that is what I did. 

NL6184 knit dress back

I used New Look 6184 for the neckline and and bodice but I left out the back waist darts, added about 1 inch at the side seam waist on the front and also created a square neckline in the back (which I see could have been maybe another inch or two deeper.  For the skirt I just cut two squares that added up to about 4 inches larger than my hip measure and gathered the top of the skirt into the waist of the bodice pieces. I think I also lengthened the bodice about 1 inch front and back as I wanted it to be a tiny bit blousey at the waist, kind of Saltspring-y, if you have seen the new pattern from Sewaholic. It is funny that came out as I have two vintage patterns from the 70's I had been contemplating making this summer and never got around to them, both with that waist blousing that is so nice to wear and flattering if the proportions are right. 

Dress front close up. I really like this pleated front neckline and have been searching for just the right version for a while.  You can see the color is nice and saturated, the light in the outdoor photos washed out the color of the dress slightly. (Hard to compete with that nice tropical background :)

NL6184 knit dress close up front
Ever since I made a few Vogue designer patterns specifically made for knit fabrics that were fully lined I really like the effect and feeling a full lining creates so this one is also fully lined. Which also gave me the opportunity to have the clean finish around the neckline and armholes. No zipper, not needed. A reader asked recently about what lining I use in these knit dresses. In the dancewear section at my local Joann fabrics (where the fabrics for making costumes, skating and gymnastics wear, swimwear etc) there are some knit fabrics in neutral colors which are used for linings in those items and work very well for any knit dress. I just feel the weight and slippy-ness of the lining fabric, to me that is the key factor, if the lining will glide against the outer fabric and not be catching as you move or walk. 
I also added tiny belt loops at the side and with the remaining shreds of fabric made a narrow fabric tie belt to pull in the waist as the dress is cut rather straight and needs something to create the waist and blousing. 
Here is the pattern, I used the Version D which is the square cut neckline. 

NL6184 pattern envelope

OK time to hit the beach for a tough day of swimming and novel reading :) and a Mai Tai calling my name later.  
Happy September sewing, Beth

p.s. did anyone notice I cut my hair? heading toward long hair is just not for me! I gave it a good year but that was enough. Oh, I am so happy now! 

Tuesday, September 10, 2013

Random Threads # 4

The subtitle of this post could be "where did August go?"  For the lazy last days of summer it seemed like I have been running to keep up with my schedule. Lots of custom sewing to complete and a few teaching sessions plus personal and family commitments have wiped me out. The result is a mysterious respiratory type flu bug that knocked me out for a few days. I haven't been sick like this in a few years so I hope this is my quotient for the forseeable future. But today I am on the mend and feeling ready for vacation.  I have quite a few things completed and ready to blog but they all deserve a post or two and the photos are still on my camera card.

In the meanwhile I have seen some great discussions started on other blogs. Bunny of La Sewista introduced a really interesting topic in her post "Do you Tape?" She mentioned some of the pros and cons of downloading, printing and taping patterns from various sources and a very good discussion followed in the comments. My thoughts on the print and tape together pattern are a lot like hers, in that I would only do it for something very simple since I have the option to buy the big 4 patterns on sale. A few commenters mentioned that for markets other than N. America the PDF print is a good value and I can certainly see that as compared to the $ 30 list price of some Vogue patterns.  I have printed and taped a few times and unless it was something unique I find it a really big pain to do. However - I did have a huge success with a Lekala pattern last year so in that case it was a positive (Lekala is a Russian pattern company where you provide your specific measurements and purchase a custom sized pattern).

Today I saw this post  on Debbies's Stitches and Seams blog which also caught my interest. She asked some questions which were originally posed on a Pattern Review message board so here are my responses.

1. Do you cut with your fabric Right side out or Wrong side out? 90% of the time I cut with the wrong side out - to protect the right side of the fabric (especially important on white or light colors) also I like to mark wrong sides with chalk, and often chalk alterations on the wrong side. Only exception is pattern placement but I can usually see that when the fabric is wrong side out.

2. How do you do your pattern markings? I do 1/4" snips for all the notches, I do thread tailors tacks for all the dots and other markings, and if I change the seam allowances to 1" then I mark the notches right on the seam line with chalk, which is easily done as the wrong side is out :).

3. Do you follow the cutting layout in patterns? No, but I do recommend that beginners do this for a few years. It is easy to cut something out on the wrong grain, or miss cutting out something double. After a while sewing you get the feel for the various pattern pieces but I made a lot of goofy mistakes when I started, as everyone does. I generally cut everything out in the same direction, perhaps this is a bit fussy but I find it is a good habit to develop.

4. Are you obsessed with re-folding your pattern tissue on or very close to the original fold lines?
Oh heck no.  I pull out the pattern pieces I am going to use, press them with a dry iron. Cut away the extra blank tissue and discard. Often trace the size I want with my fit alterations. I store the patterns plus tracings in manila file folders with the pattern company/number/and brief notation of the first garment I made from the pattern which is handy for future reference. So as an example I have file folder labeled "NL6457 Blue denim topstitch". Some of the labels are way more cryptic - such as "NL6864 Bl/Wh Multi-fav". As for folding I try to fold them in the biggest possible way that they will fit into the file folders which are around 9"x12"? so they will be more flat. I store them in a lateral file cabinet but the actual color pattern envelopes are stored separately as I like to be able to quickly scan through all the pattern photos for ideas and inspiration.

5. Do you make all the markings? See # 2 above. YES, I make all the markings. I do make quite a few very complicated garments and love to do tailored things so the markings are a necessity. My feeling on marking is like the phrase a stitch in time saves nine, although that probably applies more to preventative maintenance than preparation. I find that doing all the markings in the prep phase lets me sew faster and have everything go together smoothly. Once I remove the paper pattern piece it goes in the file because all the markings are on the cut-out fabric piece. But I don't remove the paper pattern piece until that part is sewed. If it needs to be interfaced, I do the iron-on, then pin the paper piece back on the fabric pieces and set aside until time to sew with it.

That's enough about pattern pieces for a while, huh?  As for actual sewing here is a custom dress I recently made. When the request came to me to make this flower girl dress for a nautical theme wedding I thought perhaps people spend too much time on Pinterest. As it turns out the family has a mariner heritage and it sounds like it will be very lovely. They gave me an illustration and the fabric so I designed this after a few tests on my little size 6 neighbor (to see if it would go over her head) since I didn't want a back zipper to interrupt the sailor collar. It has a hidden side seam zipper instead. The fabric is an ivory color satin with navy blue grosgrain ribbon and a bit of tulle on the underskirt.

  Sailor dress frontSailor dress back

Up next, my black denim jacket, final version, and my first foray into Marfy patterns. Oh, I have a lot to say about that!

Even the roses are looking a bit limp and bedraggled this time of year in my garden. This one drives me crazy as the color is great but the blooms are not ideal for the climate and wilt quickly. That little spot of garden real estate may be destined for something else come January but until then, enjoy.
Happy sewing, Beth


Rose, red, view 2