Tuesday, December 31, 2013

Burda Jacket 08/2013 #106 Finished

Another Burda completed, now I have made two! This jacket made it under the wire as completed in 2013 with a day to spare. Based on the comments left for the previous post a lot of Burda subscribers noticed this jacket pattern and possibly were waiting to see it sewn up. I am giving this pattern a big thumbs up with a few cautions. Did I mention it is short?  Or maybe it is me, I am lengthening everything lately, jacket-wise.

Burda Jacket front
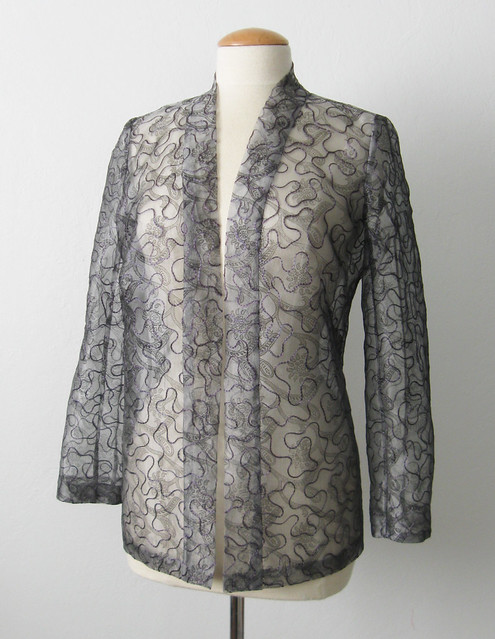
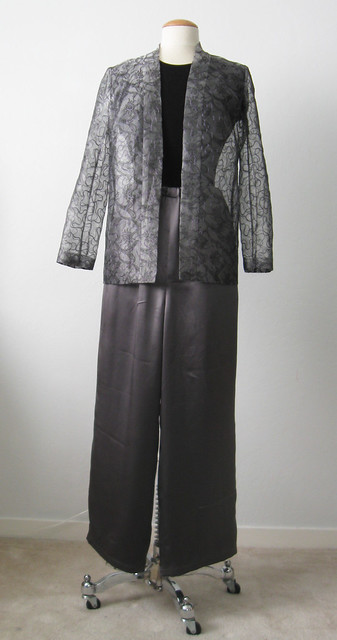
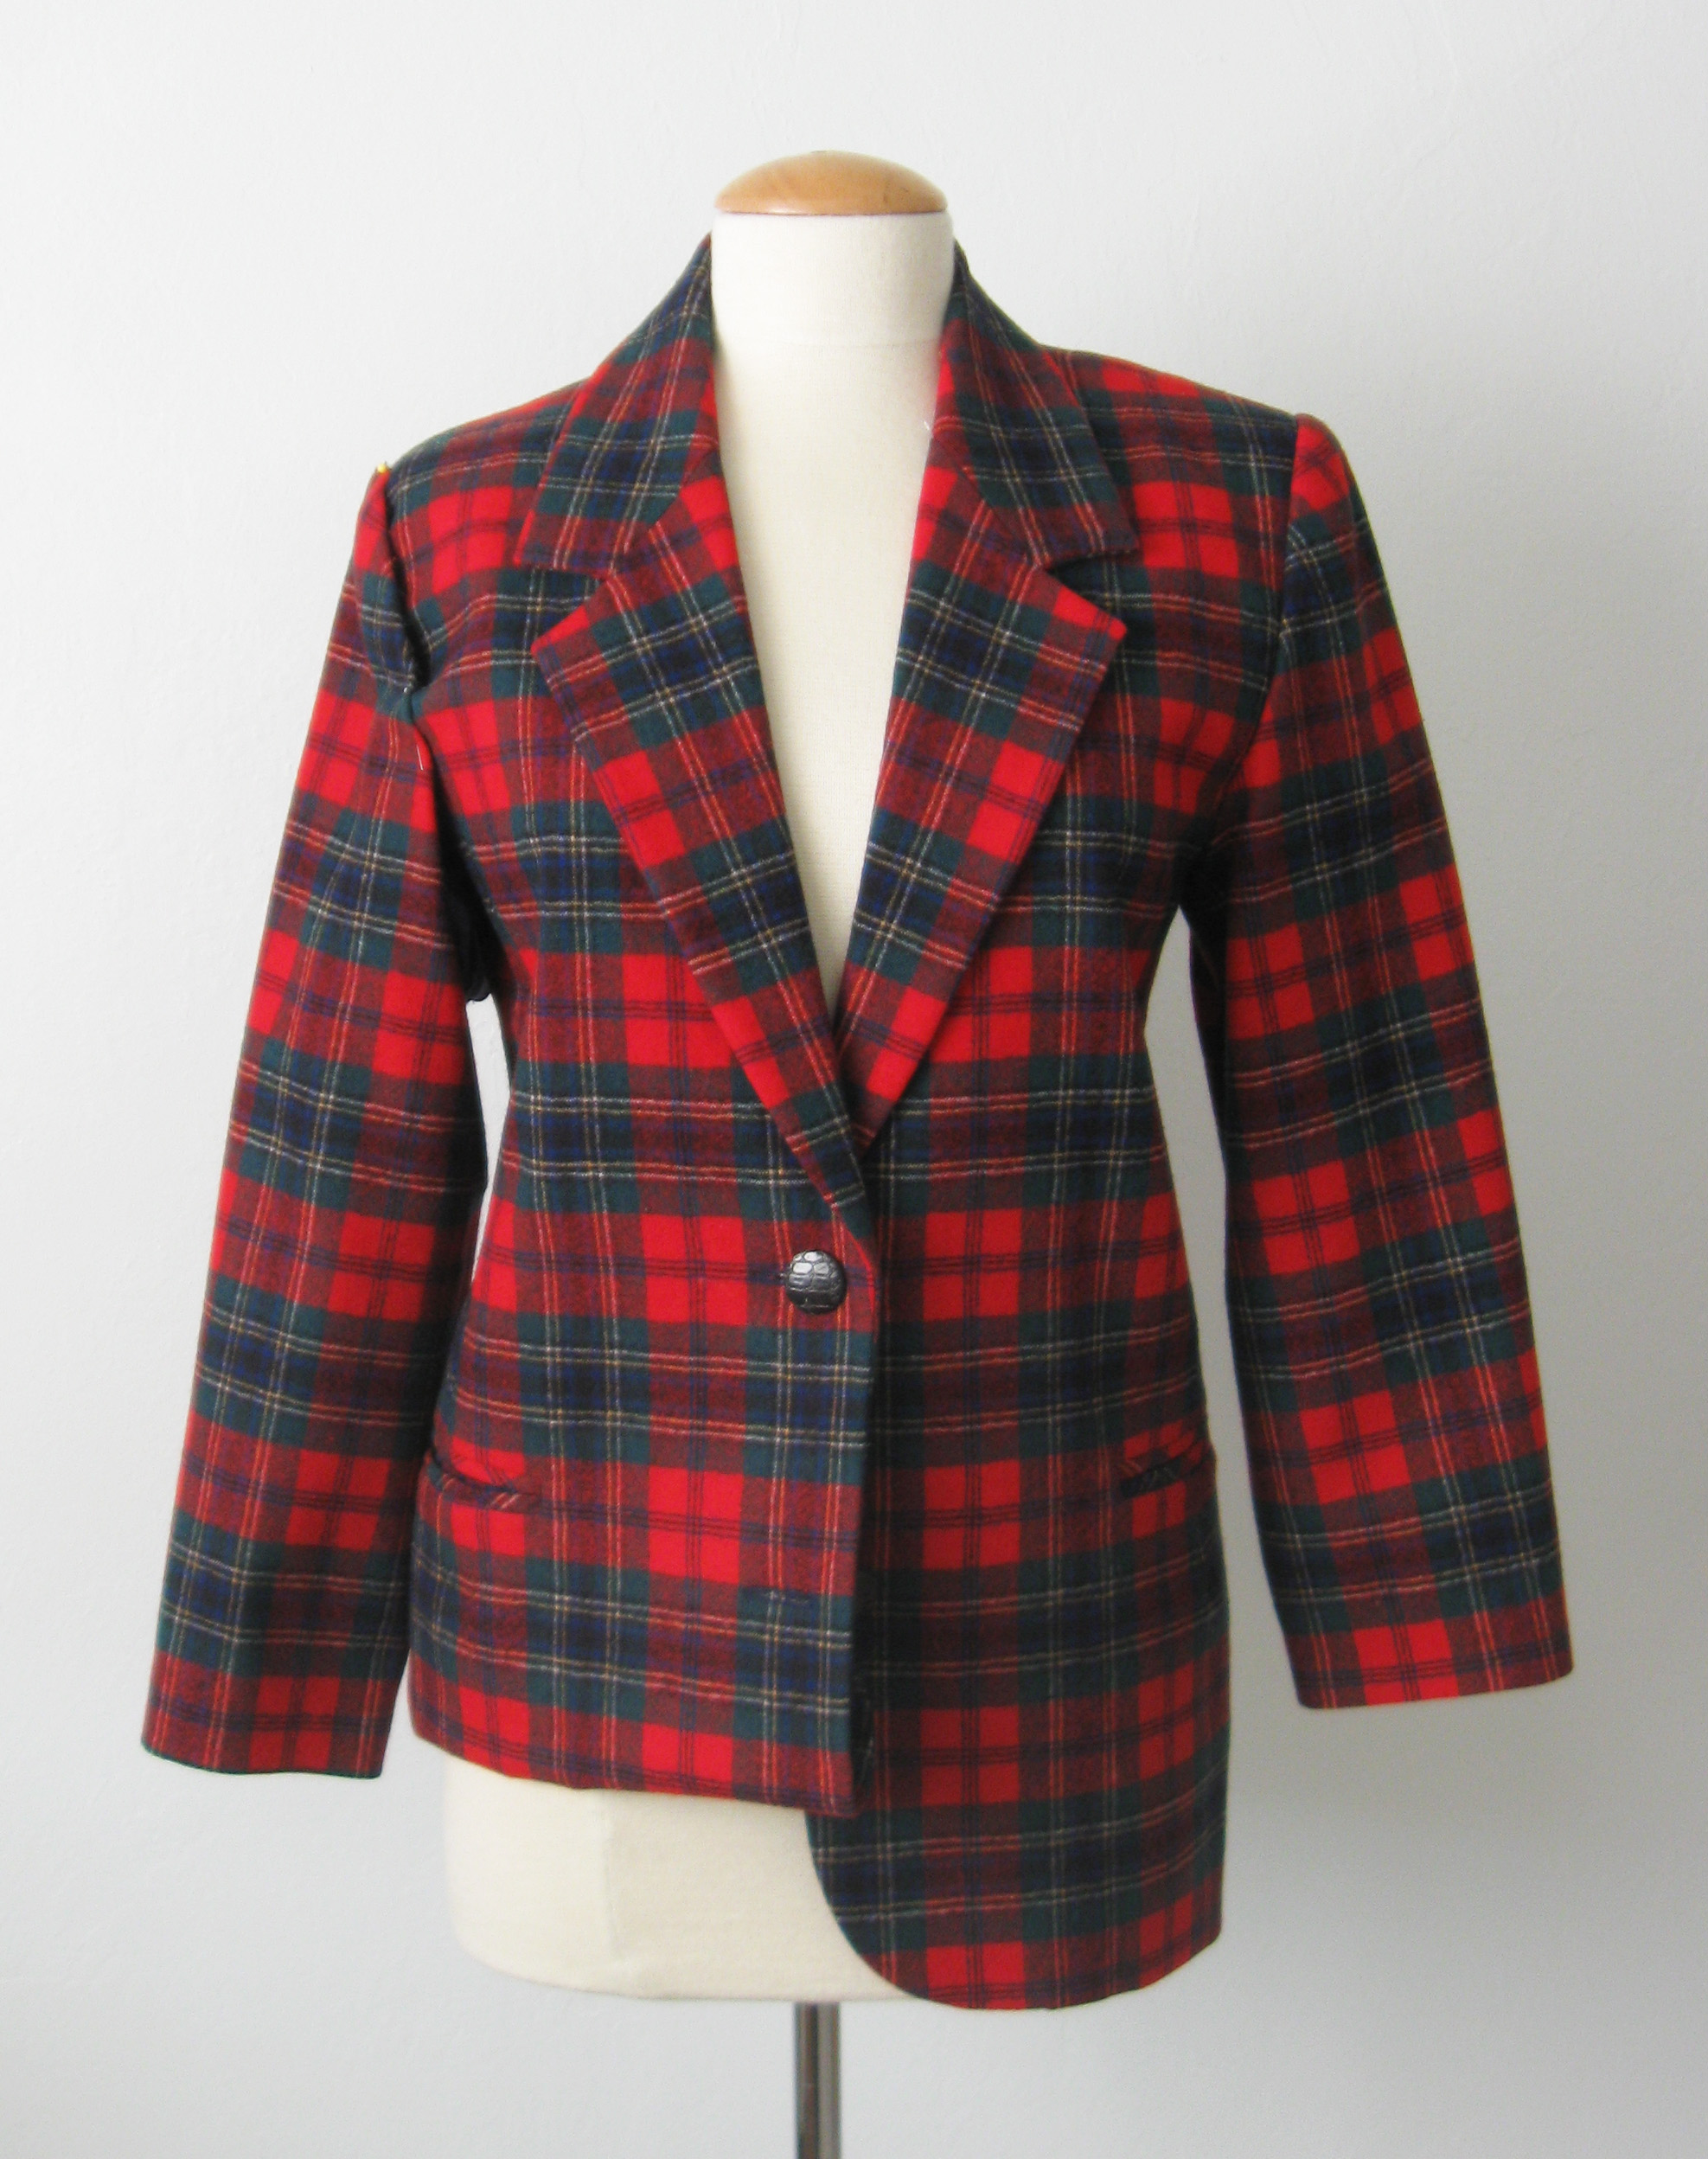
Not a very exciting project for a New Year's eve post, not a sparkle to be seen. Truth be told this jacket is a bit dull to me, and once completed I really struggled to see what I can wear under it. I must have  color !  I think a new silk top is needed and I have some fabric website gift certificates burning a hole in my virtual pocket.  Raspberry silk, don't you think?

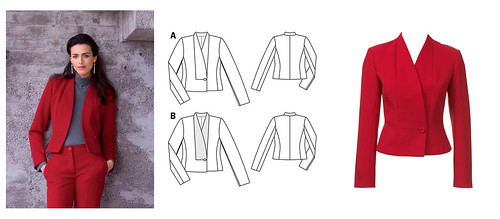
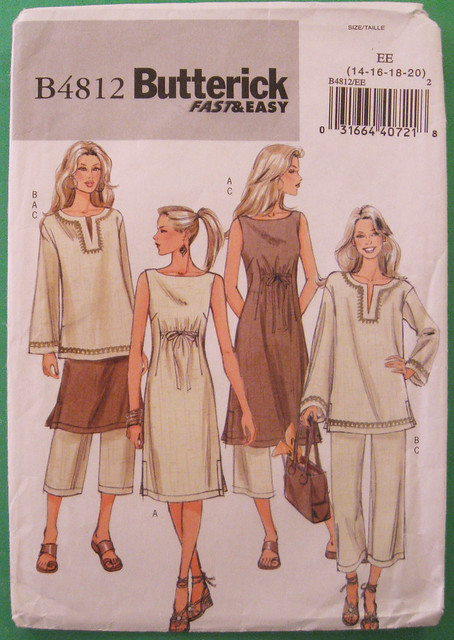
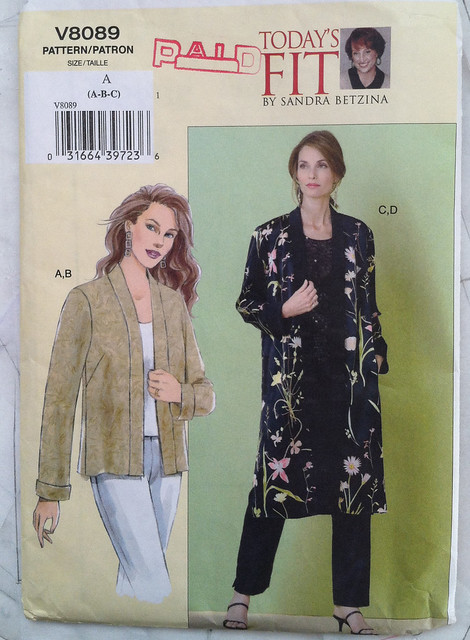
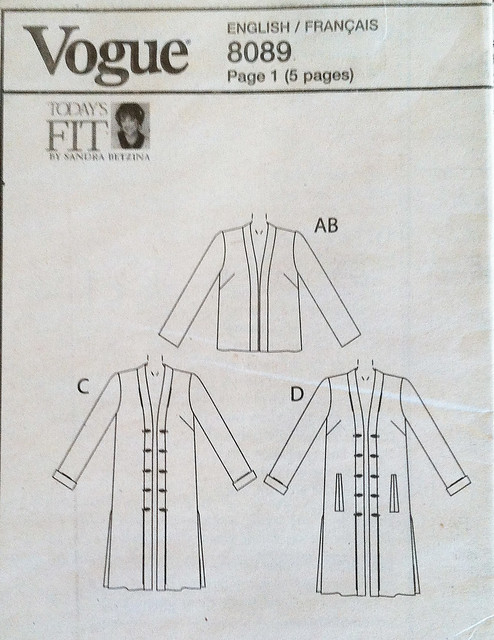
Edit: 1/5/14  This pattern is the one used for the jacket on the latest issue of Threads magazine, in a bright blue with some textural embellishments. 

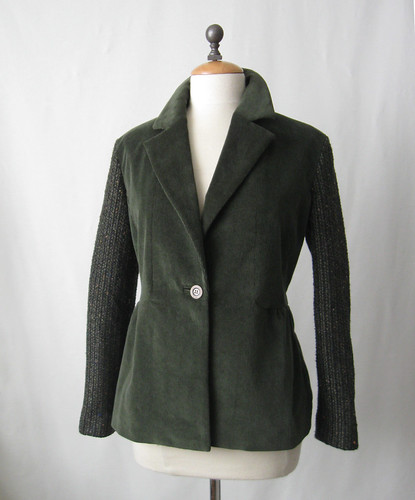
Onward with the details.  Lots of details. You asked for them so here we go.  
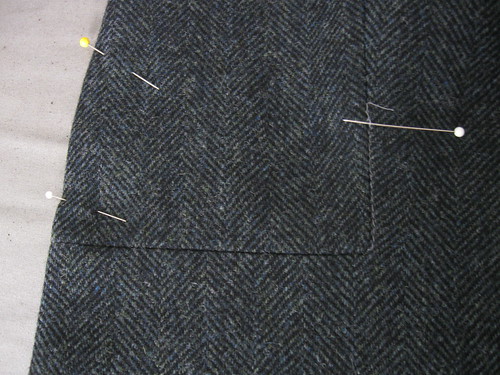
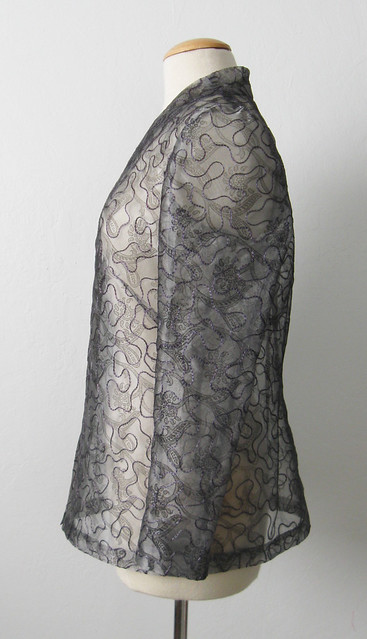
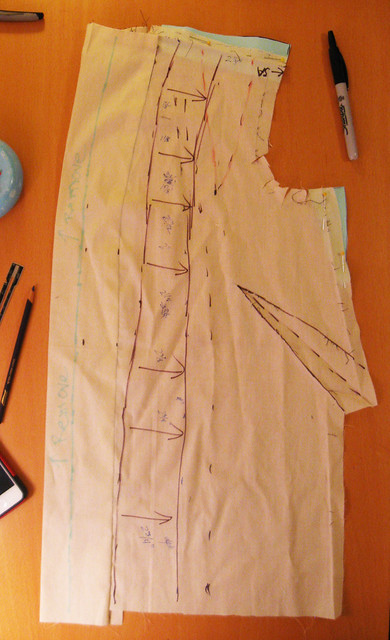
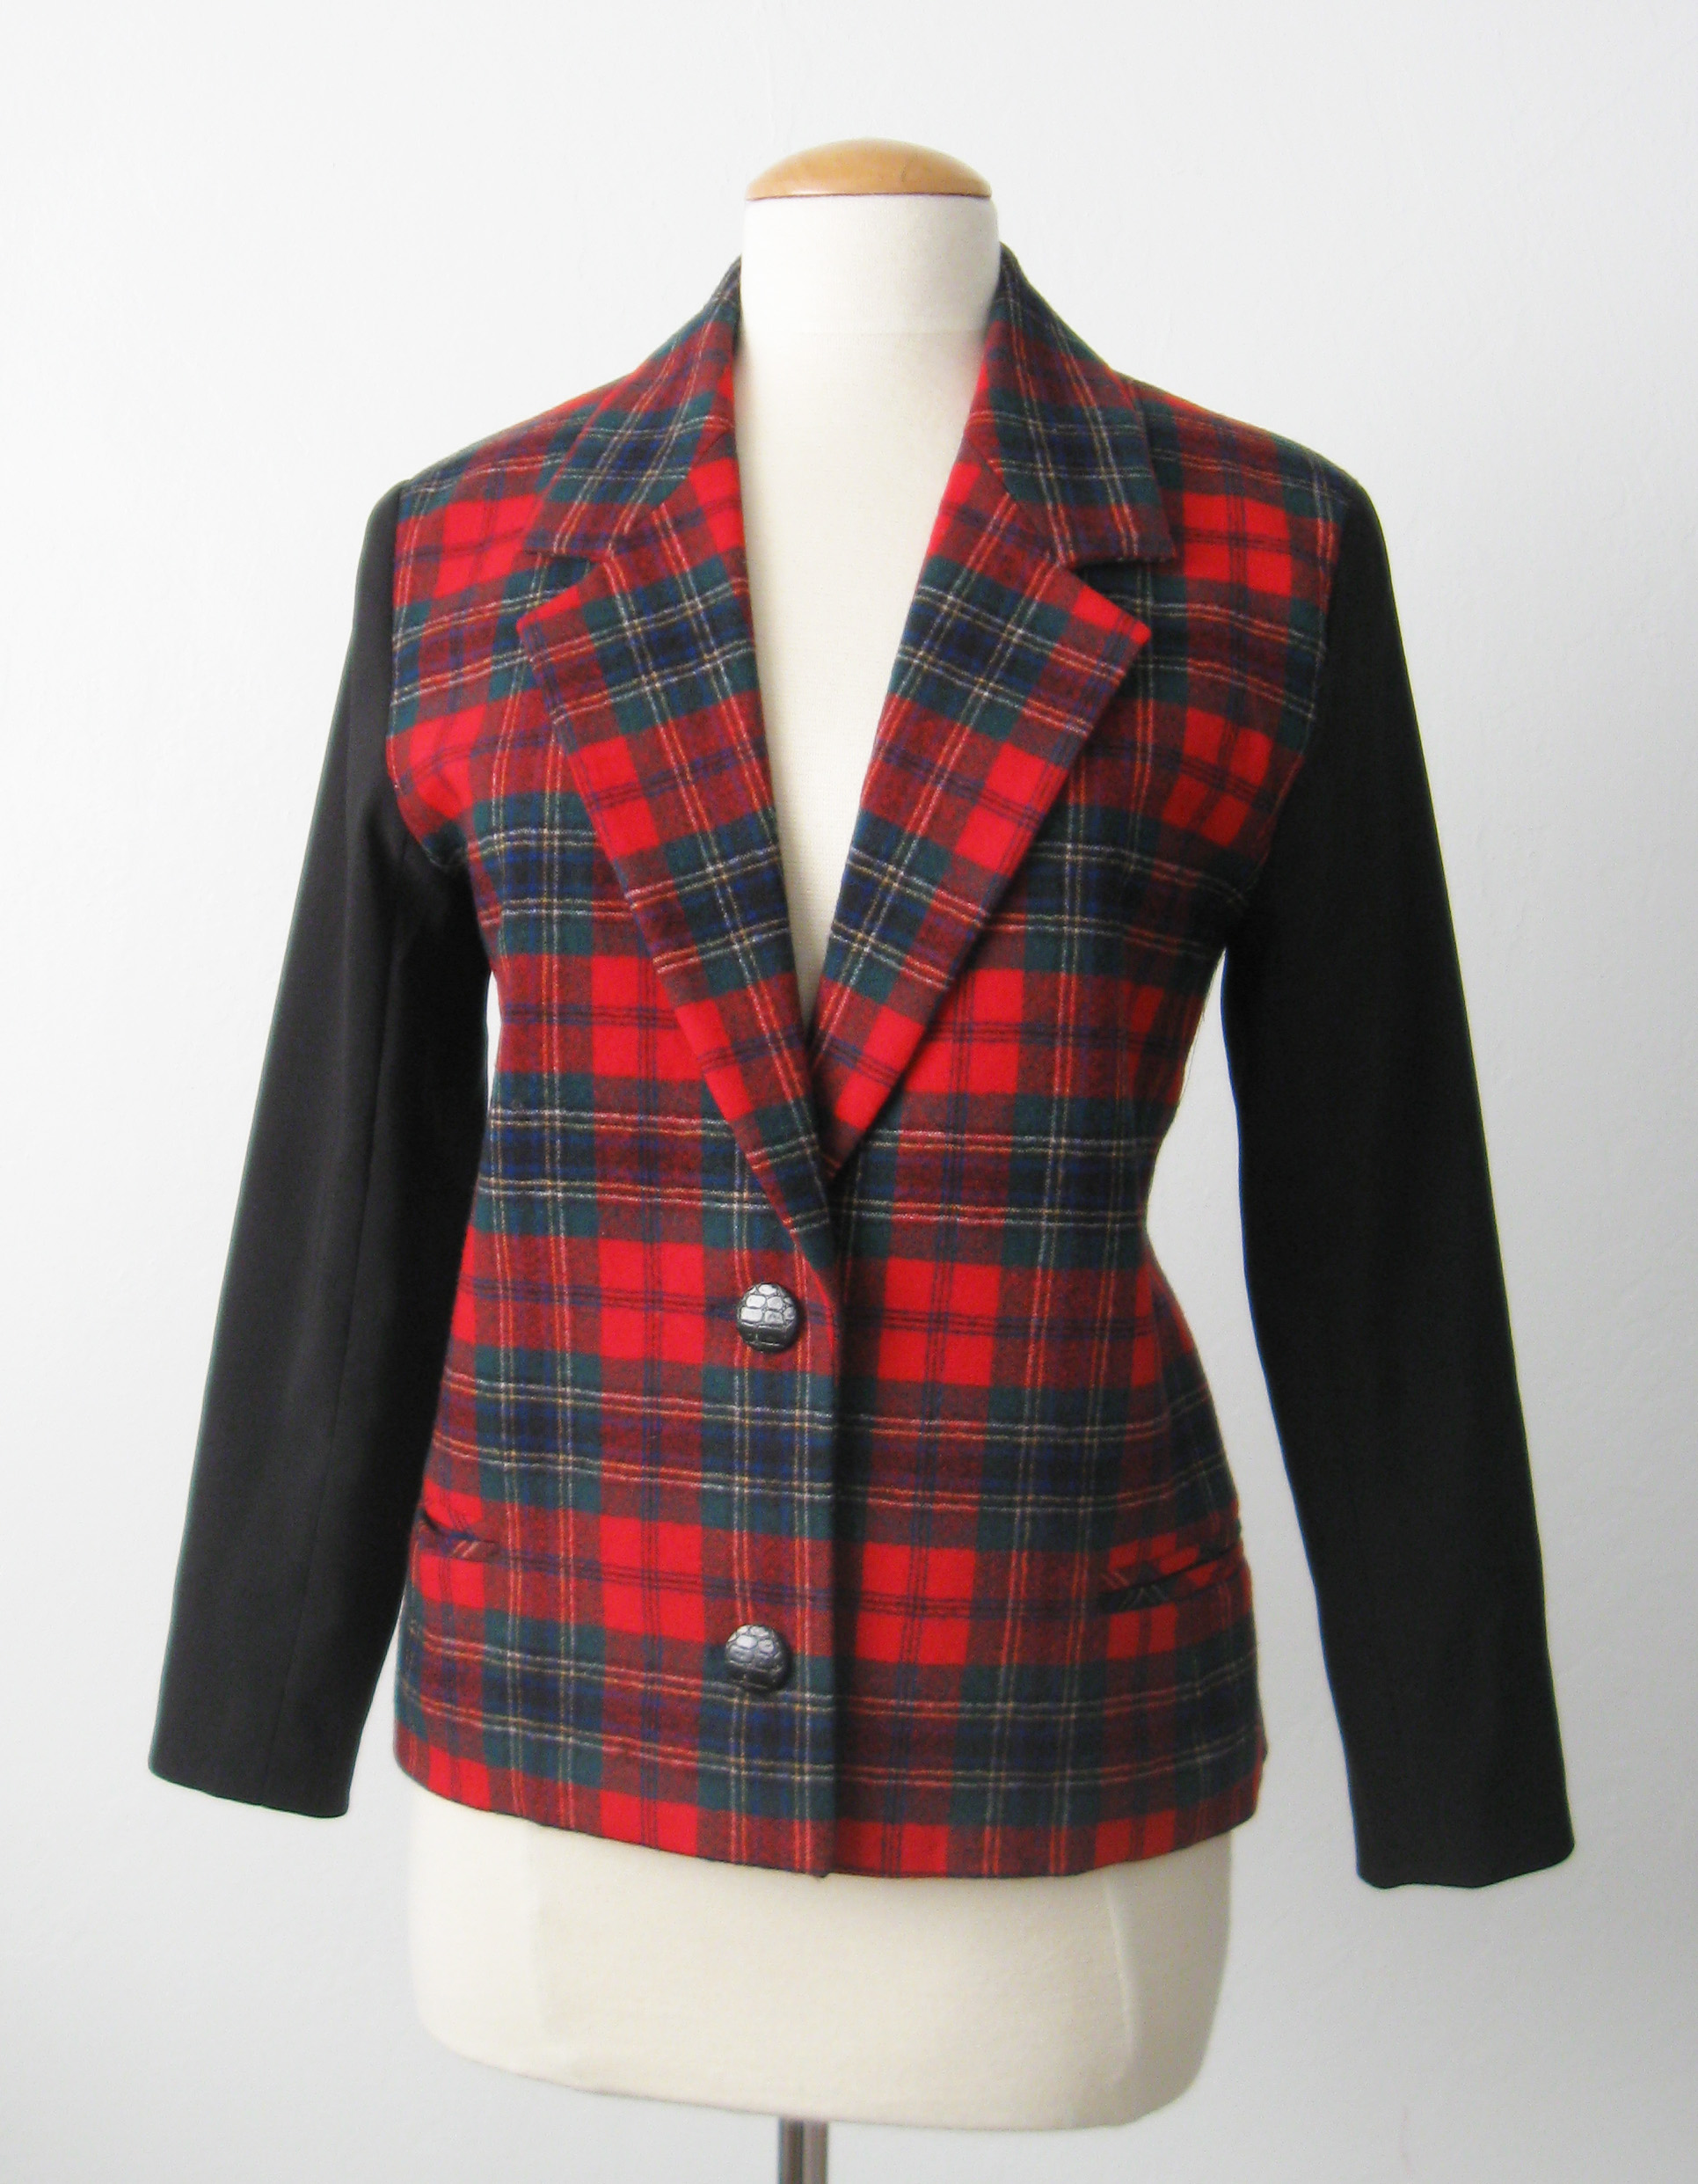
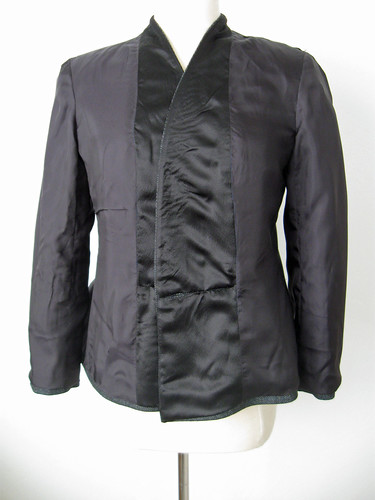
I am totally enamored with this closure - designs that use seaming to create buttonholes always attract me. The pattern shows just one button but that seemed lopsided so I added a second one. 

Burda jacket buttons
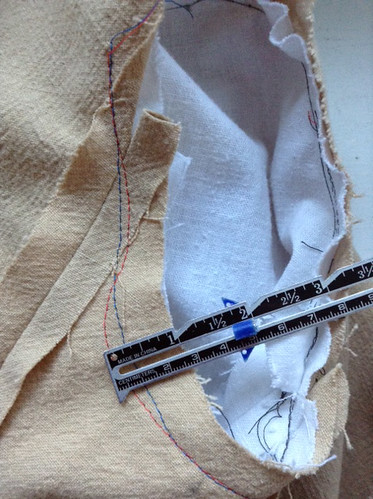
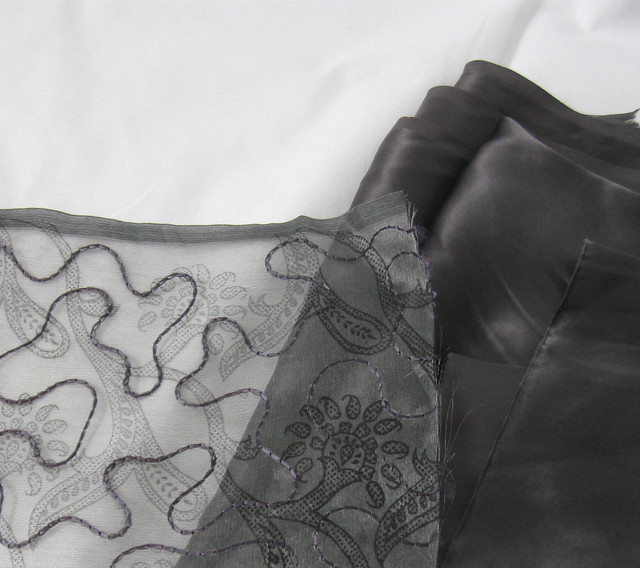
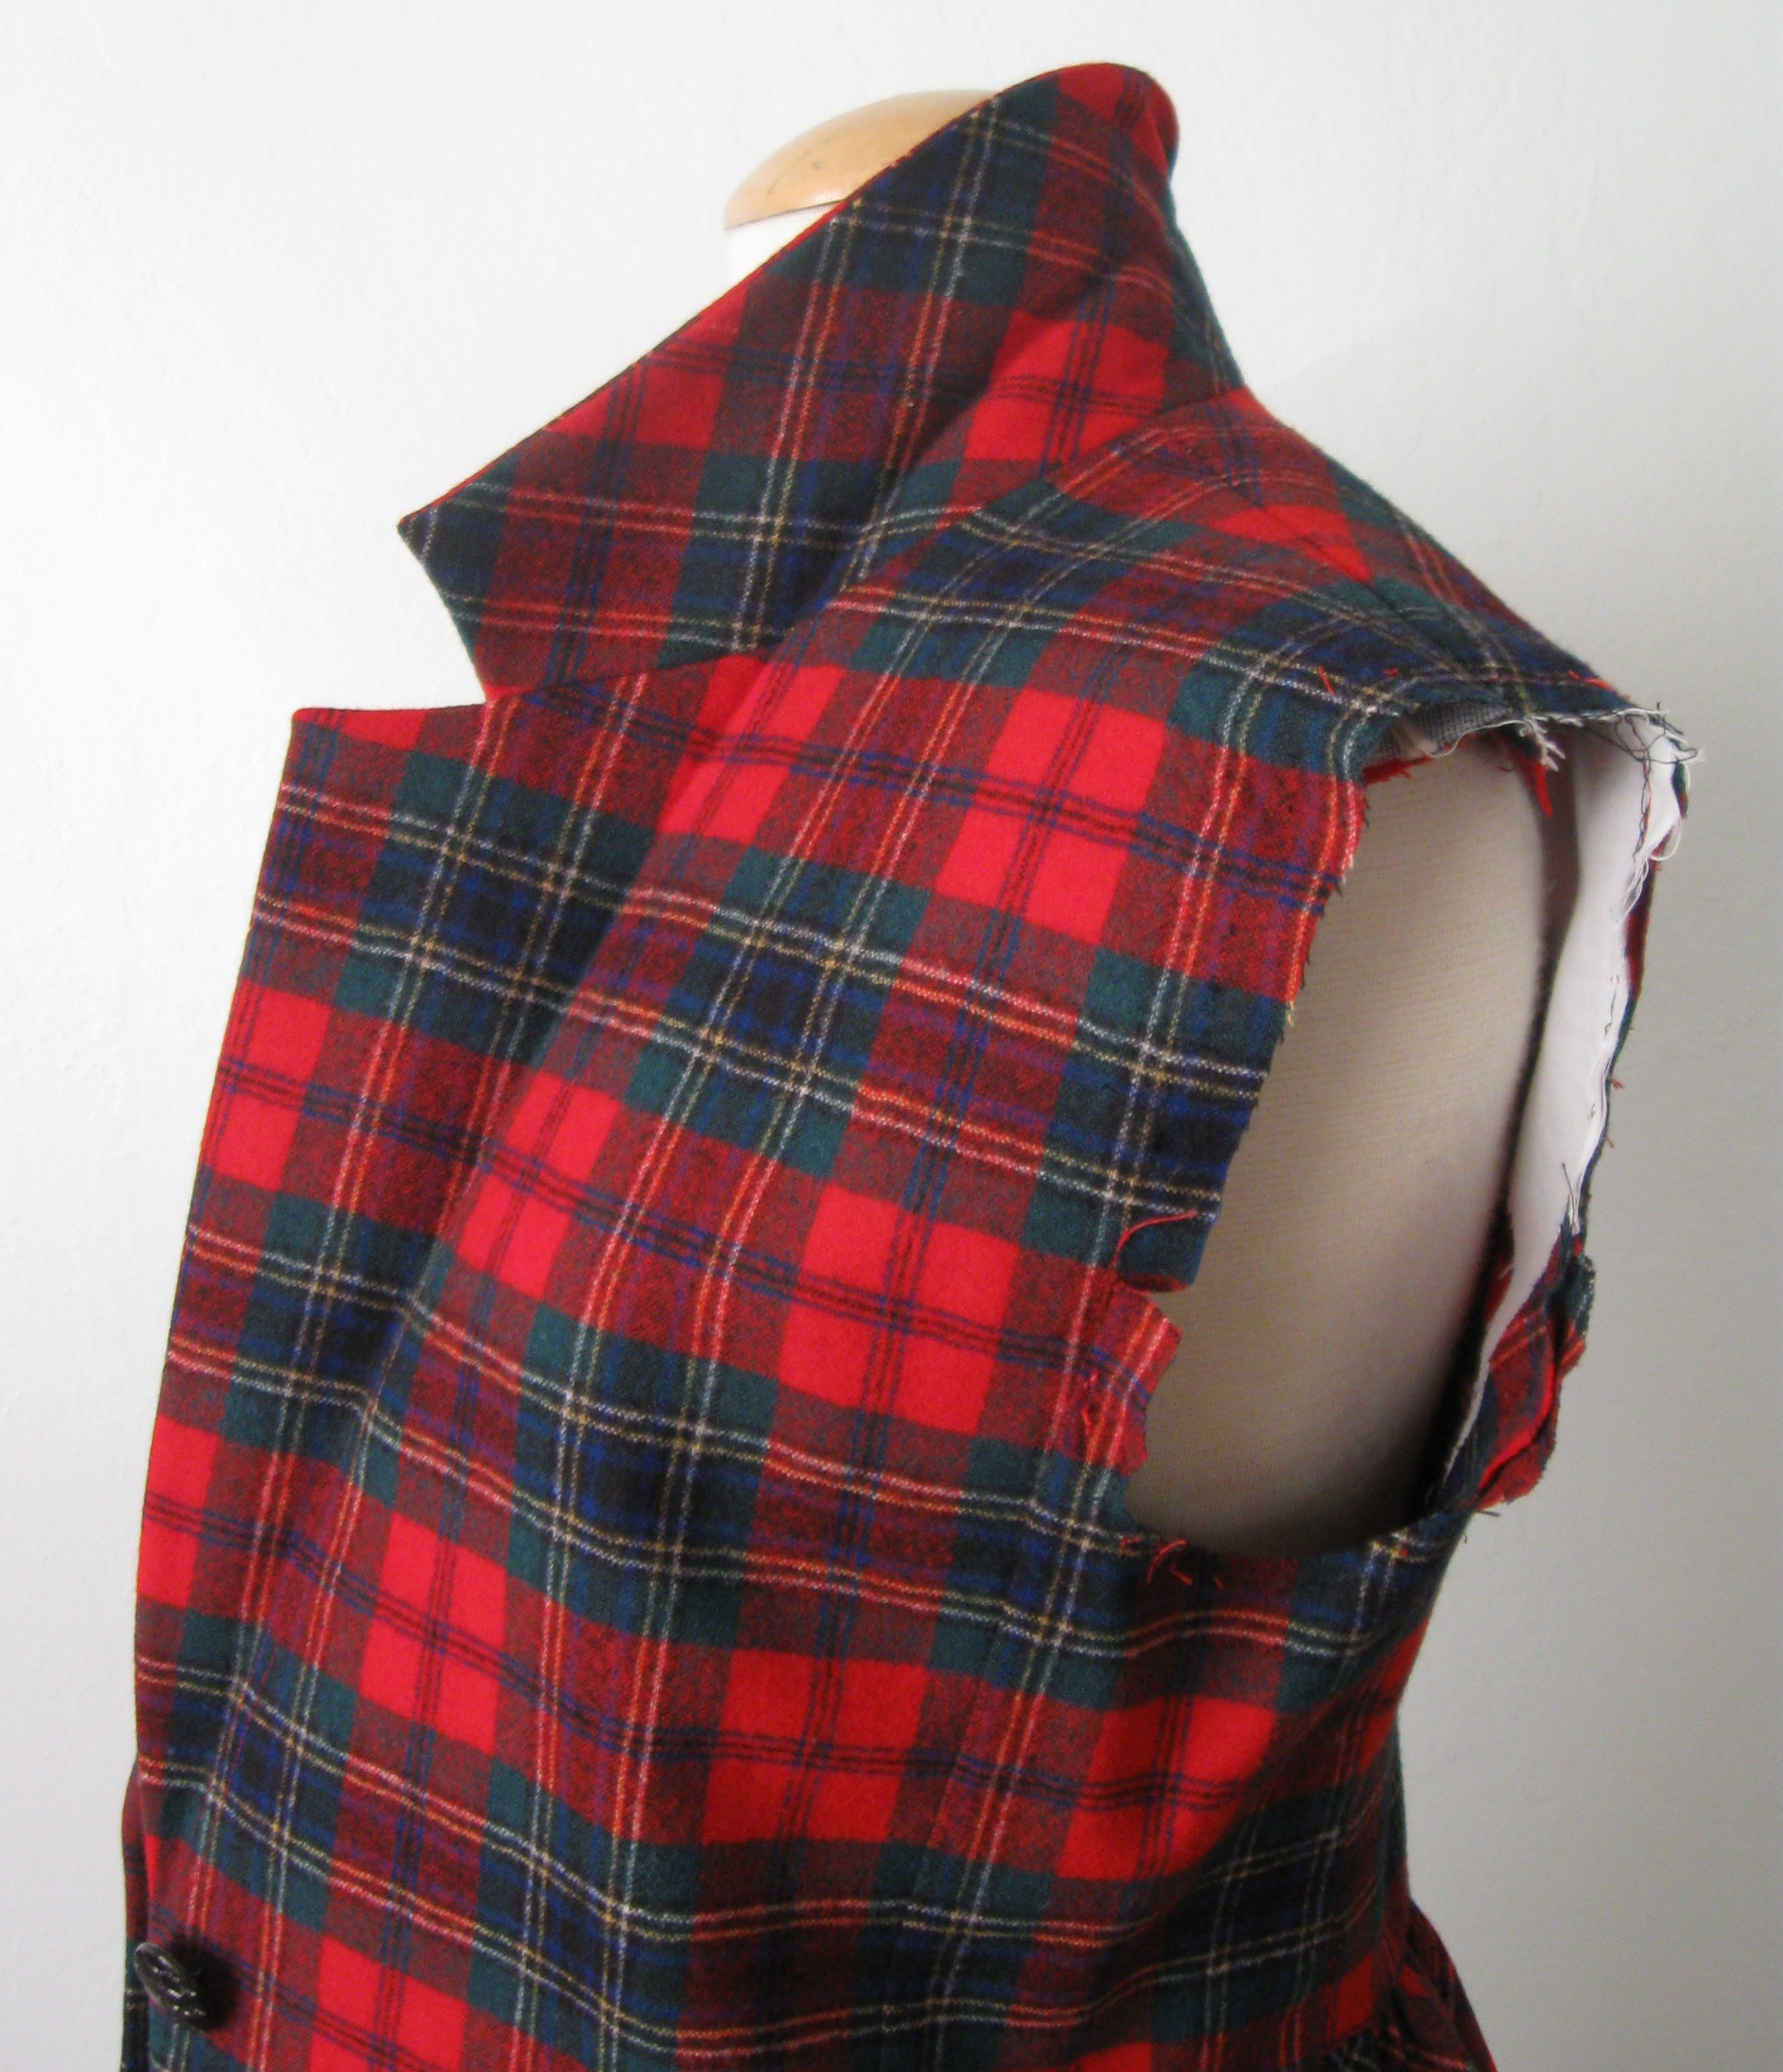
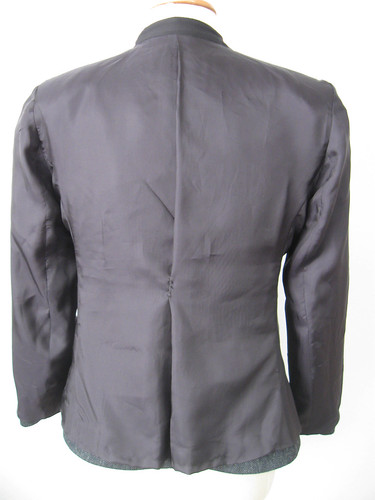
The inside. I used my remaining scrap of black silk charmeuse for  the front facing pieces which ordinarily would cut from the wool fabric. While part of the reason was not enough wool remaining the main motivation was to cut down the itch factor. Can you imagine how itchy that wool tweed would be around the neckline? Soooo much better with the silk charmeuse. The pattern provides a facing piece that runs the length of the front but I changed that into two pieces as I thought it would work better for those in-seam buttonholes. The rest of the lining is Ambience rayon.

Burda jacket lining
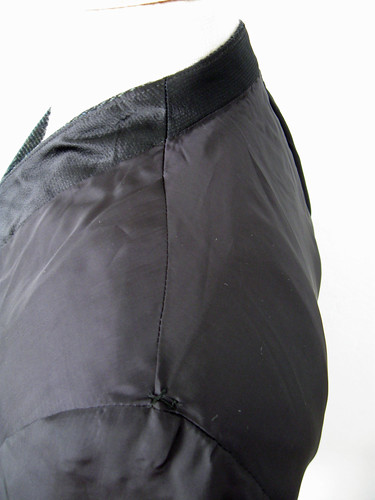
Here is a little thing that I do for lined jackets. Maybe not easy to see here, at the outer top of the shoulder seam I do a little hand stitched X to secure the lining to whatever is underneath, seam allowances or shoulder pad.  Not too tight, just a loose tack but it really helps the sleeve lining stay where it should and not want to pull when you remove your arm. 

Lining shoulder

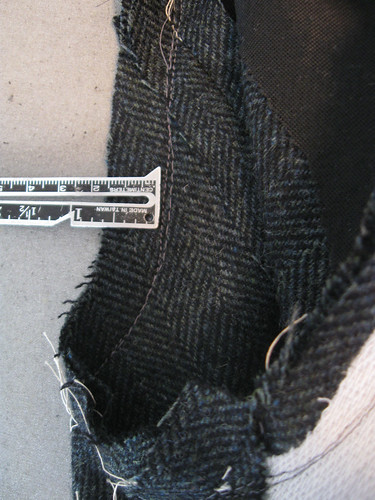
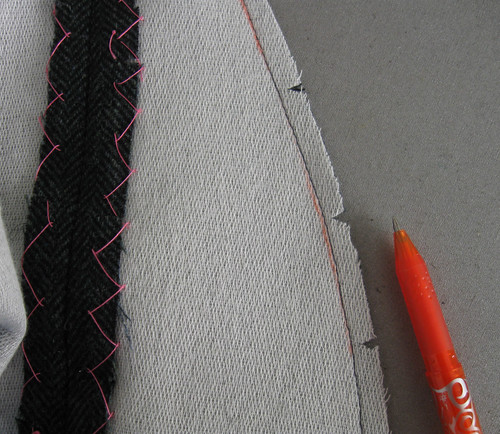
I made the full lining and then sewed it in by machine - a nice change from my usual hand sewn in lining. Once I had that long front seam done I double check it to make sure the line is very smooth and even on the 5/8" line. I saw a few bobbles here and so I use a Frixon pen to draw where I want to go over the stitching to fix any wiggles. It might seem excessive but if you have a little wiggle in a long seam it can show and cause a bump or dent. Easy to fix and I love to use these pens so I look for opportunities. (Childhood fixation with colored pens continuing into adulthood...who doesn't love an array of colored pens?)
front stitching adjust   understitching
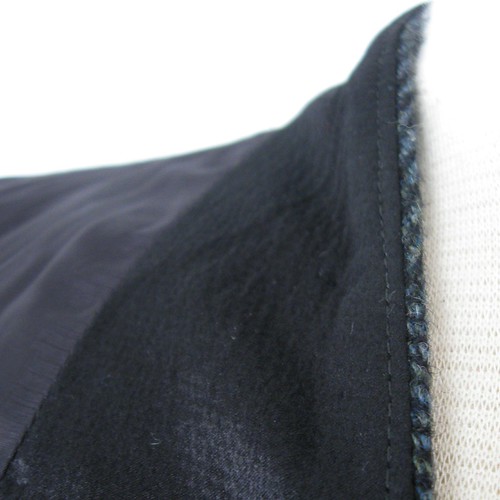
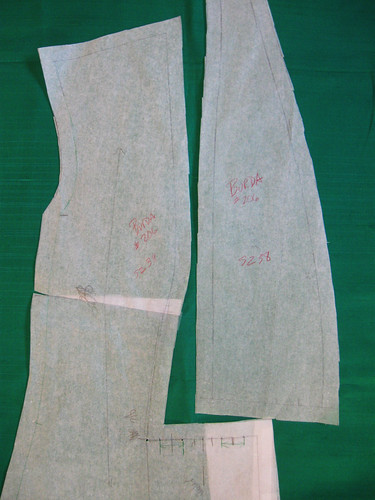
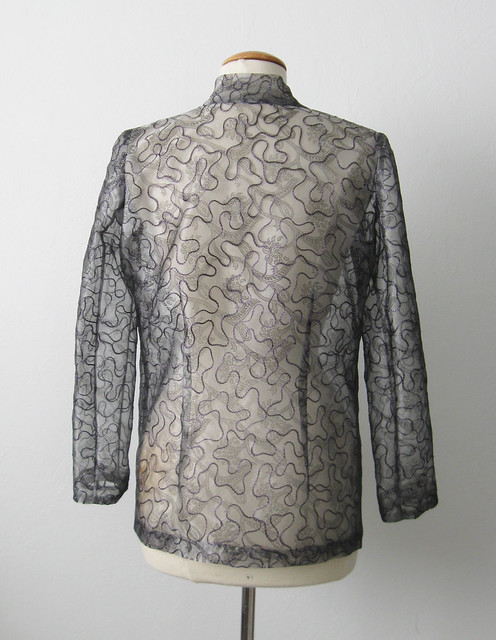
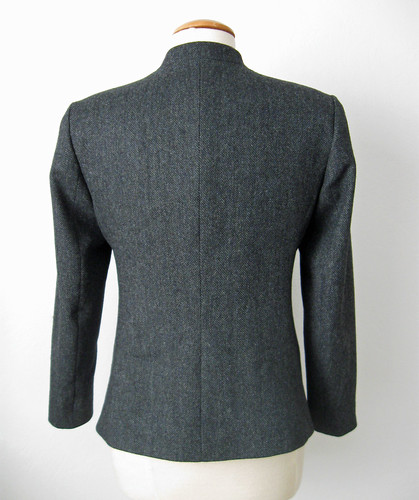
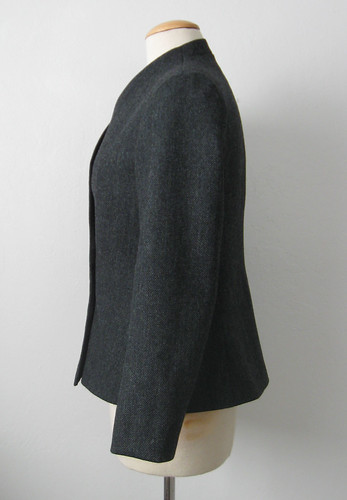
For the center back lining I cut on the fold and added a 3 inch pleat which adds a lot of comfort to any jacket. There is a center back shaped seam in the jacket which you can see in the side view. I am not happy with the look of the sleeves on the dress form as viewed from the back. Perhaps I should have tilted them forward just a bit at the top to make them hang differently but as it looks OK from the side what is really impotant is how it looks when worn.
                      back liningBurda jacket backBurda jacket side
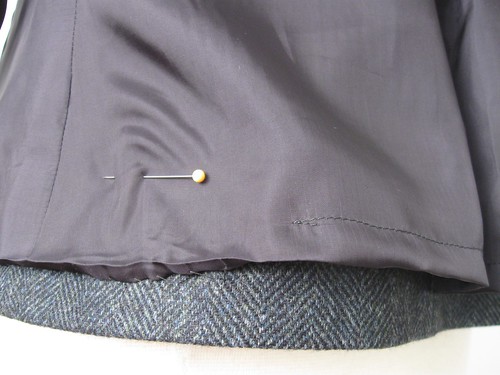
Last detail is the hem, I always use a good 3 inches of fusible interfacing at the fold of the hem and then  hand stitch to that. With a jacket edge that flares out a bit the hem edge is wider so I steam and kind of shrink it to fit. I think I also did some sewing to take out width - that would made a good blog post - note to self for future:)

hem pleathem details
Lastly I pressed the lining and then pulled it up a bit to sew away from the edge, leaving that little bit of ease at the lining for movement. It drives me crazy when I see a jacket with the lining pulling at the inside. If anything - make the lining a bit bigger than the jacket and that won't be an issue.

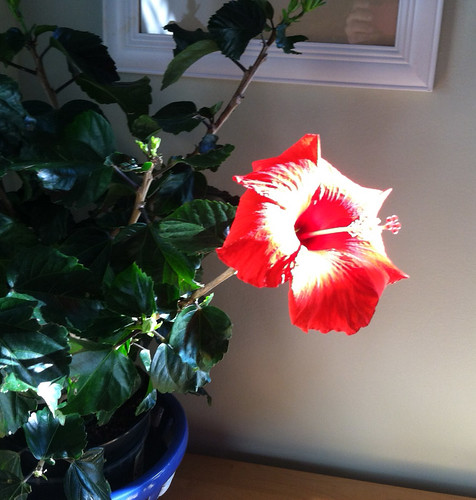
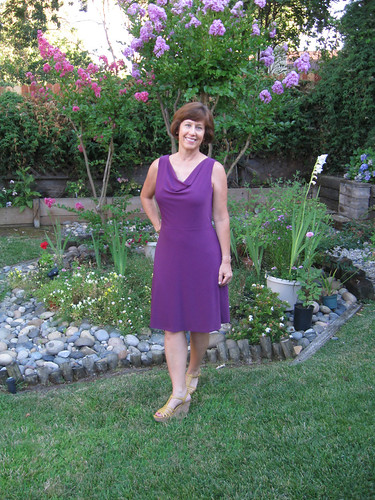
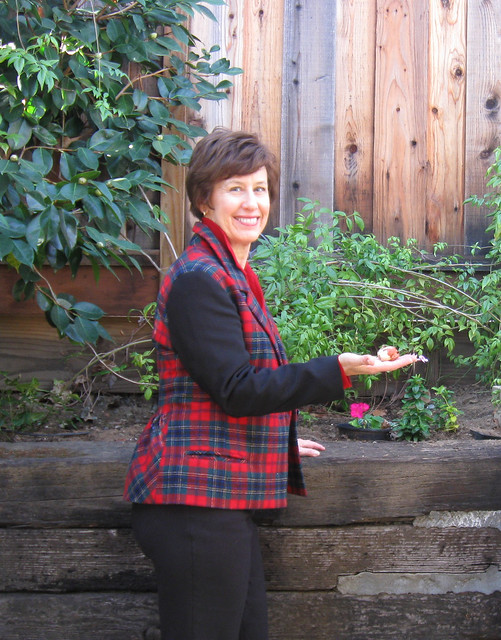
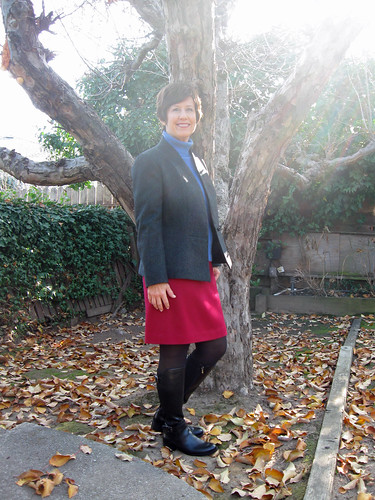
A pop of color in front of my sad looking yard. The apple tree is bare but the bees are still there and if the temperature warms above around 55 degrees F then I see them buzzing out in search of the few flowers that are blooming.
.
tweed jacket outside 3

A big thank you to everyone who reads this blog and welcome to so many new readers. Which I attribute to some very nice words from Carolyn who writes Diary of a Sewing Fanatic. I look forward to more of her creativity, spirit and very warm authentic voice on her blog next year. 

Now to steal a quote from another wonderful Carolyn, who writes Handmade by Carolyn. This morning I read "We who sew tend to do so on our own, so the big ol' fantabulous internets has been pretty good for our socialising, yes? ;)"  I could not agree more. Socializing, trading patterns, advice, making new friends and generally getting out of the sewing room to meet more people who are as crazy about sewing as I am has been the very best part of this blog. 

Happy New Year and I hope to meet more of you in 2014!   

Beth

Sunday, December 29, 2013

Burda Jacket 08/2013 # 106 in wool tweed

There is just enough time remaining in 2013 to finish sewing one last item and post about it. Changing from my usual habits I actually bought a downloadable pattern from the BurdaStyle website. I did ask a friend if she had this issue of the magazine, and was thinking about tracing it but luckily she didn't! So once again I escape the tedium of tracing from those confusing pattern sheets. 
Long Sleeve Blazer 08/2013 # 106.  I made this composite image from their website photos so we can look at the jacket drawing, on the form and as worn. The first thing that jumps out at me is the jacket on the model is too small, or at least the fit is really odd. Skipping ahead I can say that the fit is beautiful so they really should have done better. I think it looks way too short on her, and maybe not even able to button. But the shape of the jacket on the dress form looks great, and I really like the raised neckline effect.

Burda jacket collage

The subtitle of this blog post should be something like "A series of unfortunate events". OK, maybe that is a bit overdramatic but I figured after all the lovely comments recently on my skill and expertise it would be helpful to show my mistakes as well. Nothing tragic on this project, just a few times when I wanted to kick myself.
For starters I decided to make a muslin since I am still so new with Burda patterns having only made one before, the coat from the BurdaStyle Book. For that I used size 40 so I made a muslin with that size  and it was huge! But also way too short for my taste. That I could anticipate by looking at their photos plus just eyeing the pattern pieces but the size 40 was really big in the shoulders so I made a new one in size 38 and it seemed perfect. I did lengthen it by 3 inches plus a 2 inch hem allowance and added a bit of width at each of the princess seams at the hip which I figured I could taper out when I stitched the seams (and for the record I ended up adding about 2" total circumference at the hip, partly because I need the inches on their size 38 and partly because of the lengthening).
When I finished the muslin the long curved seam edge seemed a bit gappy across the chest so I pinched out the excess and transfered that to my pattern piece.
OR DID I?
Spot the error?

Burda pattern adjustBurda 206 muslin front

eeeek! talk about annoying. And I didn't even realize it until after the jacket front was all sewn together. Thus the magic of wool! You can ease just about anything. When I was assembling the front pieces I thought "oh these are not drafted quite right and good thing I am working with this nice soft tweed." Then a day or so later I was sitting at the sewing machine and happened to look right at the muslin on the dress form. Suddenly it hit me that I had adjusted the wrong pattern piece. The triangular wedge should be on the other pattern piece. I blame late night sewing combined with watching some Sherlock previews on my Ipad mini. (you can find them on the pbs.org website if you are a Sherlock fan as well).
Despite this little bobble the jacket sewed together beautifully and the front edge is not too long as it was on the muslin. Maybe the muslin was a very loose weave and that edge stretched out despite the staystitching. For the jacket front pieces I did carefully mark and then apply Pro-Weft Supreme Medium Fusible interfacing to keep the edges in shape.

Now some technique talk. On my recent post when I asked what topics I should write about, fitting was by far the number one but technique was a close second. These two items actually intertwine here:


Sewing Accuracy


Precision, correctness, exactitude - whatever you call it sewing accuracy can make a big difference in fit. Next time I make a shirt I will show this on a lighter color fabric but here is a very quick example on a muslin sleeve. Suppose you have spent lots of time on a pattern, created adjustments and added an inch here, took away an inch there, sewed up your muslin and felt ok about it. Then you sewed the garment and it was not fitting as you wished. If the stitching together of two pieces does not follow the correct seam allowance you have just nullified some of your pattern size adjustments. In this photo the blue stitching is on the 5/8" seam allowance line and the red is the wobbly one that would need to be fixed. Granted this is quite an exaggeration of the wobbling stitch but I often find that when making the turn of the sleeve seam at the underarm it is easy to go wide and make the seam allowance at least 3/4".

seam allowance example
If left as it is, and it was sewed similarly on the other sleeve,  then in this example the width across the back has been reduced by 1/4" x 2 plus the sleeve circumference reduced by 1/4" x 2 so there is a total of 1 inch less for movement at the bicep/back. May seem like nothing but to me it would be the noticeable difference between nice fit and uncomfortable in a close fitting jacket. Suppose there was another bobble in the front, with maybe another 1/4 to 1/2" gone across the chest. A pattern with hard-fought adjustments now doesn't fit because of the wiggly sewing. 
Here is my example on this wool tweed jacket. I sew in the sleeves using long basting stitches and then measure around it with a seam guage to check the accuracy. Then I go back and restitch, sometimes even using a chalk pen to mark the correct 5/8" seam line. I missed it on the first pass but fixed it and so didn't give up that 1/8". When I am happy with the sleeve then I go back around the sleeve again 1/8" inside. Why a second row of stitching? Because the movement of your arms cause a lot of strain on the fabric and that seam needs the extra help. 
sleeve stitching
Below is another spot where I am super fussy, when there is reinforcing stitching as in this inside corner. Note that I used grey thread, I have realized that thread does not have to match - in fact it is better for the seamstress if it does not. So grey shows up very nicely on this fabric instead of black and I can remove the threads without too much trouble. Another tip:  use black thread on navy blue and deep blue thread on black (exception: topstitching and hems I use the matching thread). 
Burda jacket stay stitch corner

I will be interested to hear if you find this post interesting or does it sound like a lecture from a cranky professor? Sewing, like many other craft or artistic endeavors, is a combination of creativity and imagination but also engineering, geometry, material sciences and no getting around the fact that precision has its place in sewing. 

Here is a small peek at the finished jacket, I really like this new to me neckline shape.

Jacket neckline

As for the garden, it is a scene of drab colors and frost bitten shrubbery. I spied a gorgeous red camelia and a few tulips poking out the ground yesterday so spring is waiting in the wings. However we have not had any substantial rain for weeks and there is none in the forecast so without a doubt this spring and summer are going to be garden triage and the very real possibility of water rationing. Possibly saving shower water in buckets to pour on the plants. We have done it before in California but it has been a long time. Let's hope it rains! Meanwhile my hibiscus that survived the melting temps of August and September is now adding some holiday color by blooming in a corner of the kitchen. 

hibiscus indoors

Happy end of year sewing, Beth

Thursday, December 26, 2013

Top 5 of 2013

This time of year I really like seeing all the year in review posts so I have decided to join in.  Mostly just the 5 favorite things I made with a few inspirations and goals thrown in.

Top 5 of 2013 - An Annual Blog Series

I had a lot of favorite creations this year so it is difficult to narrow it down to just five. I have decided to go with the items that suprised me, things that I made which I anticipated to be nothing special but ended up loving and wearing a lot.
Reaching all the way back to my first blog post of 2013 is this New Look knit long sleeve top. I love this top and wear it all the time. Of course it is my favorite color but the shape and style suit me perfectly. Just the thing to wear instead of a plain t-shirt. I made 2 for myself, and 2 for gifts. 

    Aqua wrap top frontWrap top sweaterknitWrap top knit grey stripe front

My next favorite has to be this corduroy jacket which was a complete suprise. Not really my color at all however it caused me to rethink my color palette a bit. I think this was the # 1 item in terms of repeat wear for 2013. A perfect jacket to pair with jeans, most any color top and the contrast sleeves are always something that people notice and think is a sweater knit. The details are in this blog post.

Olive cord jacket front

For my third item we jump to the 4th of July and this knit top I made using fabric from Girl Charlee. A super simple top but this fabric has the perfect weight and I love the color pattern. I am now a big fan of Girl Charlee fabrics.

red and white knit top

For number four I was completely suprised by my affection for the Jacket Express, which I made while viewing the Craftsy class of the same name. I signed up for this in order to get the pattern which I planned to make for my mom.  I detoured by making this test version for myself and ended up with another of those items I never expected to wear much that jumped into heavy rotation during the late summer and early fall. Perhaps it is the soft red denim that is the star but this jacket is oh so wearable. And I don't even mind that the sleeves are too long (I just fold them up). Also you can see I am wearing  it with my trusty Vogue 1247 denim skirt - the most worn item from the previous year.

red denim sleeves on me

So I have made it through the year choosing favorites and not a dress among them. Perhaps a lesson to be learned?  I did make a few dresses but my favorite is a rather simple one I made at the end of summer in the pre-vacation sewing frenzy. New Look 6184 is just about perfect, the fabric and color are my dream combination. The Marfy pattern dress I made got a LOT of comments and I do love it but this one will get more wear when the hot weather returns.

NL6184 knit dress front

It is difficult to whittle the list of fav's down to just five so I will throw in a couple of close contenders. The bright blue coat I made from the Burda Style Book and the purple knit Vogue 1351 dress are winners as well however I have not worn them as much.
                            Blue coat frontV1351 Purple dress

As for the rest of the Top 5 categories, I am not much for introspection and reflection when it comes to sewing (or anything else for that matter).  Items that were not so succesful were thankfully few and I really had nothing that I didn't wear at least once or twice. In pursuit of a black denim jacket I made one that didn't work out for me style-wise but I passed it on to my friend Alice.  I do see that making separates is certainly practical, in particular tops and jackets that can be mixed and matched get a lot of wearings.
Inspiration - I find that everywhere. Goals for next year - stretch a little with my color choices, perhaps even a few neutrals (but beige...never). Fine tune fitting on shorts and pants, maybe even a swimsuit. Attack my fabric stash of wools before our warm weather arrives. Revamp my sewing room (in progress) and reorganize my pattern files.

Or more likely, be distracted by a new pattern and forget all these ideas. Either way I will enjoy the time spent with needle and thread.

Today after a bit of house cleaning and organization I plan to spend the afternoon sewing. There is that unfinished Burda jacket on my dress form and some pre-shrunk plaid flannel for a shirt. The more time I spend sewing today the less I spend on-line ordering more stuff :)

I hope everyone had a wonderful holiday and still have more fun/family/vacation time in the week ahead.

Happy year end sewing, Beth


Saturday, December 21, 2013

Giveaway winner and a big Thank You

Due to the usual pre-holiday hectic pace, plus some serious plumbing issues here at Casa SunnyGal, it has taken me a week to get back to you with the winner of the Claire Sheaffer Couture Sewing Techniques Book. So taking into account those who left comments but said they already had the book, it is comment # 14 from Jolsen.  If you would email me and let me know your mailing address I will send the book off to you.   sunnygalstudio (at) gmail dot com

If I was short on topics to write about before I will not be going forward! and I can't even express how much I appreciate your kind words about my sewing and my posts here. Positive reinforcement works so I am already planning out how to get incorporate these ideas in the new year. Plus Ngoc mentioned my Random Threads posts - I really like writing those and have a page in my notebook where I write little snippets of an idea so there are definitely more of those to come soon.

Fitting, Fitting, Fitting, this is SO the #1 issue with everyone who sews clothes. Sewing techniques ran a close second, and a number of other interesting suggestions such as fabric choice (pairing the right fabric with the pattern), interfacings, hemming, and how to sew efficiently. That last one is a great suggestion that had not occurred to me before but something I always try to emphasize with students.

It is a bit early for resolutions, we still have more than a week until the new year, but for your entertainment I will tell you that I am trying to learn to knit. Why? I don't really know other than I see so many cute sweaters and want to be able to make them. This is the 2nd (3rd?) time I have tried to learn so maybe by March the weather will be warming and the garden calling so who knows if I will persevere. But this time I am going to get some help from my friend Jean (check out her handknits gallery) - who is unbelievably great so I have high hopes!

My grandmother was a great knitter, as well as needlepoint, crochet and almost anything else stitch related - although not so much with the garment sewing. I will leave you with a close up look at a tablecloth that she made, one of many treasures we have. Here is another view of the whole tablecloth, it has Christmas trees done around the hem and then this large motif in the center, using green, white and gold threads. So pretty when the table is set and can you imagine the patience to complete this? !

Tablecloth closeup

Merry Christmas to all,
Beth

Friday, December 13, 2013

A giveaway and a question

Recently I have seen some interesting topics on sewing blogs.  The one that caught my attention was the discussion about whether home sewers are cheap.

I probably fall into the cheap category but the very first commenter was Karen who said "Here is the thing with garment sewing, you can't try it on before you sew. We do pin fittings, we make muslins, but still, we have to buy fabric and patterns and notions and hope that the end result is wearable. The less I put into materials, the less I lose when the garment doesn't work. It's a constant balance of time and money versus result."  I could not have said it better. Probably everyone has had the experience of knowing that some costly fabric and time have gone down the drain along with the hope for a great garment. So yeah, if we are cheap there is a valid reason. Definitely a balancing act, and if I can make one thing for a pittance then I feel better about splurging on something else.

However the very best bargain is free, right?  With that in mind I am giving away this book which I recently found at a sale. I already have a copy and it is very useful - not to mention inspiring. Plenty of diagrams and tips on how to sew all parts of a garment plus photos of the inside of vintage couture items.

Couture techniques book cover

To be entered in the giveaway leave a comment suggesting a specific topic you would like me to write about in the new year. As anyone who writes a blog knows, sometimes you have plenty of items to talk about and sometimes the mind goes blank. It is always interesting to see what blog posts get the most views, so far the most "Pinterest-ed" is this post on hemming sleeves. Something I keep meaning to write about is bodice length - this seems to be the most overlooked pattern adjustment and it can really make or break the fit of anything. 

Up next I am sewing a Burda jacket (yes, gasp a Burda, which I downloaded from the website, no tracing required :). A totally unnecessary wardrobe item and yet the fabric was in my stash, crying "pick me, pick me" so I did. 

Happy weekend sewing, Beth

p.s I will send this book anywhere, so if you are outside the US please comment. 
A big thank you to everyone who reads and/or comments. It's that time of year to take stock and be thankful for things and that includes connections. Writing a blog has opened up a whole new world of sewing friendships and I appreciate being part of the mix.

Monday, December 9, 2013

A simple silk jacket and pants - Vogue 8089 completed

The holidays are getting nearer and I am crossing things off my "must sew, need to sew, want to sew" list. This one was a must, as the lovely Anne was flying off to Seattle for long holiday visit so I was able to finish it prior to departure. She is the one who chose all these beautiful and interesting fabrics that I have been making my way through.
The embroidered silk organza was a fabric I have never worked with before. While sewing I was imagining using this for the very full overskirt on a vintage style party dress, wouldn't that be pretty? Luckily she had already decided on something a bit more practical, although maybe only a little more!

Here is the finished jacket, it is Vogue 8089 with quite a few adjustments for fit which you can read about in the previous post . As I wrote in that post, for a very simple style it had a suprisingly large number of adjustments and I think if I were a beginner I would have been very frustrated.

In person I think this looks a lot better, you see the shimmery quality of the embroidery threads and the paisley pattern on the silk.
Silk jacket front


One thing I do like about this pattern is the neck band, the front pieces are cut on the straight of grain but the back neck piece is cut on the bias, so it fits nicely and hugs the neckline perfectly. Clever!

I also made pants from a matching grey silk charmeuse. Just a straight leg pull on pant with an elastic waist. The pants are pinned on my dress form, over a simple black tee shirt just to show the outfit but Anne has a purple sleeveless top she will wear over the pants and it complemented the other colors well. Looking at this photo I can see a few wrinkles. Charmeuse is maddening, sometimes I seem to accidentally press in few extra creases when I am trying to take them out. 

Silk outfit
The pants are simple and so not much to tell about, I used this old Butterick pattern which is one of my favorites (I have made this dress maybe 4 times) made the pants full length and fully lined them with Ambiance rayon. Whenever I make pull-on or elastic waist pants I put some stitching in a contrast color in the back so I know which is which.  Kind of silly but who wants to put their clothes on backwards, no matter what age? (I even mark some of my turtlenecks...maybe this is my issue, backwards dressing.)

B4812 pattern envelope       Silk pants inside
Here is a closer look at the jacket fabric. I did french seams throughout and since this fabric pressed like a dream they were very little extra work. You can really see the purple embroidery thread accent here.

Silk jacket sleeve seams

Anne has an eye for fabric (as I have already documented) but she is happy to have me sew up her garments. When she came to pick up her silk outfit she brought the fantastic project that she had been working on and I had to take a photo since the color complemented this blog post so well. It is a Hawaiian style quilt for her daughter and son-in-law.  (another one of my not so great photos). The border is muted blue-grey batik. So pretty, I love Hawaiian style quilts, in fact I bought a pattern book on my last trip. Haven't made anything yet although perhaps I should start small, with a pillow :)

Anne's quilt

Happy pre-holiday mad rush sewing,  

Beth


Saturday, December 7, 2013

A simple silk jacket and pants - Vogue 8089, part 1: Lots of Fitting Details

Based on the comments and feedback this past year there is endless interest in information on fitting. I agree and voraciously read any blog post where the writer discuses their fitting issues, changes made to the pattern, etc. I promised to do more posts about the fitting details and when I was making this "simple" jacket I realized that for a style with a basic shape and relatively few pattern pieces I had made a lot of changes for fit.
Vogue pattern 8089 is out of print but I see it pop up on blogs and Pattern Review once in a while so I think a lot of people have it in a drawer somewhere. It has a lot of potential, style-wise and could be made into a lingerie piece, a lightweight linen wrap style, or even a lined and quilted version. I was making this for my sewing client who brought me these beautiful silks, an embroidered organza for the jacket and silk charmeuse for the pants.

grey silks2

The pattern envelope and the technical drawing.

Vogue8089 jacket    V8089 technical drawing

You can see from that drawing that the shape is really boxy and calls for 1/2" shoulder pads which I omitted. My quick verdict on this pattern:  it turns out well but needs more adjustment than I expected.

Ready for some details? Sandra Betzina for Vogue patterns have her own sizing system so I made a muslin based on the wearer's measurements (High B 36" B35" W 30.5" H 38.5") using the pattern size C. Which is virtually an exact match for her so you would think that would turn out well, right? Nope. I have made 3 of these Vogue Today's Fit patterns and had a lot of adjusting on each of them but I can't say that they have any one issue, there were different issues on all of them.

This photo is not the greatest as I was taking the pins out of this muslin before tossing it in the trash and then realized that it would be a good visual. The most glaring adjustment is that big vertical pleat down the jacket front. I had pinned that out on the body and then I mark where my pins are using a Sharpie marker or pencil. You can see it is a bit wonky, not the same amount pleated out from top to bottom but that is OK, I just pin it and mark, then deal with it later on the flat pattern piece.  I put some blue pieces of paper at the top to indicate where I added at the shoulder, even though the wearer is about 5'3" she has a longish torso, in particular the upper section, which I dealt with before I even made this muslin and will show the detail in the next photo.

front piece 1
Another big change on this pattern which unfortunately is difficult to see in the photo above, I reduced the width of the neck/front band by about 1.25 inches. As designed it is really wide, almost 3 inches and looks very odd. Final band is about 1.75" and proportionally looks better. 

Final pattern pieces


  • Lowered bust by 1" (horizontal 1" addition both front and back)
  • Reduce width of front pattern piece, about 1.5" (vertical tuck front).  Note what that does to the shoulder seam.
  • Reduce width of back pattern piece to match front, vertical tuck.  Also affects shoulder seam on back.
  • Build shoulder seam back up on both front and back to make up for the vertical tucks.
  • Add another .5" height on front shoulder seam based on muslin fitting.
  • Armhole adjustment.  See the original shape of the armhole. I think any pattern where the front armhole has that very sharp curve is problemmatic, and on most people causes it to feel very tight across the chest or even the arms. If you make a top/dress/jacket with sleeves and it seems to fit but feels like your armhole is strangling you, take a look at the pattern and see if the angle of the armhole is as this original shown above. If you make that addition it will give you a lot more room and be more comfortable. If you do that then what about the sleeve? You can baste in the sleeve to test and then either adjust the ease a bit or possibly remove a bit at the underseam.


The last fit issue on this jacket was the fit around the chest/back and upper sleeve. It was strangely tight and uncomfortable despite fitting well around the bust. I blame this on the design of the armhole and the sleeve which is a one-piece sleeve that was cut very straight and not likely to fit the anatomy of a real arm. After I adjusted the armhole I knew that the sleeve piece would be even more of a problem so my new go-to jacket pattern (Vogue 7975, my faux French jacket)  came to the rescue. I had the sleeve from the muslin sitting on my desk so I made the jacket body muslin, basted on the sleeve muslin from the V7975 and viola! a very nice fit.  I did measure the jacket armhole and the circumference of the finished V7975 sleeve to see if they were a good match and they were, the sleeve was about 1" larger in circumference which is great.  Below is the original sleeve on top of the V7975 2-piece sleeve so you can see the design differences. There is more room at the top of the 2-piece sleeve as well as more width at the bicep.

Sleeve comparison 2

The last adjustment was to add a little bit of a gusset to the underarm to add a bit more mobility, comfort and reduce the strain on this sheer fabric. If you look at the front and back pattern pieces above you can see there is a small triangle wedge added at the top of the side seam both front and back. I added .5" tapering to zero about 3" down. Correspondingly, I split the under sleeve at the center dot, added 1" in width and tapered that to zero at the wrist. It really doesn't make the sleeve much bigger below the elbow but adds a the needed bit of space at the underarm.  In total there is a 1" wide diamond of extra fabric under the arm which disappears when the arm is down but just adds to the ease and keeps this sheer and delicate fabric from ripping when you reach for something. You see this feature on a lot of vintage patterns, often it is a sewn on gusset but for a small addition you can use this method. Note tt does not make up for a sleeve that is too tight across the bicep - for that you need to slash and spread the actual sleeve piece.

To test out all these adjustments before I cut into that pricey silk I made a final (hopefully) muslin using some garage-sale find fabric that was very similar weight. (unusable for anything else despite the pretty color due to fade marks). Look at that lovely arm-shaped sleeve :)  Good thing I made this version as the sleeves needed a good 2 inches in length and I would not have been happy had I cut them out too short!

final muslin

So it is all finished in time for holiday wearing. Here is a  tiny sneak peek of the finished jacket. I did french seams throughout (what else could be done with this sheer fabric?) but due to it's crispy organza deliciousness they were the easiest french seams I have ever done.

silk very close up

I hope these pattern fitting details are helpful and I will try to do more with my next projects. I think it's time for something fun and casual, I need a quick and easy result. Although I saw this post recently and now I want some plaid wool shorts too!

Happy pre-holiday sewing,  Beth

Monday, December 2, 2013

A very very holiday refashion - Yes Virginia, you can remove those gigantic shoulder pads

Lurking in the back of my closet are a few more refashion possibilities and since December is here this one seemed the best candidate for a quick update. While I don't recall making this specifically as a holiday item, could this be any more aggressively Christmas-y? I think it was Pendleton wool and probably sewn by me in the 90's based on the pattern and the humongous shoulder pads.

It does not pay to dwell on our fashion choices from a previous decade! Perhaps if this had aged gracefully for 40 or 50 years it would become delightfully vintage, but looking at it today all I see is old-man golfer or stereotype country club character from a movie. Also I buttoned it a bit wonky on the form but indeed the plaids do match across the front and all the way around. I had started to take the sleeves off as you might be able to see on the left, then remembered to take this picture.

holiday jacket before
I started playing around with the proportions and pinned up the hem plus extracted those gigantic shoulder pads and it was looking better already. I removed both sleeves and reduced the top shoulder seam from zero at the neck to about 3/4 inch off the front and back at the outside. That is a big reduction! It was interesting to open up something I had made a while ago, I had done a lot of hand stitching plus taping the lapel and collar roll line. Check out that crease in the collar, and I will bet you will find that on the pattern pieces the roll line is marked. Thank you, Vogue patterns in 1990-something! And why don't you do that anymore??? The result was a lovely turn of the collar and a perfect fit around the neckline.

holiday jacket phase oneplaid jacket sleeve removed

Because I keep everything...well not everything but a lot of patterns, here is the pattern envelope. Which I found after a very short search (amazing, that I found it.  Why can't I find the lining which I just bought last week? chalk it up to the mystery of the fabric closet) And why it has a stamp from a bank is another mystery.

holiday jacket pattern envelope

To refashion this jacket I decided to "harvest" the fabric from the sleeves and add a peplum detail in the back, and then update the look with contrast sleeves. I am not entirely sure it is successful but I do like the back detail. I have that other jacket with the contrast sleeves which is one of my most popular makes, blogged here, so I thought it might work. The fabric for the sleeves is bengaline  - at least that is what the label said. Not a fabric I am familiar with. I cut the sleeves on the cross-grain as the stretch is vertical on that fabric, not horizontal (selvedge to selvedge) as is typical. 

Holiday jacket frontholiday jacket back 1

To tell the truth it was a bit tight across the hips, so the gathered detail is a trendy way to make a bit more room over the backside. Sneaky huh? Also I like the look of bias plaid and then I didn't have to match that section to the side seams.

A look at the insides, I had used armo-weft fusible on the front, knit fusible around the welt pocket and on the upper lapel. I reused the sleeve heads in the new sleeves. The lining was completely removed to do these changes so it was certainly fun to have a fully complete lining to pick up and sew back in, with a slight adjustment in the center back to accomodate the gathered section.

plaid jacket inside plaid jacket lining

Since it is now December I figured it was time to start wearing this jacket which will have a very short shelf life (and I went to a holiday lunch today). So here it is, a side view so you can see the back detail.

And what is that in my hand? A tulip bulb, which I found right there on the retaining wall. Just recently planted by me and then dug up by the evil masterminds also known as squirrels. My nemesis. Nemeses? because they run around in a pack. Curse you, squirrels. Why am I smiling? because I have devised a plan to thwart them, to be revealed...

Plaid jacket on me2

Happy Holiday sewing, Beth

P.S. If the title of this blog post is confusing to any readers, perhaps those outside of the US, I will direct you to this Wikipedia entry which explains the origin of the phrase "Yes, Virginia, there is a Santa Claus" and then hope you will excuse me for twisting that sentence into a blog post title.