
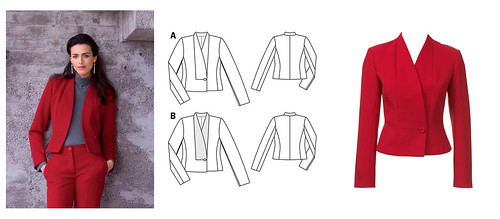
Long Sleeve Blazer 08/2013 # 106. I made this composite image from their website photos so we can look at the jacket drawing, on the form and as worn. The first thing that jumps out at me is the jacket on the model is too small, or at least the fit is really odd. Skipping ahead I can say that the fit is beautiful so they really should have done better. I think it looks way too short on her, and maybe not even able to button. But the shape of the jacket on the dress form looks great, and I really like the raised neckline effect.
The subtitle of this blog post should be something like "A series of unfortunate events". OK, maybe that is a bit overdramatic but I figured after all the lovely comments recently on my skill and expertise it would be helpful to show my mistakes as well. Nothing tragic on this project, just a few times when I wanted to kick myself.
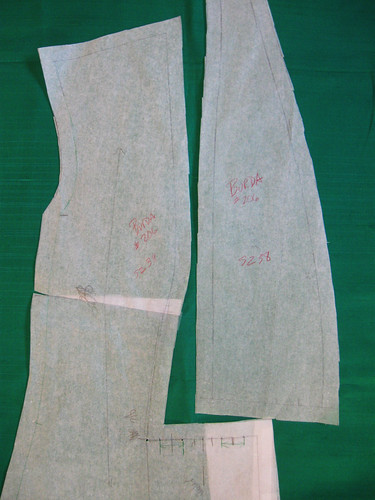
For starters I decided to make a muslin since I am still so new with Burda patterns having only made one before, the coat from the BurdaStyle Book. For that I used size 40 so I made a muslin with that size and it was huge! But also way too short for my taste. That I could anticipate by looking at their photos plus just eyeing the pattern pieces but the size 40 was really big in the shoulders so I made a new one in size 38 and it seemed perfect. I did lengthen it by 3 inches plus a 2 inch hem allowance and added a bit of width at each of the princess seams at the hip which I figured I could taper out when I stitched the seams (and for the record I ended up adding about 2" total circumference at the hip, partly because I need the inches on their size 38 and partly because of the lengthening).
When I finished the muslin the long curved seam edge seemed a bit gappy across the chest so I pinched out the excess and transfered that to my pattern piece.
OR DID I?
Spot the error?

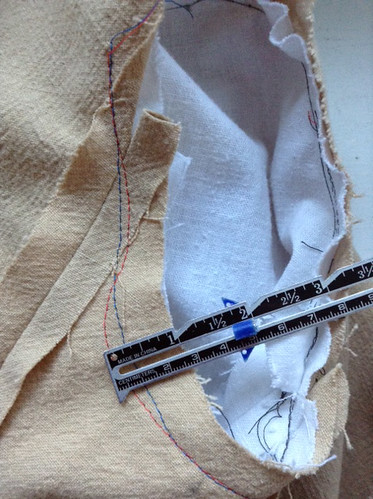
eeeek! talk about annoying. And I didn't even realize it until after the jacket front was all sewn together. Thus the magic of wool! You can ease just about anything. When I was assembling the front pieces I thought "oh these are not drafted quite right and good thing I am working with this nice soft tweed." Then a day or so later I was sitting at the sewing machine and happened to look right at the muslin on the dress form. Suddenly it hit me that I had adjusted the wrong pattern piece. The triangular wedge should be on the other pattern piece. I blame late night sewing combined with watching some Sherlock previews on my Ipad mini. (you can find them on the pbs.org website if you are a Sherlock fan as well).
Despite this little bobble the jacket sewed together beautifully and the front edge is not too long as it was on the muslin. Maybe the muslin was a very loose weave and that edge stretched out despite the staystitching. For the jacket front pieces I did carefully mark and then apply Pro-Weft Supreme Medium Fusible interfacing to keep the edges in shape.
Now some technique talk. On my recent post when I asked what topics I should write about, fitting was by far the number one but technique was a close second. These two items actually intertwine here:
Sewing Accuracy
Precision, correctness, exactitude - whatever you call it sewing accuracy can make a big difference in fit. Next time I make a shirt I will show this on a lighter color fabric but here is a very quick example on a muslin sleeve. Suppose you have spent lots of time on a pattern, created adjustments and added an inch here, took away an inch there, sewed up your muslin and felt ok about it. Then you sewed the garment and it was not fitting as you wished. If the stitching together of two pieces does not follow the correct seam allowance you have just nullified some of your pattern size adjustments. In this photo the blue stitching is on the 5/8" seam allowance line and the red is the wobbly one that would need to be fixed. Granted this is quite an exaggeration of the wobbling stitch but I often find that when making the turn of the sleeve seam at the underarm it is easy to go wide and make the seam allowance at least 3/4".
If left as it is, and it was sewed similarly on the other sleeve, then in this example the width across the back has been reduced by 1/4" x 2 plus the sleeve circumference reduced by 1/4" x 2 so there is a total of 1 inch less for movement at the bicep/back. May seem like nothing but to me it would be the noticeable difference between nice fit and uncomfortable in a close fitting jacket. Suppose there was another bobble in the front, with maybe another 1/4 to 1/2" gone across the chest. A pattern with hard-fought adjustments now doesn't fit because of the wiggly sewing.
Here is my example on this wool tweed jacket. I sew in the sleeves using long basting stitches and then measure around it with a seam guage to check the accuracy. Then I go back and restitch, sometimes even using a chalk pen to mark the correct 5/8" seam line. I missed it on the first pass but fixed it and so didn't give up that 1/8". When I am happy with the sleeve then I go back around the sleeve again 1/8" inside. Why a second row of stitching? Because the movement of your arms cause a lot of strain on the fabric and that seam needs the extra help.
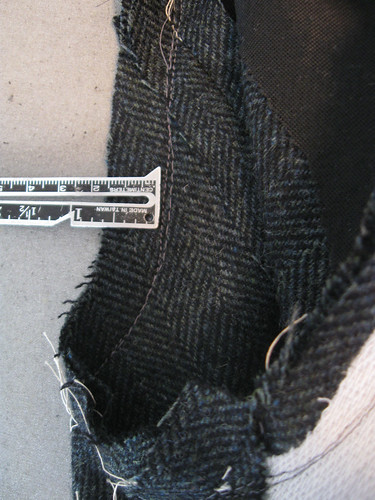
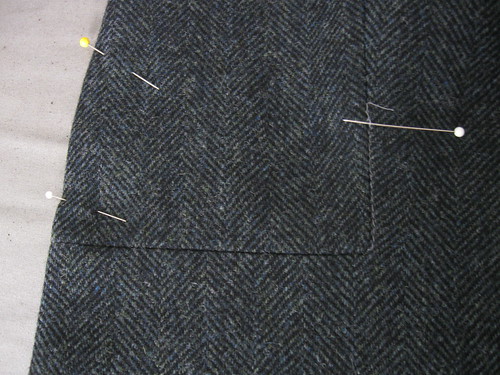
Below is another spot where I am super fussy, when there is reinforcing stitching as in this inside corner. Note that I used grey thread, I have realized that thread does not have to match - in fact it is better for the seamstress if it does not. So grey shows up very nicely on this fabric instead of black and I can remove the threads without too much trouble. Another tip: use black thread on navy blue and deep blue thread on black (exception: topstitching and hems I use the matching thread).
I will be interested to hear if you find this post interesting or does it sound like a lecture from a cranky professor? Sewing, like many other craft or artistic endeavors, is a combination of creativity and imagination but also engineering, geometry, material sciences and no getting around the fact that precision has its place in sewing.
Here is a small peek at the finished jacket, I really like this new to me neckline shape.

As for the garden, it is a scene of drab colors and frost bitten shrubbery. I spied a gorgeous red camelia and a few tulips poking out the ground yesterday so spring is waiting in the wings. However we have not had any substantial rain for weeks and there is none in the forecast so without a doubt this spring and summer are going to be garden triage and the very real possibility of water rationing. Possibly saving shower water in buckets to pour on the plants. We have done it before in California but it has been a long time. Let's hope it rains! Meanwhile my hibiscus that survived the melting temps of August and September is now adding some holiday color by blooming in a corner of the kitchen.

Happy end of year sewing, Beth


As usual, beautiful work! Thank you for sharing the boo-boos as well as the successes. Nice for us mere mortals to hear! LOL!!
ReplyDeleteThank you so much for your detailed descriptions of this project! It is on my list for last-wool- jacket of winter, so I esprecially appreciate your walking me through this pattern. I am 5' 8" so knowing what to lengthen is great.
ReplyDeleteAppreciate this detailed type of information, we can all learn and I know I have been naughty with the 5/8 on the sleeve seams but thankfully have been basting them in for years. I love this jacket and it is on my wish list, just not sure when!
ReplyDeleteI totally appreciate your post. I love your tip on setting in sleeves. ~Teri
ReplyDeleteThis looks fabulous, I love your inset seam, so neat and balanced. Good tip about chalk marking your sleeve seam line.
ReplyDeletethis is such a useful post, I love hearing about the details of how to get better results, and the images of your completed jacket make it look superb. If this is being "a cranky professor", then keep it up - I'd far more like to read this sort of post than something all sweetness and light.
ReplyDeleteSo looking forward to the finished jacket, your wool is beautiful! And what a pretty neckline.
ReplyDeleteThe jacket is looking great, can't wait to see it in whole. It's now on my want to sew list!
ReplyDeleteInteresting about the precise sewing, I've never really thought about how those little bits can add up. I've never checked my seam allowances on sleeves once they are sewn, I'm actually looking forward to checking them next time I sew a jacket to check on it. As a self taught sewist I really appreciate these type of posts, so thank you!
Definitely an interesting post, not a lecture. It is very much appreciated especially because I have been eying this pattern. Thank you.
ReplyDeleteNot at all "cranky"! Thanks for this fantastic post. I am all in favor of precision--good for sewing and good for character in general to strive for excellence. Thanks for the reminder. Happy sewing the rest of your jacket!
ReplyDeleteGreat post! I've noticed lately that when I take the time to be precise, the finished garment really shows the extra care. Thanks for your great tips. I've been eyeing this jacket for months, and I think you've convinced me to try it.
ReplyDeleteThank you for this interesting post. I saw this pattern and wasn't really drawn to it, but seeing your version makes me want to make one. Very interesting about the need for precision when setting in sleeves -- for me, it's one of those things that I know is important, but if I've flubbed a bit I just let it go (unless it is really bad!). I'm lazy, I know! You mentioned that you add a second row of stitching around the armhole/sleeve -- is that all the way around or just at the underarm?
ReplyDeleteI do it all the way around to strengthen that seam, and then trim the underarm from notch to notch (only) down to 1/4".
DeleteThat is a great looking jacket. Loved the details that you provided as well.
ReplyDeleteBeth, I really appreciate it when you describe fine details about how or why you do something. In fact, that is one reason I read your blog. I consider you a beloved teacher. Please don't stop sharing!
ReplyDeleteThe neckline on the jacket looks great - looking forward to seeing the rest!
ReplyDeleteI love this post - please keep it up. There is so much to learn. I have been sewing for 50 years and only ever had my mother to teach me when I started out. Anything else is self taught - however, in recent years I discovered so much 'sewing gold' on the internet and I am learning so many new things. I would never have thought to use a different coloured thread to reinforce the inside of a corner - but once told - it makes so much sense. Thank you so much for taking the time to share.
ReplyDeleteGood post--thx for these important reminders! I've been drawn to the same jacket and you've provided just the nudge. As for Burda Style, I have to really rely on the line drawings because the garments seldom ever fit the models (because they're to scrawny?!) who pose in weird ways to conceal the ill fit making it impossible to tell what the garment really looks like. Anyway, the jacket looks great :)
ReplyDeleteChiming in with "not cranky!" I love this amount of detail and want to know more. My question is how do you ensure accurate seams (especially when sewing curved seams such as when setting in sleeves? Do you do your best, then check by measuring? Do you carefully mark seams when it's harder to use a seam guide at the machine?
ReplyDeleteMy sewing books seem to assume that I know this stuff and I don't. I think it's part of the reason I've felt stuck at the advanced beginner level for years.
Thank you for such a great post!
Great post, thank you. I have not heard before about using a slightly different colored thread, but will begin doing this with my next project. I just finished a black blouse. As a beginner, I tend to be obliged to rip out a few seams or parts, and it was almost impossible to see the black thread on the black fabric, even sitting directly under my Ott lamp. I have made a solemn promise to myself never to compromise on the quality of my work, but I was sorely tempted in this case, because it was so hard to distinguish the thread from the weave of the fabric. In one spot, I actually made a little hole. Never again, thanks to you.
ReplyDeleteI tried to leave a comment a few days ago, but maybe Wordpress ate it.
ReplyDeleteFirst, I love cranky professors and appreciate the more advanced details. I think the really good professors are inherently cranky because they have so much knowledge, but they're limited to what they can cover in a semester, and they end up giving really concentrated information. Blogging gives you the freedom of time to discuss what you know, in the level of detail you want.
Second, I have a question. When you sew over basting, do you remove the basting afterward if there's no wiggle deviation from the intended stitching line?
Thank you!
June, if the basting is "inside the lines" then I don't remove it. I just pick out the parts that are outside the seam allowance.
DeleteThanks, Beth!
DeleteJust to say that I adore reading about tips and insider expertise. Mistakes are also a great way to learn! I will certainly use your tip about thread color. So...keep these posts coming any time you wish! Grazie
ReplyDelete