Wednesday, January 26, 2011

Vintage treasure where you least expect it, Part 2

Last week's post told the story of my estate sale find which was a completely cut-out but never sewn up dress from 1953.  Here is the finished dress.  I really like this fabric, the red is such a pretty shade and butterflies are a nice change from florals.  

Vintage dress front full1
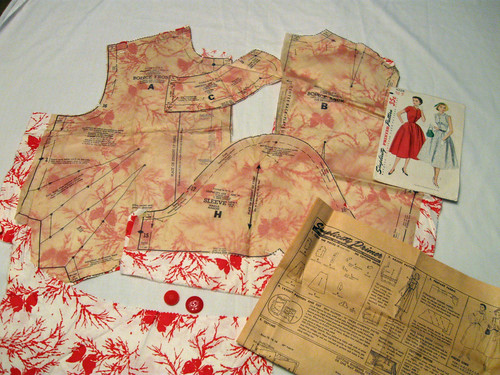
Another peek at the pattern envelope, which was included in the paper bag with the dress pieces and extra fabric.

Vintage find pattern S4228
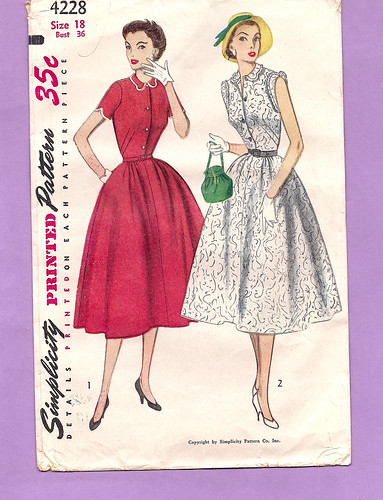
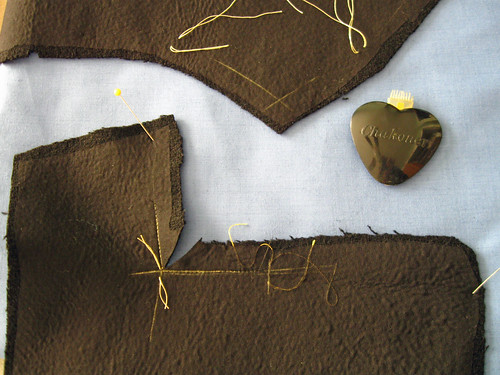
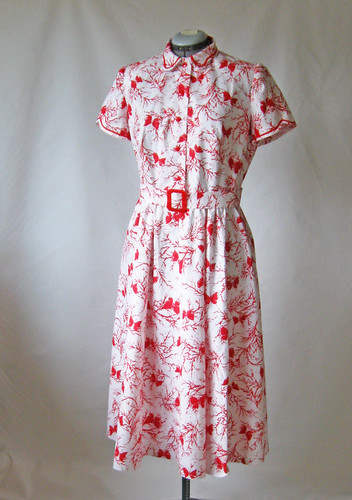
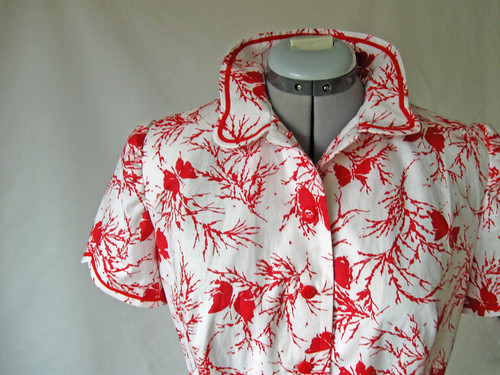
You can see on the red dress illustrated above, there is trim on the collar and sleeves to accentuate their shape, so I decided to follow their lead.  Rummaging in my box of trims (more stuff I found at estate and garage sales) I came up with a package of Middy Braid, in the exact shade of red.  I don't think I have ever used it before, but I certainly will try it again.  Sews on very easily and is flexible around curves.  So just the thing to trim and outline.    
Vintage dress close up
This dress definitely needs a belt, so I made one out of the remaining fabric which Margaret  supplied. (which is the name I have given to this long ago and no longer anonymous sewer).
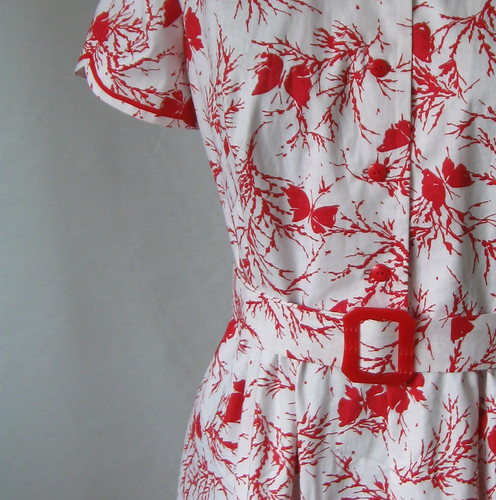
I ordered a vintage buckle from Etsy - and the color could not have been better.  


Vintage dress buckle closeup


Vintage dress facing flip
Sewing this dress was completely straightforward, the only new thing I tried was actually something big to me.  I sewed the fusible interfacing, right sides together to the dress facing piece, and then flipped it and pressed.  This serves to enclose the facing edge, no need for any other treatment.  I think I saw this in Threads magazine, can't recall if it was in a recent one or in an old issue (now I have a stockpile of these old magazines- purchased at a sewing guild sale,  the fashions are out of date but the sewing tips are useful).  Here is the facing.
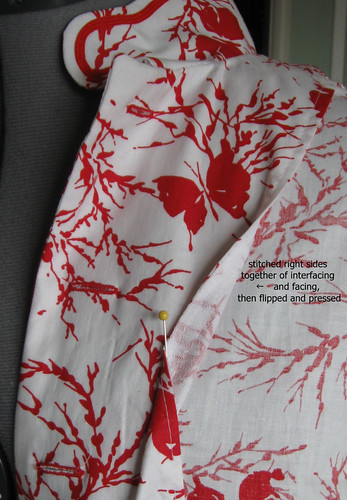
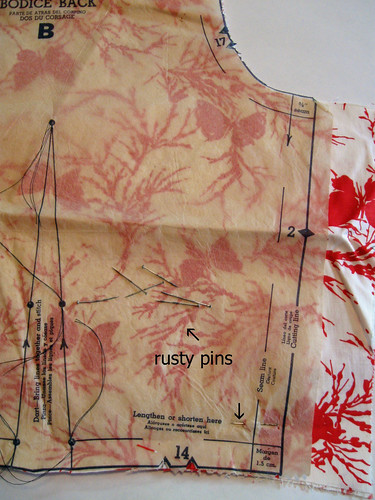
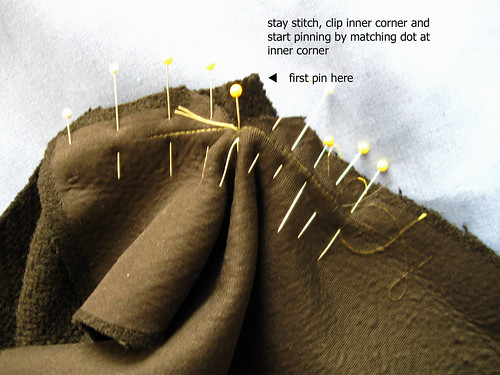
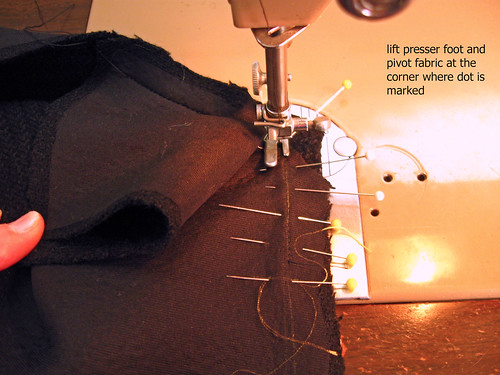
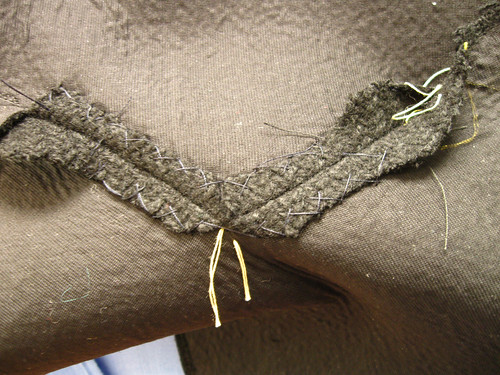
Perhaps you have been doing this all along - but I could have kicked myself for not doing this before.


The pattern which is Simplicity 4228,  is a size 18 in          their 1953 sizes,  which gives the following measurements:  Bust 36", Waist 30", Hip 39".
Looking at a current Simplicity pattern that would be between a size 14 and size 16.  
The finished garment measurements are the following:  Bust 43.5", Waist 36" , Back waist length is 16.75 and the length of the skirt is 30".  Total length from shoulder to hem is now 46.5 inches.  These finished garment measurements show that there is quite a bit of ease, which seems correct for this style.   I have not hemmed it yet, and it does look a bit creased in the photos.  The fabric presses out well, but so far I have not steam pressed enough to remove all the wrinkles as I have been treating it a bit delicately.  


A few people have asked what I intend to do with the dress.  It is definitely not my size, this dress is perfect for someone a lot taller than I am.  I could cut it down, but I prefer to preserve it as Margaret had intended.  So I think I will list it in my Etsy shop, and hopefully someone in this size range will be interested in a "new vintage" dress.  If you are interested let me know.
Edit:  I just listed this dress in my Etsy shop, here is the link    Cotton Shirtwaist Dress


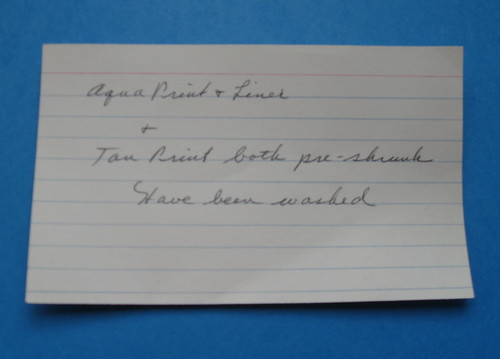
One last remembrance of this long-ago home sewer.  I was looking in my stash for some light blue cotton lining for a dress I was working on this weekend, and pulled out some fabric from the Margaret collection.  Something fluttered out onto the floor, and it was this card:
index card
If I didn't before, now I really wish I could meet this woman who fabric shopped and sewed a long time ago.   I am sure this note was for her own records, but I felt that she was letting me know a little bit more about her, and I am glad to have met her through this project.

Monday, January 10, 2011

Vintage Treasure where you least expect it

Sometimes on Saturday mornings if I am in the mood I scroll through the listings for estate sales in my area.  Every once in a while there is one that lists sewing supplies among all the other household items.  Even the lovely words "retired seamstress"  "patterns, fabric, notions . . . too much to mention"  occasionally crop up.  That is when I gulp the last of my coffee and hit the road.  So in early December I saw a listing just a few minutes away and drove over in the mist and fog to see what was on offer.  I find these sales can be a little sad, to see the contents of a life spread across tables and driveways.  There are gems to be found looking past the cut glass and china plates, beauty being in the eye of the beholder, and a stash of vintage silk thread spools in a rainbow assortment is beautiful to me.


At this particular sale there were boxes of linens, vintage embroidered napkins and other nifty items that I have to refrain from purchasing, but among these were boxes of fabric.  Sometimes the fabric is weird 70's polyester but I have found gorgeous Pendleton wools or silk dupioni hiding among the oddities.    I decided to take two whole boxes of fabric, as it was starting to rain and everything was getting soggy.  Total price tag $ 10.  At home I tipped the boxes onto the wood floor and examined my purchase.  A charcoal Harris wool tweed, corduroy in kelly green and a snowflake print, lots of cottons and other stuff I have yet to identify, with plenty of turquoise - my favorite color.  There was a wrinkled paper bag with some cotton fabric, and as I opened it seemed I was opening a window into the past.  Here is what I found.

Vintage find dress pieces

It is a completely cut out dress, the pattern is Simplicity 4228, dated 1953.  Every piece is there, including all the leftover fabric.   For some reason this really touched me, to pick up a project that someone had begun, and for whatever reason folded it up, put it away and never worked on.  You can see there are two buttons, they were the only ones in the bag so I guess the sewer was making her selection.   I have decided to name this seamstress Margaret, as she needs a name.   I will never find out who cut out this dress or any other part of her sewing story, just gleaning what I can from the box of fabric, but I want to give her an identity.


Here is a closeup of the pattern envelope. I like those double darts on the bodice, and the shaped collar and sleeve on the red version.  


Vintage find pattern S4228

The fabric is a really nice weight cotton, unbelievable lucky that even though it is white, the color is perfect, no spots or stains.   Here you can see how Margaret cut the very full skirt piece on the fold - something I do all the time, cheat a little bit on the seam allowance and let it hang off the fold line if it wider than the fabric.  Cut out with pinking shears, no serger needed for Margaret.

Vintage skirt piece

My only criticism is of this project is the fact that the small dressmaking pins left here for many, many years have rusted a bit, so in some places I really had to tug to get them out.  Thankfully most were pinned in the seam allowances, and those that were not for the most part didn't leave spots.  The only two really unacceptable spots were in the facings, right where they would show with an open collar, but Margaret helpfully included the fabric remnant so I could cut out new facings.  
Vintage dress old pins

I just finished putting in my tailor's tacks, and then noticed that she had drawn all the markings, dots, notches and dart lines, on the wrong side of the fabric with light pencil.  I am not sure I approve of the method, but I appreciate that she was a pattern marker - just like me.
Very nice, Margaret.

I spent part of yesterday afternoon sewing up this dress, it is a lot of fun to just pick up a dress and sew it together as is, with no adjustments for fit, which is something I rarely do.  
Later this week I will post the finished dress  - and then what?  Margaret's dress needs to find a good home, so I will have to think about that.   
Until then, my first vintage pattern (despite the fact that I have purchased several on Etsy, as yet untouched).    


For new readers, here is a link to the next post,  Vintage Treasure where you least expect it, Part 2,  for photos and details of the finished dress.


5/19/11  If you are arriving here from The Sew Weekly, welcome and thanks for reading.
Here is a new post about another vintage project I just completed.  Officially a Fan of Vintage

Camelia jan 2011Finally a garden photo - something blooming around here, but it will be few and far between for a while.  Cherry red camellia flowers to match Margaret's red butterfly print.

Happy sewing, Beth

Wednesday, January 5, 2011

In pursuit of lapel perfection

For any project I always feel there is a critical construction element - once I get that right I can breathe a sigh of relief.  For some dresses, it might be the darts.  For a plaid skirt, matching the seams.  For a coat or jacket, the collar and buttonholes are my focus.  For my winter coat, as the pattern was designed, the lapels seemed really large, or maybe just a strange shape, but as sewn up they seem just right.  
Coat lapel outside close up


It is that seam and inner corner where the collar and lapel meet that are tricky.  
Here are a few notes on construction.


To start I mark the stitching lines on the collar and lapels, being most important to mark the inside and outside corners.  You can see the tailor's tacks in yellow thread.   The fusible is a bit bubbly and not solidly fused as the fabric is so dimensional, but it was sufficient to create the right amound of structure.  The inside corner is clipped to the reinforcing stitching.


Coat collar and lapel pieces

Next pin the pieces together.  I start with what I think of as the "anchor" pin,  piercing through the tailor's tack on both pieces and holding them in place.  Then I pin outwards from that inner corner. 


Coat lapel pin inside corner

Then stitch between markings being sure to lift the preser foot and pivot at the 
inner corner.    I have always been one to sew over pins, trying now to break myself of the habit, but for something like this I still do it, at least at the inner corner.


Coat lapel sewing corner

Then it is time to trim, press, and catchstich the seam allowances down.  This last step may seem like extra work, but a few minutes of catchstitching really pays off in smooth lapels.   Since everything is interfaced, you really can do it very quickly - you are just catching a few threads of the interfacing and no stitches will show on the other side.  The tailor's tack is still in the fabric, just at the corner so the anchor pin did its job.  


Coat collar inside collar catch stitched
coat lapel inside corner

For the lining of this coat, I made some adjustments to the pattern because as designed it had a back yoke and center back seam, which seemed unnecessary for the lining.
To cut out, I pinned those pieces together and then moved them about 3/4" from the fold to create a pleat in the center back of the lining.  This is always a good idea for jackets, allows more movement and gives the lining a bit more room so it doesn't pull at the front of the jacket.


                                             coat back lining

I think that is enough on this coat.  Time for something new, and preferably quick and easy :)


And here is the only guy doing anything in the garden this week, even though I have plenty I should be doing.  He has dug so many holes I should give him the bag of bulbs to plant.  


Happy Winter sewing, Beth

Mr squirrel

Monday, January 3, 2011

Giveaway Winner

Thank you to all for the great comments on my Winter Coat project. With everyone's encouragement I will wear the faux fur collar and feel very glamourous when I do.

I have a few more coat construction topics to post about, which I will get to soon.  Then my next project may be something of the vintage variety - not something I often do.  I found a little treasure at an estate sale, something very surprising and charming.  Stay tuned.


But enough sewing talk, what about the chocolate ?


Silver_Box.jpg


The random drawing winner is 


Melissa! 
who writes the Fehrtrade blog from London

So congratulations to Melissa, lots of great information and inspiration to be found on your blog.  I look forward to your creations and comments in 2011.   


AND you have to let everyone know how you like the See's chocolate.  The last of the holiday treats are rapidly disappearing around here - and then it is time to put some of those New Year's resolutions into action  (is that my sneakers I hear calling me?)  


Thank you to everyone that participated.  Here's to stitching up more connections with fellow sewers in the New Year!


Beth


Sunday, January 2, 2011

Winter Coat wrap up plus last day to enter giveaway

Happy New Year to all.  The winter coat from my previous post was finished on New Year's Eve with minutes to spare.  So glad I could wear it then, but the photos had to wait until today. 
Maybe this is my new favorite item of 2010 (surpassing my Vogue 1117 Michael Kors Dress)
I will probably get more wear out of the coat!  
Coat Collar up
My great friend and neighbor Alice does some of my photos (the really good ones)  but she makes me laugh too much when we have a photo session.  Or perhaps I am just happy that I have finished this project and can vacuum the sewing room floor.  If you would like to see the pattern here is the first post on this project.

I debated here on wool or velvet for the upper collar, to solve the potential itchy wool issue, but decided the wool collar looked so much better.  Thank you to everyone that gave feedback on my question. 
Coat front outside
Wool collar
Coat outside fur collar
Faux fur collar

I made a detachable faux fur collar, which dressed it up quite a bit.  Not sure I will ever wear it, but fun to have.  It secures with some elastic loops and buttons on the inside of the neckline
The lapels are a bit larger than some styles, so the fur collar has to be big enough to cover them.  

A look at the back, and better view of the lapel and fabric.  Good thing I have never wanted to be a model, I talk to much and crack up laughing during photos, however everything about this coat makes me happy.  The lapels which on the pattern looked crazy big are in reality just to my liking,  the bound buttonholes came out well (always hold my breath until I finish those successfully) and the style and fit are just what I wanted.
Tomorrow I will do a post on some construction details including lapel+collar assembly and changes I made in the lining and coat back.


Coat lapel outside close up
Coat outside back

Until then, thanks for visiting and today is the last day to leave a comment or sign up to follow the blog to be entered in my "sweet" giveaway.


Happy New Year Sewing,  Beth