Saturday, February 24, 2018

Giveaway winners and some recent sewing

Thank you to everyone who read and commented on my last post. It's so great to see names from all over the world connected by our love of sewing. Here are the international names drawn for the sewing patterns giveaway.  Please email me and let me know which 2 patterns including size (any currently available Vogue or McCalls) that you would like. If you can send this information sometime in the next day or so that would be great, as they are on sale :) and I can pick them up on Monday afternoon.  By the way, I was at the store on Friday and it looks like they had the newest ones already in stock! Although I bought one and it was the last of that size. Helen and Camelia - if you don't happen to read this soon, then no problem - I will just get them when the next sale happens...

Note you can email me by clicking on the envelope symbol in the righthand column.


IMG_3488

And here is the name of the person in the US who will get the Pauline Alice trouser pattern. Textilegram please email me your mailing address.


Drawing

By the way, isn't this tissue paper fantastic? I received a package from The Confident Stitch, a fabric store in Missoula, Montana, and it was wrapped in this tissue paper. I wouldn't mind a skirt in that print either. Check out The Confident Stitch and stay tuned as I will be sewing with their fabric soon with another treat for a blog reader in the US.

What about sewing? I have plenty of things to blog about, but here is a small something that I sewed recently, for a first birthday present. And I took this picture on the deck about 2 weeks ago, when it was almost 75℉. And last night it was below freezing here. No matter what the temperature, we unfortunately have NO rain. Climate change is a real thing...


IMG_3441

The hat came from an old pattern but the dress is from this current Simplicity pattern. Which I could not resist st the photo on the pattern is too cute!!  I really like the bow version but in this casual cotton I did the simpler version. The cotton fabric is by Monaluna, a local fabric designer who uses all organic fibers and has a website, plus you can find the Monaluna fabrics at lots of stores and online shops.

IMG_3326

That's it for today. Tomorrow I'm doing my class at Hello Stitch in Berkeley. This one is "Pattern Basics: How to Read Sewing Patterns" which I demystify the pattern envelope. In this class I cover

  • reading the pattern, decoding the info on the pattern envelope
  • how to measure yourself and how to choose pattern size
  • explanation of the symbols and information printed on the pattern pieces
  • how to choose the right fabric for a pattern
  • how to lay out the fabric, pin the pattern pieces, cut out and mark your fabric

It's a great class if you haven't worked with a lot of different patterns, or if you are returning to sewing after a while. Or if you have a friend that wants to get into sewing send them the info, it's a great way to get familiar with patterns and fabric choices. Tomorrow's class is full but the next one is on Sunday April 22.

Happy Sewing,
Beth

Today's garden photo - these lovely daffodils. And I noticed a small purple tulip out there today:)

orange daffodils
SaveSave

Tuesday, February 20, 2018

Blog Anniversary, a Retrospective and a Giveaway

Can it be 8 years since I started blogging? According to the blog archive on the side of the page I started in February of 2010.  I had discovered sewing blogs almost a year previously and after months of reading and following I decided to jump in. The funny thing about starting (and continuing) a blog is that I expected to be able to comment on other people's blogs, check out how patterns look on a variety of people and learn some new techniques. But I never expected that writing a sewing blog would lead to a whole world of fantastic new friends, both locally and all over the globe. I've said it many times but that is the very best part of writing a sewing blog - making connections with people who are as crazy about sewing as I am.

The other thing that I discovered after blogging for a while is that I really like writing. I've always been a big reader and had aspirations of writing something one day. My teenage self could not have imagined that my writing outlet would develop via an interactive platform that allows connections around the globe.

I have written a lot of blog series, or posts that continue through more than one entry (I want to call them chapters) so I thought today I would post and link to some of those. In the last year or two my readership has grown a lot. Like any writer it's nice to have your material read, and those old posts have likely never been seen by those of you who recently started reading.

Vintage Treasure
It's no secret that I like to find fabrics in unusual places - meaning garage sales, thrift stores, or other bargain-y spots. One rainy Saturday morning I was looking through the Craigslist listings and saw one for a garage sale with the enticing words "sewing stuff" in the description. So I gulped down my coffee and jumped in the car.

vintage treasure composite

One of my very best finds and perhaps my favorite blog post, which I titled "Vintage Treasure". Because I found this lovely cut out but never sewn up dress. Here are the links to the posts and what happened to that pretty dress. At the same garage sale I also bought the fabric which I made into this jacket so quite a good score that day.

Links:   Vintage Treasure Part 1     Vintage Treasure Part 2      Vintage Treasure Part 3

Coats and more Coats
If you have been reading for a while you know I love to make coats, and jackets. Despite living in balmy N. California where our climate means that you could get away with a minimal coat wardrobe. Although it was below freezing last night and supposedly all week so I'll be wearing a variety of these coats. Every time I make a coat I think "ooo this is my favorite" but I wear each one. Just based on frequency of wearing the green one in the first picture might be most used but the tri-color coat is the one that won the coat contest on Pattern Review which awarded a $ 100 Mood gift card which led to my trip to NY - so perhaps that's my favorite!

coats composite


Green Wool Peacoat Style Jacket Simplicity
Blue Burda Coat from BurdaStyle Sewing Book
Black wool Simplicity Coat  
Camel Cashmere Sleeveless Coat for my pal Alice
Heather Purple wool coat from BurdaStyle Magazine
Tri-Color wool coat from BurdaStyle Magazine

I also wrote a multi-post series on jacket sewing after some requests for that. Here's the start of that series.

Kimono Silk Wedding Dress
Sewing can be really meaningful. Clothes are so much more than something to keep us covered or warm. Back in 2011 someone found me via Etsy and asked if I would make here a dress for her wedding. She didn't want a wedding gown but something a bit different and I was intrigued. We met and I instantly said I would do it. Susan was an incredibly kind and charming person and while the project had some ups and downs the result and the journey were more than I could have hoped for.

Kimonon silk wedding composite SaveSave

Here are the links to the posts for that dress which have a lot of sewing details. The professional wedding photos which she kindly let me use are gorgeous. Note - these days I only do custom sewing for a couple of people - so this project and the writing of the blog posts were unique and special for me.
Kimono Silk Dress post 1,   post 2,  post 3,  post 4.

Sewing Friends, online and in person

meetups composite

When I first started writing I noticed that in some places like New York or London groups of sewing bloggers would get together in person to indulge in the pleasure that is sewing chat. As it happened there was a Balenciaga exhibit at the DeYoung Museum in San Francisco so I organized a meet up to see the exhibit. We did it again the following year for the Gaultier exhibit and now some of the people I met at these events and others have become fantastic friends whose latest creations I can see in person when we have a meet up or get together for coffee, lunch or fabric shopping. One day in 2012 I opened my email box to a request from Karen of Did You Make That  asking if I was available to do a week of sewing lessons as she had arrangements for a structured class here in SF which was unfortunately cancelled but her trip was all planned and ticketed. We hit it off and had a great time, plus she made a beautiful wool jacket and dress outfit. Here's a link to her post although the photos are not showing. In summary she says, if you have a chance to do something, take it! And that is the bottom line in all these meet ups and get togethers. Don't be shy, reach out and comment or connect with other people in your area. Even when traveling! That is to me the most fantastic thing about the sewing world - you can go anywhere and know you will have some friends waiting to show you around or get together to compare notes on your fabric stashes.  Friends you might not have met other than a few comments on their Instagram or blog. But I guarantee it will be great.
Because I had a gift card from Mood Fabrics burning the proverbial hole in my pocket I decided to take a trip to NY in 2016. Plus I wanted to meet a bunch of people who I only knew via blogging. And once again it was a blast. Carolyn of Diary of a Sewing Fanatic  arranged for a shopping meet up at Kashi's fabric store in the Garment district and while I scored some great fabrics, getting to meet and spend time with her was the real prize. I also had the chance to meet Delphine, of Sewing Tidbits which was lucky as she is back working in Haiti now. Getting to know Delphine is a perfect example of a sewing friendship - I started commenting on her blog (any blog that features palm trees will always get my attention), we correspond and now I can't wait to see what she comes up with in terms of her patterns and also now articles in Sew News magazine. Next up, I hope to make it back to Europe this year or the following one - amiche italiane, sono pronta per parlare di cucito!

Writing for Craftsy

craftsy writer composite
You never know where writing a blog will take you, and one day I had a request from Craftsy to write articles for their sewing blog. Which has turned out to be another outlet for my writing bug, and it's interesting to see which posts get the most clicks, Pins and shares. I think this is my most pinned post:   Easy Elegance: Tips to sewing perfect Princess Seams. I recently created another page here on my blog, with a list and links to every post I have done for Craftsy, organized by topics.

Teaching at Hello Stitch Studio in Berkeley


Hello St composite SaveSaveSaveSave

Last spring I saw a new follower on Instagram which turned out to be Hello Stitch Studio in Berkeley. It's a beautiful light-filled sewing and quilting studio owned by Stacey, Kristen and Terri who are quilting artists and sewing machine wizards. The studio has classes, every kind of sewing machine, monthly and daily memberships and a great sense of community and camaraderie gathering around sewing of all kinds. Their big cutting tables are a dream for those of us who make do on the dining room table or the floor.
We have lots of new classes for spring, here is the class schedule page.
The "Pattern Basics: How to Read Sewing Patterns" class is my new favorite, and a lot more than the class title can express. I go over all the details, inside and out of sewing patterns - any and all brands and types.  What fabrics work best, how to choose your size, what to look out for and what to avoid, what all the marking mean and why they might matter. Plus a bit on how to lay out, pin, cut and mark your fabric. Everything to get started and give you confidence to tackle the unlimited array of sewing patterns that call our names :)  The next one is April 22.
We have a cute summer dress class in April (pattern included in the class), that's on March 17.
Another new class is "Adjust the Bust" on March 25 which will be a hands-on workshop. We'll go through adjusting the bust on a pattern, FBA, princess seams, and use generic pattern templates so you can get the hang of doing these paper pattern adjustments before you cut into that precious pattern. I'm really enjoying teaching the classes, sometimes I'm wiped out at the end of the day and other times I meet friends and spend some time socializing at a tapas bar that is quite near and outstanding. Any excuse for tapas.

Pauline Alice pattern mania

Pauline alice composite

Alameda Dress
Safer Jacket
Aldaia Dress in red and white
Hemisferic Coat in burgundy wool
Aldaia Dress in blue
Quart Coat in plaid wool
Mirambell skirt in black with lace edge

We all have our very own pattern obsessions. Some people are on a quest to find the ideal shirt pattern, or every year seeking the perfect party dress. What can I say - if you have a great coat pattern you will reel me in. A few years ago I mentioned her pattern company in a post about patterns and pricing and she contacted me to see if I would help out with testing a coat pattern. Once she sent a sketch I was hooked - and that test version became the Quart coat pattern. Which I think is one of the all-time most stylish coat patterns I've seen. Although I didn't sew it for myself! And then I have sewn a lot of her other patterns, they always have interesting details which set them apart from other patterns I have seen. Here are all the links to the Pauline Alice patterns I have sewn.

One-Hit Wonders

One hit wonders photo composite

Do you ever sew something and wear it just once? It happens to all of us and I was doing a closet clean-out and noticed I had things in there I had really labored over, sewing-wise, and yet worn them only once. Thus my one-hit wonders, with links to the backstory and what happened to these flowery wardrobe wallflowers. (spoiler alert- readers convinced me to wear a couple of them again).

One-hit wonder # 1 - Butterick 4978
One-hit wonder # 2 - Simplicity 2588
One-hit wonder # 3 - refashioned and wearable
One-hit wonder - the grand finale

Now time for a giveaway which is a small expression of my huge appreciation of everyone who reads my writing here, including my sometimes cranky Random Threads posts (up to # 30 now and due for another one). I'm so happy to be able to share my sewing thoughts will all of you.

For readers outside the USA: It's a select your patterns giveaway. The photo is just an example.

Vogue patterns exmple
I'll send any two currently available patterns from Vogue or McCalls. I know these patterns are costly outside the US and they don't go on sale as they do here. I learned to sew mostly from using Vogue patterns and I still think they are among the best. So leave a comment and let me know what country you are in, and then I will draw 2 names from the overseas commenters. You don't need to tell me which patterns, wait until I email the winners. And then I will post which ones they chose, because it's interesting for the rest of us to see. These patterns are going on sale on this weekend,  I will announce the winners Saturday 9 am California time and hopefully you can let me know by Sunday so I can get them.on Monday.  Otherwise you will have to wait a few weeks for the next sale :)

For readers in the USA: the giveaway is a European pattern which can be costly for us to buy. Suddenly trouser style pants have come back in fashion and I have this Pauline Alice pattern to send to one US reader. Leave a comment and let me know you're in the US.

Sorell trousers pattern


I hope I have expressed how much I appreciate everyone who reads and comments, the exchange of ideas and the things I have learned via sewing blogs has made my sewing more fun every year that goes by.

Up next - I have plenty to catch up on, lots of sewing that I want to blog and a Pattern Whisperer post that will apply to spring. (whether it is happening or just a dream where you are). And now I have to go and watch the Olympic figure skating plus mentally critique their costumes  - like I know anything about skating costumes, ha.

Happy Sewing, Beth

Here's today's garden photo, a dahlia, chosen from my file of flower pics. When I first started including a garden photo I thought maybe it looked kind of silly, but instead I get lots of comments from people who really enjoy them. I think it's like looking at a beautiful photo calendar on your desk or something like that, a nice picture of nature is just relaxing and inspiring.

dahlia


SaveSave
SaveSaveSaveSave
SaveSave
SaveSave
SaveSave

Friday, February 9, 2018

Part 2: Hemisfèric Coat completed, Pauline Alice patterns

True to form, those of you who read my blog are interested seeing the insides of garments and construction details. Thanks for the nice comments on the previous post. I'm lucky to be able to pick and choose who I want to sew for, and the process of selecting patterns + fabric is maybe the most fun part of the process. That is definitely my view once I get near the end of a complex project, when the fun fades away and I just want it to be done!

This project felt that way at times, mostly because of delays with all of us getting sick after the holidays. But it's complete and it's adorable.

Coat unbuttoned view copy

Everything about this project was a time crunch, including taking the photos, so the lighting and sharpness is not quite what I would have liked and I have increased the brightness a bit so the details are visible. I made this coat for Sara, who is the daughter of my friend Heather (who I have sewn a lot of things for, including this coat). They were going to an evening wedding so Sara needed a coat, and I did sew a dress for Heather which is one of my favorite things I have done in a while, Burda 07-2017 # 124A. The dress is fantastic and I can't wait to blog about it. One thing at a time::)

I tested this Hemisfèric coat pattern for Pauline last fall. I really love her designs, Pauline Alice Patterns, and feel that she always thinks about creating a design that is unique, as in her Quart coat which I also tested and then sewed up for a friend. But she also has patterns that are for casual and fun wear as well. And now she has a book - although I think it's in French - not one of my better languages...yet.

As mentioned in my previous post, I love the shape and seaming of this coat but I just don't like separating zipper, particularly a long one on a coat front so I changed the front closure from zipper to a hidden buttonhole placket.
All the details on how I did that are in my previous post. Also lots of info on interfacing. The fabric was from Stone Mountain in Berkeley, as well as the lining.

Merlot coat front full length

Here's a good look at the shoulder and neckline seaming which is unique. I love it when garments have interesting seaming and shaping, they are more entertaining to sew, to look at, and it's nice to make something that is new to you. The sleeves are raglan with a seam along the top of the shoulder, and the whole coat front and back rise up to create the funnel neck which stands up quite well in a coating fabric like this one.

H coat side shoulder seams

And pockets of course. The pattern calls for the pockets to be in the front princess seams and with my buttonhole changes there is just enough room for them. I suppose I could have put them in the side seams but I wasn't really thinking about it. And they work fine where they are. She doesn't really have her hands far down in the pockets but there is plenty of space. This image is a bit fuzzy but she has the coat buttoned about 2/3 of the way up, so the top two buttons are open and I expect that is how it will be worn. While it looks super sharp with the top buttoned it is probably more comfortable like this.

Coat S with pockets view
coat back view1


I am still so happy with the placket! Time to confess that with the thickness of the fabric I had fears that it would be a lumpy mess, but choosing that silk charmeuse to use as the inner layers of the placket really worked out beautifully, plus it feels so luxe.


H coat close up placket view

H coat lining view

The lining is bemberg rayon also found at Stone Mountain - they have a great selection of colors.
The pattern pieces for the lining are included in the pattern and are separate pattern pieces which is very nice.

One construction photo that I didn't include in the previous post, the hem, I did lengthen this about 3 inches, and Sara is shorter than me. So this coat is short! Which I also found in the Quart coat. Anyway by adding length at the bottom I took away that shaping on each princess pattern piece which is necessary for the hem to fold up smoothly and not have excess fabric due to the angle of the seam at the fold.

H coat hem prep

So I did have to quickly stitch up and trim each seam so that it folded up without excess. In this blog post from 2014 I showed what I'm talking about. Scroll down the post for the photo with the pink and yellow lines marked on the picture.

Found the photo with the coat all buttoned up.

H coat buttoned up

Quick reminder, this is the pattern drawing and an example from the website.

Pauline Alice Pattern view Hemesferic Coat

Coat unbuttoned view square crop

So cute! One of these days I will have to make a Pauline Alice coat pattern for myself. We'll just have to see what she comes up with next year.

And sneak peek for my next post - this fantastic dress that I made for Heather. I am still raving over the quality of the blue wool crepe fabric.  Sorry for the grainy photo - it's cropped from full length one, and the light was really fading as we took the photos. But hey - it's documented and done. On to the next project!

H and S wearing wool outfits peek


What's in the works? I just finished something with mini-sequins. Easier than I imagined and kind of fun. I want to make a few pairs of jeans or pants now that I am happy with my pattern that I made via copying a RTW pair of jeans. Plus I have a lot of stuff to prep for some upcoming classes at Hello Stitch Studio.

So keeping busy here  - and now I'm off to repair some of my garden drip irrigation, because there is no rain in sight and we are getting worried about the drought again. Hope not but I think so.

Are you watching the Olympics? I am an Olympics fanatic - not that I have ever done any of those sports. Well plenty of skiing but other than that, nope. However I love watching everything and am a sucker for the human interest stories. (although no network is as good as ABC was back in the "thrill of victory, agony of defeat" days.)  But the Tara and Johnny skating coverage is very entertaining. Plus they dress  to coordinate!

Happy Sewing, Beth

Here's today's garden photo - so many daffodils already.

salvia


Monday, February 5, 2018

Part 1: Hemisfèric Coat from Pauline Alice patterns, pattern changes and sewing details

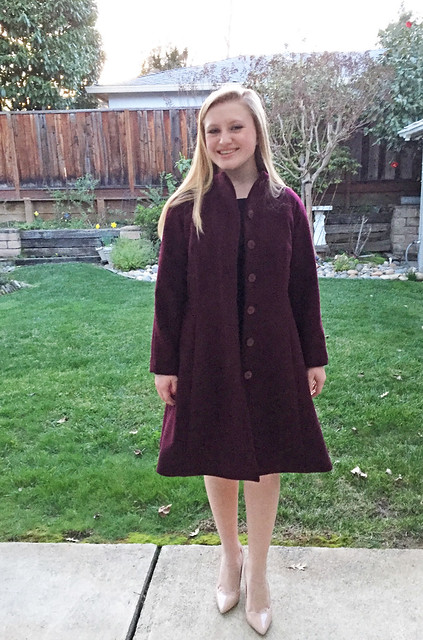
Did you think I would go a winter season without sewing a coat? I tried to convince myself I didn't need a new one, and succeeded. However there was one pattern that I really wanted to sew! This is the Hemisfèric Coat pattern from Pauline Alice Patterns. Fortunately I knew someone that wanted me to make a coat, and that gave me the opportunity to suggest this one.

This post will be a long one all about the sewing details and the pattern changes I made. My next post will show the finished coat. I am not a fan of coats with zippers, particularly on anything longer than a hip length type of coat or jacket. So while I loved this pattern I knew from the moment I saw it that if I sewed it I would change that zipper to a hidden buttonhole placket. In fact, I did test this pattern for Pauline, and mentioned that to her in my feedback. For the final pattern she has included the center front line on both front pattern pieces (which are not symmetrical) so that makes it very possible to do this change.

H coat front peek at button placket

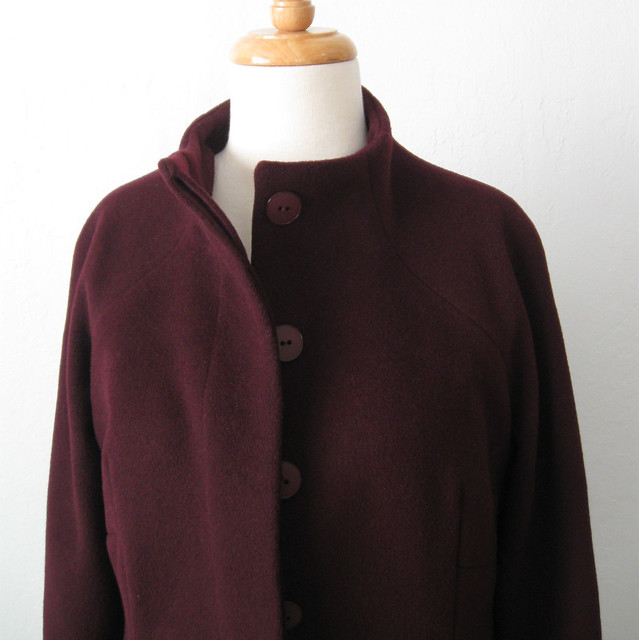
Here's a look at the pattern example from the Pauline Alice website and the line drawing. I love the curved seaming and the flared skirt. Her patterns always have some interesting details that make them unique - which is certainly something I look for in a pattern.

Pauline Alice Pattern view Hemesferic Coat


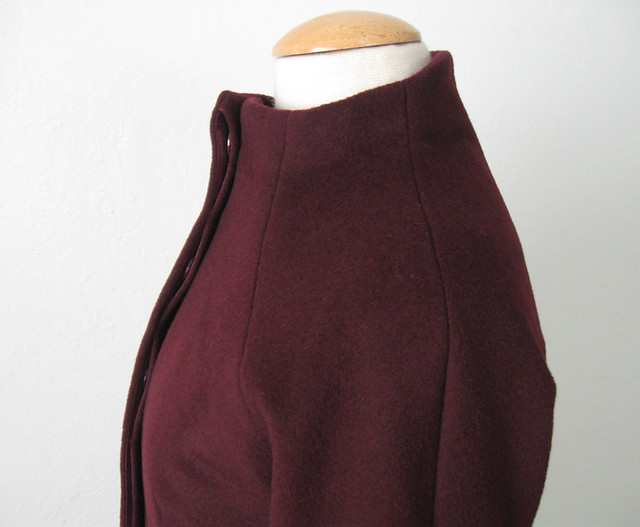
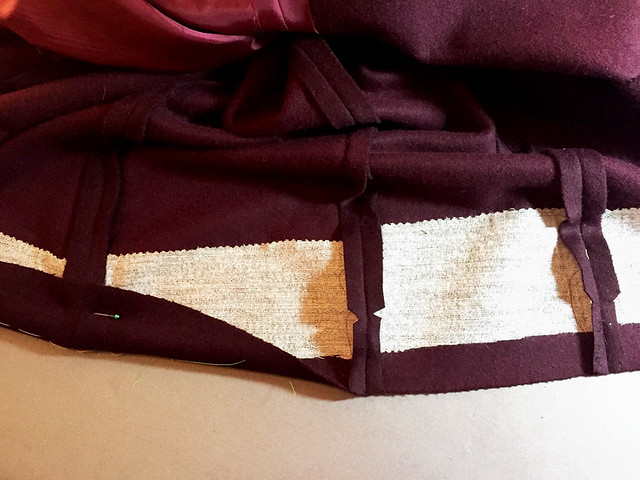
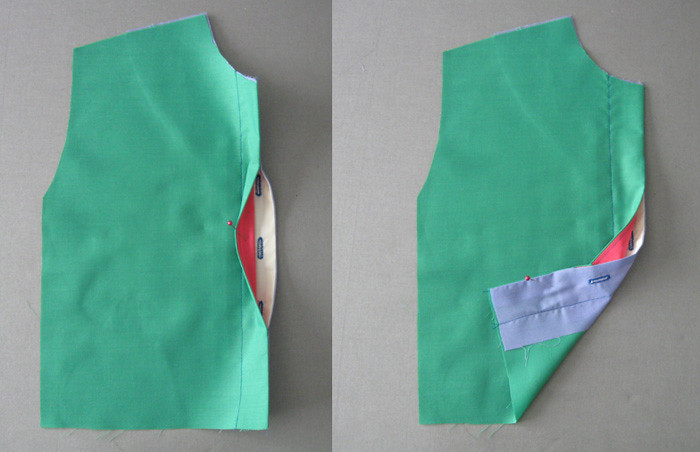
Here's a look at the inside of the coat before I attached the facings and placket. Actually the coat center fronts in my version are the standard front that you would find on any coat or jacket pattern, I wanted you to see the interfacing I applied. I think in the pattern instruction you apply the interfacing to the facings, both the front facings and the neck facings, but I just find that more interfacing is almost always better. A coat of this style and fabric needs to be supported at the neckline and hang on the shoulders without sagging in that area. So I added weft interfacing around the neck, and even down the shoulder seams about 10 inches, both front and back. Here you can see the coat fronts overlapping as they would in a regular button front coat pattern.

H coat inside interfacing front full length


H coat back view interfacing and seams

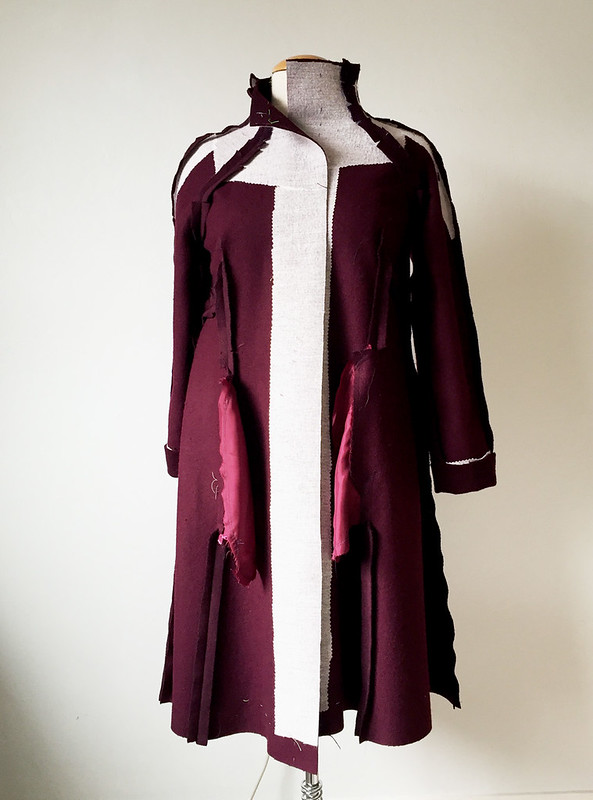
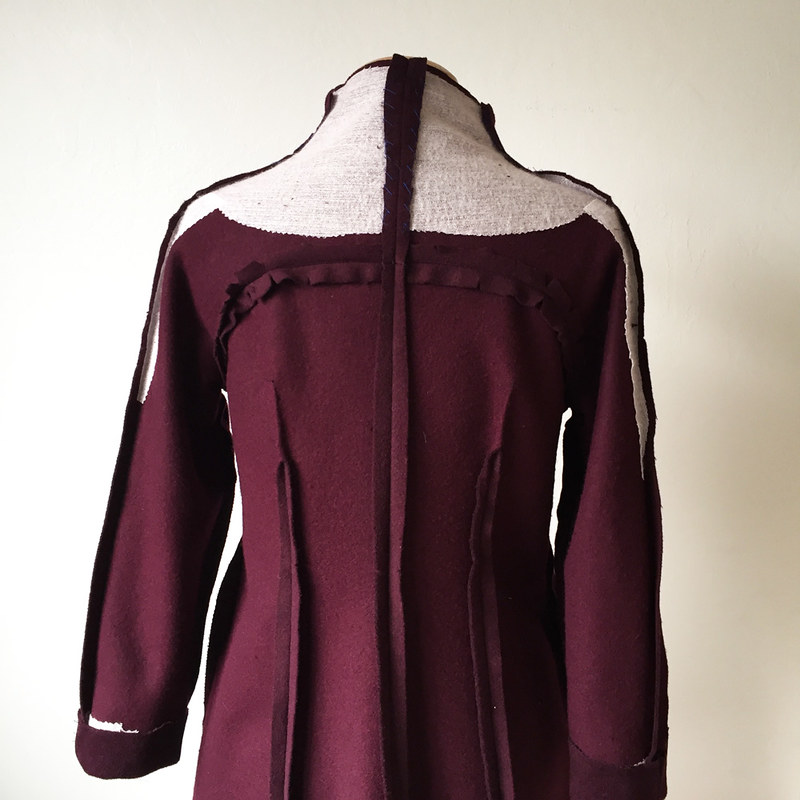
Sometimes I wonder when I show the insides of garments as I am working on them if readers think they look like a mess? But in a lined garment I have absolutely no concern about how the inside looks. It can have 3 different colors and types of interfacing, applied wherever I think it's needed to get the outside looking perfect. As long as there is a lining then who cares? And I never ever serge the edges. That just adds bulk and thread  - the opposite of what I want the seam allowances to do which is disappear when pressed so that the outside is smooth and unmarred. Also the curved seams needed quite a bit of clipping and notching, being that they curve in different directions sometimes they need clipping to release the fabric and in other spots a few small notches so that the seam bulk can lay flat and not create a bump where the seams curve. I should do a post on that one of these days, where to clip and where to notch...

Ok - enough on interfacing, onto the hidden buttonhole placket. I have had a number of comments asking how to do it so here goes. The first part of this information is specific to this pattern, but the principle of how to make the hidden buttonhole placket can be applied to any garment.

Here's the RIGHT FRONT pattern piece of this pattern. Remember that the pattern has 2 different front pieces, a LEFT and a RIGHT because the design is for a zipper that is covered and offset under the right front. But for a hidden buttonhole placket the coat needs to have two fronts that are the same, and that cross over the center front line allowing space for the buttonholes. Whether they are hidden or regular buttonholes on one side this re-design would be the same. I used the RIGHT front pattern piece as it has the center front line. (which on this pattern is the grain line arrow, also marked as Center Front. Note that on any coat, jacket or shirt pattern the horizontal buttonholes cross over this center front line. In the example below I'm using the smallest size (34) on the multi-size pattern because it is just easier to draw on this. For my coat I traced the size 38 and working on my traced pattern piece.

1. Mark the center front, and determine the buttonhole placement. This is a bit tricky for this coat where the neckline is high, as you want the neck to stay closed but gets to be a bit of a small space for your fingers to fasten the top buttonhole. It worked out OK as I did it, but it would also be really nice to have one button which showed at the top and then the rest as hidden.  The buttonholes in this thick fabric cross over the center front about 1/4".

2. From the center end of the buttonhole draw the finished edge line. Which is also the stitching line of the facing. I decided to use 1/2" from the end of the buttonhole. On the pattern that happened to be the fold line if the zipper had been there which sounded about right. Then I added a 5/8" seam allowance past that finished edge stitching line (labeled as new cutting line in the photo below)

3. Straighten out the top edge of the coat above the buttonhole. These will be overlapping when the coat is finished so they need to be able to overlap evenly.

Hemisferic coat right front pattern piece

These changes turn this pattern piece into the coat front for both the left and the right side. The placket is only applied to one side, and the other side is sewn with a facing just as a regular coat.

To make the coat facing, which is necessary since the facings in the pattern are also asymmetrical due to the zipper design, I used this new updated coat front, overlaid the lining side piece and just drew a facing that would match up to the side front lining piece. This coat definitely has a number of pieces because the neckline has some facings that mirror the shape of the sleeve and then attach to the lining. But I could use all of them except the center front facing which needed the redesign.

Placket How To:  I actually didn't take a lot of photos when I was doing the placket portion as I was in a super time crunch to finish this, but I did write a post on Craftsy which is a step-by-step tutorial that can be applied to a variety of garments. If you are interested then take a look at that. As a condensed version here is a composite of the photos in that tutorial, but really - take a look at the Craftsy link, you will be able to see exactly how it is done.

hidden buttonhole placket steps

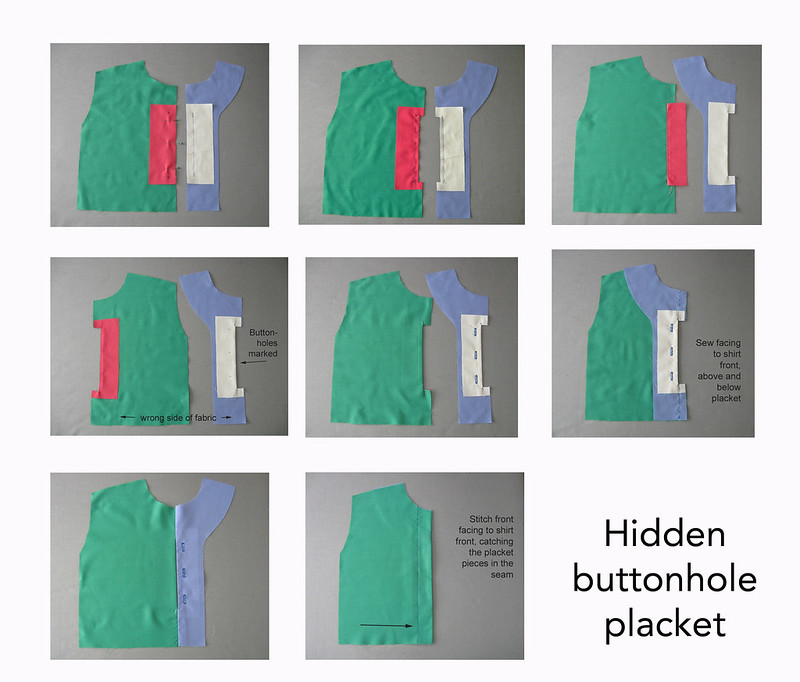
After all the sewing of facing etc, this is what you end up with. So the idea is the same on the wool coat - just a bit more tricky with a thick fabric.

Hidden buttonhole placket example


With the coat, the placket adds an extra two layers of fabric so I knew that I couldn't do it in the wool or it would be about 1/2" thick with all those layers. I decided to use silk charmeuse in the placket for the two extra layers and found the perfect color at Stone Mountain. I only needed 1/3 of a yard and cut two strips of 6 inches wide. While I wanted them to be thin they did need some support so I used Sheer Elegance Light in black on both pieces of charmeuse. Also on the coat facings, the same interfacing.

H coat stitch silk to facing

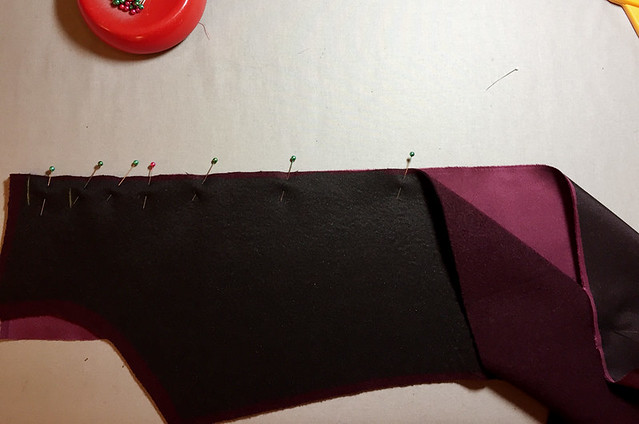
The silk and the coat facing are sewn right sides together. I did cause myself a lot of extra work because I couldn't quite decide where I wanted the placket open edge to start on the coat front, so I actually played around with it on the coat. I do not recommend! It's better to figure that out beforehand, I could have experimented with some scraps and figured out all the measurements. Live and learn.

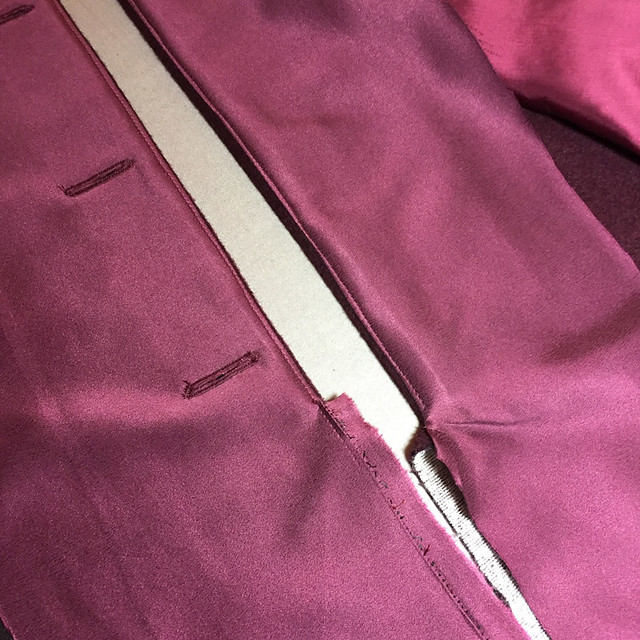
I posted this photo on Instagram which illustrates that point exactly - the stitched edges of the bottom of the placket sides don't match and I had to do some extra work and trimming to make them equal.


H coat silk placket and buttonholes

But I finally got it all worked out and stitched the front facing and placket to the coat front. Oh, I forgot to say, even before that, the buttonholes needed to be made. And this time I remembered to stitch them horizontally (unlike the Bamboo coat where I sewed them vertically, to my great annoyance). That pattern actually has a hidden buttonhole placket so if you want a coat with that feature then that is the pattern for you, and a good way to get the hang of the construction. Although the welt pocket steps on that pattern - seemed so complicated and not at all the way I would do it).

Here's how the coat front looks on the inside.

H coat front inside buttonhole view

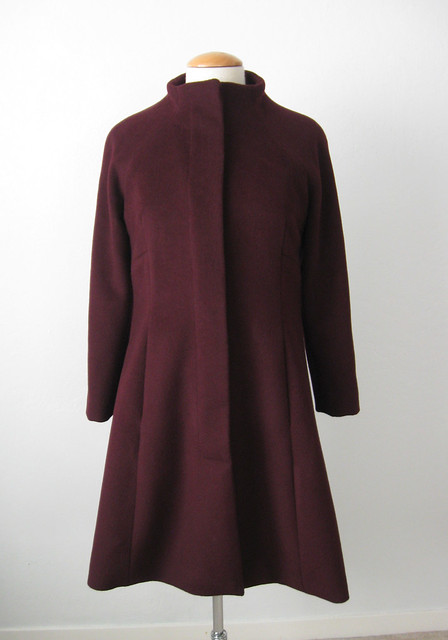
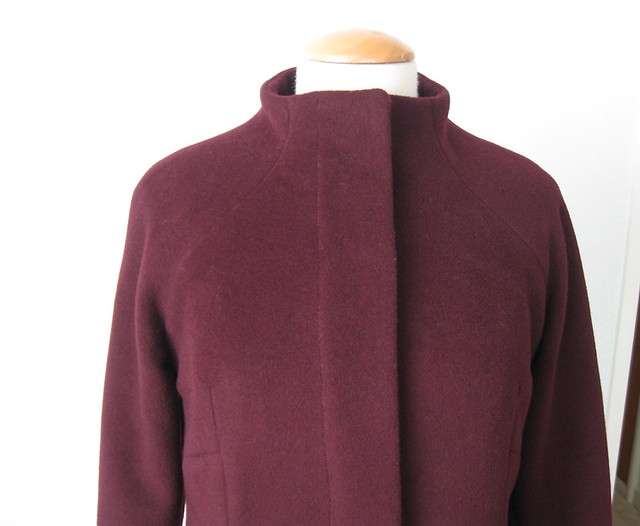
And all buttoned up.  The lighting in my sewing room plus probably my photography skills make me crazy and the same thing looks a different color in various images.

H coat front buttoned up

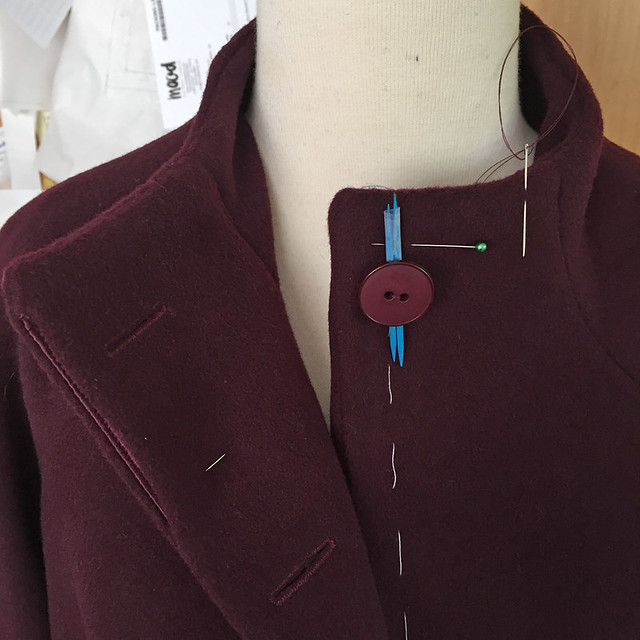
And once all is done, sewing on the buttons. Oh I hate sewing on buttons....But hey, we've come this far and a coat needs buttons. My method: ONE AT A TIME! Yes, I sew the buttons on one at a time. Start with the top. Sew on. Button up. Mark # 2. Sew on. Button both up. Mark # 3 and so on until finished. Because why? Because I can't stand it when one button is just ever so slightly out of place and tugs at the coat front. Remember the Quart coat? I sewed those bleeping buttons on multiple times until I got the button alignment and the plaid matching just right.

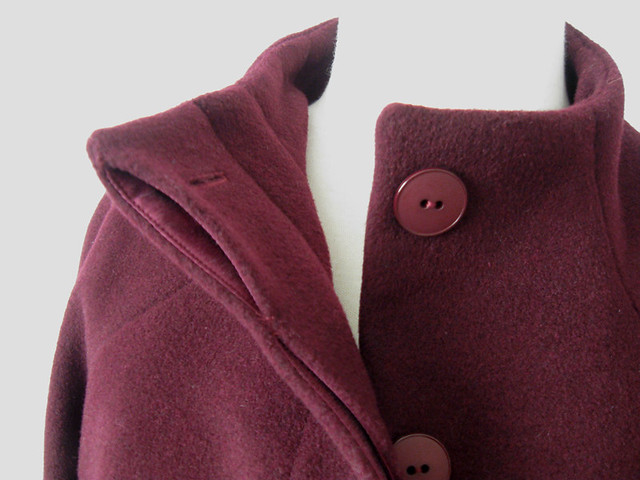
This is a good view of the completed placket. The silk insides are nicely hidden but the color match couldn't be better. I did hand stitch the edge of the placket closed, halfway between each buttonhole so that it wouldn't flop open and that worked really well. To create enough space for the buttonhole shank I taped two toothpicks together. A thick coat means the buttons need to be sewn on with a good 1/8 - 1/4" of space, in order to fit into the buttonhole and rest on the top of the coat without strain.

H coat sewing on buttons

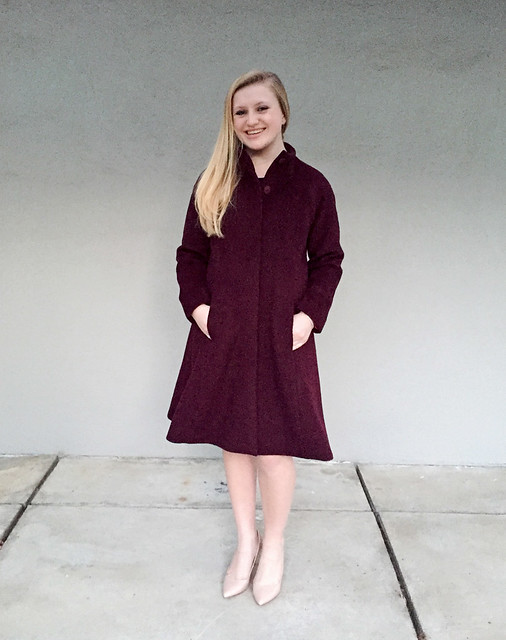
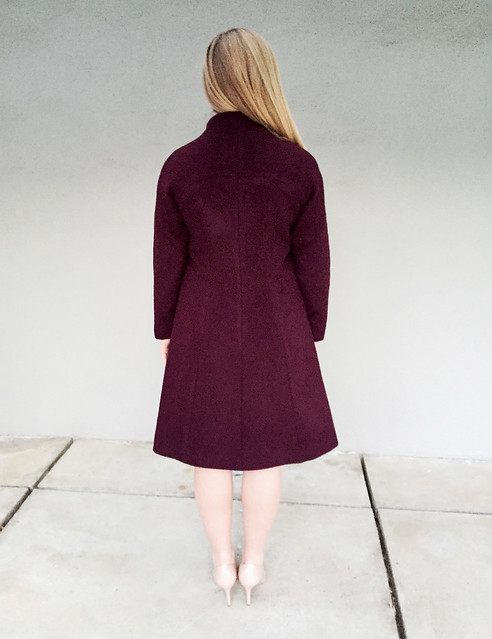
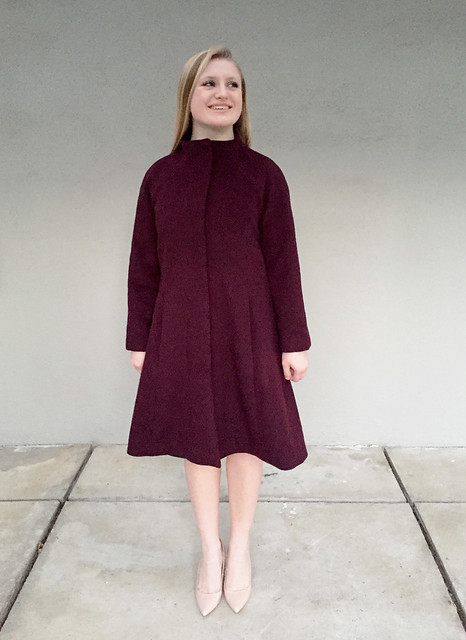
OK - that's the scoop on my playing around with plackets. Up next - I have great photos of the completed coat modeled by the lovely owner.

And a backlog of other stuff to post here. Told ya I was going to blog more this year!

Happy -  is it still Winter? - Sewing,   Beth

Man, the weather is weird! My garden doesn't know what to do with itself, some things are blooming and others are thinking, what? where's the spring showers. Which don't look like they are arriving any time soon and people are starting to mention the dreaded "drought" word again. Yikes, again? after our nice rainy winter last year. But on the other hand, it is supposed to be about 72°F for at least the next week or so. California sunshine - hey, we just have to live with it, the good and the bad 😎.

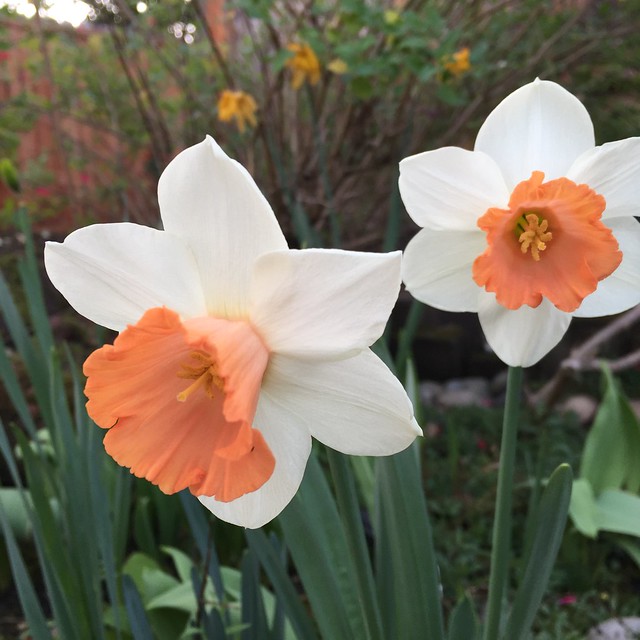
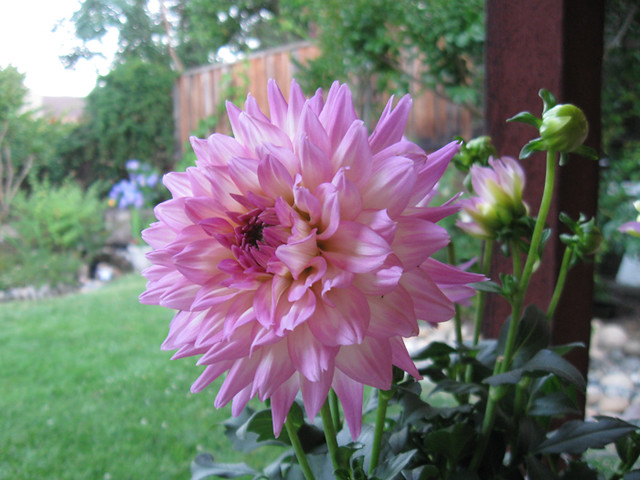
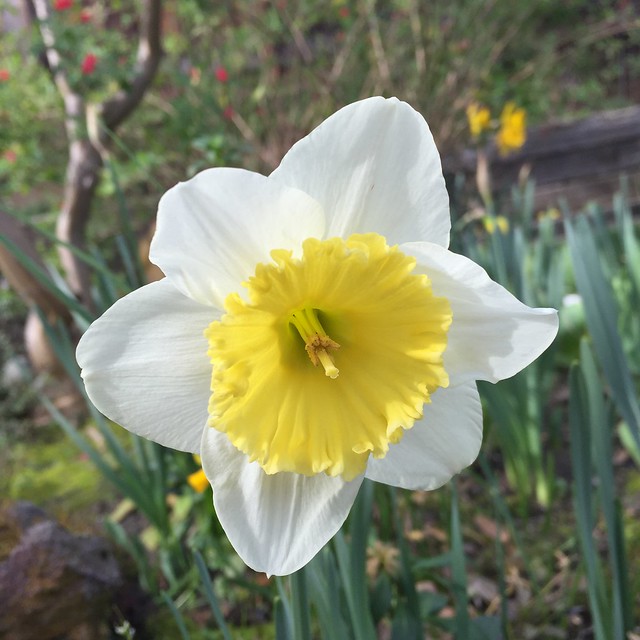
Today's garden picture. I wish I could remember the name of this Salvia, it has turned out to be a weird plant, which I put in last spring, and it grew and grew, to 6 feet tall but never bloomed. And then recently out popped these flowers at the end of the long stalks. The color is fantastic but it's a bit of an odd one .However it has passed the bloom test - so it's a keeper for now.

salvia