Tuesday, October 26, 2010

Grey wool crepe suit - sleeves and more

Sewing on the grey wool crepe suit from my previous post continues.  This fabric is a dream.  The jacket is almost finished, but I took a few pictures along the way.   If you notice the orange thread near the collar, I will explain that below.

Grey suit sleeve head

Grey suit shoulder stay
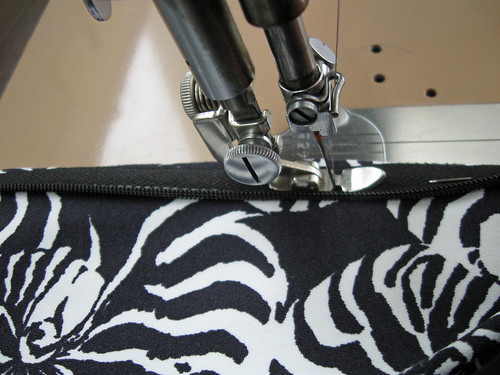
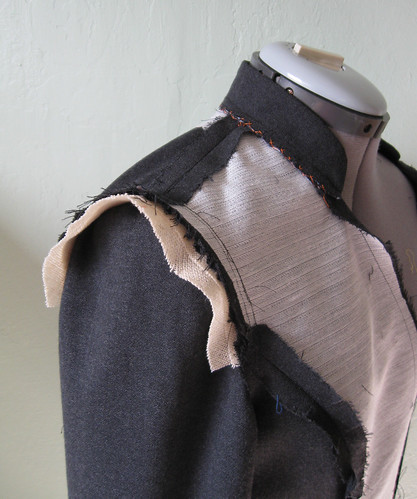
To stay the shoulders, instead of stay tape, I cut a piece of the selvedge from the lining, and used that in place of stay tape.  I think the commercial stay tapes are just a bit too stiff whereas the lining selvedge is thin and presses better but achieves the same effect and satisfies my fabric miser tendencies.


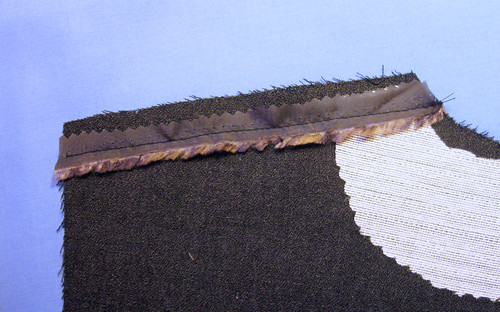
Since I almost always sew in linings by hand, I can do what I like with the seam allowances at the neck and collar so in this case I have sewn them down flat using a catchstitch.  
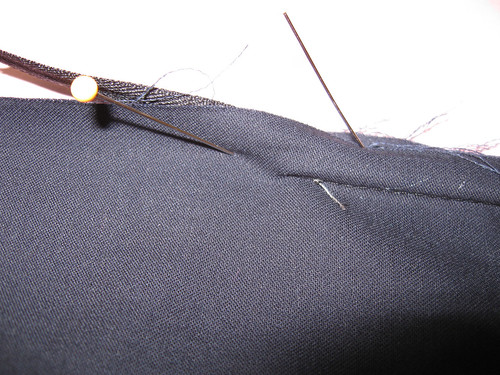
A catchstitch is kind of a criss-cross X pattern of stitching that is really useful.  If you want to see how to do it check out this Oliver + S blog post or there are a number of videos online.


Grey suit catchstitch

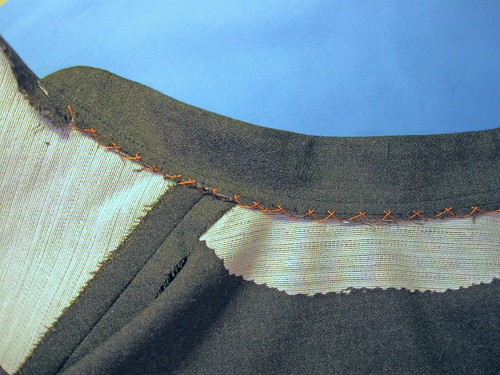
Getting back to the orange thread - this catchstitch will never be seen, so I went to my stash of silk thread and picked the most unlikely color that I will never need for any other project.
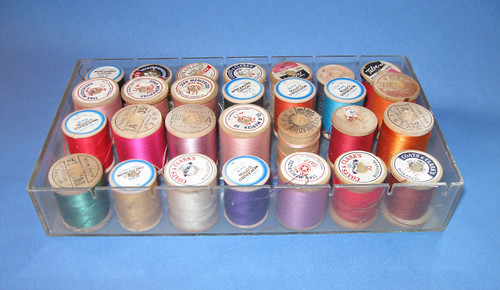
I found this little rack of threads at an estate sale and bought it along with a huge trove of other goodies.   See those beautiful little wooden spools of Belding and Corticelli silk thread.
I miss that company that seemed to disappear when I wasn't looking and always thought the thread colors were like little jewels.

Silk threads

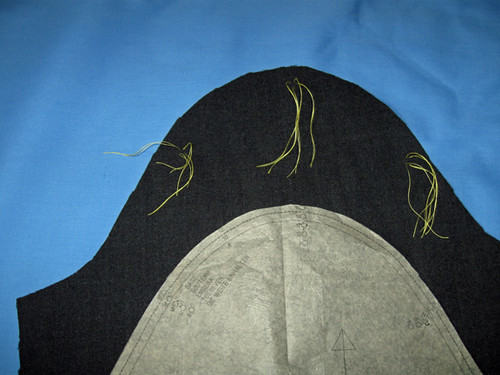
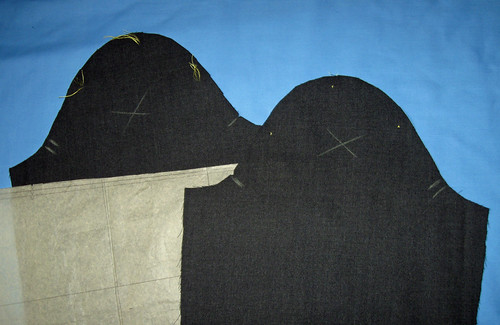
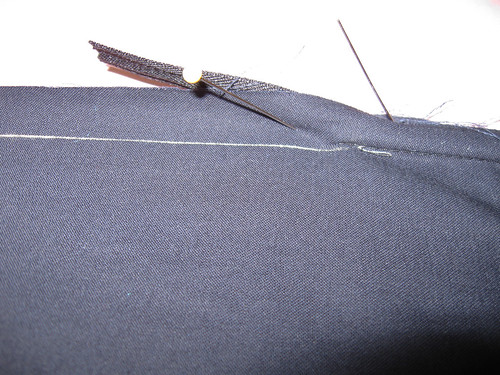
Once the sleeves were attached I sewed on sleeve heads.  I think this is some kind of wool, not sure as I have a big piece and cut out the sleeve heads myself.  Bias strips 10" x 2" and then fold over about 1/3 and press lightly.    Hand sewn in place onto the seam allowance on the sleeve side.    The photo on the right shows the sleeve head in place on the sleeve on the right side of the photo, the left side sleeve does not have its sleeve head.  It may be subtle but there is a difference.   The sleeve with the sleeve head has not been pressed (and will not be)
but the sleeve cap is smooth and ever so slightly filled out.


Grey suit shoulder difference
Grey suit sleeve head

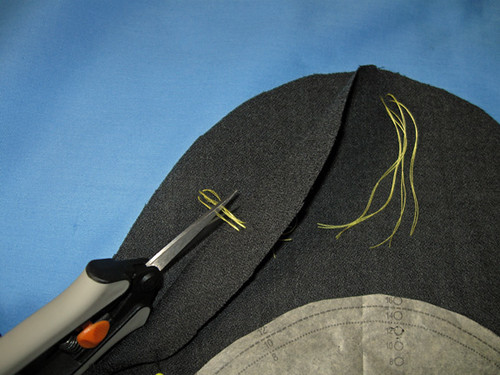
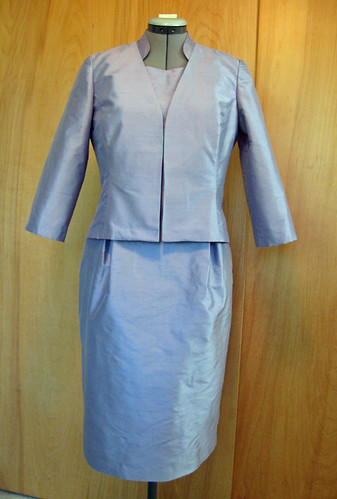
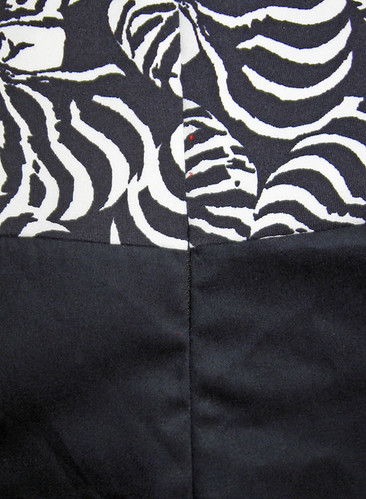
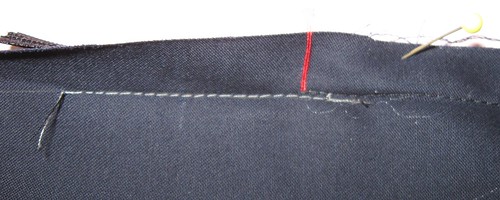
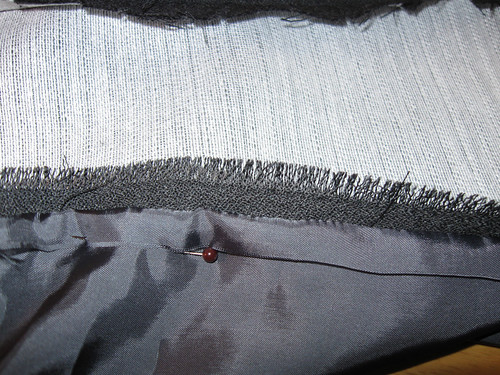
The last step I have finished on this jacket is to sew in the lining, here I have used a combination of machine sewing and hand sewing.   Then I got to try out a new technique called Ravel Grading that I learned from Pamela Emy on her blog, Off-The-Cuff.  Her blog is fantastic and I have learned so many great things since I discovered it.  Plus her interfacing is really superior and now my first choice for tailoring projects.


By doing the Ravel Grading, bulk is eliminated in the seam allowance without trimming.
On this wool crepe the technique works especially well, I am interested to see how it works on other fabrics.   Here I have removed threads for about 1/4" reducing the thickness of the seam allowance on the center front edges of the jacket.  

Grey suit ravel grade

Next up,  finish this jacket - started the pants last night.


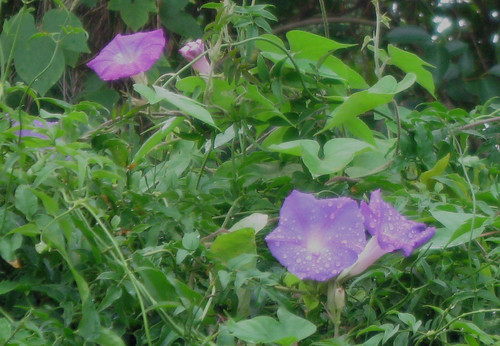
Here is today's SunnyGal Garden photo, taken on Saturday in the rain.  Most years after the pink Jasmine on the back fence has finished blooming, I see the morning glories growing and they bloom in the late summer, so there is a scattering of these purple jewels across the green carpet of the jasmine vine.  But this year there have been no flowers until just the last week or so.  What a strange garden year it has been in N. Calif. 2010.   The first of the morning glories, when they should be ending!


morningglory

Friday, October 22, 2010

Crazy for Wool Crepe

Wool crepe - great colors, low itch level, presses like a dream,  and tailors beautifully.  I especially love it for suits and dresses.  Last night I started a suit in grey wool crepe for Ellen.  She is a great friend of my mother's and I have made a number of things for her in the past year, including this same jacket in navy blue wool crepe  (as well as silk dupioni - photo to follow)


I broke one of my own rules in that I cut it out at 10pm, which is the not best thing to do - however no harm done. Also I did all the markings.  Once I cut out - I have to mark all pattern pieces and then it can "rest".


Here is a look at the tailor tacks.  Stitchywitch had a post last week about marking fabric, Making Marks and she concluded that she disliked doing tailor's tacks, so she boldly did the many, many marks on her very lovely dress with chalk.  Hmm.  interesting.  And probably really helpful on that pattern.  Her dress is adorable and I wish I had time to make that pattern and/or somewhere fun to wear it.  I confess I have used chalk on some things with a lot of pleats.   But in general - I support the tailor tack!   anyone with me?


Esuitsleevepatternview

I generally do 1 loop and snip, but for purposes of this photo, 2 loops and about 2" per tack
so they would show in the photo.


Esuitsleevetailortack1

Next I carefully separate the two sleeves, and snip the threads, so I have threads on both sleeves.    Of course I have on multiple occasions pulled the top piece off without snipping, with leaves you with one piece marked and the other blank.  No harm, just have to redo.  Like any other error - make it a few times and you will teach yourself not to do it.

Esuittailortack2

Lastly, I do use chalk here to mark the inside of the sleeve.  For a fabric like this wool crepe the right and wrong sides are indistinguishable, so it is easy to get one piece turned over and then sewn up, with the result being two left sleeves.    Don't tell me you haven't done that :)
After separating the sleeves and snipping the tailor's tacks, I put a chalk X on the inside of the sleeve.   Also I have put chalk hash marks on the double notches just for another visual aid.  It is strangely enjoyable to make the chalk X, kind of like coloring outside the line instead of always being careful and accurate.  


Esuitchalkmarking
In the course of a lesson recently, I mentioned to one of my sewing students, "well you can see that is the back piece because it has double notches"  and she stopped me there.   If you are new to sewing, take a look at the pattern pieces and see that this is the case,  generally single notches are for front pieces, double notches for back pieces, triple notches are often seen on the center back seam.  Thus the sleeve has double notches where it attaches to the back of the jacket and single notch where it attached to the front.    Not always exactly this way - but there is an order to the notches.


Here is the pattern envelope and jacket that I made last year from this same pattern.
In this case it was for a 2-piece dress and jacket.  

NL6633E silk dress with jacket

Lastly, here is a finished view of the dress I was working on last week, where I posted about invisible zippers.  This is Simplicity 2550 and I really like this pattern, it is very flattering on a variety of figures.  It is a bit wrinkled as it was worn to a wedding on Sat.   Cotton interlock knit on top and cotton sateen in navy blue on the bottom.


Kdress front

no garden photo today - not much blooming, it is starting to rain, lots of leaves to rake and generally heading into the least interesting time of year here, gardenwise.
Time to stay inside and sew!

Tuesday, October 12, 2010

Invisible Zipper, you don't scare me

Halloween is right around the corner - and speaking of scary things.


color zips


                                oooooooohhhhhhhhhhhh. . . . . . . . . the Zipper . . . . . . . . . 


This week I am making Simplicity 2550, combining 2 fabrics.  Cotton Interlock knit print in navy blue and white for the top, and cotton sateen in solid navy blue for the skirt portion.  Recently I have run into a lot of zipper phobia among friends and sewing students.  Perfectly brave sewers who say - I can make anything, as long as there is no zipper.
Oh, there are a lot more scary things out there in pattern world.  Welt pockets, two piece tailored set in sleeves,  buttonholes.  I still hold my breath each time I cut open a buttonhole.


But zippers - nah.  Invisible zippers, a few more steps - but with practice more likely to come out just fine.  There are a lot of great tutorials available, which this is not.  But here are a few of my tips on the key steps to get that zipper to disappear like it should.  


First, prep the zipper as it states on the package.  Unzip all the way and Iron each side so that the zipper teeth side is slightly uncurled. Don't worry about how flat you get it, and beware of melting - just enough so it is relaxed a bit.  


Pin the zipper on one side of the garment,  placing the top of the zipper at about 1/4" below the seam allowance.  So 5/8" seam allowance plus 1/4" = about 7/8" down from top of garment.  This allows for some wiggle room at the top and no cutting off the top of the zipper.
Pin all the way down the zipper, to about 1-2 inches from the bottom.  Then I machine baste the zipper - just as I would be sewing it later.  But by machine basting, you get that zipper attached to the garment, and you can fiddle with the exactness later - fix any ripples or puckers.   MY Tip:  use a contrasting thread.  So here I have used grey thread on a dark blue zipper.  The thread will not show, and it is SO much easier to pick out if necessary.


Kdress zip stitch closeupKdress zip foot close up


Once the first side of the zipper is put in, lay the two sides of the garment down flat, and line up the second side of the zipper.  This is where the boo boos can happen,  so I find the point that matters.  In this case it is where the two fabrics meet at the waist.  If one is not careful, the zipper can shift and then you have that eye-searing problem of mismatched seam and/or pattern.  Calling out to everyone, look at me, zipper insertion malfunction. Oh be quiet
stupid zipper.   But we can silence that zipper by lining up the two sides of the zipper, putting a mark continuously across the zipper where it landed on the first side that you have already sewn down.  Now we have an anchor - a place to start from when pinning the other side of the zipper.


Kdress Zip chalk mark

Then pin upward and downward from the anchor point.  Don't worry if it is a tiny bit off at the top of the garment - you can adjust that when you apply the facing or lining.  If you are off by more than 1/4", could be a problem, but less than that will be fine, adjust later.   Then stitch that side of the zipper.   
Note that I do not use a special invisible zipper foot.  Tried that and I just didn't like it.
I use the Singer adjustable zipper foot, I can slide the actual foot to just the right point for stitching.  If you have any sort of zipper foot - give it a try.  Moving the needle position may be necessary.


Kdress zip outsideAfter I have stitched the second side, check your work and see if everything matches up.  In this case with two different fabrics it would be very noticeable, however on other garments, for example with a waist seam, you want the seams to line up nicely and look continuous.   So I am happy with this zipper, which is machine basted.  At this point I usually try on the garment to check the fit and see if the upper back fits.  That is an area where a small adjustment can make the neckline fit a whole lot better.  Sew over the basting with regular length stitches - a lot easier with no pins to slow you down, you can confidently get close to those zipper teeth.   Here it is sewn but not pressed.
After stitching, I pin the seam closed where the stitching stopped, and then draw a chalk mark along the seam line where I plan to stitch.  If you leave a little "tail" of zipper, as shown,
it makes it easier to finish the bottom.  You can trim that off later (after first sewing across the bottom of the zipper to keep the pull from falling off  - ask me how I know that)

Kdress bottom of zip1Kdress zip2

Now that our chalk mark is drawn, stitch about 2-3 inches,   just creeping alongside the existing stitching that holds the zipper in place.  Start 2-3 inches away and stitch toward the bottom of the zipper, running alongside the zipper stitching about 1/2 inch.  Below I have used grey thread to make it more visible.   Don't be concerned about the rest of this seam, just get this transitional area to be "seamless."  The piece of red thread shows where the zipper stitching ended.
Kdress zip4

That is it - you are done.  Here is the finished zipper.   On the left zipped down, on the right zipped up.  Like a Halloween ghost - bottom of the zipper has disappeared.  The rest of the seam needs to be sewn but after I do an invisible zipper I always take a break.  


Kdress zippedup
Kdress zip3

Like anything else - practice makes perfect.  Look in the bargain bin, find a few of those weird color invisible zippers, pull out some scrap fabric, give it a try and let me know how it works out.  


Here is today's SunnyGal Garden photo.  I love sunflowers but instead of honeybees they seem attract more squirrels in the autumn frenzy of gathering seeds and acorns.  But they are fun to watch.


Sunflower aug10