

oooooooohhhhhhhhhhhh. . . . . . . . . the Zipper . . . . . . . . .
This week I am making Simplicity 2550, combining 2 fabrics. Cotton Interlock knit print in navy blue and white for the top, and cotton sateen in solid navy blue for the skirt portion. Recently I have run into a lot of zipper phobia among friends and sewing students. Perfectly brave sewers who say - I can make anything, as long as there is no zipper.
Oh, there are a lot more scary things out there in pattern world. Welt pockets, two piece tailored set in sleeves, buttonholes. I still hold my breath each time I cut open a buttonhole.
But zippers - nah. Invisible zippers, a few more steps - but with practice more likely to come out just fine. There are a lot of great tutorials available, which this is not. But here are a few of my tips on the key steps to get that zipper to disappear like it should.
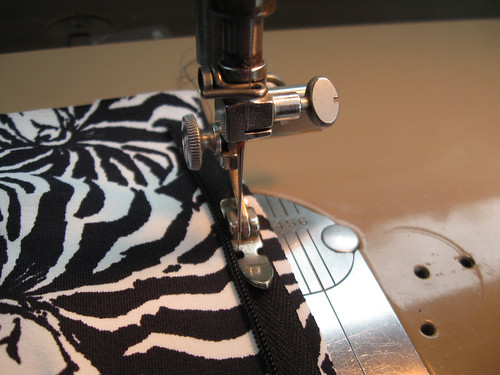
First, prep the zipper as it states on the package. Unzip all the way and Iron each side so that the zipper teeth side is slightly uncurled. Don't worry about how flat you get it, and beware of melting - just enough so it is relaxed a bit.
Pin the zipper on one side of the garment, placing the top of the zipper at about 1/4" below the seam allowance. So 5/8" seam allowance plus 1/4" = about 7/8" down from top of garment. This allows for some wiggle room at the top and no cutting off the top of the zipper.
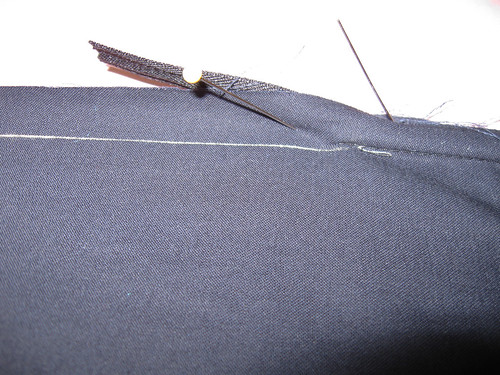
Pin all the way down the zipper, to about 1-2 inches from the bottom. Then I machine baste the zipper - just as I would be sewing it later. But by machine basting, you get that zipper attached to the garment, and you can fiddle with the exactness later - fix any ripples or puckers. MY Tip: use a contrasting thread. So here I have used grey thread on a dark blue zipper. The thread will not show, and it is SO much easier to pick out if necessary.
Once the first side of the zipper is put in, lay the two sides of the garment down flat, and line up the second side of the zipper. This is where the boo boos can happen, so I find the point that matters. In this case it is where the two fabrics meet at the waist. If one is not careful, the zipper can shift and then you have that eye-searing problem of mismatched seam and/or pattern. Calling out to everyone, look at me, zipper insertion malfunction. Oh be quiet
stupid zipper. But we can silence that zipper by lining up the two sides of the zipper, putting a mark continuously across the zipper where it landed on the first side that you have already sewn down. Now we have an anchor - a place to start from when pinning the other side of the zipper.

Then pin upward and downward from the anchor point. Don't worry if it is a tiny bit off at the top of the garment - you can adjust that when you apply the facing or lining. If you are off by more than 1/4", could be a problem, but less than that will be fine, adjust later. Then stitch that side of the zipper.
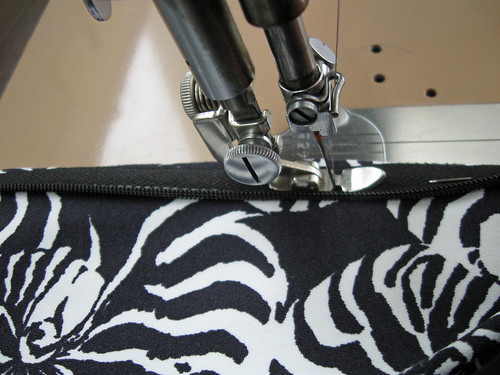
Note that I do not use a special invisible zipper foot. Tried that and I just didn't like it.
I use the Singer adjustable zipper foot, I can slide the actual foot to just the right point for stitching. If you have any sort of zipper foot - give it a try. Moving the needle position may be necessary.
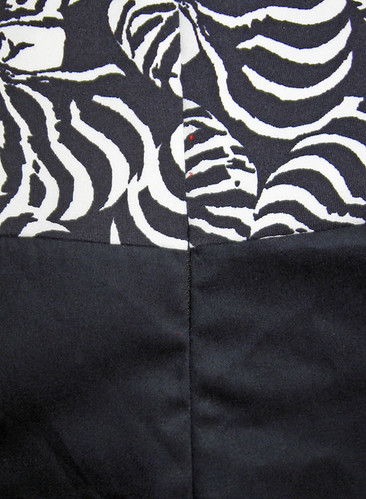 After I have stitched the second side, check your work and see if everything matches up. In this case with two different fabrics it would be very noticeable, however on other garments, for example with a waist seam, you want the seams to line up nicely and look continuous. So I am happy with this zipper, which is machine basted. At this point I usually try on the garment to check the fit and see if the upper back fits. That is an area where a small adjustment can make the neckline fit a whole lot better. Sew over the basting with regular length stitches - a lot easier with no pins to slow you down, you can confidently get close to those zipper teeth. Here it is sewn but not pressed.
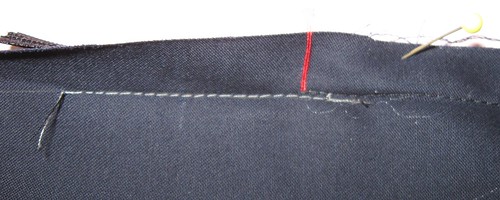
After stitching, I pin the seam closed where the stitching stopped, and then draw a chalk mark along the seam line where I plan to stitch. If you leave a little "tail" of zipper, as shown,
it makes it easier to finish the bottom. You can trim that off later (after first sewing across the bottom of the zipper to keep the pull from falling off - ask me how I know that)
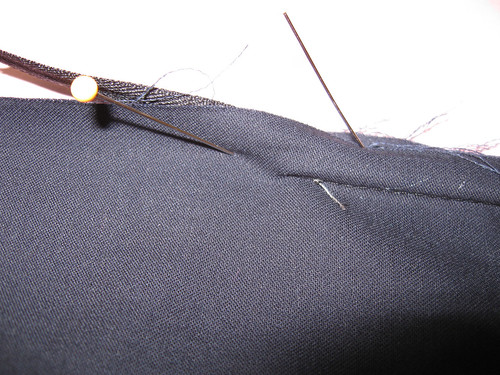
Now that our chalk mark is drawn, stitch about 2-3 inches, just creeping alongside the existing stitching that holds the zipper in place. Start 2-3 inches away and stitch toward the bottom of the zipper, running alongside the zipper stitching about 1/2 inch. Below I have used grey thread to make it more visible. Don't be concerned about the rest of this seam, just get this transitional area to be "seamless." The piece of red thread shows where the zipper stitching ended.
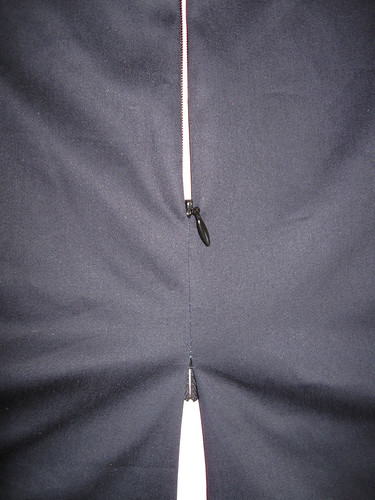
That is it - you are done. Here is the finished zipper. On the left zipped down, on the right zipped up. Like a Halloween ghost - bottom of the zipper has disappeared. The rest of the seam needs to be sewn but after I do an invisible zipper I always take a break.

Like anything else - practice makes perfect. Look in the bargain bin, find a few of those weird color invisible zippers, pull out some scrap fabric, give it a try and let me know how it works out.
Here is today's SunnyGal Garden photo. I love sunflowers but instead of honeybees they seem attract more squirrels in the autumn frenzy of gathering seeds and acorns. But they are fun to watch.


Thanks for sharing your tips. I think they are very helpful. Pretty Sunflower!
ReplyDeleteTHANK YOU FOR THIS. I AM FOREVER IN DEBTED! LOL I have been looking for a tute so I can improve my zippers. I have always shied away from invisible zips because mine look like they were driving while intoxicated! I am linking to your blog from my blog if you don't mind.
ReplyDeleteAnd that is one beautiful flower!
Thank you so much for these tips--Mushywear told me about them and I refer to them each time I insert an invisible zip now. :)
ReplyDelete3.5 years later and I *still* refer to these tips!!
ReplyDelete