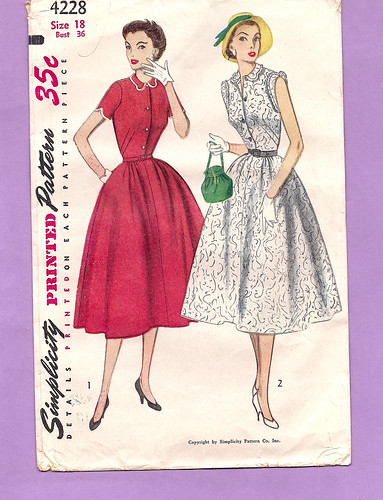
Another peek at the pattern envelope, which was included in the paper bag with the dress pieces and extra fabric.
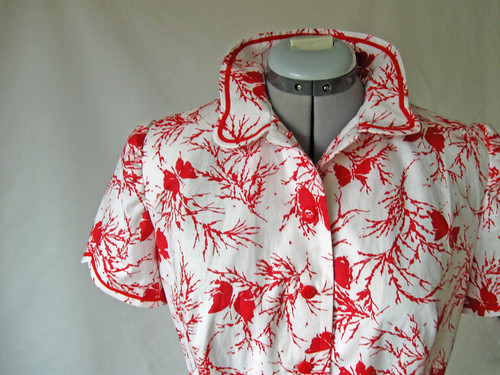
You can see on the red dress illustrated above, there is trim on the collar and sleeves to accentuate their shape, so I decided to follow their lead. Rummaging in my box of trims (more stuff I found at estate and garage sales) I came up with a package of Middy Braid, in the exact shade of red. I don't think I have ever used it before, but I certainly will try it again. Sews on very easily and is flexible around curves. So just the thing to trim and outline.
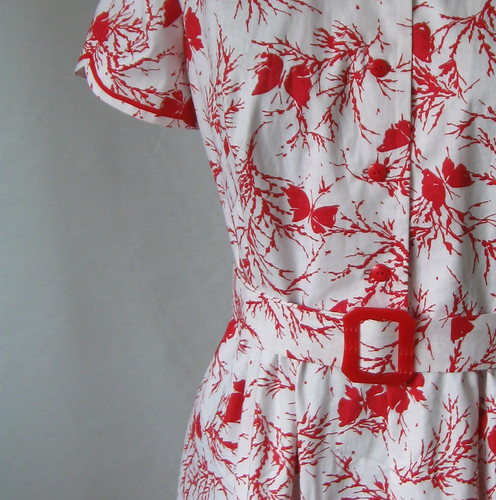
This dress definitely needs a belt, so I made one out of the remaining fabric which Margaret supplied. (which is the name I have given to this long ago and no longer anonymous sewer).I ordered a vintage buckle from Etsy - and the color could not have been better.
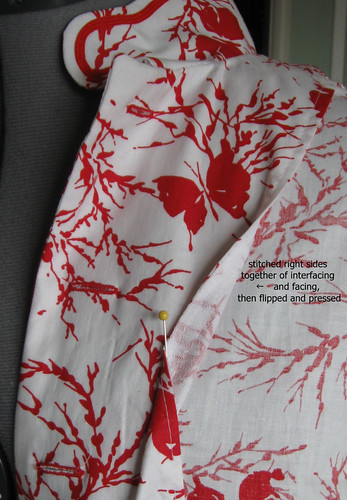
Sewing this dress was completely straightforward, the only new thing I tried was actually something big to me. I sewed the fusible interfacing, right sides together to the dress facing piece, and then flipped it and pressed. This serves to enclose the facing edge, no need for any other treatment. I think I saw this in Threads magazine, can't recall if it was in a recent one or in an old issue (now I have a stockpile of these old magazines- purchased at a sewing guild sale, the fashions are out of date but the sewing tips are useful). Here is the facing.
Perhaps you have been doing this all along - but I could have kicked myself for not doing this before.
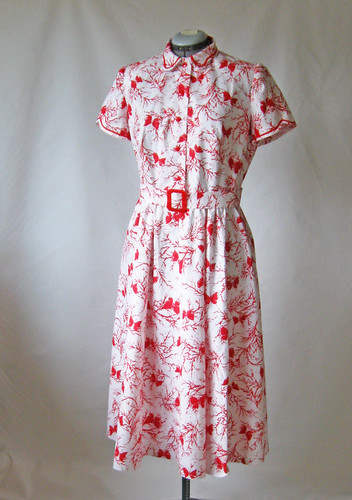
The pattern which is Simplicity 4228, is a size 18 in their 1953 sizes, which gives the following measurements: Bust 36", Waist 30", Hip 39".
Looking at a current Simplicity pattern that would be between a size 14 and size 16.
The finished garment measurements are the following: Bust 43.5", Waist 36" , Back waist length is 16.75 and the length of the skirt is 30". Total length from shoulder to hem is now 46.5 inches. These finished garment measurements show that there is quite a bit of ease, which seems correct for this style. I have not hemmed it yet, and it does look a bit creased in the photos. The fabric presses out well, but so far I have not steam pressed enough to remove all the wrinkles as I have been treating it a bit delicately.
A few people have asked what I intend to do with the dress. It is definitely not my size, this dress is perfect for someone a lot taller than I am. I could cut it down, but I prefer to preserve it as Margaret had intended. So I think I will list it in my Etsy shop, and hopefully someone in this size range will be interested in a "new vintage" dress. If you are interested let me know.
Edit: I just listed this dress in my Etsy shop, here is the link Cotton Shirtwaist Dress
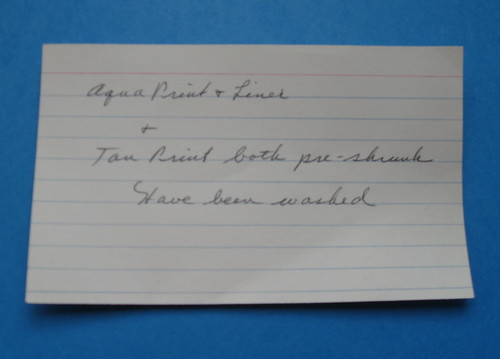
One last remembrance of this long-ago home sewer. I was looking in my stash for some light blue cotton lining for a dress I was working on this weekend, and pulled out some fabric from the Margaret collection. Something fluttered out onto the floor, and it was this card:
If I didn't before, now I really wish I could meet this woman who fabric shopped and sewed a long time ago. I am sure this note was for her own records, but I felt that she was letting me know a little bit more about her, and I am glad to have met her through this project.



The dress turned out gorgeous! I am sure it will go quickly once you put it in the shop. The application of the interfacing is the only I way I do it. Makes the facing so much nicer, doesn't it? Congratulations on a job well done.
ReplyDeleteAngela
Your dress is great! Its future owner will look so pretty
ReplyDeleteWhat a treasure to find. The fabric is beautiful I love butterflies. I hope the dress finds a good home.
ReplyDeleteFirst, love the dress and the story behind it and everything.
ReplyDeleteSecond, I did not know that facings/interfacing trick! I will remember and use that tip in the future.
I'm going to post your dress photo on the Vintage Sewalong site.
This is such an amazing story! And thank you for the interfacing tip, I would never have thought of it! I tend to avoid facings, but maybe this tip will warm me up to them...
ReplyDeleteOoh it is gorgeous made up - I love the trim! You've done a beautiful job, and you simply must tell the buyer the story behind the dress!
ReplyDeleteI once found the original receipt for a pattern in the envelope with the buyer's name and address on the receipt - she lived not far from me and bought it from a nearby department store - about 50 years earlier!
I haven't seen that interfacing method either - it looks very neat!
I think you've done Ms. Margaret proud.
ReplyDeleteBeautiful dress, every detail.
ReplyDeleteThe dress turned out beautiful - I'm sure Margaret would be proud! I hope the dress finds a home where it will be loved and worn. :-)
ReplyDeleteThat is such a beautiful dress. You brought it to life.
ReplyDeleteOh it turned out lovely! Wonderful job. I'm sure someone will adore this dress and bring it home! I just learned this interfacing tip too and used it on my birthday jacket. I saw it on Hungy Zombie Coutures' blog. I love the clean edge too!
ReplyDeleteThat is a beautiful dress, and what a find!
ReplyDeleteThat is a divine dress and I hope it finds an appreciative new owner soon.
ReplyDeleteBeautiful dress --- so nice that you brought it to life.
ReplyDeleteBeautiful dress and story .
ReplyDeleteThanks for the facing tip.
An amazing dress to match an amazing story :)
ReplyDeleteI dind't know about this facing tip, but it's briliant ! I will most definitely use it on my next project
ReplyDeleteThanks for sharing!
Beautiful story. You did right by Margaret. She was a credit to sewing, and so are you!
ReplyDeleteI just read your interfacing tip. I've been doing that for at least 30 years. Here's another tip to make it an even neater look. After you stitch the interfacing to the the facing, go back and understitch on the facing side before pressing. Then you won't need to topstitch on the facing. It gives a really classy look, which might not be a big deal on the inside of a dress, but it really looks nice on an unlined jacket.
ReplyDelete