
The last few days I have been catching up on everything, and finishing the unconventional wedding dress made from Japanese Kimono silk I mentioned some time ago. I have taken lots of pictures but the post and photos of the bride in her dress will have to wait until after the wedding which is in 2 weeks.
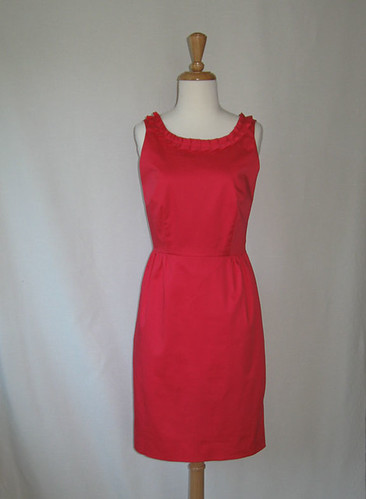 Today I did some alterations and finishing on a dress I started months ago. My neighbor Jenn kindly models for my Etsy shop photos and looked so great in this color so I decided she should have it.
 I used Butterick 5314 (out of print) as a starting point, which is a basic dress with bust and waist darts, separate skirt, and different neckline views.
I changed the neckline to make it a bit deeper, and pulled in the armholes at the shoulder as I like that look. For the skirt I changed it to a very slightly gathered skirt where the center front is flat and then the gathers begin where the front darts would be which gives an effect of a smooth front but the ease of gathers.
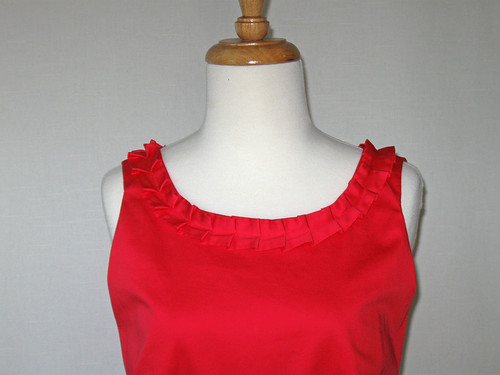
Here is a look at the pleated trim on the neckline. This is so popular right now and I have my own low-tech way to make the pleats.
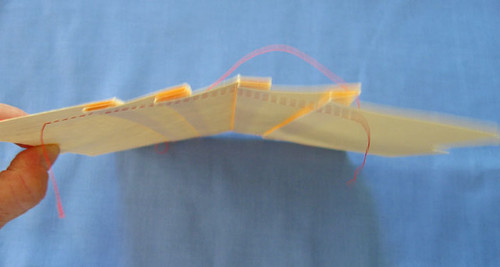
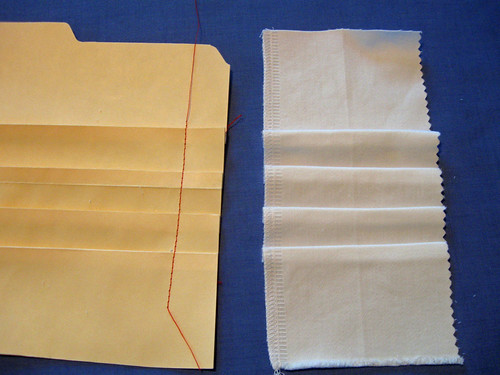
This is my pleat maker, which started as a manila folder. To make one, measure and mark the pleat distances, fold, press and secure the edge by stitching. No glue or pins needed.

Before pleating, make the ruffle to the desired width, and finish the edges. Then pleat away.
I used a scrap of white fabric, unfinished, to show how the pleater works.
On left, fabric placed in pleater. On right, fabric pressed and ready to shift to pleat the rest of the strip.
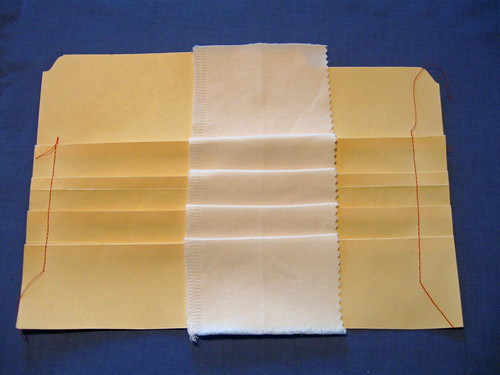
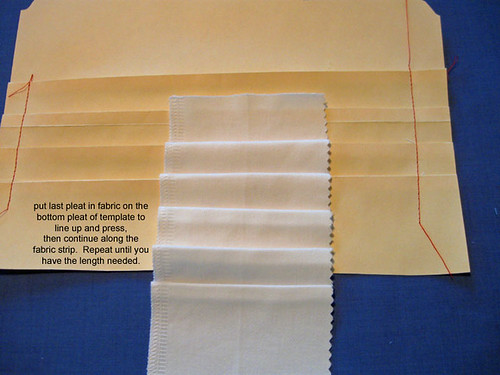
Next step is to shift the pleated area down, placing the last pleat into the bottom slot, and then continue until the entire trim is pleated. Once I have the whole strip pleated, I can stitch down the center to secure, or just pin it directly on the garment and then stitch down.
So that is my handy-dandy handmade pleater. I think I saw a contestant on Project Runway, Andy from Hawaii, show Tim Gunn pleated garments he was working on and there was a quick flash of his handmade pleater so that is where my idea came from. Does anyone else watch that show with a notebook in hand? There are some very clever tips and techniques for the sharp-eyed viewer in between all the workroom drama, which I also enjoy.
 Here is Jenn in the dress - actually before alterations so it is a little big on her but I think the color suits her.
I have lots to catch up on this week, around the house and in the sewing room. Hard to resist the temptation to do too much - but I REALLY don't want to go back to where I was 3 weeks ago. So I will be taking it easy and enjoying feeling better :)
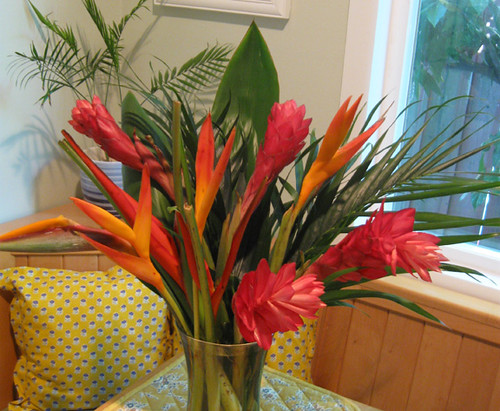
Definitely no gardening for me for the time being, so I will share a beautiful tropical bouquet sent to me as a get well wish.


So very glad to hear that you are on the mend. I have missed your blog posts. Hope that you heal quickly from here on in and get to do some of the things that you enjoy doing. Take care. Sally S
ReplyDeleteThats a really cool idea, as you say pleated trims are everywhere at the moment and that looks like a really easy way of forming the pleats. I might steal that idea soon!
ReplyDeleteI wondered what had happened... I'm so sorry you have been laid up with a sore back! I sympathise completely as I have been totally immobile with a bad back on a few occasions; it is AWFUL. One physio told me to give up sewing (eek!) of course that wasn't going to happen, but I have worked out ways of cutting out and sewing which don't aggravate my back...
ReplyDeleteI'm very glad you are on the mend, and the red dress is stunning! It looks beautiful on your friend Jenn!
Ouch, ouch, ouch. So glad that you are starting to feel better. Back pain can cramp your style. And thank you for such great instructions. I'm going to give this a try.
ReplyDeleteSorry you've been down in your back. That's mierable. Your pleater is very clever. I like the neckline trim. I want to pleat the hemline and sleeve edges of a jacket with unstitched pleats/tucks. My delima is how to make the come out evenly all around. Or, if I should just fudge them to fit.
ReplyDeleteYou are so right about the color. Just lovely. Great tip on the simple pleater.
ReplyDeletewww.sewingcafewithlynne.blogspot.com
Fabulous pleating idea! I'm sorry to hear about your back problems and hope you are back to 100% soon.
ReplyDeleteOuch and ouch! So glad you are feeling better! You made your own pleater!! I love it!!
ReplyDeleteGlad to hear you are feeling better. The dress is lovely and looks wonderful on your neighbor/model. Fantastic idea for making a pleater.
ReplyDeleteJenn looks amazing in that fabulous dress. I love the colour and I adore the pleated trim - it looks so professional and beautifully done!
ReplyDeleteI am so glad you are feeling somewhat better.
ReplyDeleteLove the handmade pleat-making tool.
Great dress! You're right the color and style looks perfect on Jenn! I love your method of doing the pleats and I'm happy life is getting back to normal for you:)
ReplyDelete