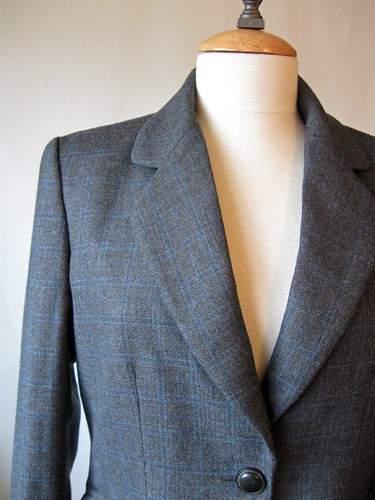
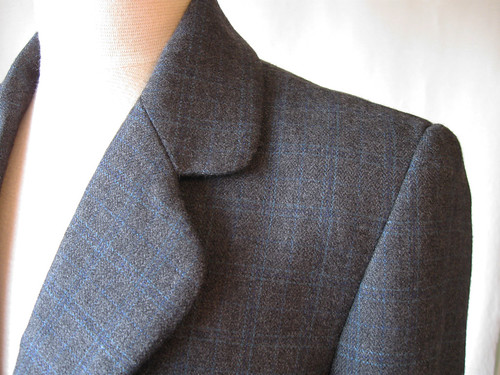
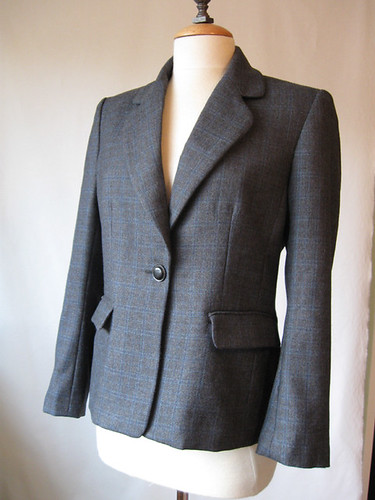
So can I say it? I am really happy with that plaid matching! Check out the sleeve/sleeve cap/jacket front. I was very careful when I cut out the jacket - but sometimes the sewing fairies sprinkle magic dust on a project and it works out perfectly.
This is an even plaid, so I was also able to match on the collar and lapel seam.
In my last post I outlined a number of steps required to finish a tailored jacket, but giving it more thought I realized that each step actually consists of many small steps. For a look at sewing the collar and lapels on a tailored piece, check this post for my dressy winter coat from last January, or this post for my corduroy blazer jacket.
Sleeves have their own issues, and while easing in the sleeve cap is one step that can be confounding, there are lots of other small steps that contribute to success.
Here is a quick outline of steps I go through:- mark sleeves, notches and dots
- chalk mark inside of each sleeve - helps to prevent sewing up 2 lefts or 2 right sleeves!
- stitch sleeve seam or seams in the case of a 2-piece sleeve
- press sleeve seams
- run gathering stitch from notch to notch along sleeve cap
- pin sleeve into garment, start at center bottom, pin notches, pin dot markings and then ease sleeve cap into place. Pin inside the circle created by the sleeve. I disagree from some sewing books on this, but it works for me.
- sew sleeve using long basting stitch, turn garment right side out and check the placement, fix any ripples and re-stitch.
- Sew with regular length stitches all around sleeve. Run second row of stitches inside seam allowance 1/8" from from first row. Sleeves get a lot of strain when you move your arms so this is important in a coat or jacket.
- Trim the seam allowance under the arm to 1/4" from front to back notch.
- Press the seam cap allowance only, do not press the seam allowance into the sleeve.
- Stitch in the sleeve head, I always hand stitch.
- At this point, I let the jacket "rest" a bit on the dress form, and play around with various shoulder pads (if required) to see which ones work best. Often the ones that I least expect are the best choice which I define as disappearing but supporting the garment.
 Another whew! no wonder it takes so long to make this type of jacket. But on the plus side this type of project lends itself to lots of small sewing sessions. You can see the double row of stitching, and how I have trimmed the seam allowance at the underarm. On the left is the sleeve head, pinned on and being stitched. Below is the finished sleeve head, the wider portion is up against the sleeve cap, so it supports the
 sleeve and smooths it out.

Here is the jacket without the shoulder pad, so it is evident that the pattern is designed for using one, and if you omit it the shoulder kind of sinks and creates those drag lines. On the left is the jacket is nearing completion, still needing hemming, buttonholes and pressing. On the right is the shoulder pad that I used. I tack it down along the shoulder seam, and then sometimes a few stitches on the sleeve seam allowance, but less it more, it should kind of float inside the jacket and if it is the right shape and size it will be invisible.


Finished jacket, with lining completed and machine buttonhole. Looking at this photo I think I need to do a better job on the pressing, I was rushing to get it finished and take photos while the light was just right in my sewing room. I found a nice black leather button in my button box, always rewarding to find just the right button!
I am ready to move on to spring sewing - there are so many great patterns calling me. However my next project will be the one selected by blog reader Ruta, Vogue 1143 Guy Laroche suit, in a lightweight stretch fabric that will make a great all season outfit. I looked over the pattern this past weekend, and while it has a zillion pattern pieces it looks fairly straightforward. Except that it has pants ! EEEK! I will persevere and get them accomplished. . . I hope.
If you are interested in this tailoring project here are links to the previous posts on this project. Post 1, Interfacing and other details and Post 2, details going on inside the jacket.
Today's SunnyGal garden photo - the first daffodil of the season plus some violas and a white primula enjoying the early morning sunshine.


What a lovely classic style jacket! If it was mine, I would wear it often. And the plaid matching is perfection. Not done by fairies, but by you.
ReplyDeleteAbsolutely gorgeous.
ReplyDeleteWow, this jacket is stunning. The matching, the excellent set in sleeves, the roll of the collar. You really outdid yourself. It looks like it was handmade by an italian tailor. Well done!
ReplyDeleteIt looks beautifully made Beth! The collar and sleeve head look great - and these are the tricky bits!
ReplyDeleteWhat a beautiful jacket!
ReplyDeleteThis jacket is beautiful Beth. You did a magnificent job. So perfectly tailored and very professional. Congratulations!
ReplyDeleteVery, very nice!
ReplyDeleteYou did good. The plaid matching is very good. Very nice.
ReplyDeleteAmazing work Beth, your plaid matching and the notched collar are perfect, I'm sure this was a time consuming project but the results are well worth it.
ReplyDeleteYou jacket looks sooo good! :)
ReplyDeleteI aspire to be as good as you one day.
This jacket is just perfect. Amazing work .
ReplyDeleteReally lovely! I am especially impressed with the plaid matching at armscye/front. I have never figured out how to lay out the pattern so that they are even remotely close to each other. Beautifully tailored piece!
ReplyDeleteBeautiful! Every element looks perfect!
ReplyDeleteSuch perfection! Your jacket is beautiful.
ReplyDeleteHi Beth, I have given you the Sunshine award 2012. If you would like to accept then the details are http://handmadebycarolyn.blogspot.com.au/2012/03/little-bit-of-sunshine.html
ReplyDeleteAbsolutely beautiful sleeve caps! Thanks for your steps...your workmanship is superb. Thanks so much for sharing...your blog is wonderful! Bookmarked.....
ReplyDelete