
Anyway, onto today's project.
Back in June my friend and sewing client Heather spent a couple of weeks in NYC. There was fabric shopping involved with long distance consultations and a flurry of photos and texts. The grand total being fabric for 7 garments purchased at Mood and some other spots. How long it will take me to sew up these items time will tell.
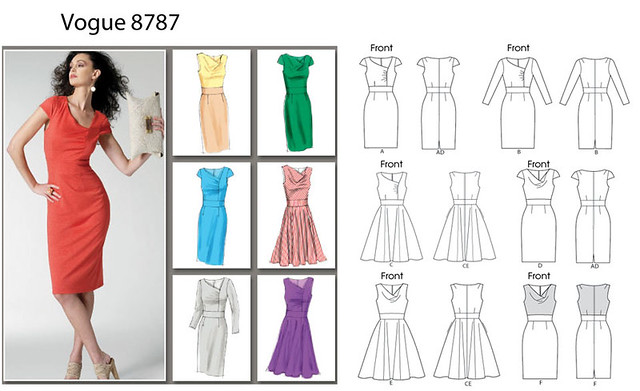
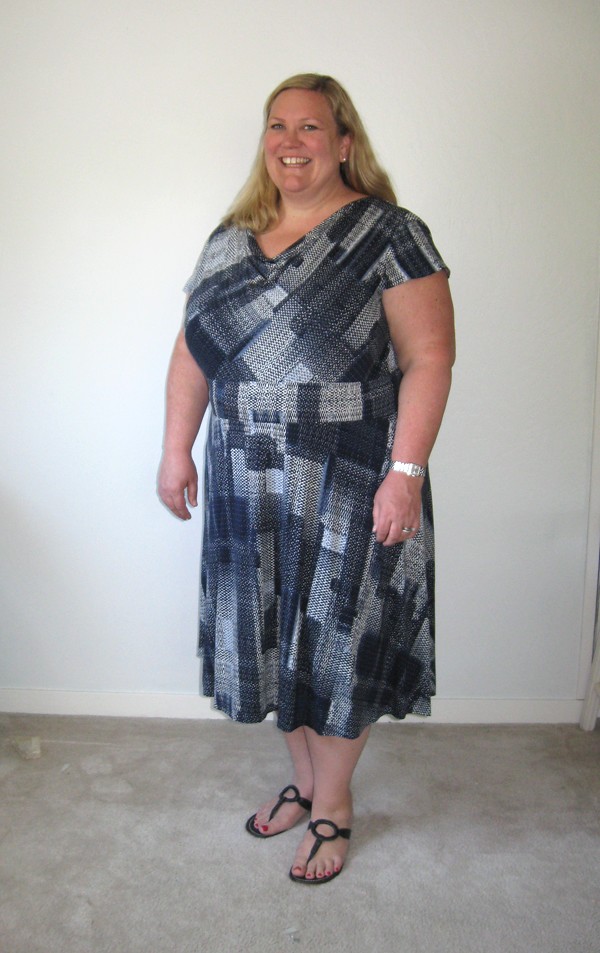
Some of the fabrics are for specific items, more fall/winter in season so they can wait. I will definitely be repeating this Burda dress as it is a fantastic pattern. One silk fabric is perfect for wearing on a tropical vacation so we will set that aside until needed. A couple of the fabrics were jersey knits which are ideal for dresses most all year round here, so I started with a pattern that I have made twice before for Heather, Vogue 8787, view E with the cowl drape neckline. I like this pattern as it has a lot of options.
The dress on Heather. When fall arrives we will have to do a better photo shoot than standing in front of my blank wall but it was way too scorching to go outside that day. The fabric is a lot more blue that it appears here - and looks so nice with her blue eyes/blonde hair. I am so happy with the fit. Waistband in exactly the right spot!
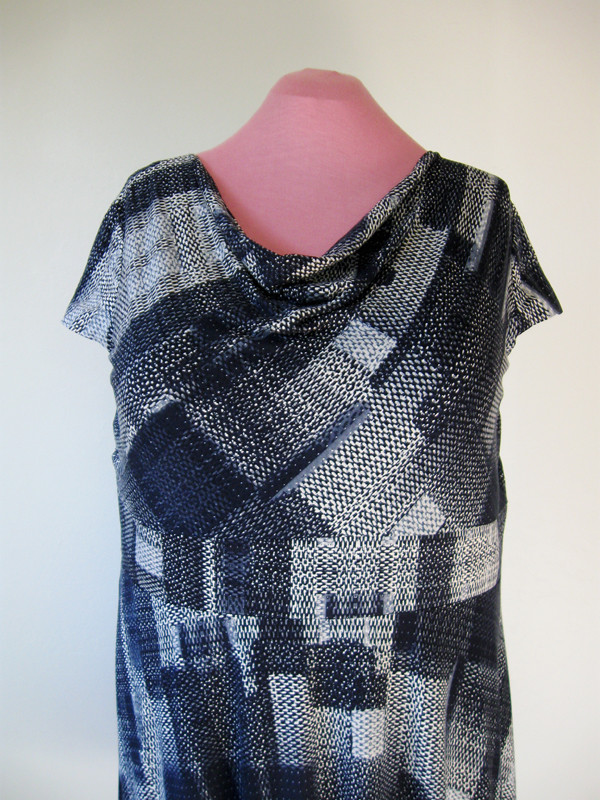
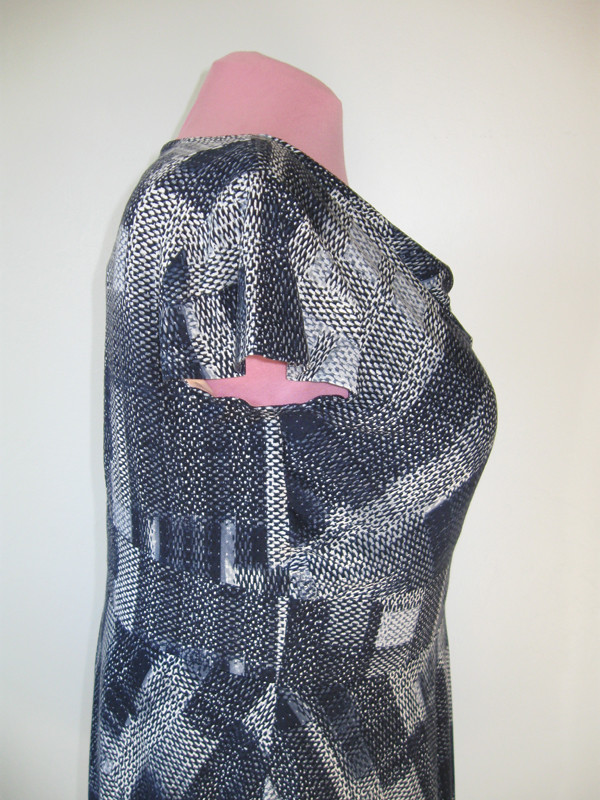
Here is the finished dress, on the dress form. The fabric is from Mood in NY and it is still available on their website here. I was a bit doubtful when I first saw it because it has a print that could read or need to be worked with as a stripe but actually this pattern was just right. Nice how the bodice is on the bias giving a bit of motion to the print. And the slight pattern matching creating a flow across the right and left sleeve was a very happy accident. (I should take credit for these things so you can think I'm a wizard - ha ha, not at all, just luck.) This pattern calls for woven or knit so the upper pattern piece has to be on the bias.
Ok fitting details shown here with my slightly comic-book illustration but you get the idea.
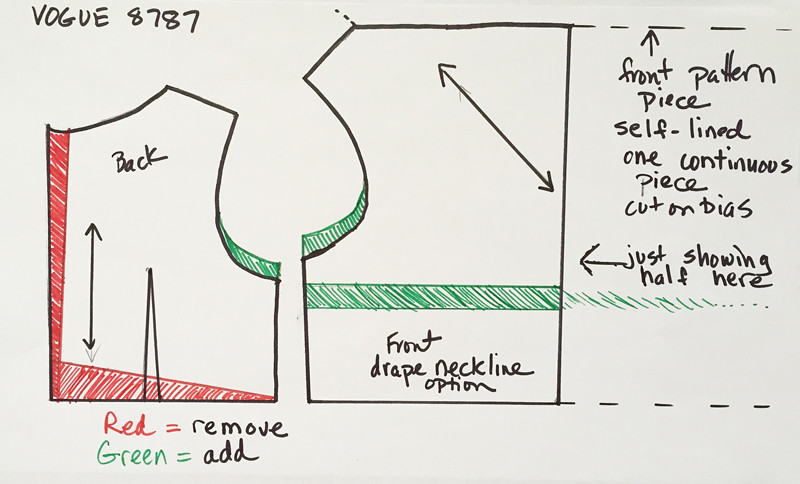
Starting with the front pattern piece. I have only drawn one quarter of it here, it is actually the entire front and is doubled so that you cut it on a single layer, on the bias, and it creates its own lining. So the adjustments in green have to be done on both halves and/or side of the pattern piece.
- I choose the pattern size based on her circumference measurements. I added to the seam allowance 3/8" to make a full 1" seam allowance on all side seams, which I think of as fitting insurance. That makes the dress likely to be too big but I find it best to sculpt or fit the side seams on the body. Granted it is quite easy to do this on someone else instead of for yourself. But I do it when sewing for myself as well. Just involves a lot of on and off and flitting around in my sewing room in my undies. Worth it in the end. No seam ripping needed :)
- Add length in front bodice. Perhaps a bit unorthodox in terms of an FBA, but it will work. Really works in jersey, a bit more tricky in a woven. Anyway...I added about 1.25" I think. This is to counteract that waistband seam rising up and bisecting the bust. If you are in the full-bust category you know what I mean, anything ready to wear is likely to hit at the wrong spot and pull upwards. Just geometry, folks. We will deal with the difference between back and front in a minute.
- Raise armholes. She is about 5ft. 3in. and I find that if you are sewing at the high end of the bust range the patterns of course get bigger everywhere - so the height or depth of everything is too much. I use size 12 in Vogue for myself, am about 5 ft. 3.5in. tall and even then the shoulders are too long, the armholes are often too big. I don't like seeing an armhole that is too big on a sleeveless dress, and just tightening it up at the underarm seam is not the answer. You have to adjust the actual armhole, luckily this is one of the easier pattern adjustments. I raised this one about 1 inch. My words to sew by "you can take away but you can't add".
- Back bodice. Raise the armholes there also. Then on to my number one fitting mania, the back waist seam. See red section removed. Which I have squawked about before. Here is my primo example with photos from April 2014, A Fiting Post: Watch your Back! I think this adjustment is more common than I every realized, and often sewing students say something to the effect of "I didn't know I could just cut off there". You can cut off the extra fabric anywhere! BIG note on this one, I have made this pattern for Heather 3 times now so the pattern is all adjusted, however on the first version I did this adjustment on the body, thread traced my adjustments on the dress, sewed it and then transferred all those adjustments to the pattern for posterity. I will say that every fabric behaves a bit differently so the amount of adjustments can vary with fabric. (Jersey is heavy and pulls more than a woven might). Also note; the length of the back bodice bottom edge gets a little longer when it is cut on an angle like shown (again geometry:) but I have some fit insurance on the side seams of all my pieces so we are Ok there. But keep that in mind if you do this type of adjustment. A simple sheath dress with a waist seam, where you do this adjustment will need some more length across the upper part of the back skirt to match the back bodice. Hope that makes sense!
- Center back. Even with a full bust a person can have very narrow shoulders or just be a small frame carrying a lot of, shall we say, frontage? So the pattern size that accommodates bust and high bust is way too big for the shoulders, even if you don't pick a size by bust but instead choose by high bust and then do an FBA. Anyway - The center back seam is an easy place to adjust and if you do the zipper last as I do then it is really a good spot to get that final fit worked out. In this pattern with the cowl front it is idea, on a more structured style you would have to be more precise in the fit of the front and back.
- What about that difference between front and back side seam? I just treat it like an invisible dart, in that I gather the section that would be a dart on the front side and ease it into the back. A lot of knit t-shirts have this type of easing and even some woven patterns. If the difference is about 1-2 inches more in the front I think that can be eased into the back with little problem.
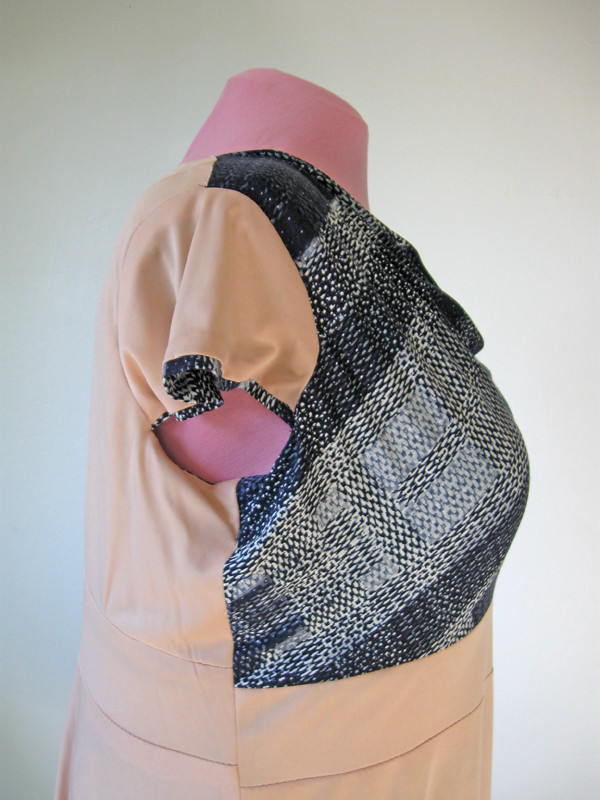
Here is a look at the dress from the side, and just imagine that extra 2 inches of length along that back bodice. The waistband looks reasonably horizontal here, maybe a bit tilted but a dress form is not a human and would be a lot lower if that section had not been removed. Also she has extremely good posture which is another contributor to having too much length in the bodice. People who slump over get longer in that dimension, so they can use the extra length but if you stand up nice and straight then your dress might end up bunching around the waist.
I lined the dress in a jersey as well. I get a lot of questions as to what I use to line knit dresses and it is not particularly special fabric, after some experimentation I have settled on some poly knit fabric that I buy at Joanns. 100% poly, they call it Jet Set knit fabric, it comes in a lot of colors, washes easily and makes a really good lining for these rayon knit dresses. They have a lot of other types of knits that I have used for lining, check the dance wear aisle. I think some of the nylons or poly that you use for inside dance/gym costumes are ideal for using as lining in knit dresses. My biggest tip is to check the slipperiness factor - you want something that won't stick and grab the outer fabric. But this Jet Set stuff works well and is darn cheap (like between $ 3 to 6 dollars/yard depending on sales or coupons.
I go bonkers when I buy it and the sales associate says Oh what are you making with this. Like I would make a 100% poly thin knit item in that color. Yikes. Although they must be bored and I would ask every customer that if I worked there as well. But I can't tell you the number of times I have bought lining - like actual lining and they ask what I am making with it. Sad lack of sewing info at those places - gripe for another time.
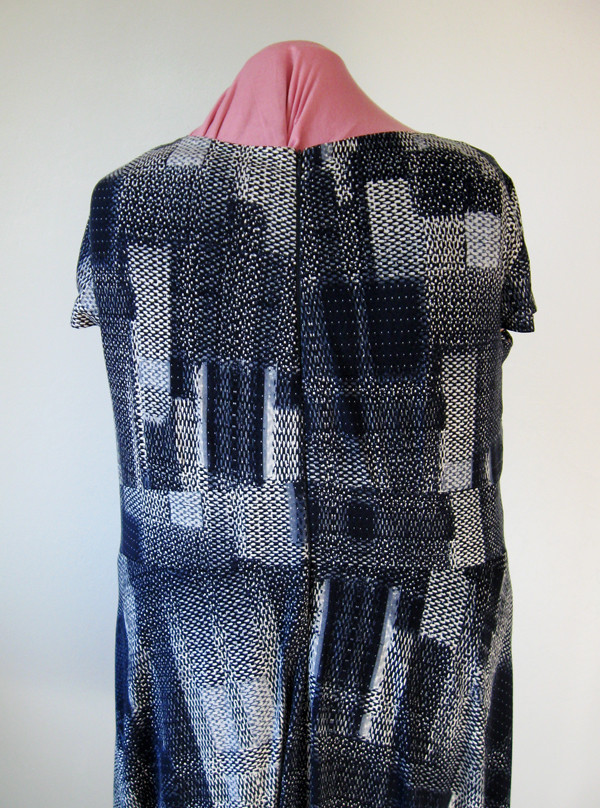
And you can see my seaming is a bit off in the inside. Which makes no difference to wearability so it stays :)
Back view. Oh by the way - I didn't use the skirt that came with this pattern. Never have. I think it has seaming, 3 piece front and back. I was making something else for Heather when I made this first dress, and also muslining a different Vogue pattern which we ended up never sewing in real fabric but the skirt was all adjusted so I frankenpatterned it onto this one. Same basic shape and no seaming.
I hope this fitting info is helpful, and my explanation makes sense! My biggest fitting tip is to consider the up and down measurements along with the circumference.
Onward with more summer sewing for me, I have a backlog of summer items to post so those will be coming up soon. Including a semi-vintage pattern that is totally timeless. (is it vintage if I made it when it was new, in the 80's when I was, ahem, younger?) Let's just take this moment to remember that I have been sewing since age 8 so I could have been in elementary school. (not!) Best not to dwell, right? And speaking of time passing, I have my annual new dress for my birthday, I try to make something fun or different. This year is is a pattern repeat sewn many times but never for myself. Wait and see:)
Stay cool if summer is in full force wherever you are, and happy sewing.
Beth
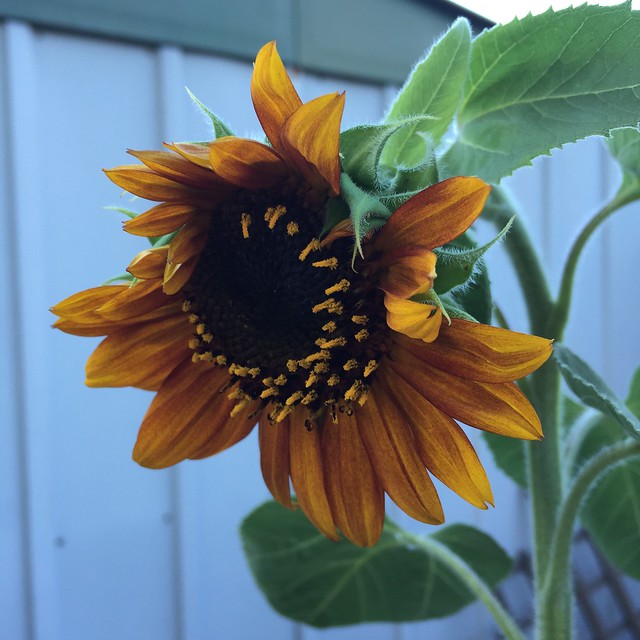
Today's SunnyGal garden photo, what else for the heat of the summer but this fantastic sunflower.


Love, love, love your alterations on the paper BEFORE cutting the fabric. Darling dress and such nice fit. Thank you for mentioning the need to alter for posture and narrowing of shoulders when inserting the back zipper...all great tricks that work and the gathering of where the side bust dart would be too! Have never bought that particular knit as a lining but for sure I will be hopping down to my JoAnn's and checking it out. I had to laugh when you said they ask you about what you are making...same goes for me when I am buying yards of tulle to make sleeves for the wedding dresses...the first thing out of their mouths..."Making tutus, are we?".
ReplyDeleteBeautiful dress. She looks lovely. Thanks for the tip on knit lining, I am in need of some right now! You did a great job on the dress!
ReplyDeleteBonnie @ www.sewplus.blogspot.com
Looks like a perfect fit to me. She looks beautiful in it.
ReplyDeleteThis dress certainly proves that fit is really what looking good is all about. She looks wonderful.
ReplyDeleteLove that pattern (which is in my enormous stash-lol). Nice to see it on a curvy woman. Great work and thanks for giving the details.
ReplyDeleteGreat information - thank you.
ReplyDeleteBeautiful dress and it fits Heather perfectly. Love to see the work you do to fit a plus figure. AND, would also LOVE to see what you do with your "before and after" fitting idea. It would be a lot of work, so thank you in advance!
ReplyDeleteLovely dress and great post on fitting.
ReplyDeleteAwesome post! Love your tips on pattern mods and fitting. I made a muslin for this dress (View A) and the left shoulder feels too narrow and placed too far to the side. On the model it looks like this seam goes straight up to the shoulder, but on the line drawing it looks angled. I haven't had the patience yet to modify it. But after seeing this post, now I want to make the cowl version!
ReplyDeleteIf you end up removing a 'pie' piece from the back waist and center back, how do you maintain the fabric grainline?
Wow! Excellent job fitting. It looks really good on Heather.
ReplyDeleteI loved that post and I'm extremely impressed with the fit you got. I have to admit that I have very little experience sewing outside my own shape so I read everything eagerly! Your approach to what is usually called fba or swayback makes a lot of sense, it's logical and doesn't have any of the jargon we like to use!!
ReplyDeleteIt is always interesting to see how different sewers approach fitting. You are not at all intimidated by the process. Great dress and fits so well.
ReplyDeleteI need to take out 3cm in the back so I just tuck that amount out front and back. Seems to be ok...unless my front waist is too high...oops.
Thanks for the great fitting info--so much helpfulness! Certainly wish I had a dress form and/or an extra set of hands to help with all that needs to be done in that area.
ReplyDeleteOn the "unhelpful" JoAnn's employee rant: I agree wholeheartedly with your assessment of lack of specific knowledge on the part of the staff, but have to contrast the typical Big Fabric Shop with my LQS (local quilt shop, for non-quilters), where I work part-time. We LQS employees are all very part-time, paid minimum wage, have to clean the restrooms and do the re-stocking in between customers, etc. However, we were hired for our expertise; we get "paid" for that expertise and passion in our employee discounts, in my mind. None of us can support ourselves on our quilt shop pay (or hours offered), so it is a luxury for the LQS shopper to be able to interact with knowledgeable and passionate sales help. And the customers thus pay for this superior experience by paying the higher retail prices that a tiny, independent shop must charge to stay in business.
Ok, sorry, end of rant.
I browsed the new Burda Plus earlier today and I noticed the pattern of the dress you made is in there. It's a lovely pattern, I wish the had it in standard sizes too.
ReplyDeleteGreat dress Beth! Your client looks so very happy too! Isn't that the best reward?!
ReplyDelete