
My sewing is always veering off in different directions, from churning out wardrobe basics to immersing myself in coat-making or tackling some difficult fabric. I have no idea where my mood will take me this year - it probably depends on what gems I find at some out of the way estate sale. Whichever way I go, I appreciate your readership along the way.
Now that I have coat making out of the way - at least for this winter, I can return to something I finished in late November.
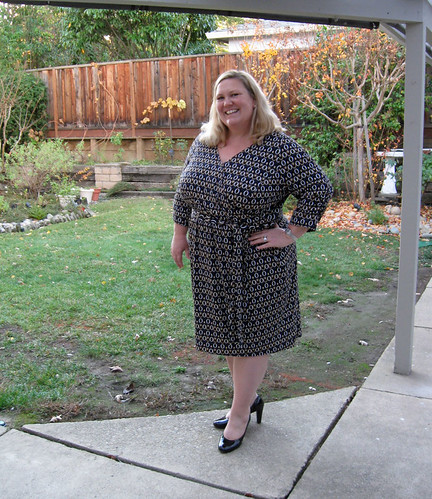
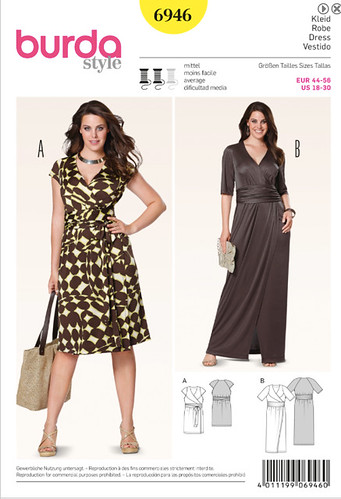
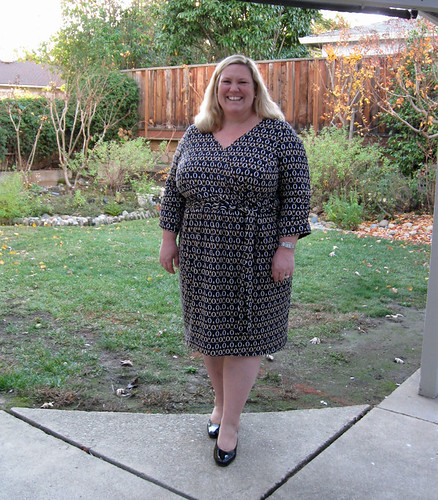
This is Burda 6946 in rayon jersey. I bought the pattern a while ago, maybe in 2014 and had been meaning to use it for a dress for my friend Heather, and among her haul of fabric she purchased in NY last summer was this print.
It is a very distinctive print so you probably can't see the lines of the pattern but it has some really interesting pattern pieces, and as one of the Burda Plus envelope patterns, was really easy to fit. I think if you are in the size range (Burda European size 44-56) in particular if your bust measure fits in that range then these Burda patterns are really good. Both in the envelope patterns and the magazine/pdf patterns, there is just about any style and some really outstanding choices. I know there are some wacky ones - they always throw in a few zingers but they do that for any collection.
Here is the pattern envelope. You still can't really see the design lines because they have also used a rather bold print.
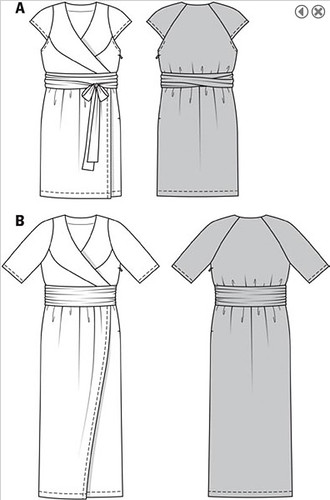
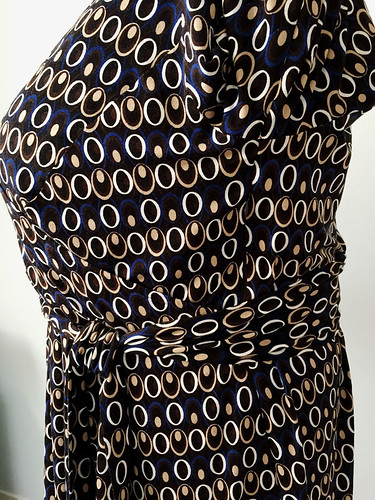
See? Slightly unusual with those two piece fronts, and then sleeves that are also also two pieces, and attach via a modified raglan seam.
A better look at it on the dress form where those quasi-princess seams are more apparent.
It probably doesn't show but the two piece sleeve seam is sewn last, so you sew the whole front and the sleeve front, then the back including the sleeve back, and then join front and back up the whole sleeve and shoulder seam. Clever, I thought. Also lots of adjustment possibilities, for bicep adjustment, take in or out the sleeve circumference, take up at the shoulder if needed.

Heather mentioned that she liked long sleeves on this type of jersey wrap dress, and wanted to be able to push them up - but mentioned how she found it annoying that they never stay pushed up. I know just what she means. She said I wish they could be permanently scrunched up that way. So I had a tiny light bulb moment and did a bit of ruching with elastic at the bottom of the sleeve so they gather up and create that sleeve scrunched up look. I put a piece of paper behind the sleeve so you can see it a bit better. Also this fabric, at first I confess I didn't care for it but it did grow on me. The background is a burgundy-brown shade with cream, ivory and blue ovals.
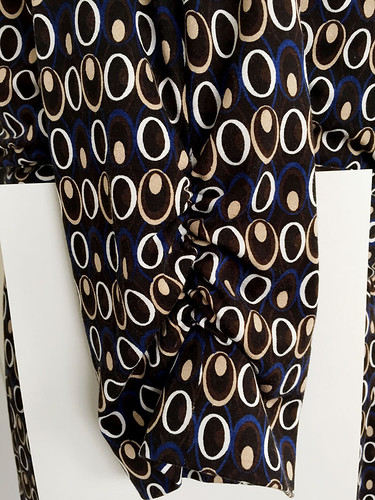
This fabric - aaaagh - reads like a stripe. Not the easiest to work with for a dress with curved pieces but I did the best I could. And told Heather no more buying fabric without sending me a text image! Ok only slightly kidding there but she bought another one that is a very specific directional pattern that I still can't decide what to do with.
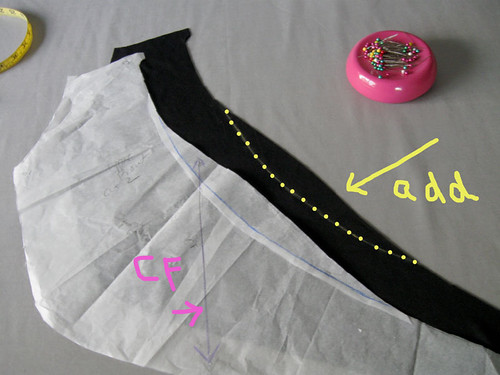
How about some pattern adjustments? Not all that many on this pattern, I used the size than corresponded to her measurements and for the most part it worked will. However - I think a V-neckline wrap is just never gonna cooperate with someone with, shall we say, an ample chest. Just a fact - that V-neckline wants to open and this is a business/office wear type of dress so a little adjustment was in order.
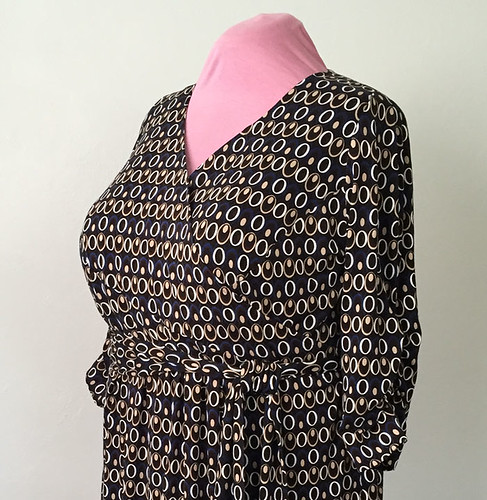
This is the upper bodice pattern piece and I did the adjustment that I very often do on wrap tops, which is to change the curve of the V-neckline to add at the center front. The center front line a front bodice piece that is a wrap is the guideline, and if you do a tissue fit or make a muslin be sure to draw in that line, and then pin the pattern pieces together there. See below, the Center Front is noted. I needed to raise it up about 1 inch at the center front, so I played around with the addition on the pattern piece to give a graceful curve on the two overlapping sections. It might look like a weird segment that was added but scroll back up and see that it brings the lowest part of the V to a perfectly daytime appropriate spot. I have done two posts on the Craftsy blog about adjusting V-necklines, this post is for a variety of adjustments including this type. This post talks about adding length to the front of a wrap bodice and also adjusting the center front curve.
I did a full lining in the dress, using the knit fabric that I have used for a lot of knit dresses. I thought about leaving the lining off the sleeves, but with the raglan that seemed more trouble than it is worth and this way it gives a nicer finish on the inside. The lining takes the place of any neckline facings which I don't like. As you can see I made sure to turn and under stitch the neckline edge so the black is not at all visible. Having a lining in a knit dress makes it so easy to wear, and you can wear tights without any extra layers since the lining is more slippery. Every time I show this someone asks, the fabric I use for all knit linings is call Jet Set Knit , I buy it at Joann Fabrics and it doesn't cost much, comes in a lot of colors although I mostly use black, white or the ivory colors. And it washes and presses really easily. So not very fancy but it does the job. Also in the Dancewear section of the knits you can find some other knit fabrics that really are linings, like you would use in leotards or gymnastics/skating costumes, and I sometimes use those as well. This fabric is 100% poly but it doesn't feel clammy. I wouldn't use it in something designed for hot climates - although I used it in this dress and it is great. So maybe I would.

The one thing that many might not like about this dress is that it is a faux-wrap, so their is a side zipper. The front sections actually cross all the way over and are attached into the side seams. So the only way to get in/out is to have the side seam zipper as the waist is fitted. Which made more work, with the lining etc. but gives such a nice shape to the final dress. Here is the zipper, you can't even see it :). Also considering the print and the various shaped pattern pieces I think I did an OK job on making the "sort-of" stripes of the oval print match.
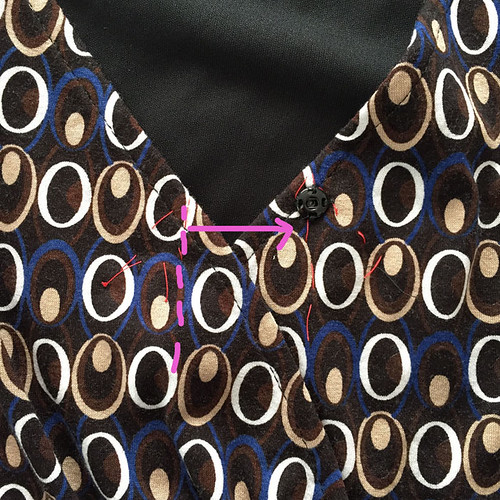
Since this is not really a wrap but a faux wrap, per request I put a snap at the center front just for insurance. It is a bit tricky figuring out where to sew the snap parts so I have my method which might make no sense to anyone but I will show it anyway.
I pin the dress wrap closed just as I want it to be. I do this all with long pins, then take it off (either the person or myself and mark with thread tracing. I mark the exact center front, and then diagonal lines where edges overlap. You can see where that knot in red thread is showing where the part underneath is in relation to the upper layer. It is keeping these angles in the same orientation that allows you to sew on the snap parts on the upper and under layer so that it lays nicely when the snap is done up.
Another look at Heather in her dress. I think we will repeat this in the spring in the short sleeve version.
And oh, that lawn is sad. Had to let it go for the most part due to the drought. and now it is growing a little bit in weeds and patchy bits. I confess - I bought some bulbs today, tulips and daffodils. Very late to put them in the ground but they will be OK. I just can't resist the colors!
Tomorrow we are suppose to have a big storm (yay!) so I think some sewing will be happening. Up next I am finishing a silk shirt and then no idea, I'm toying with trying another pair of pants. Or perhaps some napping. It seems like that kind of Saturday :)
Happy weekend sewing, Beth


This comment has been removed by the author.
ReplyDeleteThanks for the tips about how you know where to sew the snap!
ReplyDeleteA nap sounds really good! :)
Hi Beth, a tip from Denmark (maybe): the other Burda dress (11/2013 B113 with the x-darts) you made for H comes in a (true) wrap version too. It's featured in the same magazine (11/2013 issue), so I think the base might be the same, althoug the darts are placed a little different on the two versions. I thought that if you've kept the alterations for the first (very nice) B113, you might want to repurpose them on a wrap version.
ReplyDeleteYour first post about the B113 Burda dress made me want to sew it too!
Best regards, Bodil
Great post! Love the details you shared. Like the tip on how to sew the snap!
ReplyDeleteWow, such an amazing post. Great analysis of a pattern. I certainly would consider a wrap if it was designed and constructed this way. Thank you!
ReplyDeleteI'm a sucker for wrap dresses. Your friend looks very pleased, and dress looks lovely. Have seen this pattern, but have passed it up, on my "to buy list".
ReplyDeleteNice job
ReplyDeleteI love a wrap dress and yet I haven't get one - 2016 - the year of the wrap. Thanks for the pattern info.
ReplyDeleteVery lovely. Heather looks happy too. This seems like a very versatile style that you could have many versions in different colors. I'm inspired to buy this pattern and give it a try myself.
ReplyDeleteGreat job, your friend looks very happy, as she should! I love that pattern, the seemliness are lovely, it's a pity it doesn't come in regular sizes as well (maybe it does, I should check!) - especially as the model on the pattern envelope doesn't look remotely plus sized!
ReplyDeleteFits so well on Heather. Lovely dress. Personally I love a wrap to be faux. I remember way back in the early '80's my sister and I each made ourselves these woven wrap dresses. We ended up calling them "drive-in dresses" - whenever you sat down the split came open all the way up! And you had to walk holding the skirt closed in case there was a gust of wind. Ahhh, memories of early makes :). Thanks for the tips too.
ReplyDelete