
The pattern that wasn't there...
Which might seem mysterious but will make some more sense once you read a bit further. As mentioned in my previous post, I had the opportunity to use My Fabric Designs to create a custom printed fabric. Once it arrived I decided it should be a summer dress and had just the pattern in mind.
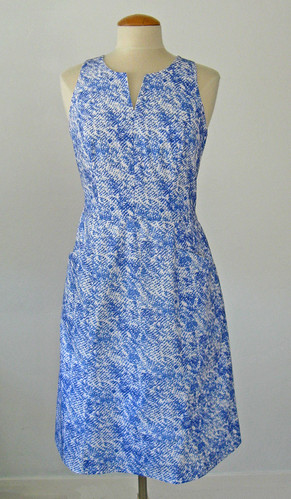
Due to the lighting and my photo skills the details might be hard to see but you get the idea. The skirt has a center panel and then side panels with slant pockets. The bodice has princess seams and slightly cut in armholes with a rounded piece at the back neckline. Here is the previous post with the first photos on this dress.
Note: this is turning out to be a long post but it has lots of fitting details so if you like that then stick with it :)
Note: this is turning out to be a long post but it has lots of fitting details so if you like that then stick with it :)
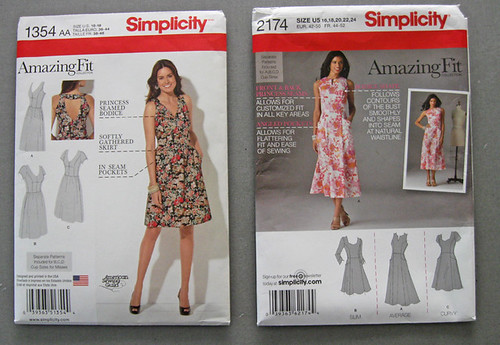
I used both these patterns to create the dress, Simplicity 1354 for the bodice and Simplicity 2174 for the skirt.
But what I really wanted to use was this Vogue 2900 DKNY pattern that I have been saving for just the right moment. I first saw it sewn up by Yoshimi and then she sewed it again here. But I didn't seem to get around to making it. Then Carolyn got in on the DKNY goodness and also sewed it up. And I wanted it even more. So told myself that this was the year I would make it.
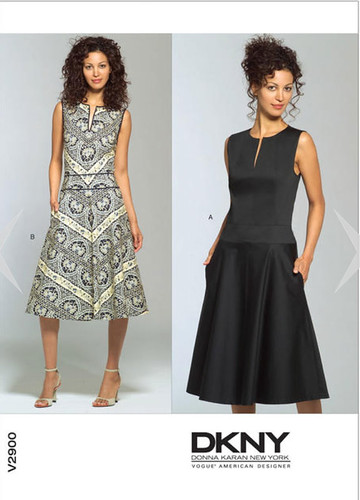
Consequently when I evaluated this self-designed cotton poplin I though "oh, self, make the Yoshimi dress" and went rummaging in my Vogue patterns. Where I didn't find it. And realized that the pattern I had in the drawer was actually this one.

A perfectly good pattern, and also a DKNY who is my favorite of all the Vogue designer patterns but not the one I wanted. I briefly thought about buying a copy of the V2900 on eBay but economy won out.
Back to rummaging among the pattern and I found that Simplicity 2174 which is quite similar to the shape/style that I wanted, but my copy is a size 16 - 24 and I usually start with a size 12. So that would be quite a chore. However - another Simplicity Amazing Fit in the box caught my eye, and that is why the result is a frankenpattern re-creation of the Vogue that I wanted.
Now for the fitting details. This Simplicity 1354 was size 6-14 with cup sizes so I looked at the finished garment measurements and started with the size 10. I have always started with a size 12 but on most all pattern brands I have to take in the front neckline and even the center back neckline, so I wanted to test out starting with a 10 C and see what happens. And this might be my new size, at least for dress bodices. I made a muslin of just the bodice, as the skirt could be fitted with larger seams as fit insurance. I always stitch in a zipper. This is my trusty blue zipper which I use and remove from so many muslin bodices. With the ribbon tied on the zipper pull like on a scuba wetsuit so I can fit it on myself.
Starting with the back of the bodice.
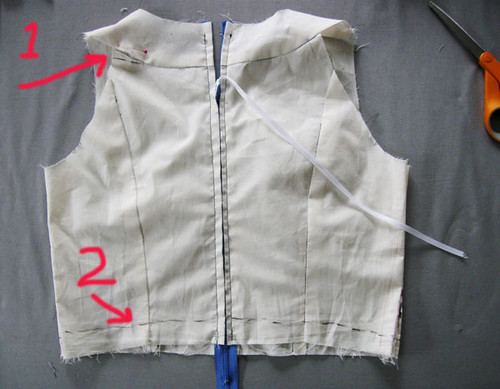
1. teeny adjustment at the back shoulder, there was a bit of excess fabric where the back met the neckline, so I just pulled it in about a quarter inch at the edge tapering to nothing.
2. Shorten the back of the bodice. Everyone calls this a swayback adjustment but I will stick with shortening of the back bodice. There is too much length there and the back waist seam is too low. I mark where I want the stitching line to be using a sharpie pen (tie a piece of elastic round your waist to decide where). Considering that the muslin includes the waist seam allowance I probably shortened it about 1/2 inch.
Now the front of the bodice:
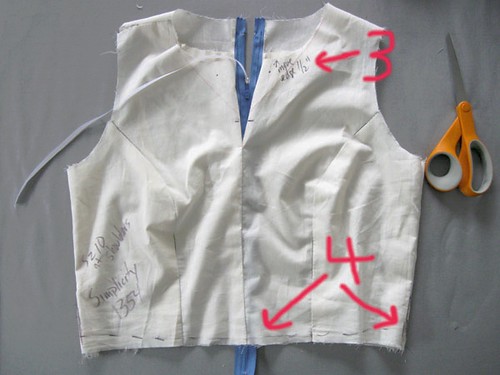
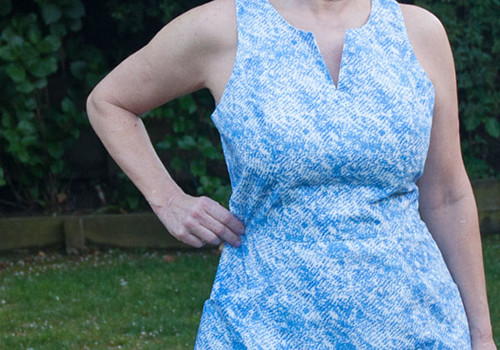
You can see on the original Simplicity 1354 pattern it has a V-neckline which is pretty but not what I wanted here. So I drew in a rounded neckline but kept the markings for the V-neckline so when I tried it on I could check both. I can see doing the V-neckline version in the future so figured it would be nice to get it fitted now.
3. I liked where the rounded neckline landed on me as it was on the muslin, so if I want that to be the edge then needed to add some seam allowances. My scribble here says to add 1/2" to the center neckline edge and taper to nothing at the shoulder seams. Note I have also marked where the center front vertical opening will end. I also decided that the narrow V opening in the center should be about 1 inch wide.
4. Waist seam - based on my try-on I had determined that the back waist seam needed to move up but the front waist seam needs to move down a bit. Since I had started with a size 10 I expected this plus often more length is needed in the front. So adding about 3/8 inch at the center front. All this is a bit inexact as I just add plenty of extra seam allowance and figure I will get it precisely lined up in the real fabric.
Side view:
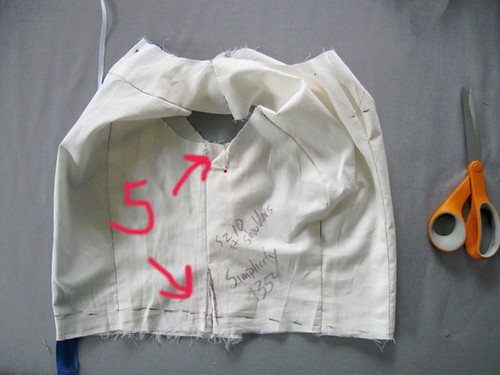
5. Side seam. I can't recall exactly but I think I added 3/8 inch on the side seams when cutting out for a total of 1 inch seam allowance. I like to adjust in the real fabric on the body as every fabric and sewing pattern behaves differently. I think a lot of stitchers are searching for that perfectly adjusted pattern which is an elusive goal - what I want is a perfectly fitted garment and the pattern takes me part of the way there.
Anyway - enough opinions? - back to this. I peeled open the top of the seam under the arm so you can see that I used all of the 1 inch seam allowance there, and most of the way down to the waist. Like most women I have that shape were the ribcage or under bust is the smallest circumference on the torso and then it gradually increases down the body. So you can see I gave myself a bit more room at the waist. (because the size 10 waist was never going to be my fit :)
Now I cut out all the pieces for the bodice and then moved my attention to the skirt portion. I used the size 16 version for the skirt - which would be a bit big but I was the smallest in the envelope and then figured I could adjust it as I sewed. The one thing I gave up on with this pattern is to match the princess seams in the bodice with the ones in the skirt. With this busy print they don't show anyway and frankenpatterning a size 10 from one pattern with a 16 from another was more work than I wanted to put in.
Here is the part where some of you might say aaaargh.....too much work?
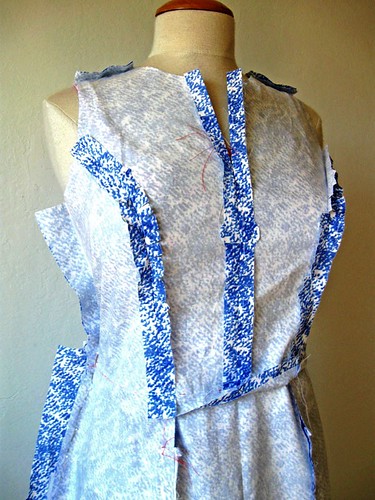
Basting is my friend! I machine baste everything together, and try it on. Including basting in the zipper. It really is a simple matter to try on and then just adjust a tiny bit here or there. Those large seam allowances make it really easy. I use smallish silk pins to pin seams in the spots where I want to try them out, and then just rip out small sections of basting, re-pin and try on again. That includes tweaking the waist seam up or down as needed. With a good helping of pencil marks or those heat-removable ink pens. You can see my extra large side seams under the arm and then the side seams on the skirt which behaved a bit strangely, front one smaller than back one but you can get a feel for how the fabric should hang in the skirt portion.
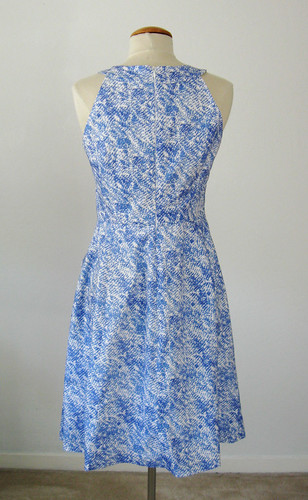
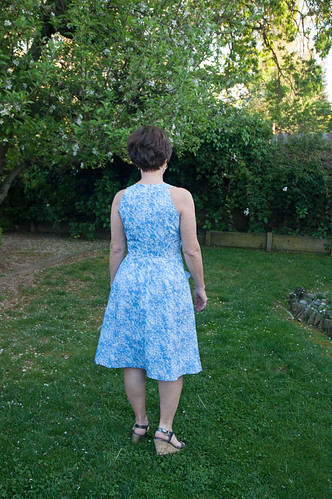
Then once I have it all basted or pinned to fit, I go over any newly adjusted parts with faint pencil or chalk mark and then sew it all up for real. Including the zipper. The back neckline of this dress is just my style, and I think I will try out the pattern envelope version with the cutout out and front V-neckline.
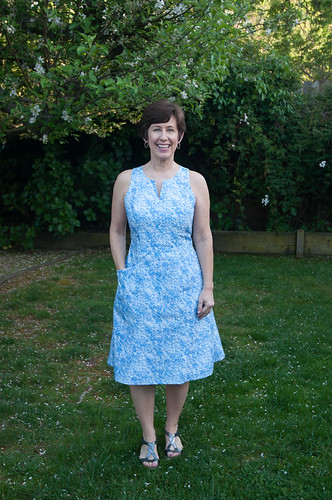
Here is the final fit on me. I think it is just about right for a woven cotton dress (meaning something with no stretch. Keep this in mind for the next picture. Demonstrating my philosophy that there should be some ease in woven garments, I like them to float instead of be absolutely fitted. Less wrinkling and pulling on the body, more comfortable. There is about 2 inches in circumference more than my waist. Too much? I think when you are moving, sitting down, in action then it is just right and doesn't look too big at all. Interested to hear thoughts on this one.
Not the most lovely photo but I don't walk around like that :)
I can't leave off with that photo so here is a repeat from the last blog post.
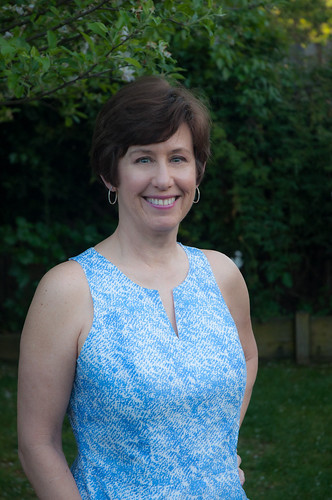
I'm happy with the neckline/shoulders fit - will definitely repeat this pattern. And will try to stand up straight - looking at sewing photos is a wake up call about posture, isn't it?
That's all for this one. I have been on a sewing streak lately so lots of things for the blog in the near future. We had a really rainy weekend so no photos completed but this week I will try to get some accomplished. April showers were so welcome - the roses are loving it.
Happy sewing,
Beth
these tulips have been popping up and I completely forgot that I planted them, I thought it was a bag of yellow and red ones but apparently they are the variegated version. So nice!


Beautiful fit, I do appreciate all your notes, they are very helpful to me. One question, with that V-neck, any tips for how to get those points to lie flat against the chest. I have made this style previously and the V flips out sometimes. Not a firm enough interfacing perhaps?
ReplyDeleteI like the extra room at the waist for the reasons you mentioned and it doesn't look too big when you're standing. Lovely dress and fabric!
ReplyDeleteexcellent details in this post. I have made simplicity 1419 twice - it has a split front with a facing, designed to have a button at the neck (strangulating!). I left the button and loop off both times and next time I plan to make it more like this neckline, lowered and more V. I was originally looking at butterick retro repro 5748.
ReplyDeleteBeth, Your dress is lovely. Your self designed fabric is clever in design and beautiful in color! Thank you walking us through all of your adjustments. 3/8" here and 3/8" there resulted in a fantastic fit. What a wonderful summer dress!
ReplyDeleteBeautiful job, great fit that is very flattering on you. I enjoy all the details, thank you for taking the time to write them all out ... with pictures. Long time reader of your blog - you are talented and funny!
ReplyDeleteLove all the details on your adjustments! You said, "I think a lot of stitchers are searching for that perfectly adjusted pattern which is an elusive goal - what I want is a perfectly fitted garment and the pattern takes me part of the way there." That makes a lot of sense to me!
ReplyDeleteI don't think the waist looks to big when you're standing; I was surprised to see how much you were able to pinch!
:-)
I made the V2900 too and must say its a great pattern! I love my dress.
ReplyDeleteSusan
I love the back of this dress! I'm curious what type of bra you need to keep straps out of the picture?
ReplyDeleteI love the back of this dress! I'm curious what type of bra you need to keep straps out of the picture?
ReplyDeleteSimply beautiful! Your alterations definitely paid off. It's so nice to see a full view with your lovely custom fabric.
ReplyDeleteYour dress is absolutely lovely, and the fit is right on. I love following you.
ReplyDeleteReally pretty...the fabric and your design. All your work paid off resulting in a dress that looks great on you!
ReplyDeletePeople are so into 'industry' seam allowances which is ridiculous. We don't have to be so stingy with fabric;we are not cutting costs to make money. At the store you can try on many dresses; when you sew you need to actually fit that dress! I too add large fitting seam allowances and pin and baste together and
ReplyDeletetry it on, lots of times. A sewing blogger confessed that she never tries on her garments as she sews. I don't understand that.
But, back to your dress, it really is fabulous on you.
Beth your dress is lovely and fits you beautifully! I think having extra room in the waist is a good idea, it helps to avoid pulling, stretching, and wrinkling from sitting down or moving. :)
ReplyDelete