
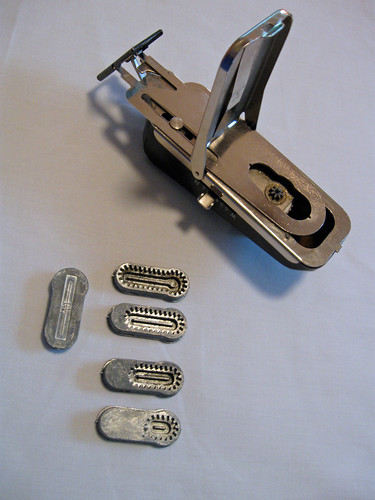
 To get started, you need to choose the template based on the size of the button. The Singer attachment has 5 templates, but I only ever use 4 of them. Once in a great while I use the keyhole template, if I make a wool jacket that seems to call for that style, but otherwise I use the straight one for large buttons. Then the other sizes are good for coats, dresses and blouses. The tiny one is cute but very small - maybe for children's or doll's clothes.
 The attachment is flipped over on its back, with the door open, so you can see where you drop in the template and the teeth of the buttonholer grab onto the template.
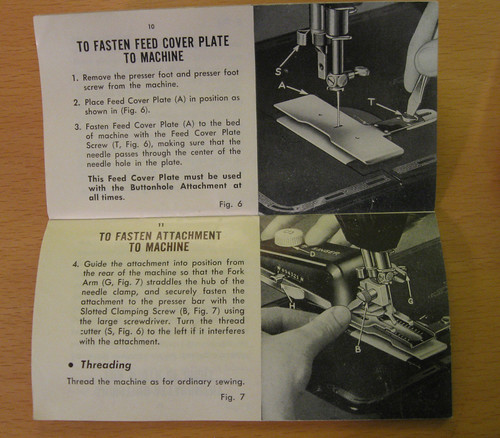
Here is the first page from the manual, the parts labeled with their technical names such as "bight adjuster" and "feed cover plate"

Back to the sewing machine. You remove the regular sewing foot, and the screw that holds it on. The buttonholer has its own screw, slightly different, used to attach it. The Feed Cover Plate has to be attached to the surface of the sewing machine, the screwdriver is pointing to the screw hole that is the correct one to use. I have mindlessly screwed it into the wrong one and then wondered what was wrong after I attached the buttonholer, so attention here.
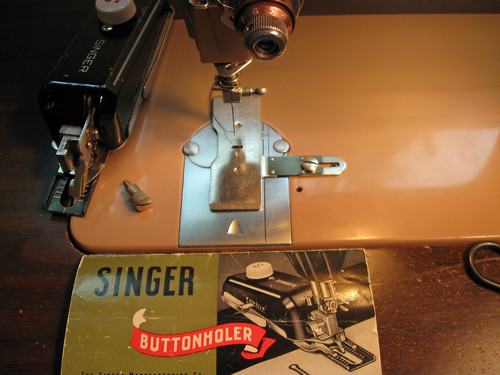
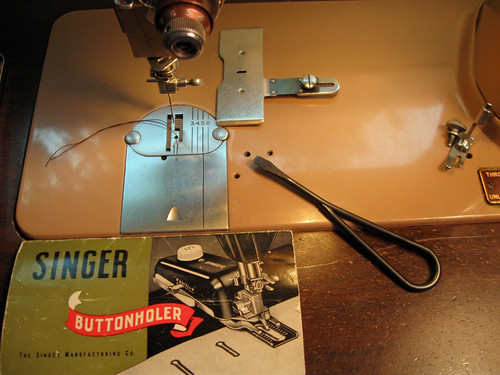
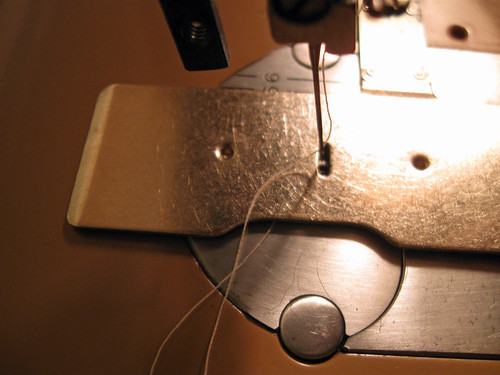
A little fiddling with the cover plate is important, as the needle must go through the very small hole and if it is off center it will hit the cover plate and break the needle, so check before proceeding.
Here is a short (1 minute) video of the buttonhole attachment in action. It is a bit blurry - my first time trying to video and sew. Mostly I wanted to show the action of the attachment and how fast it is.
Wasn't that exciting ? OK, maybe not so much but imagine making a garment with 8 buttonholes, plenty of time for daydreaming or pattern planning while hypnotically watching that little gizmo go round and round.
Samples of the different buttonholes, made on a scrap of wool with no interfacing. I went around 2 times for each buttonhole.

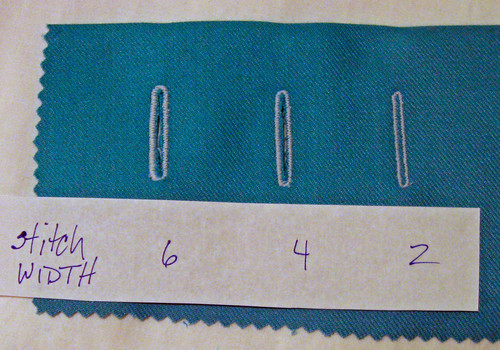
You can also change the width of the stitch, rather like adjusting a zig-zag stitch. They call it "bight adjustment" in the instructions. Here is a sample using the different widths. This is useful depending on the type of fabric and size of buttonhole selected. I usually make a few test buttonholes on scraps to choose the right combination of size and stitch width.
The manual shows the attachment in place much better than photos I took so here is a look at that. I have learned to use all the Singer attachments from the manuals that came with them, they are incredibly detailed and yet easy to understand. Perhaps because I am an instruction reader - computers, power tools, tv and cable, photoshop, whatever it is I read the instructions before proceeding. If that isn't enough, I take after my dear old dad, go to the library and get a book, try to teach myself whatever is needed. So I strongly recommend these little instruction books that come with the Singer accessories. If anyone has an attachment but no instructions, I would be happy to photograph the rest of the pages and post it on my Flickr page.
Had enough about buttonholes? I was sorting through some past photos and saw that I took a whole series of pics while I was making my winter coat, so maybe a post on my methods for bound buttonholes. Also regarding these machine worked buttonholes, there are a few tips which occur to me and I have not mentioned here, so I will do another short post on those later this week.
 Today I really should get outside and plant the new stuff I purchased this weekend. Despite our weird late May rain here in N. California, I am trying to change a lot of my garden to low water usage plants. So here is one of them, a red salvia that the hummingbirds love.


Very nice description! I agree - my vintage Singer buttonholer is definitely my Go To tool for buttonholes.
ReplyDeleteI usually narrow the stitch when I go around the second time - I think this tip is in the instruction booklet?
Is that the little round eyelet template you have there? That's the one I'm missing & would love to find it!
Great tutorial.....It's quite a treat to meet other sewists who use a slant needle and this buttonholer. I love them both...! This was a state-of-the-art purchase for my paternal grandmother who used it in her work as a professional dressmaker.
ReplyDeleteI'm lucky Jill Be...I have the eyelet template and have used it often to make stick-pin holes on my son's jacket lapels and holes for my belts. I'm pretty lucky she also left me all those odd-sized templates, like 3/8", 15/16", 13/16", 1 1/16" (keyhole), so I'm able to breeze through the holes for any size button.
My back-up sewing machine was purchased for its drop-arm capability, but I haven't mastered the ability to use the (4-step) dialable buttonhole feature it can do...Why bother, right? :)
Have a great holiday!...
Greytone - your comment reminded me that I do use the smallest template, as you mentioned, for holes when I made belts. very useful.
ReplyDeleteI have heard about such buttonhole attachments but never seen it. It is really interesting post!
ReplyDeleteAnd thank You, Beth, about commented my last post and adding to your blog list! ;)
That was very enlightening, especially since I have one of those gizmos sitting around, with a machine that it attaches to. I fiddled with it once, then gave up. I really must try this out again - you make it look so easy, and the buttonhole looks very nice.
ReplyDeleteWondering if you might help me. I need tomake buttom holes for a vest which has buttons that are 3/4. However, I don't have a templet for that size, any suggestions.
ReplyDeletethanks for the information about using my attachment. I used it many moons ago and had forgotten how to use it. Seems like I may have misplaced a piece according to your pictures. Thanks again.
HI anonymous - for buttons that are 3/4" use the larger template, you always need to use a template that is a tiny bit bigger than the button. If it seems very big, when you cut open the buttonhole don't slash the whole center, just make an opening about 3/4" and it will work.
ReplyDeleteI stumbled on your blog recently (with your British visitor) and then someone just pointed me at thi spost today. I'm so glad to have found it! I just purchased a vintage Singer button holer (low shank straight stitch version) and am facinated that it works! Unfortunately, mine was slightly damaged in shipping. I managed to put it back together but the thin bit of metal on the darning plate seems to have gotten a bend to it now. I discovered that using painter's tape keeps it in place over my throat plate though. Any reason I can't use my regular darning plate? Also, my sts don't look quite as tidy as yours. I'm wondering if this is just a mater of not getting it attached solidly enough, or could this be a tension issue? Thanks. aberka AT gmail DOT com
ReplyDeleteI have an attachment that was recently given to me but with no instructions. I am not a great seamstress but I am working on it. I want put button holes on a dog bed cover I have made but didn't know how to use the attachment. So figuring everything is on the web, I did a search and found your blog. Your instructions were great but I would still love to get pictues of the rest of the instruction book. Thank you.
ReplyDeleteHi Beth, :)
ReplyDeleteI also have this attachment which once had its instructions, but apparently it was lost after my mother passed away. I can't attach it to my vintage Bernina 830, but it fits my c. 1895 singer treadle. If your offer to photograph the rest of the instructions is still good, I'd love to get those additional pages.
-Rebecca (We met last month at the blogger's meetup)
Oh, I just found a pdf for the instructions here: http://www.ismacs.net/singer_sewing_machine_company/manuals/lowshank.pdf
DeleteFound it by searching "singer buttonhole attachment instructions"
Thank you for your post on the Singer buttonholer. I am waiting with bated breath for Part II: Tips. I have my mother's 1948 Singer dressmaker machine. It sews like a dream and nothing makes a stitch like this little worker. It is in a beautiful cabinet, I cherish every little pin scratch on the cabinet top as they remind me of the hours my mother spent making her four daughters so many beautiful dresses. I am sewing dresses for my granddaughter now. Maybe someday the machine will be here.
ReplyDelete