
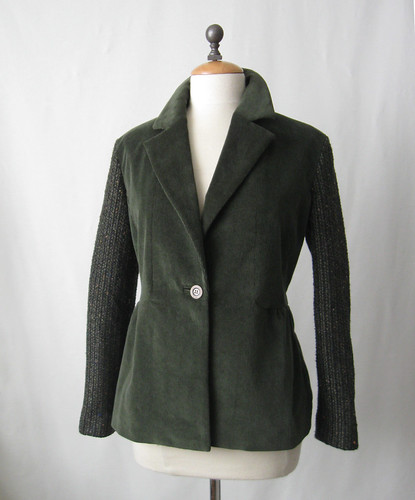
I had a piece of olive green stretch corduroy in my stash, a meager piece of 1 and 1/3 yards (60"wide). The pattern (S2455) calls for 1 and 7/8 plus the dreaded "more fabric needed for one-way design and to match plaids". Corduroy falls into that category, all pieces needing to go one way. I stared at it a few times and one day I thought ... tweedy-boucle-ish sleeves.
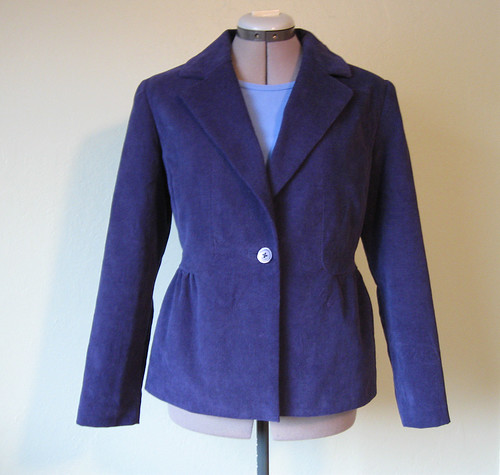
I think this is a little sleeper of a pattern, Simplicity 2455. Looks kind of serious and businesslike in the pattern images but has nice princess seams, easy to make lapels and a hint of peplum. Here is the first one I made, in blue uncut corduroy.

In the post for the first version, I have some notes on how to get that inside corner of the collar/lapel intersection nice and smooth.
I used the needle board again for pressing this jacket, and if you go to the other post you can see some photos showing why/how to use it. It is kind of a pain to remember, but this olive green fabric is cotton corduroy with a bit of lycra, so once a seam is pressed things are good to go, not that much pressing to do, and the important thing to remember is NOT to put the iron down on that right side of the fabric!
 |
| Needle board |
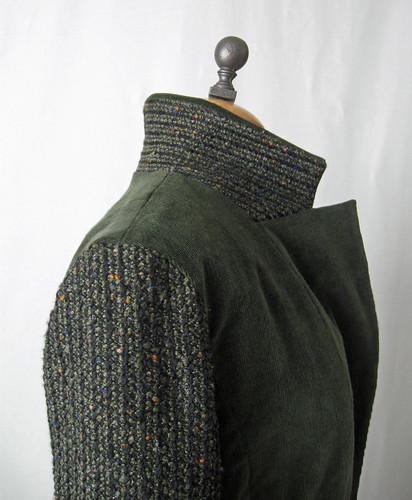
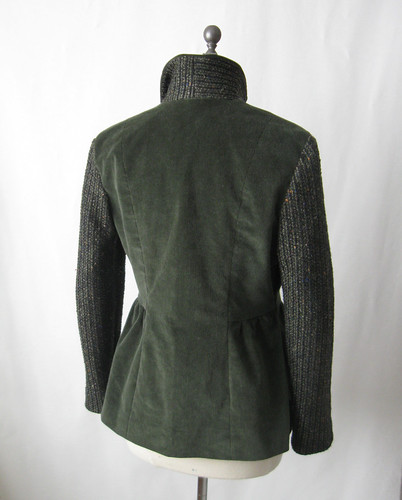
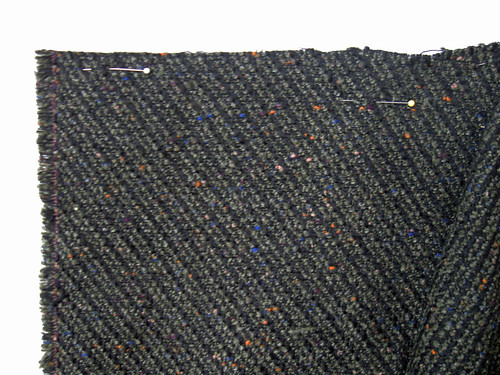
Now stop staring at that undercollar. Or am I drawing your attention to it? See the stripes, horizontal on one side, vertical on the other. Also no choice. After all, the undercollar has to go on the bias. So here is a look at the wool fabric, the selvedge is on the left. See the devious problem? As I did not see when I bought it. Diagonal stripes. But I did have a brainwave right before I cut out these sleeves, and did some draping on the dress form. If I had cut it out on the straight of grain, then while both sleeves would have had diagonal stripes but since the sleeves are mirror images the stripes would have been oriented in opposite directions. Hard to explain but take it from me, it looked weird. So the answer is - breaking all kinds of sewing rules, cut the sleeves out on the bias. Turned the diagonal stripes into vertical ones. Result - worked very well on this loosely woven fabric and gives them a sweater-ish quality that is perfect.
Other inside details. You know I am a fanatic about trimming the inside of a garment. Banish all possible lumpy bits. Here is how I do the hem on the facing, it looks a bit rough as it is a very casual corduroy garment, no pretence at all to being a well tailored jacket. On the facing I did press it directly so there is the mark from the iron, however the needle board was under it so the outer side is still all plushy and smooth.
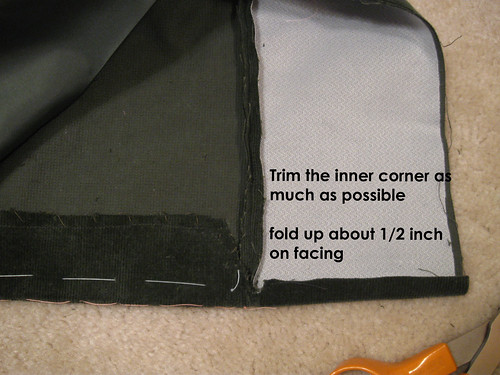

My usual motley crew of assorted linings. I did happen to have this piece that matched so I used that for the parts near the front. To make it neater I wrapped the lining around the bottom of the facing, enclosing all those ravely bits of corduroy. When I do a lining I most always put that little pleat at the bottom, it just gives the lining a little more "breathing space" letting it hang inside the garment and not pull at the outer fabric. I can't remember if this pattern calls for a lining, I just cut out the main pattern pieces and then wing it on the dress form with the jacket inside out, pinning and stitch on by hand.

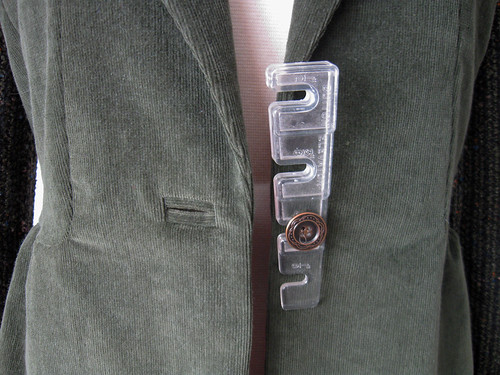
As with the previous jacket version, I did a bound buttonhole because the machine button hole maker would have marked up the front. Another find from the button jar. Do you have one of these goofy little tools? No idea what it is called, the "button raiser-upper" "button height adjuster" ? Anyway if it is a BIG button and buttonhole I use a pencil, but for anything less than that I use this gizmo. Which would be more useful if one had 3 hands, but it works once you get the first few stitches in. Kind of a weird photo, though, but I wanted to show how it is used.
Our weather has turned warm, tomorrow's plan is a hike, maybe wearing shorts ! Woohoo! (we are enjoying the temps but I fear one of our drought summers is a possibility) and I am planning to be outside and away from the sewing machine this weekend to soak up some sun. The Pattern Pyramid drawing from my last post is coming up, so make a comment if you are interested. I appreciate the interest in recent comments about fit and pattern alteration so I will start some posts on that next.
Happy Is it Spring Yet? Sewing, Beth


Amazing job on your jacket! I´m always in awe of your craftmanship!
ReplyDeleteThe jacket is stunning and I appreciate the pics on how to handle the facing/lining situation! Will refer to this for my next jacket.
ReplyDeleteBrilliant marriage of the boucle to the corduroy! I just gave away a few cuts of corduroy (given to me in the first place) because I just couldn't find a use for it - I have some more, and you've inspired me to look at possible fabric combos for some possibilities; thank you!
ReplyDeleteAnd I LOVE your button gizmo! I usually use toothpicks, but this looks less fidgety; would love to find one...
I love the jacket. It is beautiful!
ReplyDeleteThat is an inspired solution - I love the result, including the under collar!
ReplyDeleteThat is a beautiful jacket - very unusual. Love it. Thanks for all the instructions. When I get game enough to tackle a jacket I will look back at it.
ReplyDeleteGorgeous jacket and a great post too: very informative. Hope you get some weather cold enough to wear it, eventually :-)
ReplyDeleteWhat a great take on this jacket. The first version is gorgeous as is your second jacket. For such a dowdy looking envelope cover, you have made two unique and stunning pieces.
ReplyDeleteI agree with everyone here, this is a gorgeous jacket! I love everything about it, the color, style and fabric choices!
ReplyDeleteThis is probably my favorite thing you've made and posted. I agree that a jacket you can wear dressed up or dressed down is so useful and this one is so stylish and fun. I think you bought the fabric when we were together at SM, yes? A great purchase! I just love the two fabrics together.
ReplyDeleteThis is so interesting, seeing your neat tricks for something that is actually quite daunting! I really like the use of both fabrics, a perfect match, and what a lovely pattern.
ReplyDeleteThat is pure genius to add the sleeves in a different fabric. So cool. Love the look. Very cute jacket.
ReplyDeleteWhat a gorgeous bound buttonhole! Have a great hike -- the weather looks like it will be amazing today!
ReplyDeleteLove those contrast sleeves--very cool. Thank you for the details on how you do the hem. That's very helpful.
ReplyDeleteThis is a gorgeous jacket I love the contrasting sleeves and collar in the wool it really gives the jackets some style. It looks so well made you are very clever.
ReplyDeleteWhat a fantastic jacket, I really love the two fabric combo.
ReplyDeleteThe jacket is amazing and all the detailing you've put into is makes it so.
ReplyDeleteThe two textures compliment each other and really bring out the line of this jacket. You're right that this is a sleeper pattern and you've nailed it.
Another work of art.. I would love to have some classes from you.. Please come to the UK...
ReplyDeleteYour jacket is so pretty and so inspired - I love the contrast and mix of the fabrics.
ReplyDeleteWhat a gorgeous jacket! I love how you used two fabrics to achieve this look. And so professionally done, as always!
ReplyDeleteWow, Beth! You always amaze me with your garments. And, thank you for taking so many construction photos. I always forget to document my process, but since I don't have your experience, it's probably for the best. Anyway, I love this jacket. The green. The corduroy. The sweater sleeves. It feels so professor-ish to me. So fun!
ReplyDeleteThis is beautiful, Beth!! Gorgeous use of the two fabrics. I would love to find a reliable jacket pattern, and this may be the one. Thanks so much.
ReplyDeleteThese are fabulous jackets! I particularly love the contrasts in fabric on the olive one. I'm about to start sewing my first jacket so I'm pretty nervous and excited :)
ReplyDeletexoxo Lorelai
Seams Unbiased
I never fail to learn something new when I pop by, and this post has delivered in spades. Apart from the obviously comment of - OMG I love your jacket, I couldn't agree more on the need to sew 'basics' to suit everyday living. It seems boring at first... but when you reach into the closet time and time again for that one fabulous self-sewn jacket, you know you need to make more! I'm with you all the way on trimming and reducing bulk, it really does pay off for the finished result. The more I sew, the more I realise that it's the little details like this that make or break the quality of the finished result. And I absolutely love how this jacket has turned out. May you have many wears with it :)
ReplyDeleteHi Beth, I'd love to see a photo of you wearing your coat (this one or the lovely blue one). Cheers, Sarah
ReplyDelete