
Actually the jacket body is finished, and separately the lining is sewn together so I just have to stitch them together, do the pockets, sew on the buttons and be done. Just that! ha. I spend an hour this afternoon fooling around fringe and patch pockets and finally have it figured out.
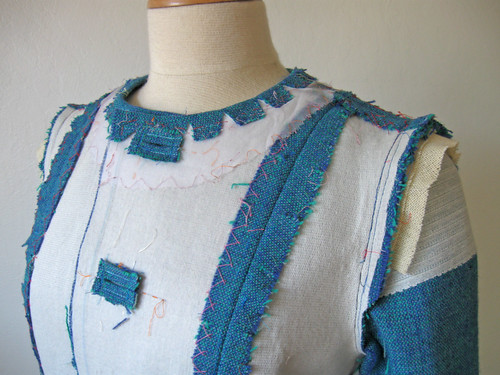
Sleeve scrutiny also overcame me, and I decided there were some wobbles in my stitching so I had to fix those. Here is the sleeve with the wobble. About 2 inches down from the shoulder seam is a distinctive bump. I measure all around the seam allowance and see where it deviates from 5/8" and mark as needed, then re-stitch.
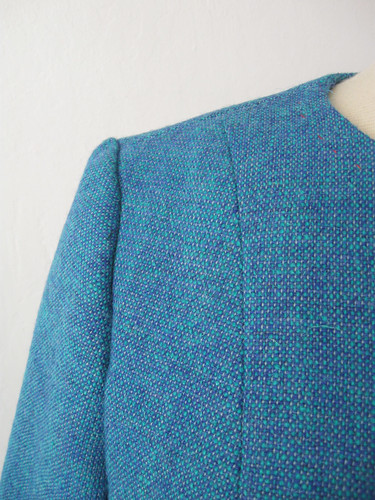
this is how it should look, on the other sleeve it came out perfectly first try.
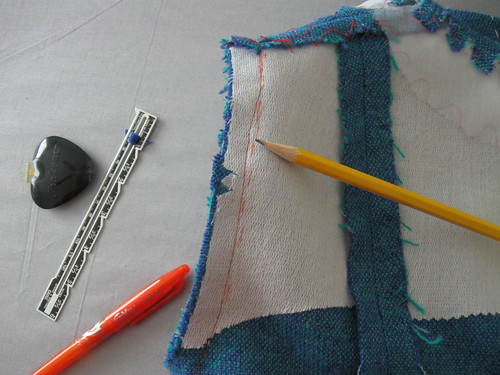
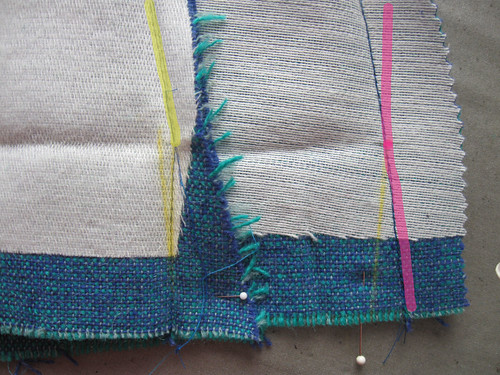
And how about a note on hems? Sometimes on a garment that is A-line, or flares out from the waist to the hip and you are working with a substantial fabric it can be really difficult to get the turned up hem to ease in and not show on the right side. I think the various methods include steam shrinking, or ease stitching but with a princess seamed garment there is the opportunity to take some of that width out of the hem allowance by sewing in at an angle below the hem. I did this on my recent Burda jacket and it worked well.
A little photo editing with colors will hopefully illustrate what I mean which is easier to show than explain. The seam on the left, with yellow is adjusted so that when the hem allowance is folded up it makes the opposite angle as the outside of the garment and takes the extra out of the hem there. The pink lines on the seam on the right show if I don't make that adjustment then the hem allowance will be larger than the garment by quite a bit and it will be difficult to get a nice smooth hem. It is chalk marked in yellow but I have not sewn that one yet.
Claire asked how my DYI table construction was going. Here it is, about 85% finished. I used two existing very heavy wood shelves turn on their sides to make the bottom portion. I put four casters on each one so it rolls nicely. Then I spaced them apart and attached a 12" wide piece of plywood to the tops, so that they are stationary in relation to each other. Next I tested out the top plywood to see if I liked the size which I did. Then I covered the big plywood with an old wool blanket which my mom was going to give to the dog rescue shelter - sorry pups but it was perfect to cover the surface and great to iron on top of. (Idea which was filed away after reading La Sewista blog). I used the staple gun to attach the wool blanket (doubled for two layers) to the underside of tabletop. Next I used 6" angle brackets to attach the tabletop to the white rolling boxes and I have a DIY sewing table. The final cover is ironing board cloth which is actually partly stapled and partly taped as I have to do some trimming in the corners before the final staples. But it is so great, plus I can keep all my ironing accoutrements in the lower parts (sleeve boards, clappers, a small task lamp).
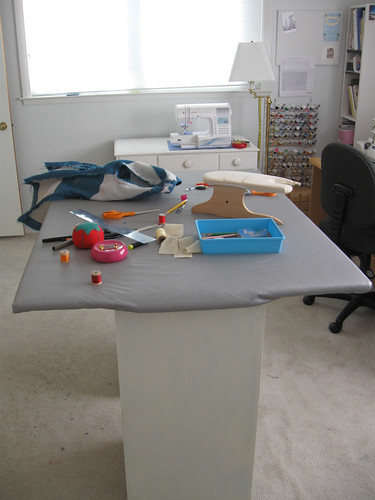
Needless to say I am very happy with it. Total cost was about $90, plywood, casters, wood screws, angle brackets, ironing board cloth. But a bargain compared to buying something that was never going to be just right. The height is 36 inches. I spend most of my time standing so I was really specific on the height I needed.
Next post will have a finished wool jacket. I swear! and then onward to something springlike. I have a few dress requests and for myself maybe a knit top. Plus I succumbed to spring fever and bought the same J.Crew voile fabric that many did when it was on sale recently at FabricMart. I had intended to order but never got around to it, then it was sold out. A few days later I saw it at my local favorite store Stone Mountain, in red/white so I jumped on that.
Happy DIY, whether with a screwdriver or sewing machine,
Beth


Your jacket and table are coming along nicely! I got my ikea table yesterday and am finishing it up today. I too am excited to have a second shelf for all my pressing tools. :)
ReplyDeleteGreat work on the jacket. Why don't you give us a bit more on your construction details? I'm interested to see you interfaced the sleeve tops. And are you lining to the edge?
ReplyDeleteGreat photos...the jacket hem adjustment also comes in handy with very flared pants hems to avoid bulk on the wrong side. Your cutting table is quite something...so custom!
ReplyDeleteAh, the J. Crew voile, I just got some of that in the mail! Your jacket looks wonderful, but that table steals the show! It's wonderful!
ReplyDeleteYour hem solution is brilliant! Looks like we are trading tips today! Isn't it amazing how that little off seam allowance made such an effect on the outside? Gotta be more vigilant here and thanks for making me think about that, Beth!
ReplyDeleteTake your time on your lovely jacket, I LOVE seeing all the intricate work! All of your TLC will make your jacket so beautiful. Nice table btw:)
ReplyDeleteTable = great (thanks for the update!) :)
ReplyDeleteThe Sleeve Mk II is gorgeous... I've found in the past this is a really tricky thing to get first go! It's so easy to lose sight of the bigger picture when you're staring up close at your fabric layers under the presser foot, and so easy to spot the errant sewing direction when you pull it away! It's going to be gorgeous :)
ReplyDeleteI'm envious of your table! Looking forward to seeing the finished jacket.
ReplyDeleteBeth, thank you, for taking your time with posting about this jacket. I really appreciate the photos and your instructions on how to address small issues. The sleeve tip is great. Jackets are high on my list this year, and I will certainly refer back to your blog. This jacket is beautifully made. I love the color and the craftsmanship. Thanks again.
ReplyDeleteCennetta