
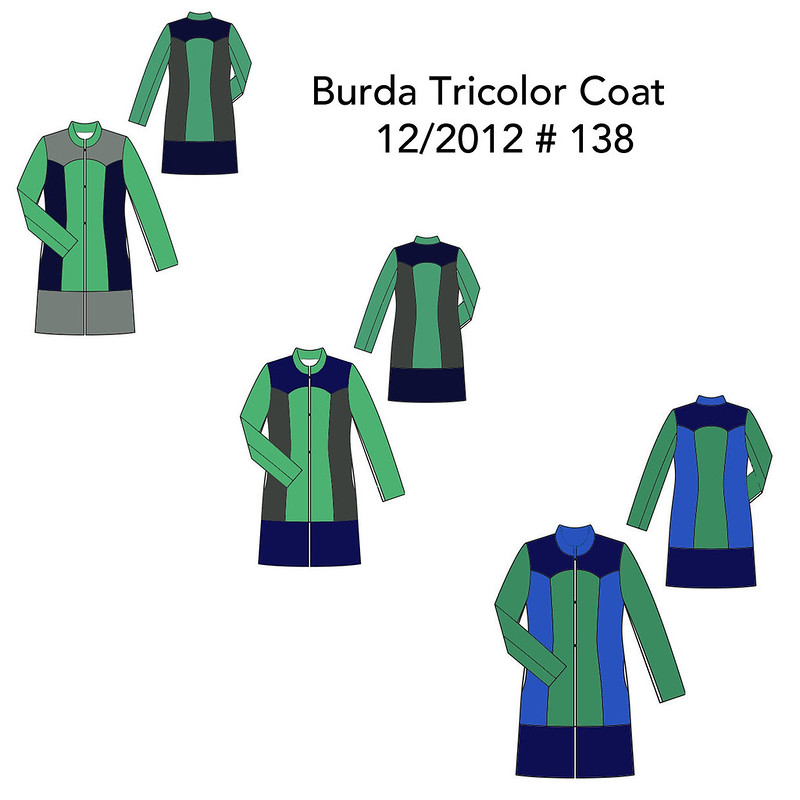
Do you ever have a pattern that have not bought but keep returning to? Over and over again, thinking about, wondering what fabrics might work, evaluating if it right for your wardrobe? This BurdaStyle pattern is from 2012 and I have probably been looking at it since then. I don't get the magazine but I always take a quick peek at their emails showcasing the new pattern collections so maybe I first saw it there.
Recently someone gave me a gorgeous piece of wool coating and I wanted to use it for something really special. Here is the link to the pattern page.

The gigantic scarf is obscuring the collar details but fortunately they show it in the other image. And this pattern led me to a discovery that may be well known to you but something I never noticed before. More on that in a minute.
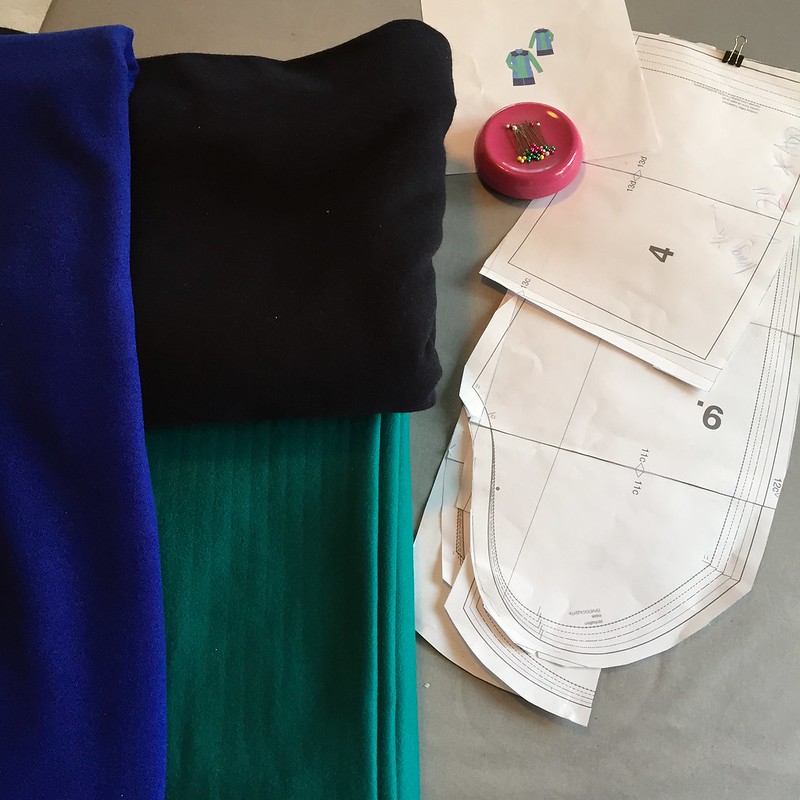
Back to the fabric. That beautiful green wool was given to me, it is a perfect weight of coating fabric. Already pre-shrunk and sealed up in a bag - thus you can see a few wrinkles which pressed out perfectly. I started thinking about combinations for the tricolor coat and remembered that I had a very heavy wool coating in my stash which - wait for it - I bought at some rummage sale or something like that. It is a 4 yard piece of super dark navy blue wool coating. Just sitting in my stash until needed :)
And I probably paid under $10 for that. So....two fabrics ready and one more needed.
This is where my silly little discovery happened. I often do a screen capture of the technical drawing image from pattern websites, either to save for a blog post, or to print out and color in with pencils, just to play around with fabric options. This time I had the drawing open in Photoshop and clicked on the paint bucket tool, filled in on the coat and to my surprise it just filled in one section. So I changed color and filled in the other sections. As with so many features in Photoshop (and many many other programs) trial and error or happy accident or crazily frustrated random clicking results in some new epiphany. (or possible erasure of an hour's worth of work but we won't focus on that now). So this may be a well known feature of the technical drawings but it was news to me. And what a perfect pattern to play with this feature.
I was thinking grey for the third color but my newly found coloring tool helped me decide on something a bit brighter (oh what a surprise, when do I choose the understated). Although the grey is nice and I could imagine this coat in shades of all grey - that would be very sharp looking. So something in the sapphire blue was the winner. Which I didn't have so I had to order fabric. Fortunately I found a perfect choice at Gorgeous Fabrics, a wool coating for about $ 23 yard. Just needed one yard so in the shopping basket it went and you can see it above.
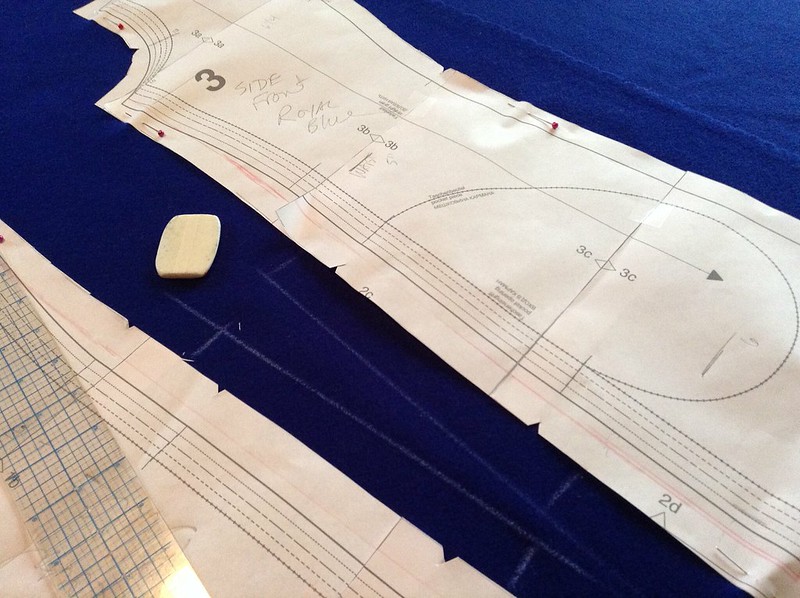
I did make a muslin of this pattern before I cut out my nice wools. Using some scraps of various things and not doing the colors in the same array as the pattern, but I just wanted to check the fit and length. I cut out the Burda size 40 with about an inch added at the hip on the side seams and the fit is spot on. Can I take a minute to rave about the Burda sleeves? I have now made a few Burda jackets and so far their sleeves are really great. Although long! which I guess is better than too short.
Sewing this coat I have taken a lot of photos - so expect a few more process posts along the way.
Here is the first on my sewing process. When it comes to linings, whether in the jacket or coat, or just the pockets, I am not a fan of novelty linings. Inside jeans or shorts it looks cute to have some contrasting cotton and that's a good way to use up scraps, but when it comes to any "serious" coat (defining serious as something I put a LOT of work into and intend to last years) I want the pockets to disappear, or be hidden and have no chance of peeking out.
So for the pockets which are in the side seams on this coat, I add an extra section of fabric and then sew the pocket bag onto that, which serves to have the coating fabric extend about 1.5 inches into the pocket so the pocket lining stays hidden. Although I did use a dark navy for the pocket lining so it is not very visible anyway.
Sewing process item #2, interfacing. While all these wools are quite thick and this design doesn't need much support (no lapel or traditional collar) the 3 fabrics were slightly different in weight and thickness. I wanted them to all behave the same way so the method to achieve that is interfacing. Also my muslin test showed me that sewing those curvy junctions was very tricky and needed some stabilization. More on this in my next post but for starters I pulled out all kinds of interfacing and did some tests.
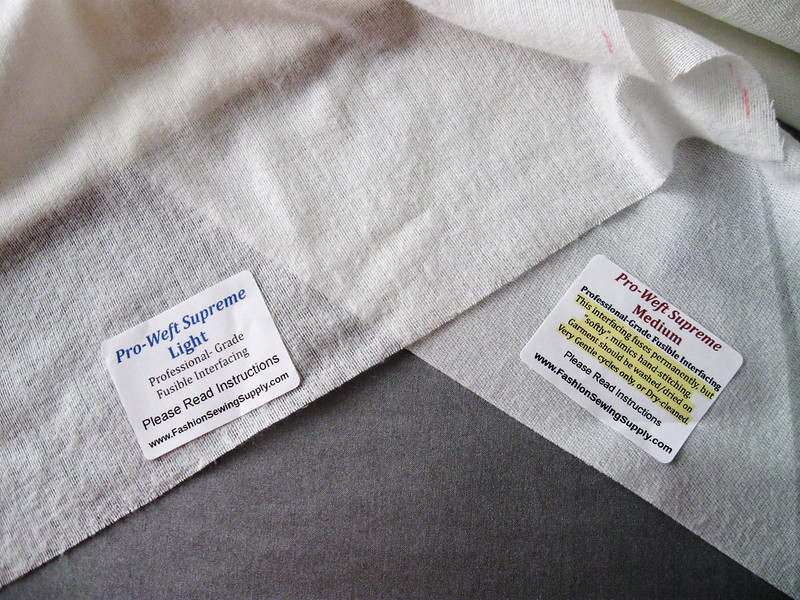
I always do tests on my fabric and interfacing combos, not just applying the interfacing but then stitching the fabrics together in various combinations to see how they go together. Sometimes I am surprised at what works so the test is always worth the few minutes it takes. For most wools I use this Pro-weft interfacing from Fashion Sewing Supply (note I just got an email this morning they are having a sale, 15% off.
Here is the sample I played around with, front and back.
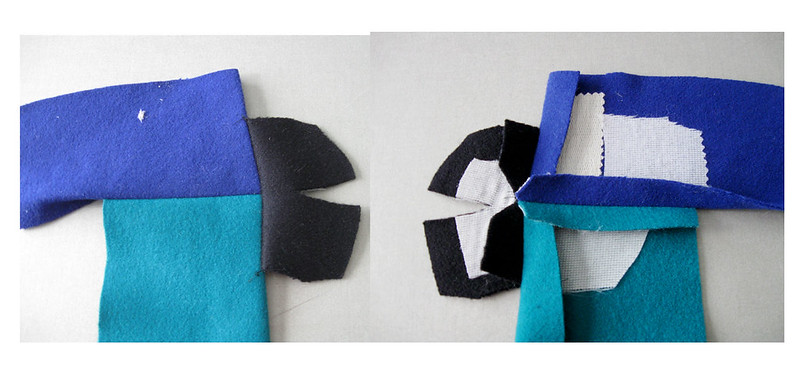
I tried to create a section that matched the pattern where the 3 colors were joined together, and also included a curve, which I had to snip, making it look like some kind of abstract art face or something. But you can see that the various weights of interfacing applied, then I stitch the pieces together, including where there is interfacing because you want to see how the interfacing does in the seam as well as in the body of the garment. I ended up using several different weights of the pro-weft as well as some knit interfacing in other sections which I will show in a subsequent post. And that image on the left includes a little speck of interfacing on the blue section - something about this wool coating catches every little spare thread or speck of interfacing, which I noticed here on this test and had to be really careful of when I did apply to the real pattern pieces. Also late night interfacing - of course I fused a big piece to my press cloth because it was glue side up. Which is a good indication that it is too late to be sewing and time to turn out the lights, unplug the iron and get some sleep. Also - yay for fusing to the press cloth and not the iron. Thank you Mr. Press Cloth for always being there :).
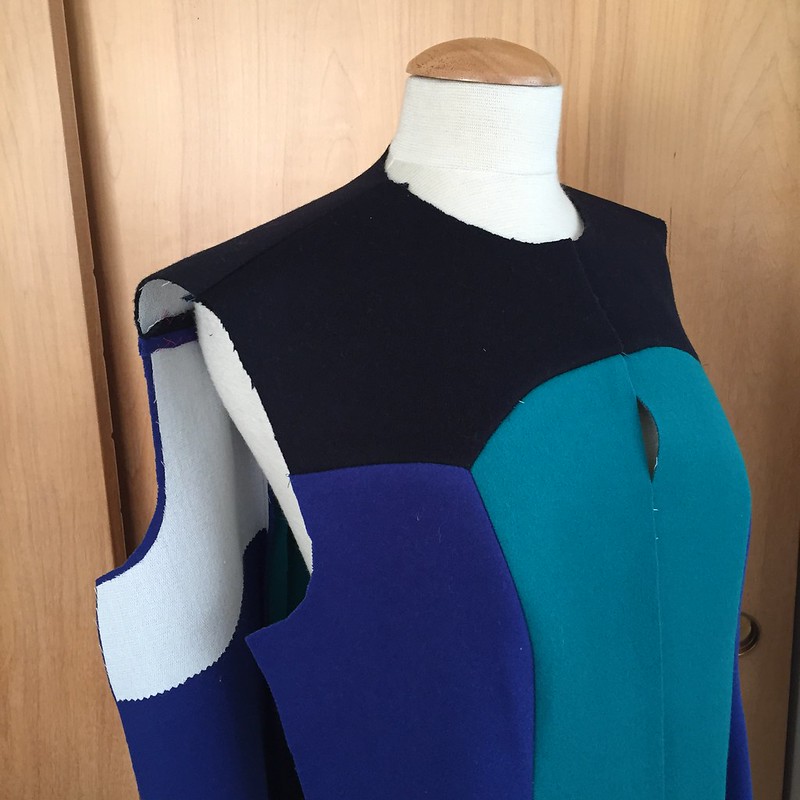
And now a little sneak peek of the coat in progress. Lots more details to come for readers who comment that they love to see the in-process sewing and technical details.
This morning I got some Christmas shopping done, so civilized with my cup of coffee and my laptop. Unfortunately the "one for them and one for me" habit is hard to avoid. Oh well.....
Now off to the gym and then perhaps some garden work is in order. Or I could stay inside and sew. Decisions, decisions. Oh who am I kidding, I will probably sew.
Happy Thanksgiving weekend and wishing everyone delicious leftovers - one of the best parts of this great holiday
Beth


No Thanksgiving or leftovers here in Australia. And I would be that conservative sewer who would do the coat in shades of grey but with a novelty lining (but not showing at the pockets). Your combination of fabrics looks fun and very much you. Looking forward to seeing your posts and hints. Now will I get up and garden or go to the gym…….
ReplyDeleteI can't wait to see how this turns out - your colours are fab! I actually made this coat a few years ago in a very ill-judged brown/purple/red combination which, when finished, made me look like a potato. I didn't really wear it much.
ReplyDeleteI did, however, add a big flowery novelty lining but it stayed pretty hidden because I changed the front fastening (which i think was originally a set of hooks-and-eyes?) to a zip which, to be honest, was the best part of the whole sorry affair. It's a great pattern and I wonder if this will inspire me to give it a second chance - but maybe in something plain because good GRACIOUS I am bad at colour blocking!
A perfect coat pattern and the colors you've chosen are spectacular! I so enjoy seeing the amount of work you put into your garment construction...no shortcuts equals a quality finished product. Can't wait to see this coat completed and in action!
ReplyDeleteooooo.... I can't wait to see it finished! I love the color combination!
ReplyDeleteLoooooove the technical details and thoughts you are sharing. This teaches me a lot. And what a color combo, they seem absolutely perfect with each other. Your coat will be stunning, no doubts !
ReplyDeleteYum, yum, yum. this is going to be fabulous! Love the colors and the design, and I can't wait for more details.
ReplyDeleteI have the issue with this pattern in and it's always taken my fancy so I can't wait to see this made up and your colour choices are fab. So exciting!!
ReplyDeleteI love the color combo!
ReplyDeleteThat's an interesting pattern. The way it fastens would need to be altered for Midwestern winter winds. But the design lines allow for easier modifications for short and umm, wide.
I made a coat many years ago before I knew how to make alterations to actually fit well. It was one of the warmest coats I've ever owned, but horribly ill-fitting (not to mention it had the 1980s linebacker shoulder pads). Now I have a beautiful wool tweed coating, but am hesitant to even muslin a pattern.
I really need to just take a deep breath and dive in!
Cant wait to see how this turns out, Ive had my eye on this pattern for - oh, I guess the 3 years since it came out, yikes!
ReplyDeleteThis coat is amazing! I am looking forward to reading more about the creative/technical process! If I have not started to work on another coat, this one would be on top of my list. Maybe next year... There are a few colour block variations on the Russian Burda site, you can see them
ReplyDeletehere.
I learn so much from you. This example of combining interfacing weights is a point in case. Really good information. I just ordered some more interfacing from Pam on the sale. Such great interfacing. It's going to be a gorgeous coat.!
ReplyDeleteBeth, this coat is going to be beautiful! I like the colors you selected too. Can't wait to see it completed. Also, it was so nice of you to highlight all of te coat patterns in your current post, thank you!
ReplyDelete