
This post is heavy on sewing details and techniques and lacking any photos of me wearing this shirt - that will have to wait until I'm feeling better, plus I have a skirt in the works that goes with this so it will wait for the the full outfit.

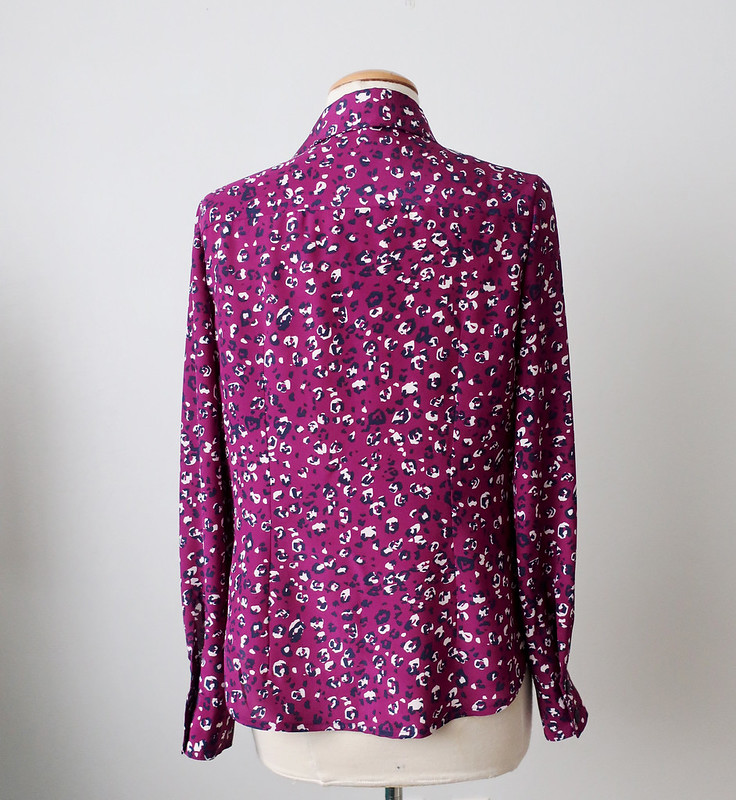
The last thing I had finished was a silk crepe de chine shirt in a purple leopard-y print. I would call this fabric "my precious" as I bought it over a year ago at Stone Mountain with not a real idea of what I would make but I just loved the color and feel of the fabric. I think at the time I had the idea of making a Bondi dress for my summer vacation but made this version instead, and set the silk aside, knowing I would wear it more often if it was a shirt or top.

The purple/magenta color is something I really like and the spots in white and navy blue make it so interesting. They still have this fabric at Stone Mountain - as you will see further down in this post.
So once I decided to make a shirt, after a few experiments with other patterns I returned to my favorite Simplicity 2339, which may be going on upwards of 20 uses of this pattern. I think a shirt is a shirt, and if this is the silhouette and detail I want then it's best to use a pattern that I know fits me perfectly. Also when people say that standard tissue paper patterns are not very strong I just shake my head - I think they last forever - or at least a good long time. Although with this pattern I have modified it for various changes (covered button placket, popover version, darts rotated to gathers, etc) so I do have some pieces copied over onto other papers.)
Let's talk about yardage. Once I unfolded this fabric I saw that previous me only purchased 1.5 yards of this fabric which is 54" wide. Even for my bargainous nature that is a bit skimpy to make anything other than a sleeveless top or a very simple dress (which was my original plan).

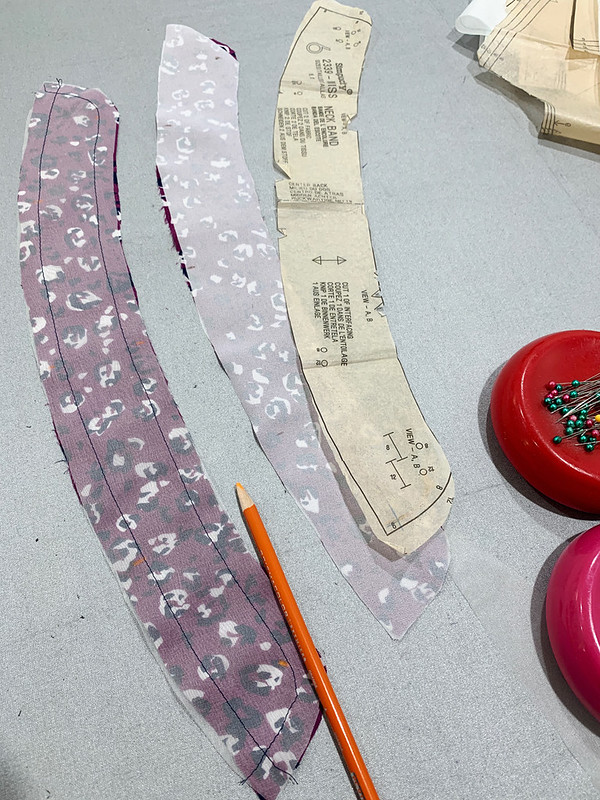
Consequently I had to do a bit of creative cutting to get a long sleeve blouse out of 1.5 yards. Note the collar stand laid out at that jaunty angle. Not exactly on grain - but I figured with interfacing it would be stable enough to work, and it was.
Speaking of interfacing, this is the new-to-me method I read about in Threads magazine, and it works so well. Particularly for small pieces. You can cut out an interfacing piece in the general shape, and on the right grain, then place over the fabric piece on top of a silicone baking mat. Press/steam away and then trim the excess. The part of the interfacing that is overlapping to the mat does not stick at all. In fact it doesn't even seem to melt. So a win in terms of less precise cutting and placement of interfacing, and no sticky bits that just peek over the edge of your fabric and adhere to your pressing surface.

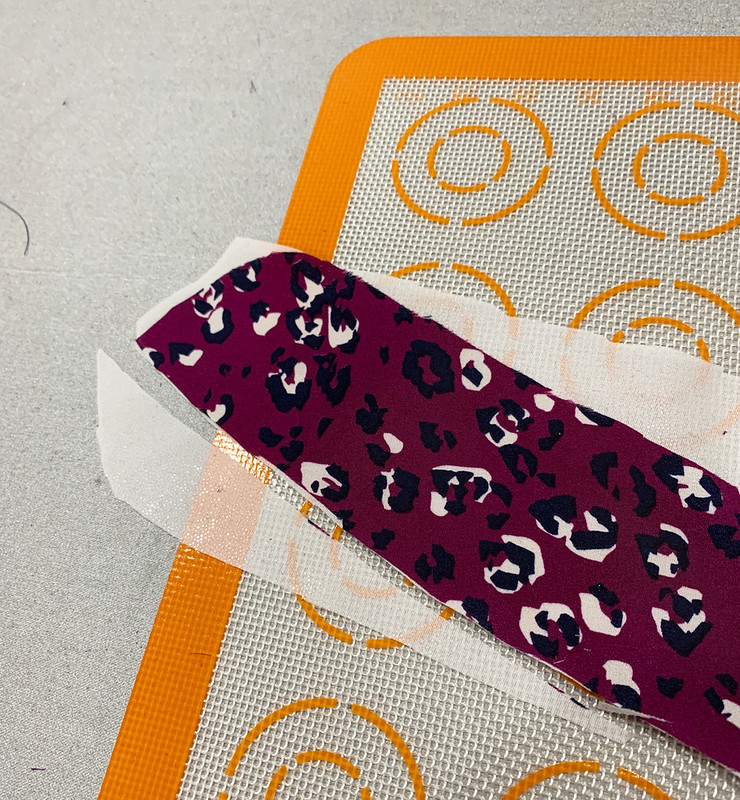
I trim it with scissors but I suppose if you are a wizard with a rotary cutter it would be a quick task. I think of all the things that make scissors dull the worst culprit is interfacing, so I do all cutting of interfacing with a specific scissors so as not to dull my nice ones. Paper I think has no effect on scissors but interfacing is a menace!
Lastly, I always use the paper pattern piece to verify the shape of my pattern pieces (usually I do this as I lay down the item prior to placing the interfacing on top. But I didn't take a photo of it that way - hopefully you get the idea. You would be surprised how much pieces distort with handling and it's just a bit of insurance to maintain the right shapes.
For silk shirts like this I have concluded that 2 types of interfacing work well, one one side I put a lightweight fusible (usually the Couture weight Sheer Elegance from Fashion Sewing Supply) and on the other side I use silk organza. Same for these three parts, collar, collar stand, and cuffs. On the button band just the fusible, no organza as I think it would be a bit too stiff, whereas I want some stiffness in those other three spots.
Another interfacing technique I use is to enclose the edge of a facing by sewing the interfacing and flipping it over, then fusing it. It's a bit of a tricky maneuver but I did take some photos and write about it in this old post.
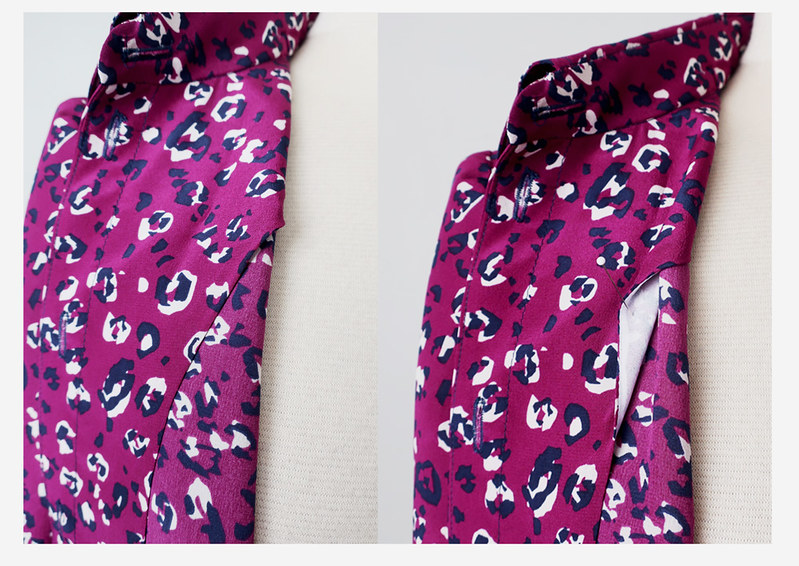
If you look closely at the edge of the shirt front facing you can see that the interfacing and the fusible are stitched together to make a completely clean finish. I love to use this on silk shirts and tops. But you have to clip the seam, and then carefully press that first 1/4" down to get it smooth and flat, then pressing the rest is not too bad.

There are a couple of ways to sew the collar stand to the shirt, and I prefer to do it this way which is a bit fiddly but I think the end comes out nicer. I wrote an article for the Craftsy website which is still alive on the Bluprint website with color-coded details on how to do the collar/stand with both methods and I still think it's one of the best I wrote! (along with my favorite one, the hidden buttonhole closure :)
Onward to cuffs and buttons. I bought these buttons at Stone Mountain, they had the right about of blue to go with the shirt. I had a number of dark blue buttons in my stash, but they were all too shiny or too bright so for once I was patient and waited to finish until I could buy some nice buttons that complemented the fabric.

When I do cuffs on a silk blouse I most always sew a continuous lap which you can just see peeking out there. I think it looks more elegant on silk fabric.
I never use a cuff pattern, I just decide how wide I want it to be, and how long depending on the thickness of the fabric. Then I cut rectangles, interface, and add silk organza to make it a bit more structured.


The fusible keeps the seam allowances from showing through and the silk adds a bit of rigidity, you can see that cuff can stand up a bit on it's own there.
Lastly, how do I know they still have this fabric at Stone Mountain?

Because when I went in to buy the buttons I succumbed to my urge to have a nice fat bow to wear with this blouse, so I bought another 1/4 yard which was used in it's entirety to make this fluffy bow.
Another silk blouse in my wardrobe - I think this will get worn a lot with all my purple and blue items. A little more costly than my usual sewing lately - not a remnant in sight. About $ 50 if you total fabric, buttons and interfacings. Considering I'm still wearing the first silk charmeuse shirt that I sewed from this pattern in 2011, I think it will get plenty of wear and use in my wardrobe.
So that's the latest - this weekend I've felt a lot better and started on a very cheery and suitably February red coat which I hope to complete to wear to Frocktails later this month. Plus I might start on some corduroy jeans as a warm up for my jeans class in a couple of weeks. And try to get outside to check what's survived the winter in the garden and even do a bit of prep for spring!
Happy Sewing
Beth
Today's garden photo is a pink camellia. These are so common around here in older houses, I think garden design has moved on to more interesting things but there are a few remaining at my place. This is pretty but it's so messy and I think this might be the year that it gets the chop to make space for something different.


Lovely top, and thank you for the construction details. I have that fabric also; used it to make a dress. When I wore it the first time, my partner said that the print looks like a bunch of pandas tumbling around — now we can’t “unsee” the pandas. :)
ReplyDeleteI saw pandas right away, too!
DeleteIt is beautiful I am glad you are doing better
ReplyDeleteI think Michele's panda reference makes me want it more! LOL! I went to the SM&D site and it looks SO purple there! Here it looks more pink-ish. At any rate, I love this print, I love the blouse, just beautiful!
ReplyDeleteMany years ago, I mentioned fusing interfacing that way. I didn't have a silicone mat though - that's smart. I just used a scrap of cotton that could get "ruined". I'd just lightly press so it would secure, trim it down, then fuse it all the way. Some ladies on PR LOST THEIR MINDS. LOL!!! Told me I "couldn't" do it that way. Oy!
I am sorry you got the bug. ICK! I got the flu for the first time a few years ago and man was it torture. Glad you're feeling better!
I love a well made silk blouse. Yours is a wonderful color/print. I didn't see the panda's til I read the comments. Now I do. Glad you are feeling better.
ReplyDeleteSo many great tips in this post. I usually block fuse, by cutting my interfacing pieces out and then putting them all on the fabric, matching the grain, and fusing them at once, then cutting out the fused pieces. I do find that they still distort this way. I think the silicone mat technique might be better. Now I need a silicone mat. The blouse is beautiful. I look forward to seeing it when you are feeling better. Rest up!
ReplyDeleteI loved that post Beth and the final shirt is gorgeous!! I never tried using organza in shirts but I'll add it in my sewing bucket list!
ReplyDelete