Monday, March 10, 2014

The Brasilia Dress, a fitting post

The bright yellow daffodils all over my garden are telling me that spring is here. So while I would like some stormy weather to relieve the current drought I am happy to turn to summer clothes. The most wonderful time of the year - at least to me. You can keep your wools and cozy sweater knits, I am happy to start thinking about some lightweight and floaty things for the hot months ahead. Which will include a pattern repeat from last year and you may be quite suprised to see it. But I have self-scheduled that for later, maybe May or June. Time now for Brasilia!
Did you see this dress a few months ago when Rachel of House of Pinheiro released her self-drafted dress pattern? I knew immediately that it was a dress for me.  A little bit retro reminding me of a 60's style shift dress but with a  modern fit and shaping.

Here is some info from Rachel's blog:
The pattern is free, available at one size only in a downloadable PDF format. The finished measurements are: Bust: 95cm Waist: 78.5cm Hips:103cm. The pattern has minimum ease and no seam allowances. Even if you have similar measurements, I advice you making a muslin as the pattern was design for 6ft tall ( 1.81cm)

Don't let the measurements strike fear into your heart  - this pattern is quite adaptable and even though I am not 6 feet tall I am quite near a finished dress.

So let's dive into to the alteration details - when I did a casual survey last December asking about blog post topics, fitting and pattern alteration was top of the list by far.  So this post is not filled with pretty pictures but for those of you who appreciate a good muslin analysis - get ready for some fun :)

Note that the finished measurements are listed: B: 95cm = 37.4"  W: 78.5cm = 31"  H:103cm = 40.5"
so these finished measurements are close to what is found on a size 12 Vogue pattern, at least in the ballpark. I was concerned about the 6 Ft. tall part of the equation.

Brasilia dress tech drawing
Looking at the tech drawing I thought that in addition to circumference changes - the major issue was the placement of the bust darts and the inside corner of the triangles, you want those to hit at the right spots on the body.
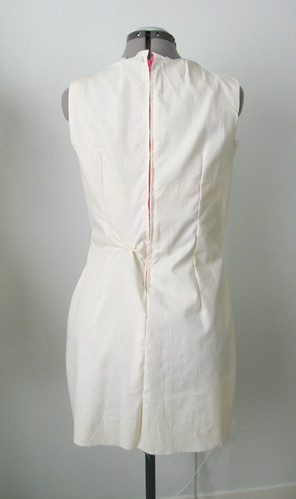
Here is my Muslin Version 1. I made it just as is with the pattern pieces as designed. This is my older adjustable dress form but it actually is the most similar to me in the upper body so it is useful to see how necklines will fit.  The first thing that jumps out is that the dress is way too wide across the upper body, shoulders, neckline etc. When I tried it on I thought the bust darts were way too wide, the points ended up too far away from the spot where they should be. The whole center front was too big. I suppose I should have taken a photo but use your imagination. The shaping in the back was a bit off for me, the darts are too long.  Also that slit in the lower front is where it was too tight in the hips and I was thinking I could add in the center front bottom half - but only thought that for a minute. Bad idea, as it would have put the skirt off grain and maybe caused other problems.  Another issue is the shoulder seams, they kind of wing out from the neckline and gape there also.
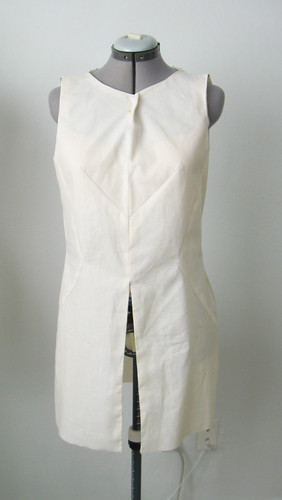
Brasilia muslin1frontBrasilia muslin1back

And Muslin Version 2.  Look at that nice neckline, no gaping there or at the shoulders. And no wardrobe malfunction down the skirt center front.  Back darts repositioned and shortened a bit.
The biggest change is that I actually took out from the center front making the center bust darts shorter and more proportional to my body.
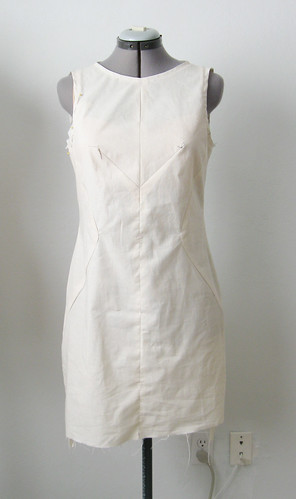
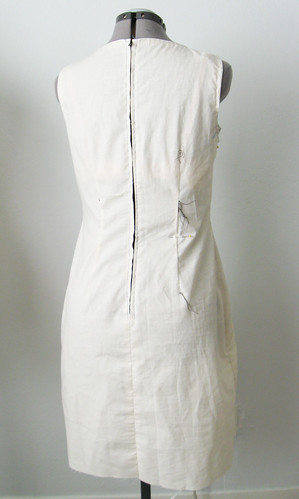
Brasilia muslin2 frontBrasilia muslin2back

Here are the pattern alteration details.
1. Removed 1/2 inch from the center front piece all the way down that seam (= 1 inch total removal)
2. Added that 1/2 inch back to the side seam and then added a bit more at the waist and hip using a    TNT pattern of a fitted dress as a template.
3. Took off 1/2 inch at the shoulder on the back piece only.
4. Raised the armhole about 3/4 inch  (this is the main adjustment re: not being 6 ft. tall)

Note that I added a good bit at the hip as I don't like dresses to be super tight, I prefer to have a good 2-3 inches of ease at the hip, particularly  in a non-stretch fabric. If I made this in a knit or stretch denim I might make it smaller. It would be super cute in denim. To me everything is good in denim!
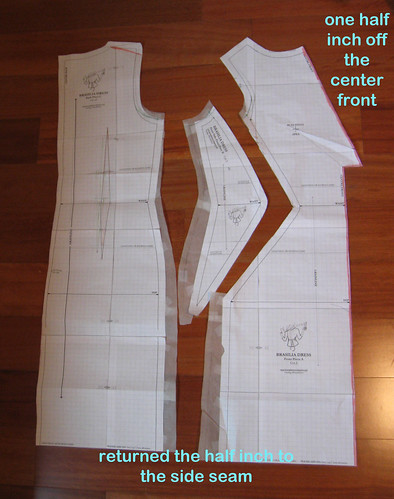
Pattern pieces adjusted Brasilia dress

Interestingly the waist of this dress was in about the right place, which just goes to show there are a lot of places on the body where you can be short and/or tall and that is why sewing is maddening at times.

In this picture of Version 2 you can see how the neckline is now smooth and laying flat. Also my handy dandy armhole fill-in patch where I pin some scrap piece in place and draw with a pen where I want the bottom of the armhole to be and then translate that back to the paper pattern. Also the remaining threads of my tailor's tacks on the bust darts, not a good look.
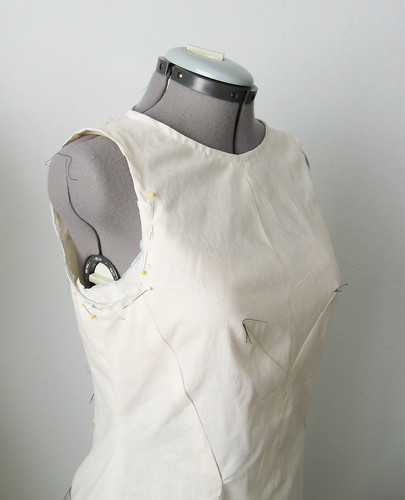
Brasilia muslin arm adj

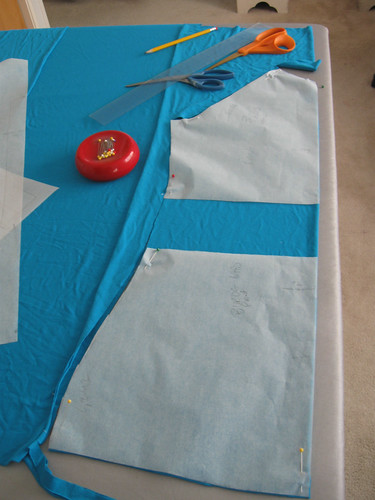
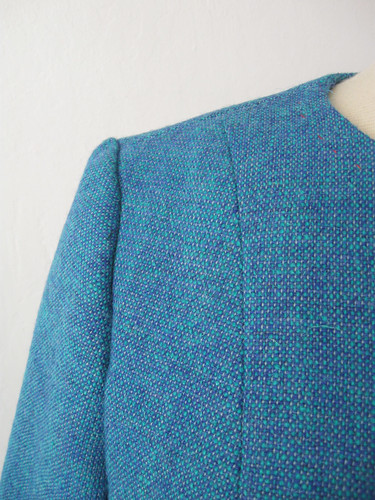
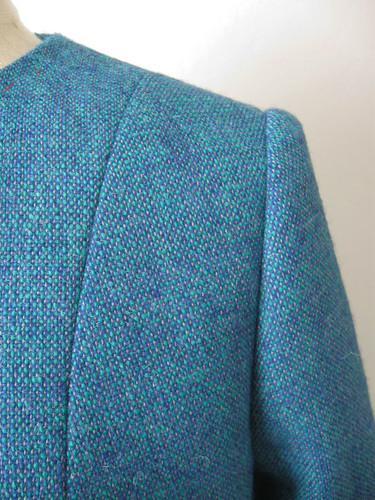
Here is that change on the pattern. Slightly tricky as it overlaps the main front piece and the side piece. Also same adjustment is on the back piece, not shown here. And I rummaged through my garage sale fabric finds to come up with this textured turquoise mystery fabric, I like the color but it is not the greatest fabric in the world. All will be revealed in the next post but this may just end up being a test version. 

Brasilia dress armhole adjustment

And proof that it rained, just a little bit recently. Some groundcover Vinca that I confess I started with, ehem, cough...cuttings... yes that is what I will call them. This grows everywhere on the trails around here so some stems made their way to my retaining wall. They just flower for a few months but the purple contrast with green is so nice. 

Groundcover plants

Happy almost spring sewing, Beth

Friday, February 28, 2014

Burda 6990 raglan sleeve knit top

More pattern love for Burda. What is happening to me? I am becoming a convert to their patterns after using maybe 2 or 3 during my whole sewing lifetime. But after I made this blue coat from the BurdaStyle Sewing Handbook for myself and then made this coat using an envelope pattern, not to mention my Burda # 106 jacket I am starting to see the light regarding Burda. Who knows what will be next?  Although I do have quite a few Vogue patterns lined up in my queue so it will be a mix this spring.

As for this one, it is a simple raglan sleeve knit t-shirt, kind of a baseball jersey style and the fit was great. I decided to use a couple of rayon jersey scraps to test out the pattern and the result was perfect.

raglan tee Burda

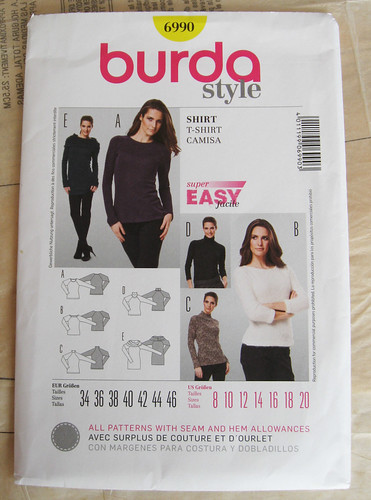
Here is the pattern envelope. I actually went to the store intending to buy a different pattern,  Burda 6910  which is a new pattern, very similar with a slightly wider neckline, and ruching on the side seams. It also has both dress and top versions which is nice. It was out of stock so I got this one instead, Burda 6990 which is very similar. Don't be surprised if I get that out of stock one sometime soon, once I get a pattern in my mind it is a compulsion, I must buy it!

Burda 6990 envelope
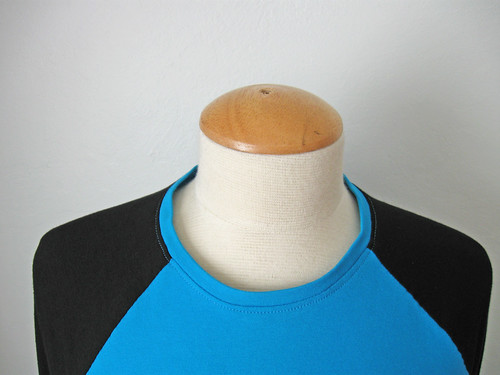
I used size 38, and changed the neckline finishing a bit. The instructions were quite weird as they have you turn and press a 3/8" edge, stitch and then sew a ribbon around that edge on the inside to finish. ?? I have never seen that before and I guarantee that will end up with a wonky neckline, plus how to get it over your head? Maybe I wasn't reading it right but in any case I saw no reason to fool around with that. I used my favorite t-shirt neckline method and cut a crossgrain strip to make the neck edge. My advice is to measure on the stitching line your neckline circumference, and then cut a strip that length, and plan on making a half inch seam at the center back. So you end up stretching it a tiny bit all around and have a neck band measuring one inch less than the opening.  Watch this video on the Threads website for a really good explanation and give it a try. 

Burda tee closeup neck

The top may look a little droopy on my dressform but I decided to try to add some ruching at the center waist rather like the pattern I had intended to buy. So I spread my pattern to add some to the front pattern piece only. It worked out OK, but I think I will add a bit more next time and run the gathers in a longer section. 

Burda raglan tee length change

We are in the midst of a big rainstorm, Finally!  and everyone is thrilled. Water water everywhere - although not anywhere enough to reverse our bad drought.  Big garden news, that fluffy white cat who has made a daytime home in my yard actually caught the gopher yesterday and I intervened to put the poor little thing out of its misery. Also my misery as I hope a gopher will not be depleting my flower beds for a while, at least until the next one finds its way here. 
Today's SunnyGal garden photo, a lovely two-color daffodil to coordinate with my two-color top.

white daffodils

Happy weekend sewing, Beth

Saturday, February 22, 2014

Final version: V7975 wool jacket with Avoca handwoven fabric from Ireland

Hello and welcome to so many new readers this month. This project was finished a week ago but I have been slow with my blog posts despite intentions in 2014 to post more often. In any case here is Vogue 7975 made with vintage handwoven wool fabric from Avoca Mills in Ireland. (note: this jacket is not for me, for one of my sewing clients)

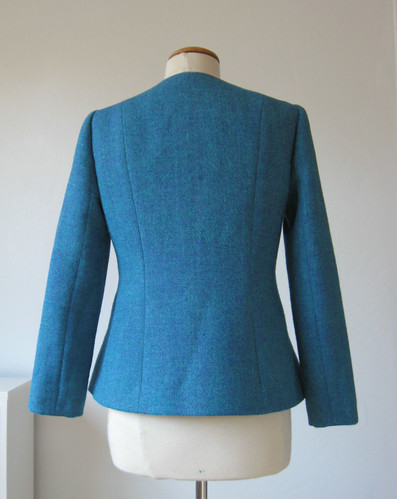
Looking at this photo I see a need for a bit more pressing which I have done after I took the pics. This is such a great pattern, very easy to fit and I recommend it if you are wanting to try a first lined jacket. I did stray from the pattern design a bit and lined to the edge instead of any facings, mostly because this wool has the potential to be so itchy and I prefer lining against the neckline.
jacket front4

Whew, it is hard to photograph this color and have it look the same in each image. I am basically a rotten photographer and also very impatient when it comes to taking photos. I have read lots of blog posts about improving your photography - and one recommendation is always to take many many pictures so as capture the one very best one. However I am way too impatient for that and usually snapping away at the end of a project where I want to be done!  After all taking photos reduces sewing time, right? 

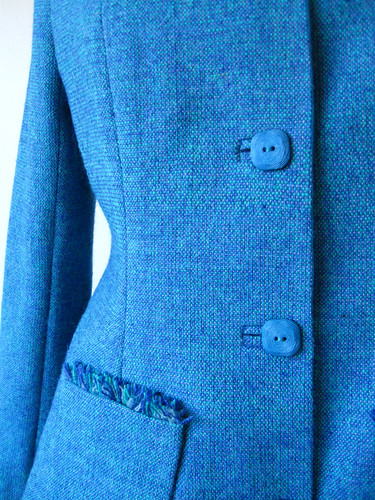
Do you love these buttons?  I do, they are just right. Thanks again to Stone Mountain in Berkeley, and their lovely wall of buttons. I took the finished front piece with me so that I could actually see the buttons in the buttonhole and how they the shape and size worked with it. I had intended to make smaller buttonholes but this was as small as could be done in this very ravel-y and springy wool.

close up buttons pocket
I said ravel-y and yet it was a pain to get that fringe to separate. This is one tough wool. 

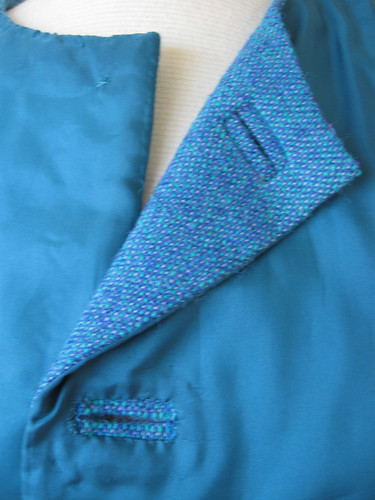
Inside of buttonholes. There are a lot of variation on bound buttonholes but I prefer the one with the least layers, if that makes sense. So no windows or squares cut. I sew on the welts, slice, turn, and then make the full lining. The very last step is to slice the lining and turn and hand stitch. Using this method you can control exactly were the lining is joined to the buttonhole, I think if you made little windows in the lining and they were not exactly centered over the buttonhole then what? I don't know as I have never tried it. Looking back through my previous blog posts I have not shown the step where I attach the lining so I will have to document that next time I do it. For more details on bound buttonholes here is a post with the steps shown. 

buttonholes both sides

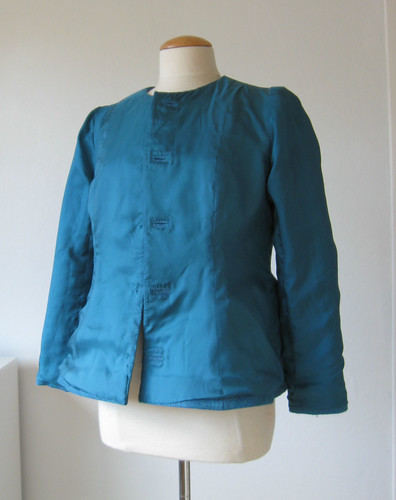
View of lining. It does look a bit bigger but that is intentional in this very fitted jacket, I often make the lining with a smidge more room than the outer layer to allow for a bit of movement. 

inside jacket lining

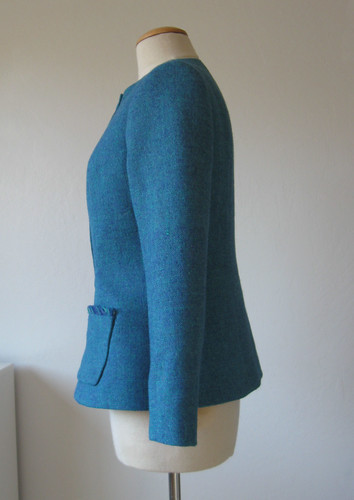
Side and back view.  Please ignore that big crease in the lower back. Ok now I am chagrined but I did press after these photos. However also note the great lines in this pattern, such perfect fitting sleeves and the princess seams allow for so many fitting options. 

jacket side jacket back

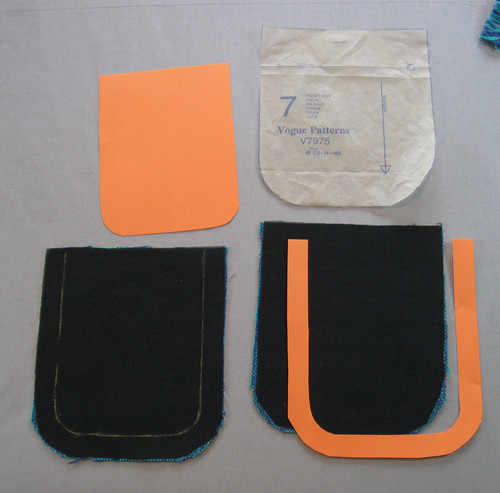
One tiny tip for making patch pockets. As you may know I love my Chalkoner chalk markers and I like to make templates from pattern pieces, and then trace the seam line to make for super simple sewing.
So I made a template from the pocket pattern piece, including the seam allowance and them trace the line so I could attach the lining by sewing on the chalk line and get a smooth even balanced pocket.

pocket template


Here are links to the previous posts on this jacket:


I made this same Vogue 7975 pattern back in October in plaid for myself, so if you want to see a different version and some details on working with plaid, here is the post. I wore this version a lot back in the fall but it was eclipsed by my wool herringbone tweed Burda jacket which is more of a neutral color so can be worn with more outfits. 

Up next some simple and happy sewing, t-shirts and other separates which are so much more useful than a sparkly plaid jacket, right?  I just got an order of super cute knits from Girl Charlee so I am itching to get started on those.

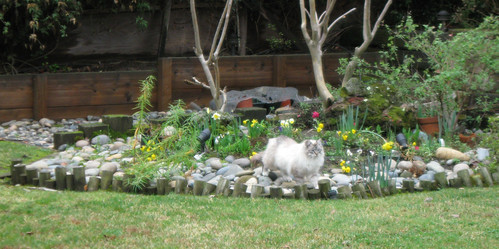
There has been a woeful lack of garden photos and I fear that this year will be a low point for my garden. Despite a bit of storm last week it is dry, dry, dry. No rain and nothing but sunshine. Which may sound good if you are suffering in the latest polar vortex but we will be in trouble this summer. In any event there are daffodils and a few tulips just starting. Also I have a new pet. OK, not really as I am wildly allergic to cats and only like to see them from a distance but for the last month this guy has been putting in a 9-5 day on my garden furniture with occasional attempts at gopher hunting. I wish he would catch that darn gopher which has eaten all my pansies in the front yard. I just makes me laugh to see him out there snoozing on his apparently favorite chair and drink water out of the bird bath.

cat in daffodils

Happy almost spring sewing,  Beth

Sunday, February 2, 2014

Part 2: Vogue 7975 wool jacket with Avoca handwoven fabric from Ireland

Yes, this is part two. Despite my wish to move on to a new project I am crawling along with this jacket. Kind of odd, based on my end-of-year analysis I should be a jacket wizard by now or maybe I am reaching maximum jacket overload?  Which should not be blamed on this one at all, I just love this fabric and next winter will seek out a wool with this two-color weave effect.

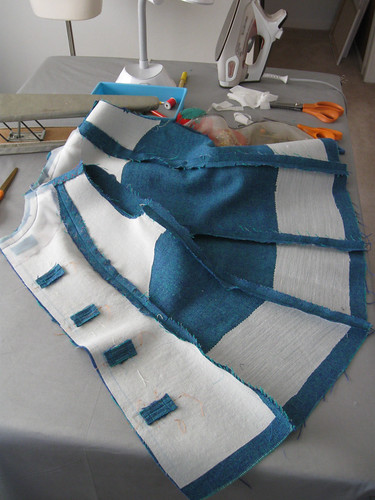
Avoca jacket close up inside front

Actually the jacket body is finished, and separately the lining is sewn together so I just have to stitch them together, do the pockets, sew on the buttons and be done. Just that! ha. I spend an hour this afternoon fooling around fringe and patch pockets and finally have it figured out. 

Sleeve scrutiny also overcame me, and I decided there were some wobbles in my stitching so I had to fix those. Here is the sleeve with the wobble. About 2 inches down from the shoulder seam is a distinctive bump. I measure all around the seam allowance and see where it deviates from 5/8" and mark as needed, then re-stitch.
Seam wobble1seam wobble adjustment

this is how it should look, on the other sleeve it came out perfectly first try.

seam just right

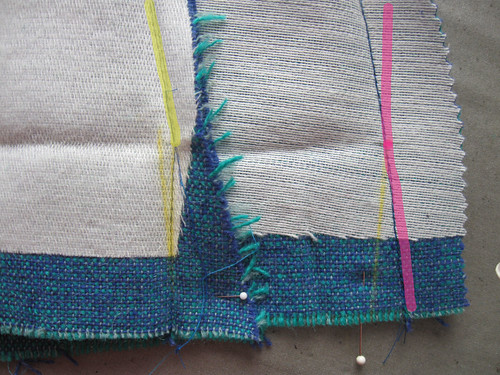
And how about a note on hems?  Sometimes on a garment that is A-line, or flares out from the waist to the hip and you are working with a substantial fabric it can be really difficult to get the turned up hem to ease in and not show on the right side. I think the various methods include steam shrinking, or ease stitching but with a princess seamed garment there is the opportunity to take some of that width out of the hem allowance by sewing in at an angle below the hem. I did this on my recent Burda jacket and it worked well.
A little photo editing with colors will hopefully illustrate what I mean which is easier to show than explain. The seam on the left, with yellow is adjusted so that when the hem allowance is folded up it makes the opposite angle as the outside of the garment and takes the extra out of the hem there. The pink lines on the seam on the right show if I don't make that adjustment then the hem allowance will be larger than the garment by quite a bit and it will be difficult to get a nice smooth hem.  It is chalk marked in yellow but I have not sewn that one yet. 

Avoca jacket hem angle

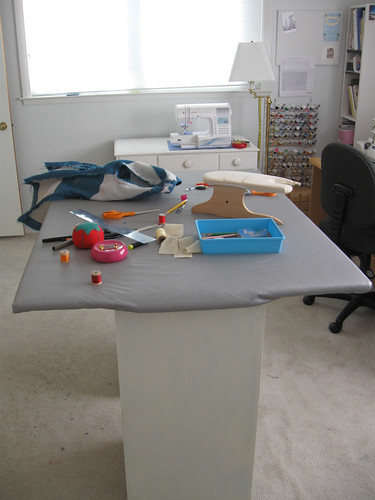
Claire asked how my DYI table construction was going. Here it is, about 85% finished. I used two existing very heavy wood shelves turn on their sides to make the bottom portion. I put four casters on each one so it rolls nicely. Then I spaced them apart and attached a 12" wide piece of plywood to the tops, so that they are stationary in relation to each other. Next I tested out the top plywood to see if I liked the size which I did. Then I covered the big plywood with an old wool blanket which my mom was going to give to the dog rescue shelter  - sorry pups but it was perfect to cover the surface and great to iron on top of. (Idea which was filed away after reading La Sewista blog). I used the staple gun to attach the wool blanket (doubled for two layers) to the underside of tabletop. Next I used 6" angle brackets to attach the tabletop to the white rolling boxes and I have a DIY sewing table. The final cover is ironing board cloth which is actually partly stapled and partly taped as I have to do some trimming in the corners before the final staples. But it is so great, plus I can keep all my ironing accoutrements in the lower parts (sleeve boards, clappers, a small task lamp).

DIY Sewing table
Needless to say I am very happy with it. Total cost was about $90, plywood, casters, wood screws, angle brackets, ironing board cloth. But a bargain compared to buying something that was never going to be just right. The height is 36 inches. I spend most of my time standing so I was really specific on the height I needed. 

Next post will have a finished wool jacket. I swear! and then onward to something springlike. I have a few dress requests and for myself maybe a knit top. Plus I succumbed to spring fever and bought the same J.Crew voile fabric that many did when it was on sale recently at FabricMart. I had intended to order but never got around to it, then it was sold out.  A few days later I saw it at my local favorite store Stone Mountain, in red/white so I jumped on that. 

Happy DIY, whether with a screwdriver or sewing machine, 
Beth


Tuesday, January 28, 2014

A fun vintage diversion

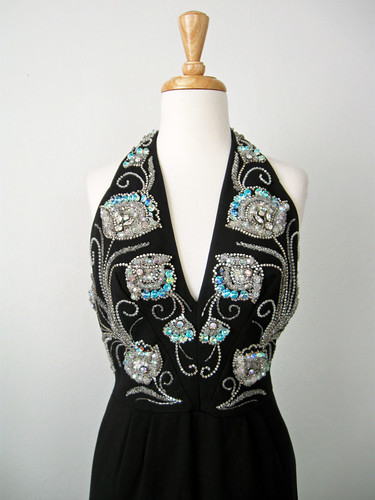
Last week a very interesting detour into the world of vintage came my way. My sister was working with a client who asked if she knew anyone that could repair the beading on a treasured dress. The owner inherited it from her mother who wore it in the 60's and the now the daughter has worn it as well. But time and maybe some wild dancing took a toll on some of the beadwork. I couldn't resist showing it to you, my sewing and fashion loving friends.

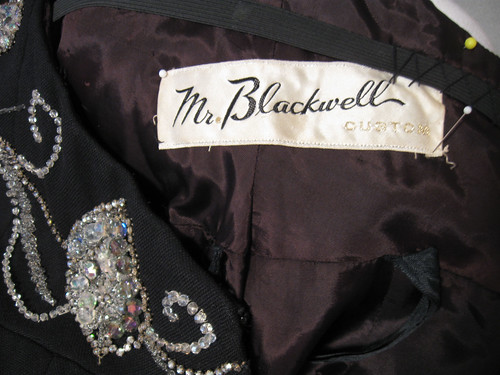
Halter style, full length, wool crepe underlined with cotton batiste and then fully lined in acetate. Elastic waist stay, hand embellished with 7 different types of beads and rhinestones. Designer: Mr Blackwell
Vintage dress front2

Yes, he of the annual "worst-dressed" list. He has now gone to the fashion show in the sky but from the 50's through the 70's he did very well and was known for a sparkly Hollywood glamour. 

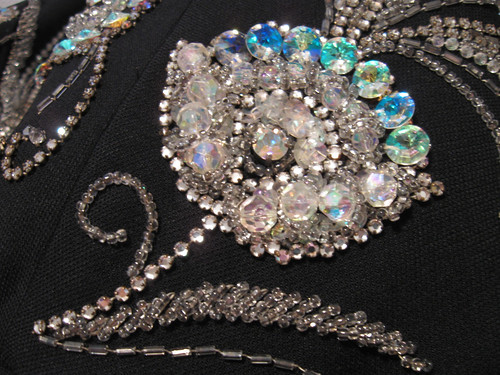
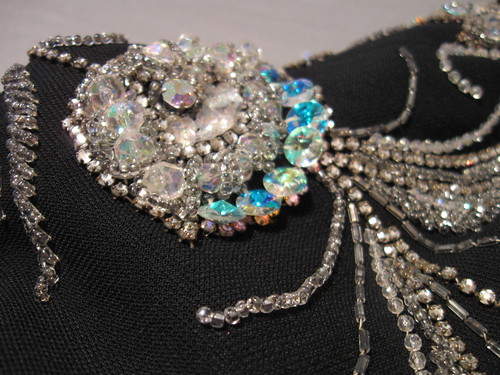
Here is a close up look at the bead motif which appears all aroung the bodice. The beads that appear blue are really not, they are actually more of an aurora borealis type so they catch the light differently based on the angle. There are also strings of rhinestones, round crystals in clear and grey, bugle beads and some smaller clear and grey beads. I don't know anything about beading so I looked at some of my books, got a few tips and gave it a try. Most helpful tip: beeswax on the thread which makes it easier to work with.

bead motif

So what did I fix? A lot of the area that was unravelling was in the back and under the arms which makes sense as that would rub or get snagged on a chair, etc. There sections with some missing beads so I took myself off to Michaels (a big chain craft store, somewhere I try to avoid at all costs) but I knew they had beads etc. I bought a few packs of Swarovski crystal beads and then some glass beads that looked similar to those appearing on my Iphone photo. I couldn't take the dress anywhere - too delicate at this point.

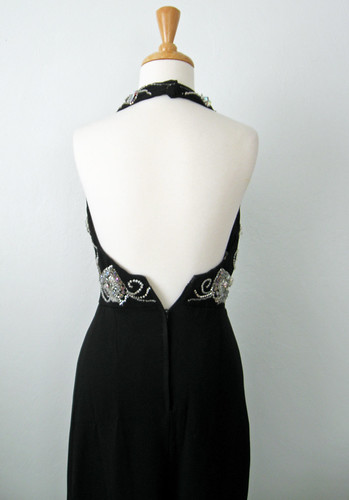
The two swirls on either side of the zipper were missing lots of beads so I filled those in. Also the larger motifs in the back had a lot of broken threads and some missing beads so I stitched those up as well.
This dress is TINY!  Shown here on my smallest dress form which has a 26" waist and look the zipper won't close. One thing I like about this dress is that you can tell it was hand beaded, the various lines and curls are not exactly matching, they differ a few millimeters here and there but the eye doesn't see that on the wearer. So note to all perfectionists - we are human and a bit of wavering is fine.

Vintage dress back

Full length view. Glamorous, huh?  Not that I have an event on the calendar or anything like this in my closet but I would wear it in a heartbeat.

Vintage dress full length

A look at the seaming at the waist and bodice. Very nice shaping achieved with the seams and I always like this type of skirt, fitted and straight with a few small pleats at the waist. A very flattering design. I also repaired those curliques in the center front. 

Vintage dress waist seam

The label inside and the waist stay elastic.

Label MrBlackwell

Of course I had to do a little web searching and found a very similar dress. It must have been from the same collection.  Here is the link if you want to see it:  Dorothea's Closet Vintage Mr. Blackwell and it can be yours for only $950. Please let me know if you buy it, I want to see pictures !

Now I am off to do just a little more on this, when I went to move it today a couple of the large round beads fell off. So I will be giving it another once over. 

motif closeup 1

I hope to finish up the Irish wool jacket this weekend and then maybe some spring sewing. Today I went to the gym in shorts and a sleeveless top. Weird, I tell you. Trite to say it but the weather is weird.
My apologies to all of you in the latest polar vortex. Hang in there, spring is coming to you too!

Beth

Saturday, January 25, 2014

Vogue 7975 wool Jacket with Avoca handwoven fabric from Ireland

Do you recall back in October that I said I was making my faux French jacket as a test version for another project? Well I really was. I am using that same pattern, Vogue 7975, to make a classic jacket with this gorgeous fabric which has an interesting backstory.

Avoca closeup with indicator
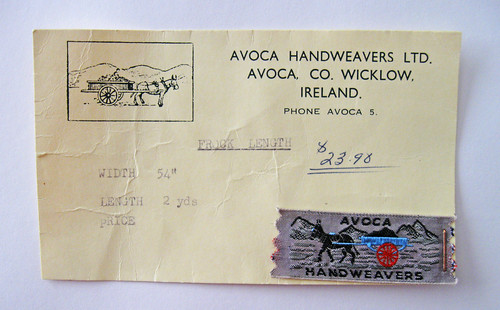
A sewing client/friend found a piece of fabric folded up inside an old suitcase when they went to clear out the house of her cousin. The woman who originally bought it had been a traveler and a hoarder so it probably was tucked away for 20 years or more. Here is the card that was included with the fabric.  I think the purchaser wrote the $ 23.98 on it, perhaps that was the amount it cost in dollars at that time. Note "frock length", this would be one itchy but warm dress!  
Editing note:  based on the comments so far I realize I wasn't clear on this project, I am making the jacket for the person who found this fabric during the house clean-out, so not for me. Despite the fact that it is definitely my color.  I am on a jacket moratoriam for the time being :)

Avoca card

Of course getting my hands on the fabric plus this fantastic typewritten card sent me down the internet rabbit hole to do all kinds reading on Avoca Handweavers and their interesting story. They have a fantastic website and if you like fiber, wool, history, Ireland or any combination thereof you will enjoy it. Here is the link to their website for more loveliness. 


The Story of Avoca from Avoca Ireland on Vimeo.

Have I said it before? I love Ireland! I guess in typical American fashion I am drawn to the lands of my ancestors, and both my paternal grandparents were born there. So green, so pretty, such great food and drink...you knew about the drink but yes, the food is fantastic also.  I can't wait to go back and you can bet that the next time I will go to Avoca.

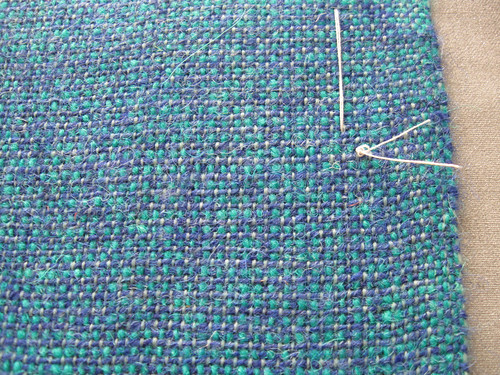
This fabric is so springy, so alive, if that makes any sense.  There are lots of little wiggly fibers sticking out in the weave, and so far I have just let them be but perhaps they will need to be snipped off once the jacket is finished. If you look closely in the middle of the photo below you can just see one of these grey fibers. I have never worked with a handwoven fabric and it is a learning experience, the actual threads are larger than other wools, the edges to tend to fray but the weave is very tight and there are actually 3 colors going on in this, a royal blue, an aqua-y green and a grey that blend to make one of my favorite color combos.

Avoca closeup2

Before I cut out the fabric I steamed it thoroughly to pre-shrink but it did not seem to shrink at all which was great. At that point I gave it some serious scrutiny and came to the conclusion that both sides were exactly the same in color and texture, however I still wanted to treat it as a fabric with a right and wrong side so that is why I have the yellow thread on the left. On the upper right you can see a pin pointing out a big knot in the fabric, I don't think it is a flaw but more like a join ? or just a spot where the blue fibers overlapped?  I don't know anything about weaving and it wasn't horrendous however I didn't want it to show so I cut around it.

under sleeve Avoca jacket
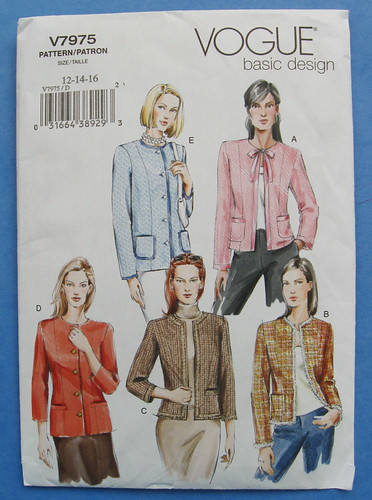
Here is the pattern used for this jacket. Such a great basic pattern and I used the sleeve on my recent Burda wool tweed jacket. Useful ! Try to ignore the less than stellar illustration art. Those women look very grumpy.
V7975 pattern envelope

I used Fashion Sewing Supply interfacing, the Pro-Weft Supreme Medium-weight Fusible which I find is perfect for most wools. And it helped to keep the edge fraying to a minumum. Conversely if I had decided to use silk organza underlining for the whole jacket I would have hand basted that along the seam lines and left it at that.  Now for an editorial comment:  step away from the serger!  Once in a while I see a sewist has serged all their pieces for a garment prior to sewing it together, to overcome the fraying edges. eek!  I would not do that as I am sure it would distort the shape of the pattern pieces or mess up the careful seam allowance I just cut out. Or slice off all the edge markings.  Or something more dreadful, like inadvertently cut the fabric (which we all have done, right?)  anyway to me a serger has almost no place on a lined garment.  OK, off the soapbox for now :)

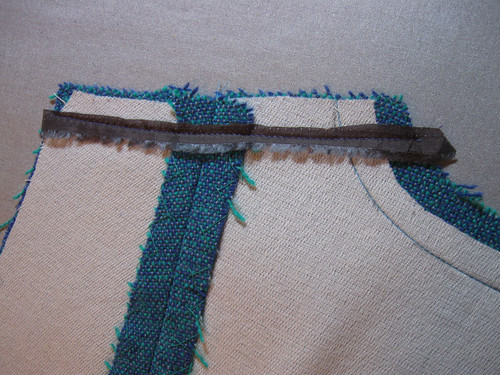
Being in a family of string-savers and old button-keepers I retain the selvedges of nice linings to use as stays in place of twill tape. Its basically free, very strong and yet soft so when you press the shoulder seam open it disappears. Plus any color will do. 

Avoca jacket shoulder stay copy

This jacket is nearly done, I have the lining assembled and it is just ready for a try-on and final fitting before hemming. 

Avoca jacket inside with interfacings

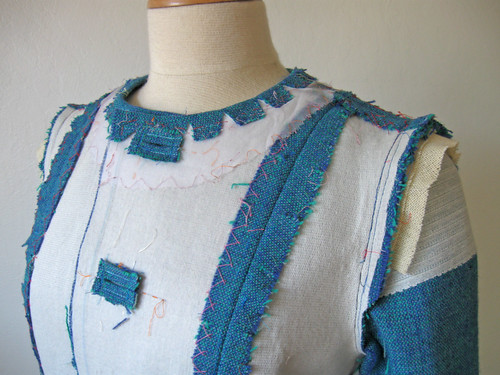
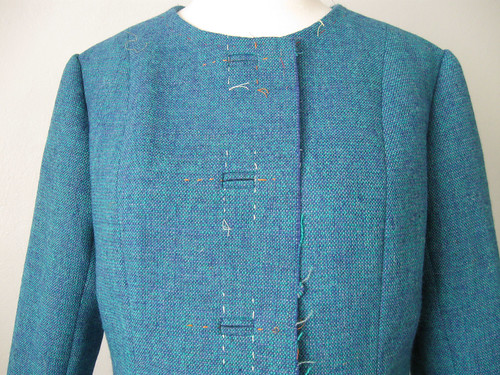
I had a little buttonhole trauma before I made these as I originally tried to make them smaller. OF COURSE making test ones on scraps before the final versions and these were the smallest I could make that would be nice and even and flat. This fabric is so springy and when you get down to little 1/4" cuts such as on the inside corner of the buttonhole slice there was no way that it would not become a frayed little mess. So these are about 1 inch by .5 inch and I found some fantastic buttons as well. After the fact which is not how I usually do it but this time it was necessary.  The sleeves are just basted on here in anticipation of the fitting.

Avoca jacket front 1

So later next week I will have a finished jacket to show you. Meanwhile I am finishing my crafty worktable project and thinking about sewing a knit top.

Happy winter weekend,  Beth

Friday, January 17, 2014

Random Threads # 5

Whatever I have been doing lately, it certainly has been keeping me busy. I have a lot of projects in process, both sewing and home improvement but nothing completed to show you. When I asked for blog topic suggestions, commentor Ngoc said she liked my Random Threads posts which is great as random is what I have for you today.
First up, I am in the process of making a large moveable worktable with a newly purchased piece of plywood, two very heavy wood shelves that I already had, many L-brackets, my staple gun and a newly purchased phillips screwdriver drill bit for my trusty Craftsman drill. So far I have it assembled and am just testing out where I want to secure the top. Then I will complete it and have something to show you. I went down the rabbit hole of wanting a higher (37" high) worktable that I could iron on top of and looked at a lot of options, plus I found the website IkeaHackers.net and then spent too many hours looking at stuff. Next I went to Ikea, looked at the raw materials for some of my ideas and came away with nothing but the appreciation for using actual items I already had. Score!
Craftsman tools

Remember my sewing machine purchase back in June? I bought the Singer Quantum Stylist 9960 at Costco. It was a deal I could not refuse. So I have been mostly happily using it ever since. Oh, it is not perfect. The feed dogs are kind of sharp? they seem to snag on delicate fabrics and there is not as much space between them and the bottom of the presser foot as on my other vintage Singers. Also the lighting really seems harsh, not a fan of the LED lights but I guess that is the future. On the plus side I LOVE the thread cutter, such a satisfying feeling to push that little button and snip, no need to pick up a scissors. 
I will do a full post on it sometime but here is a question that is nagging me.  See this foot, it is the basic foot that is used for most stitches.  Why is there the little button with the tiny spring on the right? What is that for? I cannot figure out any use or what it does but obviously it is there for something. When you push on the black button the little stem moves over toward the shank but seems to do nothing. 

Presser foot question

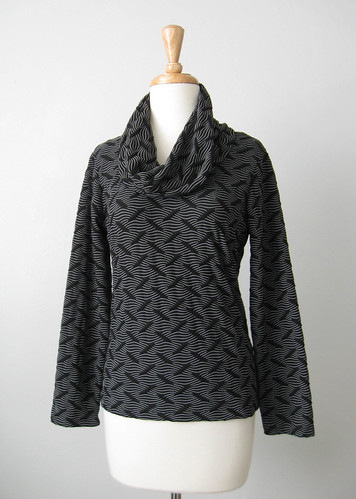
I did just make another Renfrew top for a friend of mine. Who is basically the same size as me and so it is easy-peasy to make her stuff. Plus she is a great friend and likes whatever I make her. A keeper!
                                 Black renfrew top
Black renfew close up fabric
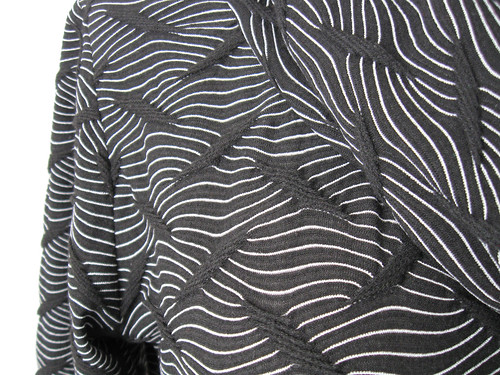
Kind of a weird fabric, huh? but I saw it at Stone Mountain and thought it would make a cozy top. Although it was around 70 degrees F today so no cozy tops needed.

I did a little analysis of what I made for myself in 2013 and used Excel for good not evil  (meaning for something amusing instead of grimly serious business analytics as in my former corporate life). 
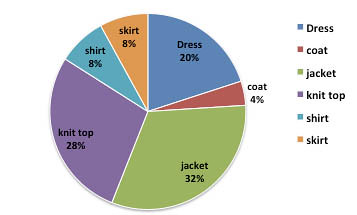
So here is the chart breaking down what I made into garment categories. As an overview, I sewed the following for myself. It includes 3 items made for mom and my sis.  
  • 25 total items  
  • 9 of the 25 reused a pattern = 36% repeat pattern use
  • 8 of the 25 items used fabric purchased at thrift stores or garage sales, total cost estimate $ 20 for those


What I made

8 jackets, 7 knit tops, 2 skirts, 2 shirts, 1 coat and 5 dresses. For the first time I can remember I made more jackets than any other category. Interesting........
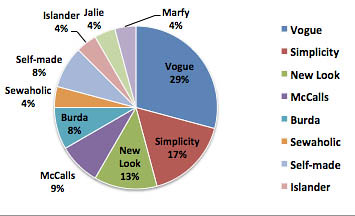
And now the pattern breakout: Vogue still the winner and Simplicity next most often. Interestingly the pattern reuses were mostly Simplicity and New Look. 


Which patterns used

Based on this data I probably could give up purchasing any new patterns just shop my filing cabinet. But we knew that, didn't we.  After all there are NO new patterns. I repeat, no new patterns. Just my opinion. And yet...I will probably make any/all of these 3 Vogues. I already have the first one V8944 but now I am liking the second one V1382 more. I promise you that the third one, V8970 is better than it looks in the drawing and actually would make a very cute blouse. 

V8944V1382V8970

That's all for now, I have so many more topics for Random Threads such as Pinterest (I can't find a use for it), sewing swimwear (I was never going to until I had an unfortunate incident with a thieving racoon, story to follow) and bodice length (the number one pattern adjustment that I think could help many who struggle with fit).
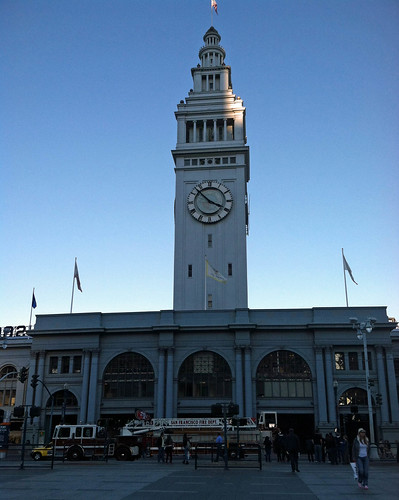
Yesterday I was in San Francisco for a lunchtime party and was walking up the street when I turned and looked behind me. The sky was so blue, my friends had arrived via the ferry, we had lunch in a waterfront restaurant and I felt like a tourist in my own hometown. Kind of a crazy city but always beautiful.
Ferry building

Happy weekend sewing, Beth