
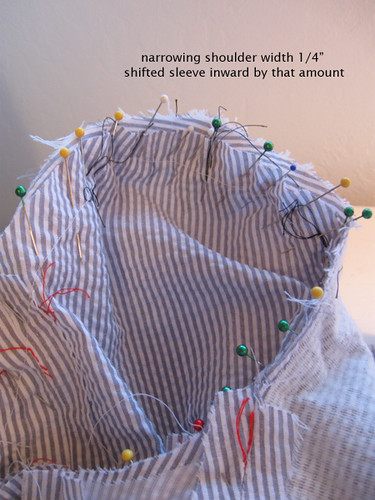
Leaving out the shoulder pads should have required a bit of adjustment at the shoulder seam but I decided to leave it as drafted and just narrow the shoulder width. If the shoulder/sleeve area collapses a bit I won't mind in this style. Where that green pin is at the center of the picture is the center top dot on the sleeve, so I just shifted the sleeve inward by about 1/4 inch and that combined with adding the sleeve head was just right for this fabric. As with all jacket sleeves, I sewed all around the sleeve with long basting stitches and then tried it on to check both the shape and the sleeve - looked for puckers or places where the stitching didn't stay right on that 5/8" seam allowance. It is so much easier to machine baste in, then go around twice with regular stitch length once it is right.
For some other details on sleeve sewing, in particular seam allowance accuracy, see this post from December about my wool tweed jacket, Burda 08/2013 # 106. (a great pattern I should revisit next winter).
For photos showing trimming of the sleeve seam (less is more) check this post about my rose red wool crepe jacket, Vogue 8865.
For a really comprehensive roundup of the steps involved in sewing a jacket sleeve, this post from Feb 2012 has lots of details on sleeves and some good photos of the sleeve head. Same pattern on that jacket as on this seersucker one.
Going back to my previous post about pressing the lapels, here is a look at the "turn of the cloth" on the front where the lapel starts. This is one of those small things about tailoring that just makes me happy and I like to see the result. The pin is showing where the jacket front turns and creates the lapel. I have the lapel propped up a bit here so you can see the seam which hides from view. When giving the jacket front a good press you shift the seam at that point so it is favored on the underside of the lapel, or the backside of the jacket front. Well that is a run-on sentence but hopefully it makes sense. It is important to keep your tailor's tack or marking at the exact point so you know where to do the shift when pressing.

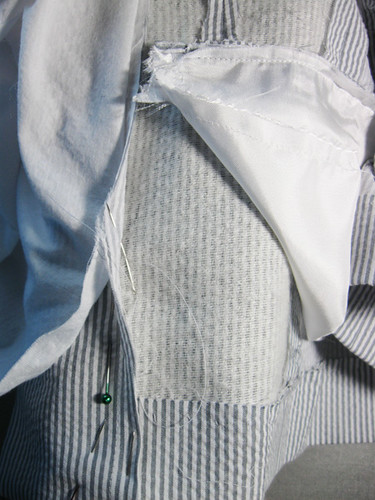
Here are two other things that I do with lined jackets, even if they have a partially bagged lining as this one does. Actually this is the reason I like to finish all the jacket and then hand sew in the lining, so I can do all these steps before putting in the lining. But in any case - here is the jacket front, I am catch stitching the front jacket facing down to the jacket front, so it doesn't separate when worn. Have you ever had a coat or jacket with a loosey-goosey lining that seemed unrestrained except by the buttons and/or buttonholes? That is because the front facings are not secured in any way to the jacket front. Perhaps that is why I don't like to bag the lining - because I like to do these steps before lining.
Last spot for a bit of hand sewing, another bit of catchstitching at the seam where the upper and under collars meet. Same reasons as above.

Next step for this pattern is hemming the jacket and the lining. I have done a few posts before about jacket hemming, and it fascinates me that a post on how I hem sleeves seems to have a very extensive life on Pinterest.
For linings, on this post with my spring coat from the BurdaStyle Handbook, there are some good pictures on adding the center back lining pleat.
I am starting to think I make too many jackets! But they are my favorite thing to make and I have at least two more planned for this year.
This weekend - final jacket photos, I promise. Took them this afternoon. Although I did recently buy some lightweight grey linen to make a skirt - but I won't wait for that.
Happy Sewing, Beth
today's SunnyGal garden photo, a nice pale yellow rose that contrasts so nicely with its neighbor the purple hydrangea.


Too many jackets! Never! Not when they are as well constructed and thought out as this one ... keep on whipping those jackets up ... J
ReplyDeleteOh my. This series is so informative, detailed, and helpful. Your explaining the "why" of what you're doing is fantastic. Thank you so much for sharing this summer jacket project with us.
ReplyDeleteThanks for all the information. Cool. Love your work.
ReplyDeleteI'm enjoying your jacket making process. It's so inspiring. I need several as that is an area in my wardrobe that could stand a little beefy up.
ReplyDeleteGracias, muy bien explicado.
ReplyDeleteThank you for the detailed photos.
ReplyDeleteThanks so much for posting about catching sticking the front facing and the collar area. I seldom see this referenced and have been annoyed by exactly what you described as my loose goose linings. Why on earth would this simple but oh so effective step be eliminated when it can make such a difference in the final result. Thanks, Beth, you just gave me encouragement to trust my own judgement and past experience when working on a project.
ReplyDelete