Here's my not quite last post of 2019. In the interest of blogging just about everything I have made this year today's item is a wool blazer I started in September as an example for my Jacket Tailoring class, back when the temps around here were nearing 100℉ ! Needless to say that I set it aside for a good couple of months until the weather was more conducive. By the way, as I write there is one spot open for my Intro to Tailoring weekend workshop at Hello Stitch which is the first weekend in Feb.
I plan to do another post this week, reviewing my sewing year and a few ideas for the next, and perhaps even sneaking in some photos of things that never made it to the blog. But for today, a wool blazer sewn completely with fabrics given to me by the lovely ladies at Hello Stitch. Can you believe these were leftovers after they had a fabric swap? ( I can believe there were no takers for the lining :)
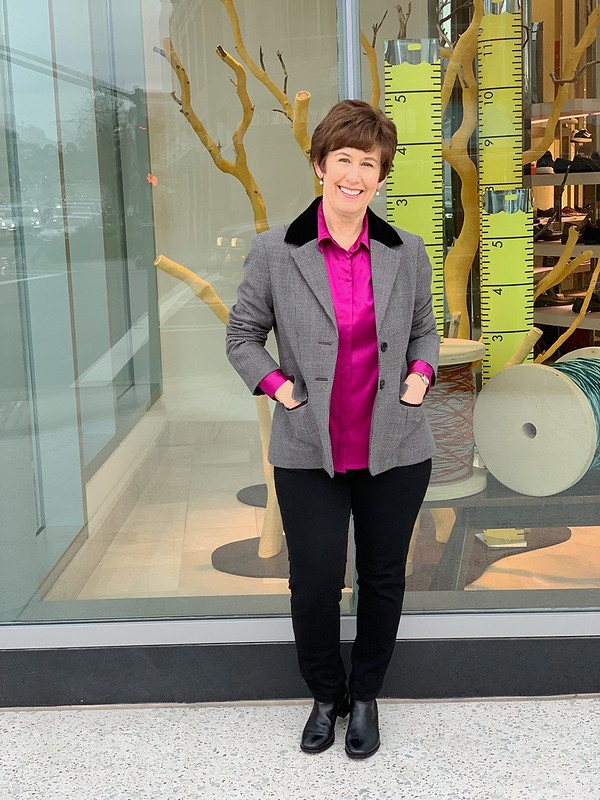
And yes, I'm wearing mostly black - quite unusual for me. I put that black cashmere turtleneck on my list for Santa as I thought it would be very useful with so many bright color jackets that I have made. Although I did sew a shirt that goes with this jacket - a bit more springlike so it will have to wait.
Let's start with some insides. If you read my post earlier this month comparing blazer jacket patterns you have seen this type of jacket collar, which has a stand that gives it some structure. I'm not entirely sold on it, although I have made this pattern three times now so I guess it doesn't bother me.
Sales jackets: the first (with lots of sewing details) and the second.
That's the stage when the jacket is finished, shoulder pads are in and it is just waiting for the lining, which I sew in by hand.
And here's the finished jacket looking a strange color as it was a rainy day and I think I lightened up the photo which was very shadowy. But you can see the details.
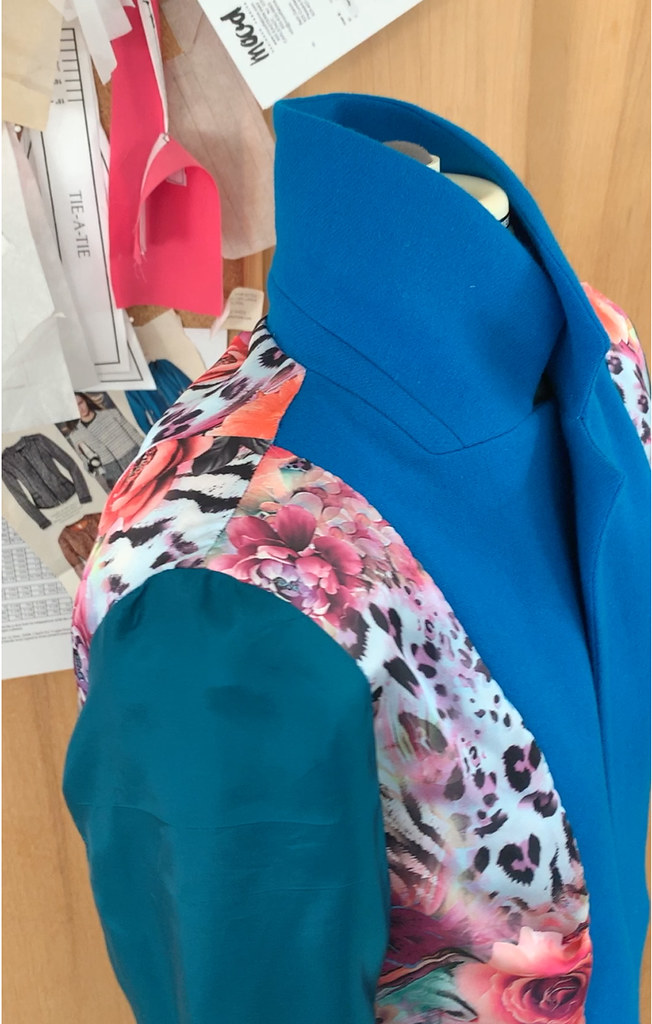
See that lining is a bit wild, at least for me. But a very nice fabric, and as I mentioned above, free! I like solid linings in coordinating or matching colors. I guess I'm just a bit boring that way - but remember - no beige in my wardrobe so I guess I can be a bit stringent in my lining choices. Here's the lining sewn in, for the sleeves I rummaged in the linings scraps box to find something solid that was reasonably coordinating, as I really didn't want that leopard/floral/weirdness peeking out at the wrist.
Let's talk buttons and thread. I am not particularly fussy when it comes to sewing garments, I generally use thread in black, white, navy, red, or grey if any of those are in the same color family for the seams and other sewing. The stitches do not show and it's so much easier to see what you are doing if the thread is a slight contrast to the fabric. So I probably sewed this with grey thread, but that does leave the buttonholes as a conundrum.
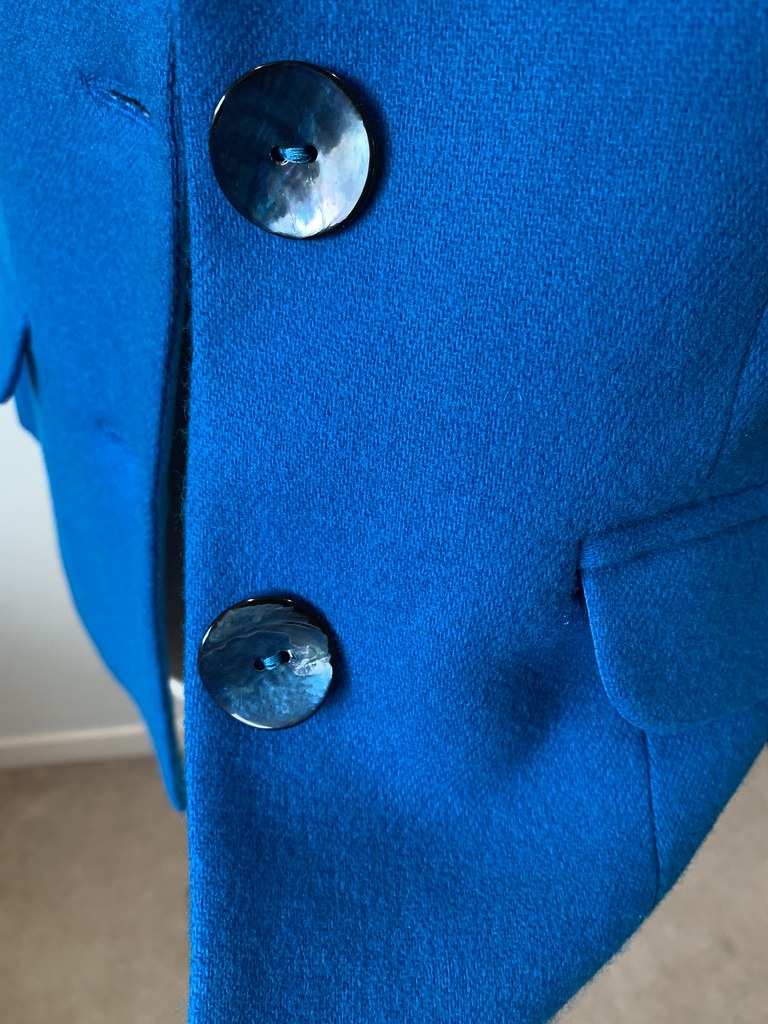
I always made sample buttonholes to see how the fabric behaves and to see the thread color. I made these using my old Singer machine, as it can make larger buttonholes than the attachment with my newer Singer. Plus the quality is better, you can go around the buttonhole several times, changing the width of the stitch which gives it a more three dimensional look. On those above I probably just went around once to check thread color. I thought the royal blue (top one) looked better than the turquoise which was actually closer to the fabric color. I bought these gorgeous shell buttons at Britex in San Francisco. My two favorite buttons are leather knot buttons or shell buttons and I mostly use those on tailored jackets if I can.
I think the sleeves are a bit wrinkly which is due to the soft fabric. I have kind of a wrinkle mania and could have minimized that by applying fusible interfacing to the whole jacket but that seemed a bit much, also it makes it more stiff and I wanted to keep it a soft and easy jacket (but with crisp lapels :) Why do wrinkles bug me so much? not sure - everyone has their preference and mine is for smooth or even intentionally textured fabrics, but the random wrinkles of wear just annoy me. Psychological analysis for another day, ha ha.
A few more details. I like to use lining inside the pocket flap, reduces bulk.
A look at the little angle at the hem seam allowance that allows the hem to turn up and fit inside smoothly.
A tiny piece of blue silk to wrap around the edge of the facing near the front hem.
Here's a look at at shirt I just made, as I noticed this fabric in my stash seemed to go well with the jacket. Let me know if you think these two items can be worn together. I think with dark denim jeans although it is pretty colorful! I got that cotton/silk voile from Mood back in August, just because I loved the print and those cotton/silk voiles are dreamy to sew and to wear.
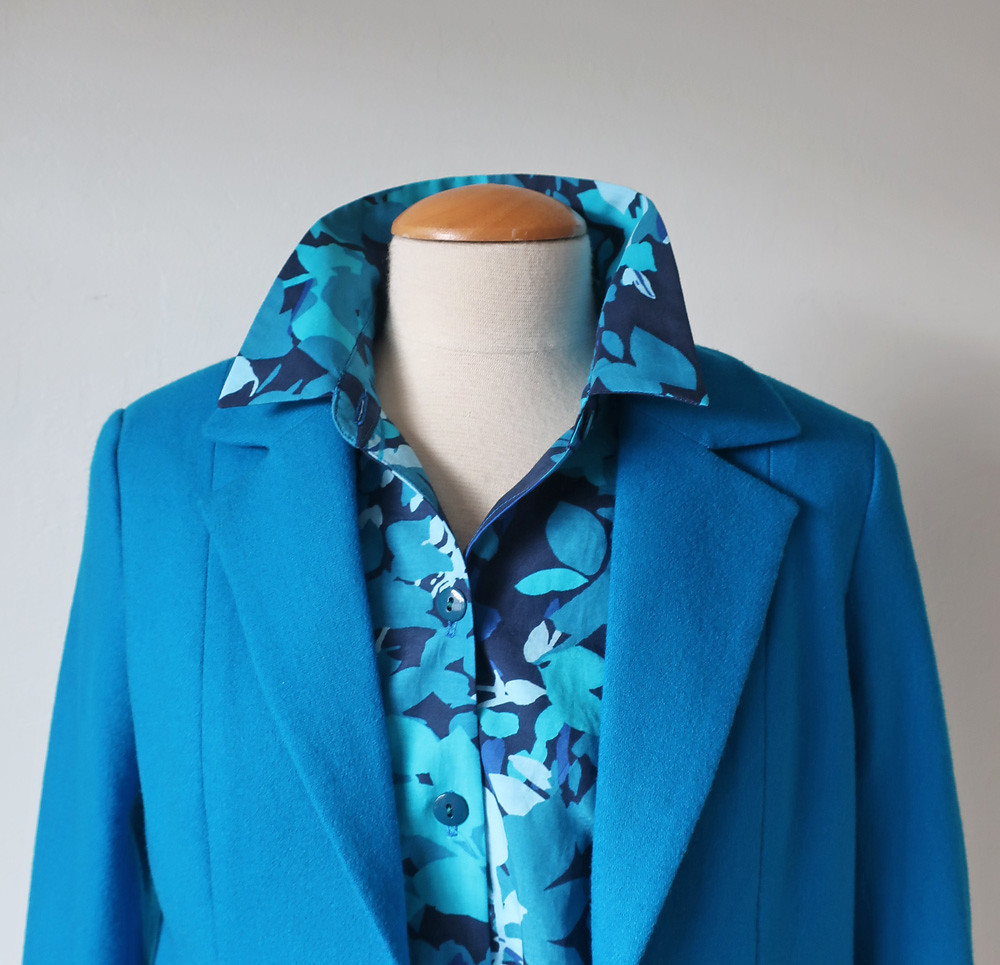
The different color in every image is a bit bothersome, I would say the outdoor photos are the most accurate color of this jacket.
So that's the latest on this blazer. I think I'm ready to put this pattern way back in the file drawer, and try out something new. The lovely owners at Hello Stitch gave me a gift card for Mood so there will be more wonderful fabrics in the near future.
Today I've been sewing on a pair of wool pants, something I haven't made in a while but I did say on Instagram when I posted a peek of this blue jacket that I had fabric leftover and was prepared to go full pantsuit. Now I'm not so sure but in any case I have just made a very wearable pair in black/grey houndstooth as a trial run.
Up next, a roundup of 2019, and a look ahead. We have some great classes scheduled at Hello Stitch, a lot of them are booking up so if you are interested register soon! You can sign up for their newsletter to get details on future classes.
And now I have to dash, my resolution is to organize my fabric stash and sewing room. Stay tuned to see if that happens๐
Happy Sewing, Beth
Sunday, December 29, 2019
Saturday, December 21, 2019
A festive new dress ๐ Burda 09-2019-104
Happy Holidays! It's that time of year when I'm filled with gratitude and love for the sewing community. Thank you all for sharing your creations, providing inspiration, ideas, advice, humor, personal stories and friendship. The sewing internet is vast and I will never catch up with everything yet every day I discover someone new to me who is doing beautiful and interesting things.
This year has been so great, I've had the opportunity to meet some of my far away sewing friends in person and to meet many new stitchers in my classes. Next year will likely have some new adventures that I can't even imagine right now.
And so as usual I've made a new dress in a festive color. Plus gone a bit silly with adding the holiday border and turned it into my Christmas greeting to you. Keep reading for all the sewing and pattern details.
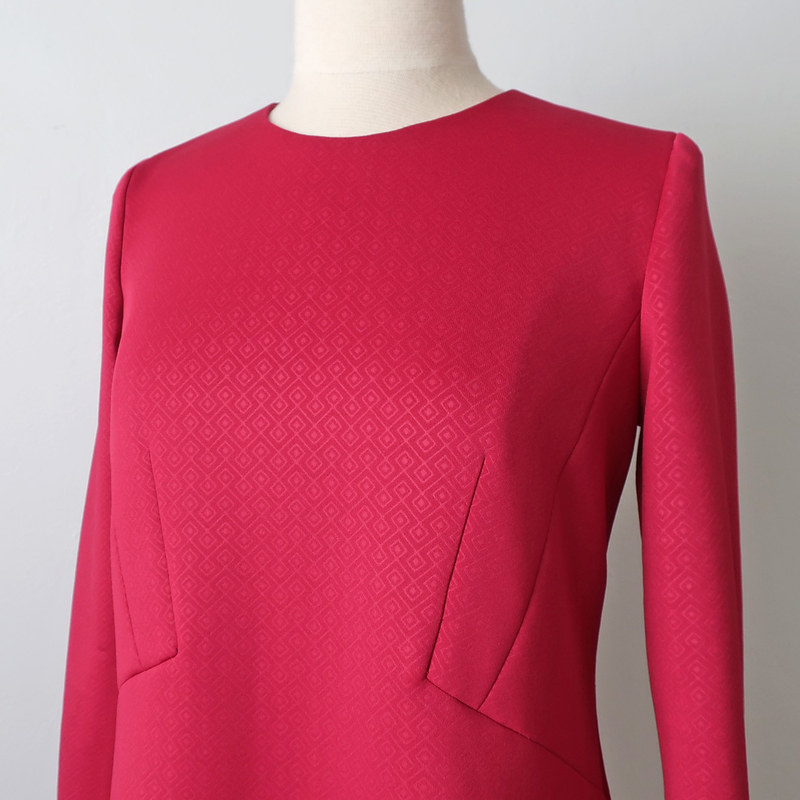
The pattern is Burda Magazine 104-September-2019. This dress is a ponte knit with a subtle print - probably not visible in the photo above but it shows more in the following images. I'm not a fan of ponte - they sometimes seem a bit clammy so as I was sewing this I thought "well I will finish it as I like the color but I'm probably not going to wear it". Famous last words, right? As I can get over the slight poly feel since the color is so nice and it holds it's shape with not a wrinkle in sight.
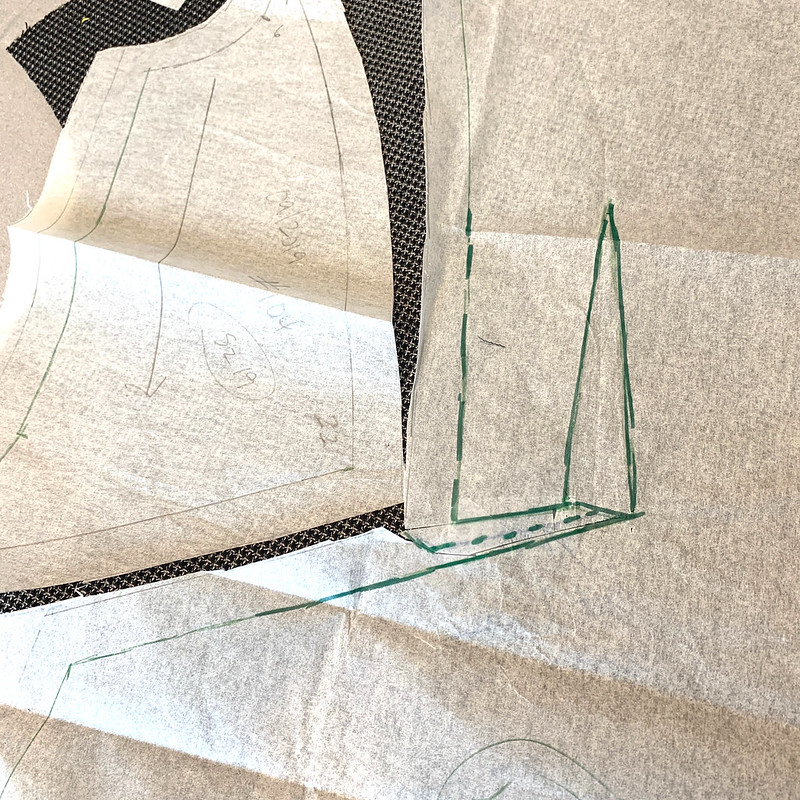
A closer look so you can see the print and also the seam plus dart details. This dress is quite simple to make, it went together very well once I figured out how to sew that darts/seam situation. Here's a look at that section of the front pattern piece plus the side inset.
I couldn't figure out how the dart plus waist seam worked, and since I never look at the instructions I tried to puzzle through. However I thought perhaps they had some of their usual jumble of words describing how to sew - but no! a holiday miracle - there was a little diagram complete with scissors showing where to cut (on that dotted line) and then it worked perfectly. I guess I should follow my own advice sometimes and just read through in case :)
Here's something new to me - this dress was in Burda Petite sizes 17-21 which according to the measurement page in the magazine are the same as sizes 34-42 other than the height difference. (5'3" for petite and 5'6" for regular) So not really any difference other than I didn't have to remove an extra 6 inches at the hem. Actually that was nice! I also have short arms so the sleeve was full length on me and as you can see in the magazine photo it is more a wrist length sleeve.
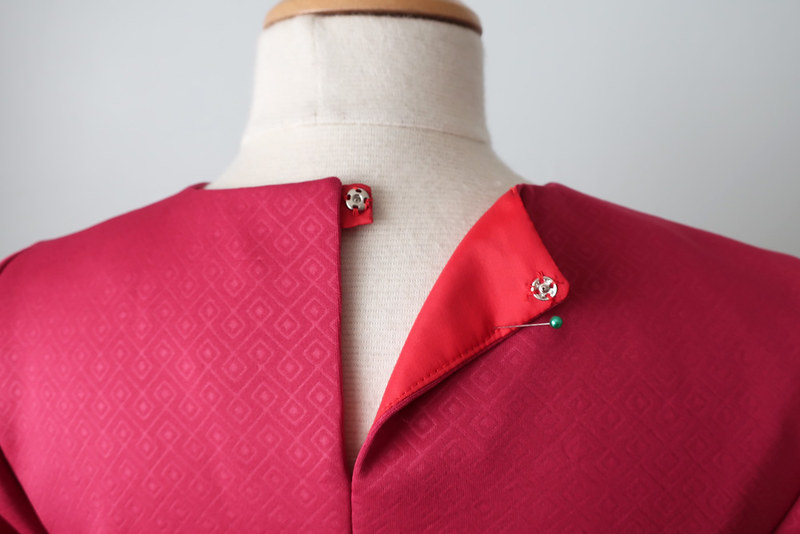
This type of fabric makes it super quick to sew, no seam finishes needed as it is a stable knit. I also decided that a zipper was not needed so I changed the back to a short opening with a snap.
I made a facing for the neckline and had it continue down about 5 inches so I could make the back neck opening.
This dress also has darts at the elbow which is nice feature I guess - it does make the sleeve conform more to the arm and the sleeves are nice and narrow. So often I make jackets or dresses and the sleeves are way too wide for me all over the arm. What do you think of my sneaky back neck closure? I don't like a button with loop, it's too fussy to make and to fasten. Or I'm just lazy :)
This dress would be fantastic in wool crepe or even a sweater knit. I think I might keep this in the active file - I can see making it sleeveless in a cotton sateen as a summer dress. Here I am contemplating summer sewing on the shortest day of the year. My words to live by - when winter is here then spring is on its way ๐.
So that's the seasonal sewing accomplished. Up next I just cut out some pants in a wool, as I had fabric leftover when I made this jacket. No I don't really need a business-y suit like that but it seemed like a fun way to use the rest of that fabric and work on my pants fit. And warm pants are always nice to have in the wardrobe.
This won't be the last post of 2019, after finishing my shopping/wrapping/baking and the actual Christmas celebrating, I plan to do a big clean up of my sewing space (resolutions, right?) and get ready for a few sewing challenges in the new year.
Plus a look back at my sewing for 2019 with a bit of analysis plus some ideas for 2020.
Time to run - those presents won't wrap themselves!
Merry Christmas to everyone ๐๐๐
Beth
Today's garden photo, taken back in July and I wish I had some of these roses right now, I could make a perfect holiday table arrangement. But they are all gone and with just the rose hips left on the bush. This is a climbing rose that I put in to fill in the space after getting the fence replaced where the pink jasmine was looking a bit sparse. It has exceeded my expectations with masses of flowers all summer and I will be on the lookout for another one in January.
Sunday, December 15, 2019
Blazer Patterns comparison: McCalls, Closet Case, Vogue and Pauline Alice
It's that time of year when a sewing thoughts turn to outerwear, and this time I'm talking about blazer jackets. I've had a lot of comments and requests both here and on IG to talk about the various patterns and do a little compare and contrast. It's also time for me to restate my very common refrain - there are no new patterns! By this I always mean that most patterns are a combination of features found in fashion, the width of a lapel may change or in the case of a blazer, the size of the shoulder pad :). On the whole, a blazer jacket is fairly straightforward and it's up to you to choose the silhouette you like, the shape of the lapel, the type and placement of pockets, the seaming, the length and number of buttons. I find it entertaining to look at new patterns and see something quite similar in a pattern that might be 2, 5, or 15 years old. When you get to scrutinizing these patterns closely you can see that most of the differences in result have much more to do with the fabric choice and styling than the pattern. With that in mind I'm trying to highlight how they sew together in this post.
For this post I'll talk about 4 different blazer jacket patterns I've sewn and highlight some features of each pattern. In writing this post I tried to do a straightforward pros and cons of each but that wasn't working - certain things turn out to be both positive and negative. I'm including a slightly older (out of print) Vogue 2853 pattern as it is interesting to show the comparison with newer patterns, plus I've made it 3 times and it's a classic. The Jasika blazer from Closet Case patterns is a very similar jacket, and the pattern includes every pattern piece needed to create the shaping a blazer needs. For fitting purposes the McCalls 6172 has detail and instruction that is invaluable. The Pauline Alice Saler blazer is one I've made numerous times, with shoulder princess seams and is a good example of that style.
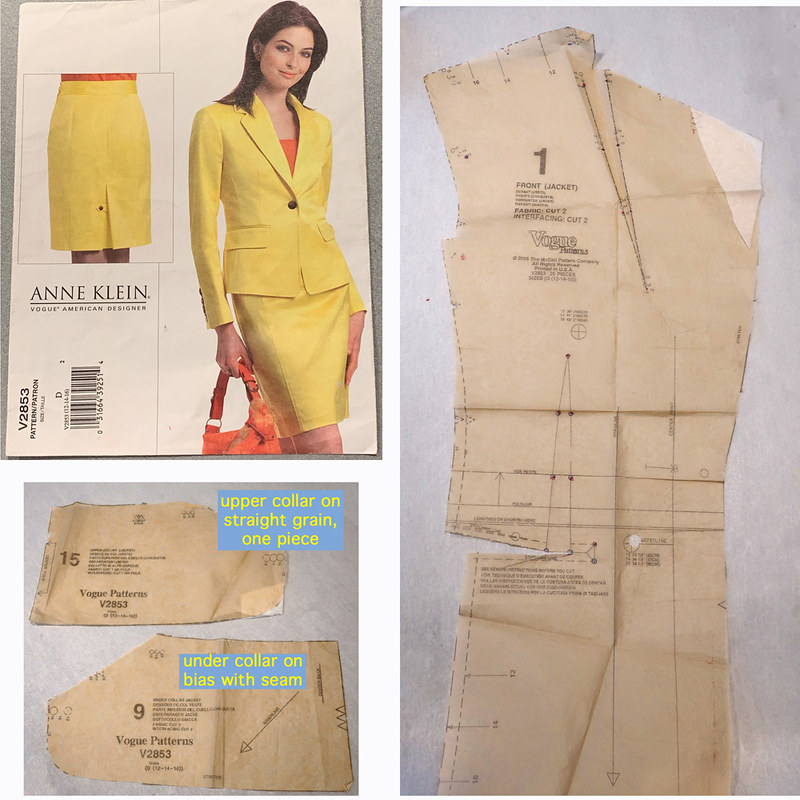
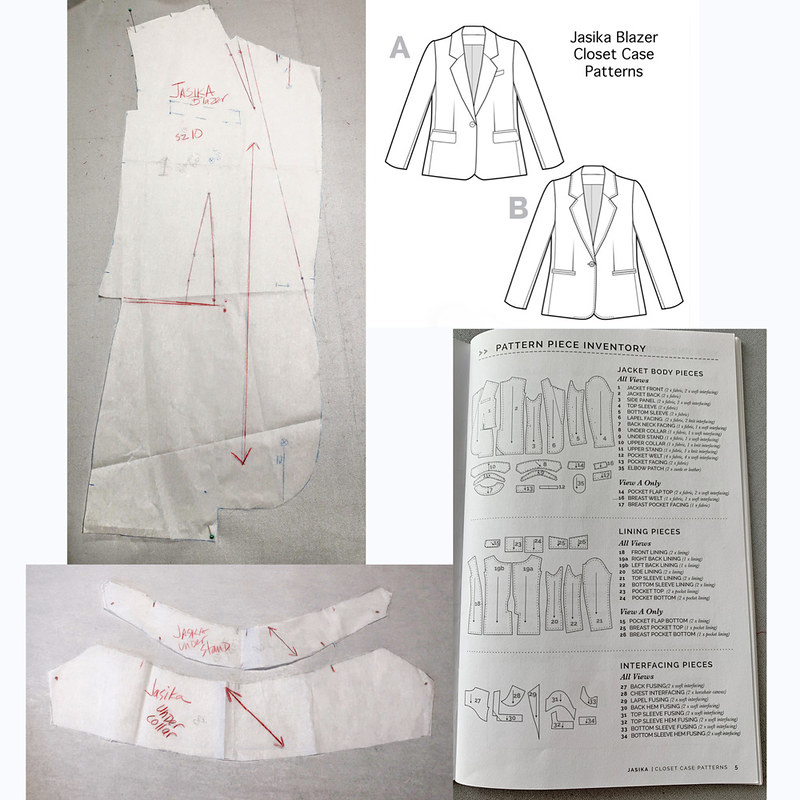
For each jacket I've included a few photo composites with the jacket front pattern piece (so you can see the shaping, lapel and pocket placement as well as the pattern envelope and then the collar pieces.
The front jacket piece really shows the style of the jacket, with the darting or seaming plus width of lapel and whether the pattern is marked well.
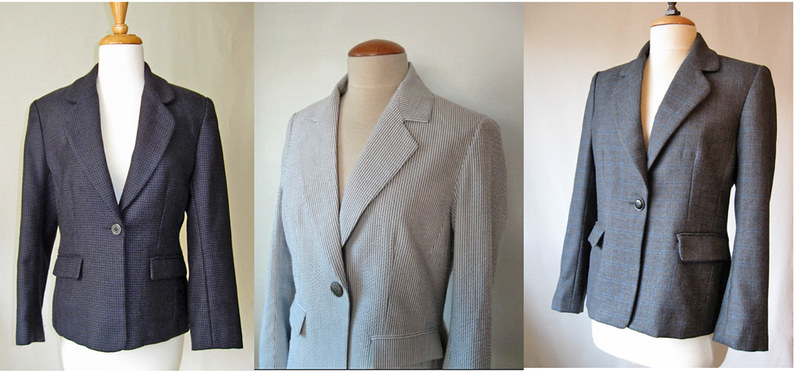
As I mentioned above, I've made this 3 times. Once you find a nice blazer pattern that fits you well I don't see the need for a lot of changing until the fashion changes drastically (change in lapel shape, more fitted, less or more shoulder shaping). This pattern has a copyright of 2005, here's the link to my most recent version. I did a multi-post series on making that blazer if you're interested in more sewing details.
Overall Impression: I started with the pattern to show a baseline - and to show how most blazer patterns are more similar to each other than different. This pattern is really well made, and sews together nicely.
For this post I'll talk about 4 different blazer jacket patterns I've sewn and highlight some features of each pattern. In writing this post I tried to do a straightforward pros and cons of each but that wasn't working - certain things turn out to be both positive and negative. I'm including a slightly older (out of print) Vogue 2853 pattern as it is interesting to show the comparison with newer patterns, plus I've made it 3 times and it's a classic. The Jasika blazer from Closet Case patterns is a very similar jacket, and the pattern includes every pattern piece needed to create the shaping a blazer needs. For fitting purposes the McCalls 6172 has detail and instruction that is invaluable. The Pauline Alice Saler blazer is one I've made numerous times, with shoulder princess seams and is a good example of that style.
For each jacket I've included a few photo composites with the jacket front pattern piece (so you can see the shaping, lapel and pocket placement as well as the pattern envelope and then the collar pieces.
The front jacket piece really shows the style of the jacket, with the darting or seaming plus width of lapel and whether the pattern is marked well.
First up: Vogue 2853 Designer pattern
As I mentioned above, I've made this 3 times. Once you find a nice blazer pattern that fits you well I don't see the need for a lot of changing until the fashion changes drastically (change in lapel shape, more fitted, less or more shoulder shaping). This pattern has a copyright of 2005, here's the link to my most recent version. I did a multi-post series on making that blazer if you're interested in more sewing details.
LIKES
- Pattern is fully marked, includes all notches, dots etc. so no guesswork. Seam allowance is consistent throughout at 5/8” (except for pocket welts)
- Separate pieces for upper and under collars, and under collar is cut on the bias with a seam at center back (so sides of under collar are mirror images, good for plaid or stripes)
- Two-piece sleeve, marked with shaping ease at elbow and it fits perfectly into armhole with no extra ease
DISLIKES
- Roll line on collar and lapel are not marked, would be nice if marked
- Rounded corners on collar and lapel, these days I prefer squared off corners but you can see in the photo that is easy to change
- No side seam. I realize this is the style but with a side seam you can make small fit adjustments quite easily, since this has a front, back and a side panel the fit adjustments are a bit more work
- Dart under lapel, is both a plus and minus, as it adds shaping, matches up and sews well. It's just not my preference as that dart adds bulk in the collar seam. (note same dart on Jasika below)
Overall Impression: I started with the pattern to show a baseline - and to show how most blazer patterns are more similar to each other than different. This pattern is really well made, and sews together nicely.
LIKES
- Pattern is sufficiently marked, not as much as the Vogue pattern but easy to follow
- Shoulder princess seams which make it easy to adjust for fit, both before cutting out and then if need be as you sew separate pieces. Also I find shoulder princess seams quite simple to sew
- Side seam - another place for fit adjustment
- Separate pattern pieces for upper and under collars, and under collar is cut on the bias with a seam at center back (so sides of under collar are mirror images, good for plaid or stripes)
- Sleeves sew in perfectly with no excess ease. Two piece sleeve.
- Includes separate interfacing pattern pieces for sleeve heads, hemline and for front lapel (which indicates lapel roll line, yay!)
DISLIKES
- I found the pocket placement on this to be too high, which just could be personal preference, and I lowered it a bit.
- Collar is a two piece collar, with a separate collar stand, the same pattern piece for both upper and lower collar. It comes out fine but I don’t think this adds a lot to the pattern and makes for more seams and bulk in the collar area.
Overall Impression: I obviously like this pattern as I’ve made it 3 times in the last few years. Once you get a blazer pattern that fits well it’s so easy to keep making the same pattern! It fits me well across the shoulders so that’s a bonus. Also the lapel/collar looks right to my eye, once you start looking at blazer patterns you can spot the small differences in the angle of the collar/lapel, the amount of lapel etc and start to figure out your preferences. I have to give a caution on this one, as I originally made a test version and then changed the length, and maybe the pocket placement. So if yu try this pattern I suggest a test version. Here's the post for the one in the photo above.
This is a pattern which has encouraged a lot of people to stretch their sewing skills and make a tailored jacket. It includes every possible pattern piece and is very thorough in the steps required. I made one version as a prelude to my tailored jacket class last fall since a lot of people came to that class after seeing completed versions of this online.
I made the outer part (not the lining) including all the steps for the collar and lapel structure as I wanted to familiarize myself with it.
Overall impression: traditional blazer styling and shape with every pattern piece spelled out and every step detailed. It's a fun option that the elbow patch option is included. The shape is kind of boxy and the sleeves are quite slim so I think a muslin for fit is probably necessary for a lot of people. I really disliked the pocket instructions and you would be better served to learn how to do a welt pocket and then just use the pocket placement to create the pockets. Not a fan of the variation in seam allowance in the collar. I am definitely not the target market for this pattern, note that I rarely look at the instructions and typically do all the interfacings as I go with the jacket shell pattern pieces as a guide.
By the way, on my Instagram profile there is a highlight "wool jacket" which has every step in making this jacket if you want to see sewing in action.
All these patterns have pluses and minuses but I think by showing the jacket front piece and the collar pieces you can see that there are more similarities among them then drastic differences. So much of what makes a sewing pattern popular is the styling, fabric choice and the internet likes but if you examine the technical drawings there aren't that many differences. If you like a particular style of instructions such as a booklet then the indie pattern will be for you. If you are accustomed to the standardized instruction sheet and diagrams then the McVoguerick patterns will probably serve you better.
I had to choose a winner among these patterns it would be the McCalls pattern. There are similar details on all these patterns but the McCalls is a step ahead with the fitting instructions printed on the pattern that are really easy to follow. The collar/lapel sewing instruction is very clear and uncluttered and has a lots details and tips (such as how to avoid that scoop in the lapel notch) that are extra helpful.
There are few of my thoughts on blazer patterns. My big takeaway is that you should look at the technical drawings and see how very similar most of them are. If you are accustomed to a particular type of instruction then you will probably have success with that brand's pattern.
Or you can take a class with me ๐. My next jacket class at Hello Stitch is fully booked but we might schedule again in late spring - you can always request and we will try to put specific classes on the calendar.
Yesterday was my last class for the year and in the words of the holiday poem, I'm ready for a long winter's nap!!! Seriously - it's time to relax, watch some movies and just do a lot of nothing for a little bit.
Up next, I have so many finished items that I want to post however the weather and my schedule has precluded taking photos. We have sunshine coming up this week for a few days so I hope to get outside and get that done. Also I may have had a little binge of fabric ordering over the weekend with some wools and silks so I predict more jackets and silk blouses in my future. And jeans. SO many ideas....
I would love to hear if you have a favorite blazer pattern or even one that didn't work - it's all informative.
Happy Sewing,
Beth
The garden is very bleak this time of year and one of the few things still flowering is the hardy geranium - a lovely spot of color in this grey time of year.
Jasika Blazer from Closet Case Patterns
This is a pattern which has encouraged a lot of people to stretch their sewing skills and make a tailored jacket. It includes every possible pattern piece and is very thorough in the steps required. I made one version as a prelude to my tailored jacket class last fall since a lot of people came to that class after seeing completed versions of this online.
I made the outer part (not the lining) including all the steps for the collar and lapel structure as I wanted to familiarize myself with it.
LIKES
- Pattern is fully marked with notches and dots that match up well
- Includes interfacing pattern pieces for every part of the jacket such as sleeve heads, collar and lapel shaping, hemline and vents
- Pocket placement is good
- Includes center back vent with interfacing and lining construction indicated
- Roll line on lapel is fully marked (yay again)
- Separate pattern piece for upper and under collar - with a caveat, see below
DISLIKES
- Collar pattern pieces - the under collar is cut on the bias (as it should be) but is one piece. I prefer the under collar to have a seam and thus the sides of the under collar are mirror images of each other
- The dart under the lapel gave me trouble in sewing, it’s quite small and doesn’t add a lot of shaping. Most people in my classes had trouble getting that corner of the jacket front to behave.
- Seam allowance variation - the pattern has 5/8” seam allowances in most of the jacket however in some of the collar lapel seam allowances it changes to a 3/8” which means you have to pay great attention when sewing. Also you then have to trim some seam allowances down to 1/4” which means trimming away just 1/8” - not fun! I really disliked this and feel that it would be simpler to sew if all seam allowances were the same and then I can trim and grade as needed for the fabric.
- Welt pocket and front vertical dart - this also was a bit fussy, if you look at the Vogue jacket it has a similar dart going into the pocket slash and is angled so that when the dart is sewn it returns to flat. This pattern has a large dart but the slash is straight so I found the pocket welt opening didn’t lay as flat as would be optimal.
Overall impression: traditional blazer styling and shape with every pattern piece spelled out and every step detailed. It's a fun option that the elbow patch option is included. The shape is kind of boxy and the sleeves are quite slim so I think a muslin for fit is probably necessary for a lot of people. I really disliked the pocket instructions and you would be better served to learn how to do a welt pocket and then just use the pocket placement to create the pockets. Not a fan of the variation in seam allowance in the collar. I am definitely not the target market for this pattern, note that I rarely look at the instructions and typically do all the interfacings as I go with the jacket shell pattern pieces as a guide.
McCalls 6172 Jacket by Palmer and Pletsch
I've made two versions of this pattern for my friend Heather. The first was a navy blue lightweight wool that was a trial run prior to making this version below in Shetland wool from Britex.By the way, on my Instagram profile there is a highlight "wool jacket" which has every step in making this jacket if you want to see sewing in action.
LIKES
- Markings for fit adjustments such as FBA, swayback etc are printed on the pattern pieces so doing fit adjustments on the pattern work beautifully. (See above photo)
- Two-piece sleeves are well marked, with notches, dots etc and fit into armhole with no issues
- Pocket placement is good.
- Separate upper and under collar pieces, the under collar is cut on bias and seamed at center back
- ROLL LINE is marked on under collar and jacket front. again, Yay!
- Pattern includes options for different length jackets and welt or patch pockets
- while it is possibly out-of-print, you can find copies available and it does come in a full range of sizes (McCalls size 8 - 22)
- The collar and lapel sewing instructions seem very clear and include some good tips to avoid bulk and pressing mistakes
DISLIKES
- The instructions and pattern pieces for the welt pockets are really lengthy and while they say are "no fail" (?) I found them quite confusing and add too many steps.
- Not really a dislike but notable, there are no side seams, the jacket has a front, side panel and center back seam with no back vent. The center back vent is a nice detail that is on the Jasika however the back has to fit perfectly or the vent will spread open and not look great.
All these patterns have pluses and minuses but I think by showing the jacket front piece and the collar pieces you can see that there are more similarities among them then drastic differences. So much of what makes a sewing pattern popular is the styling, fabric choice and the internet likes but if you examine the technical drawings there aren't that many differences. If you like a particular style of instructions such as a booklet then the indie pattern will be for you. If you are accustomed to the standardized instruction sheet and diagrams then the McVoguerick patterns will probably serve you better.
I had to choose a winner among these patterns it would be the McCalls pattern. There are similar details on all these patterns but the McCalls is a step ahead with the fitting instructions printed on the pattern that are really easy to follow. The collar/lapel sewing instruction is very clear and uncluttered and has a lots details and tips (such as how to avoid that scoop in the lapel notch) that are extra helpful.
There are few of my thoughts on blazer patterns. My big takeaway is that you should look at the technical drawings and see how very similar most of them are. If you are accustomed to a particular type of instruction then you will probably have success with that brand's pattern.
Or you can take a class with me ๐. My next jacket class at Hello Stitch is fully booked but we might schedule again in late spring - you can always request and we will try to put specific classes on the calendar.
Yesterday was my last class for the year and in the words of the holiday poem, I'm ready for a long winter's nap!!! Seriously - it's time to relax, watch some movies and just do a lot of nothing for a little bit.
Up next, I have so many finished items that I want to post however the weather and my schedule has precluded taking photos. We have sunshine coming up this week for a few days so I hope to get outside and get that done. Also I may have had a little binge of fabric ordering over the weekend with some wools and silks so I predict more jackets and silk blouses in my future. And jeans. SO many ideas....
I would love to hear if you have a favorite blazer pattern or even one that didn't work - it's all informative.
Happy Sewing,
Beth
The garden is very bleak this time of year and one of the few things still flowering is the hardy geranium - a lovely spot of color in this grey time of year.
Sunday, November 24, 2019
Color block silk (?) shirt Burda 12-2017-105
November....the worst month. There's just something about November that I don't like. Perhaps it's the shorter days, or the chill in the air. And it's not even all that cold here, although I'm always freezing and wear sweaters and jackets when others are still wearing shorts and sandals. It makes me shiver just to look at them. A nice balmy 88℉ and I am so happy!
So what can I do to brighten up this time of year? Make a brightly colored shirt. A jewel tone is always my go-to when I can't decide what to sew, and this green fabric has been in my stash about a year, I think I found it at an ASG sale. It feels and sews like silk but I don't think it is, however it was only 2 yards of 45" wide so it needed a bit of help in the yardage department to squeeze out a button front shirt.
That help came in the form of some contrasting fabric for the yoke, cuffs and the collar stand.
Here's what I started with to make this shirt. I keep all reasonably large pieces of any silks I use, they come in handy as lining, or inside of shirt yokes, pocket linings or facings, or even bias bindings.
I had the green fabric (pink arrow pointing to it) and then I had two old silk short sleeve tops, and a large piece of dark blue silk crepe. Once I got started I ended up just using the yardage plus the bright blue silk top for the contrast pieces.
Here's the pattern used. I decided it was time to try a different shirt pattern, and this one had gathered sleeve caps. Turns out I don't really like the gathered sleeve caps but they don't show all that much so I don't mind. But won't repeat! Also this shirt had a ruffle but I put a collar on instead.
I also just noticed that the shirt sleeve is gathered into the cuff and I put a couple of small pleats. Oh well! They are a bit too long for me, I thought I checked the length but I think the extra height of the gathered sleeve cap threw me off. It would have looked better if they were gathered. But it is staying the way it is!
Let's talk about buttons. It is so difficult to find nice and reasonably priced buttons lately. I used to find nice buttons at Joann's but they have reduced the quantity and color choice of their buttons to the point that they are next to useless. If I do happen to go in and they are having a sale I will buy 12 of any that I think are a useful color. I have buttons stored in small zip bags according to color family, white, black, blue, pink, purple, red, green, brown etc. and at least I can find some buttons in my stash when I might need them. But for this shirt I didn't have enough of any one type of blue button that looked good.
Ebay to the rescue. I searched for buttons and found a seller that had the type of shirt buttons I use, they had kind of a random assortment of colors and sizes but the shipping was quite low so I bought 3 different colors of buttons. The blue shown here, plus a dark blue and a deep wine color. I think the packs were 25 buttons for $ 1.89 or something like that. Anyway my whole order including shipping was around $ 10 and they arrived in 3 days so I will give them a try again. You have to sift through a lot of craft (scrapbooking) buttons to find the type one would use on a garment but I found if you put the size button you want in the search that helps.
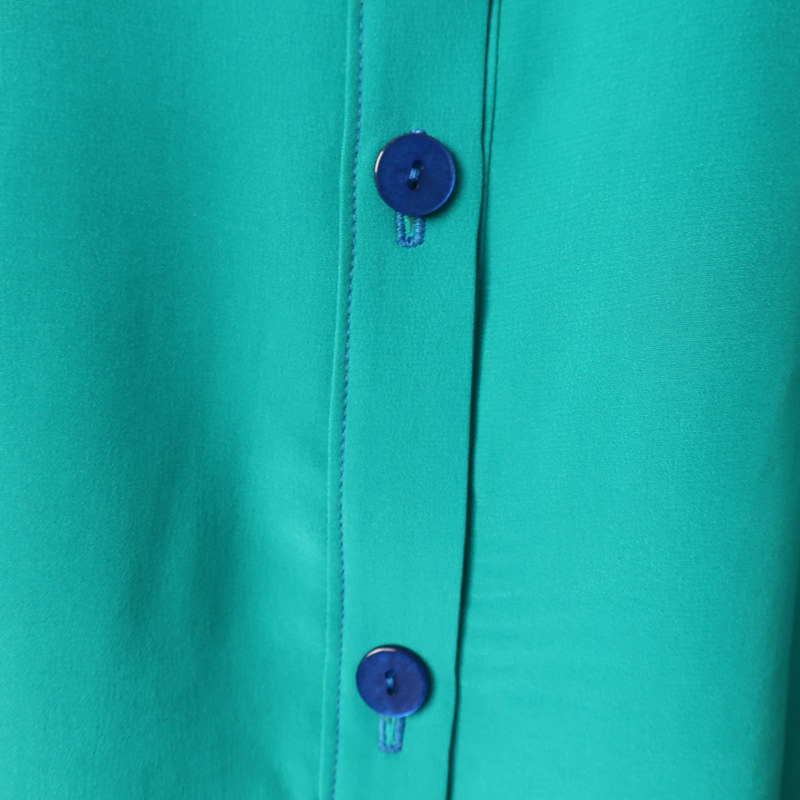
I thought they looked better flipped over with the flat side instead of the star showing. I used royal blue thread for all the sewing, it seemed to accent the contrast yoke and also I didn't have any green thread that was a good color match :) The shirt color looks different in these two button pictures, I might have taken them at different times of day. The one below is more accurate.
I kind of doubt I will wear it buttoned up like this but I wanted to see how it looks. Ok I guess and I like the fit of the shoulders so this shirt pattern might reappear with a few adjustments on the sleeves.
So that's the latest on this green color blocked shirt. Lately when I have a few minutes to waste I thumb through my Burda magazines. It kind of amazes me how many things I find that I didn't notice when the issue first arrived.
Up next, to finish a dress from a recent Burda which all visitors to my sewing room have loved but I'm not quite sure about. But it will make a good holiday outfit.
This picture makes me laugh - I think it needs a thought bubble that says "I have doubts about this shirt but I do like the color" which might be the story of many of my sewing projects! And do not look at the sad lack of blooms and dry leaves behind me. That's the California garden in November, a dull place just waiting for rain. Please, Rain!!!
We're winding down the year of classes at Hello Stitch in Berkeley, I just have two in December (the Zadie jumpsuit class still has a couple of spots open. And then I have a nice long rest until January - which will be really busy. We've had so many beginner and intermediate garment sewing classes these past 6 months and it makes me so happy to have people come back again and again. Also when they ask at the end of the day "What can I take next?" ๐ We're creating a new group of sewing enthusiasts and it's really fun and rewarding. So check the Hello Stitch website to see what's coming up in 2020 (and register if you are interested - things are filling up)
Other things to finish are a turquoise wool blazer (sneak peek here) with a wacky lining - a real stretch for me. And then have enough fabric to make some matching trousers so I plan to go full pantsuit with that one. Stay tuned!
Happy November sewing, and remember the winter solstice and longer days are just a month away!
Beth
Today's garden photo, this morning glory vine lives on the fence between houses and in late summer starts putting out a few blooms. I love this flower, it looks lit from within.
So what can I do to brighten up this time of year? Make a brightly colored shirt. A jewel tone is always my go-to when I can't decide what to sew, and this green fabric has been in my stash about a year, I think I found it at an ASG sale. It feels and sews like silk but I don't think it is, however it was only 2 yards of 45" wide so it needed a bit of help in the yardage department to squeeze out a button front shirt.
That help came in the form of some contrasting fabric for the yoke, cuffs and the collar stand.
Here's what I started with to make this shirt. I keep all reasonably large pieces of any silks I use, they come in handy as lining, or inside of shirt yokes, pocket linings or facings, or even bias bindings.
I had the green fabric (pink arrow pointing to it) and then I had two old silk short sleeve tops, and a large piece of dark blue silk crepe. Once I got started I ended up just using the yardage plus the bright blue silk top for the contrast pieces.
Here's the pattern used. I decided it was time to try a different shirt pattern, and this one had gathered sleeve caps. Turns out I don't really like the gathered sleeve caps but they don't show all that much so I don't mind. But won't repeat! Also this shirt had a ruffle but I put a collar on instead.
I also just noticed that the shirt sleeve is gathered into the cuff and I put a couple of small pleats. Oh well! They are a bit too long for me, I thought I checked the length but I think the extra height of the gathered sleeve cap threw me off. It would have looked better if they were gathered. But it is staying the way it is!
Let's talk about buttons. It is so difficult to find nice and reasonably priced buttons lately. I used to find nice buttons at Joann's but they have reduced the quantity and color choice of their buttons to the point that they are next to useless. If I do happen to go in and they are having a sale I will buy 12 of any that I think are a useful color. I have buttons stored in small zip bags according to color family, white, black, blue, pink, purple, red, green, brown etc. and at least I can find some buttons in my stash when I might need them. But for this shirt I didn't have enough of any one type of blue button that looked good.
Ebay to the rescue. I searched for buttons and found a seller that had the type of shirt buttons I use, they had kind of a random assortment of colors and sizes but the shipping was quite low so I bought 3 different colors of buttons. The blue shown here, plus a dark blue and a deep wine color. I think the packs were 25 buttons for $ 1.89 or something like that. Anyway my whole order including shipping was around $ 10 and they arrived in 3 days so I will give them a try again. You have to sift through a lot of craft (scrapbooking) buttons to find the type one would use on a garment but I found if you put the size button you want in the search that helps.
I thought they looked better flipped over with the flat side instead of the star showing. I used royal blue thread for all the sewing, it seemed to accent the contrast yoke and also I didn't have any green thread that was a good color match :) The shirt color looks different in these two button pictures, I might have taken them at different times of day. The one below is more accurate.
I kind of doubt I will wear it buttoned up like this but I wanted to see how it looks. Ok I guess and I like the fit of the shoulders so this shirt pattern might reappear with a few adjustments on the sleeves.
So that's the latest on this green color blocked shirt. Lately when I have a few minutes to waste I thumb through my Burda magazines. It kind of amazes me how many things I find that I didn't notice when the issue first arrived.
Up next, to finish a dress from a recent Burda which all visitors to my sewing room have loved but I'm not quite sure about. But it will make a good holiday outfit.
This picture makes me laugh - I think it needs a thought bubble that says "I have doubts about this shirt but I do like the color" which might be the story of many of my sewing projects! And do not look at the sad lack of blooms and dry leaves behind me. That's the California garden in November, a dull place just waiting for rain. Please, Rain!!!
We're winding down the year of classes at Hello Stitch in Berkeley, I just have two in December (the Zadie jumpsuit class still has a couple of spots open. And then I have a nice long rest until January - which will be really busy. We've had so many beginner and intermediate garment sewing classes these past 6 months and it makes me so happy to have people come back again and again. Also when they ask at the end of the day "What can I take next?" ๐ We're creating a new group of sewing enthusiasts and it's really fun and rewarding. So check the Hello Stitch website to see what's coming up in 2020 (and register if you are interested - things are filling up)
Other things to finish are a turquoise wool blazer (sneak peek here) with a wacky lining - a real stretch for me. And then have enough fabric to make some matching trousers so I plan to go full pantsuit with that one. Stay tuned!
Happy November sewing, and remember the winter solstice and longer days are just a month away!
Beth
Today's garden photo, this morning glory vine lives on the fence between houses and in late summer starts putting out a few blooms. I love this flower, it looks lit from within.
Subscribe to:
Posts (Atom)