Showing posts with label wool crepe. Show all posts

Friday, May 9, 2014

Happy ! Vogue 8944 Color-Blocked dress with pattern fitting details

Happy! just like that song that is stuck in my head.  A great song and a dress that I am so happy with. Sometimes the fabric, color, and style combine to make something that I really feel great about. I have already worn this once and I know it will get a lot of outings. Even though it is quite memorable.

Pink black dress front2

Both fabrics are wool crepe. I love wool crepe! While it doesn't stretch it has a lot of body, tailors beautifully and the colors available are fantastic. Don't be afraid to use it for any season. Here is a older post showing a dress I made ages ago in wool crepe that I often wear in the summer.
The pink fabric is something I purchased at a sewing guild sale, maybe paid $ 3 for two yards. It had a smattering of small holes but they were near the edge so I could cut around them.  The black is a leftover piece from this dress and the pink lining I bought ages ago at a garage sale. (also used the pink lining for this jacket) and I still have more. Score! Perhaps my delight in this dress is influenced by the fact that I spent so little. But between us sewers - you know that is half the fun sometimes.

If you think this simple dress was just a cut and sew...Nope.  A very expert sewer recently remarked that the simplest things often take the most adjustment because they need to fit perfectly and I agree. Not to discourage you, the adjustments were not monumental, just a lot for a simple design.

Here is the photo from the Vogue website when the pattern came out, and the pattern envelope.

V8944V8944 pattern env
I am not crazy about the fit on the model. or it could be the way she is standing, but perhaps this dress is exhibiting my nemesis - excess back bodice length. 
Here is a look at it on my dress form. I chose not to add a third color because a) I didn't have any other small pieces of wool crepe that complemented and b) a sewing group I belong to was having the end of the year lunch with the theme of "two" or "twice". So I figured fabric twice used, in two colors. 

pink black dress side front

Ok, let's talk about fitting. Based on my experience with another Vogue pattern last year (V1353), I thought that the front might not fit exactly as I wanted it to right out of the envelope. That seaming could be problemmatic so I did make a muslin of the bodice portion. Maybe I am shrinking in height but lately everything seems too long in the neck and shoulders, or too wide and gaping. For dresses with a fitted neckline I should probably start with a size 8 or 10 pattern and then alter the body for circumference but I am too lazy and either way I would be doing a lot of fitting so I will stick with a 12 to start and go from there. 
Here is the back bodice piece from my finished muslin so you can see the majority of alterations I did to this pattern. The front has the equivalent changes (reshape armhole, pull up at shoulders, raise underarm, take in at sides)

bodice back

So kind of a lot for a dress with just 4 pattern pieces. Here is the bodice upper front piece, most of the changes mirror the back bodice piece, but I did give more room across that center horizontal seam, sewing at 3/8" tapering to the normal 5/8" at the side. That gave a bit more length across the front bodice although I did raise the skirt waist there just a little bit. I could probably take it in another 1 inch at the waist, but it felt fine when I wore it the other day so I will skip that. A very fitted waist can look good standing up but after sitting a bit there are too many creases for my liking.

upper front

My main pet peeve with patterns that have a sleeveless and sleeved version is that the armhole is so clunky in the sleeveless version. I always reshape it, usually moving it in as I did here. Even though I pulled it up at the shoulders note that I raised the underarm by 1/2".  Kind of a good item to do as a general rule, if it makes the armhole too high them you can lop it off but it is often needed.  By the way, no changes in the skirt. 
Lest you think I never have a boo boo I have one thing I need to fix. I was so careful with the zipper so that the color portions meet perfectly at the center but the alignment is off by just a few millimeters. And it will make me crazy. So I wore it on Monday but now I will take that portion apart and fix it.  Here is the lining, which I always make a smidge bigger than the dress (about one inch) just or comfort and movement. So it looks a bit droopy. I had to do the color block on the lining as well since it might show just a tiny bit on the edge if I had done all black or all pink. 

pink black back of dresspink black lining

More sewing happiness.  This is one of my favorite colors.

Pink and black dress

Happy Mother's day weekend and sewing happiness to all,  

Beth


Today's SunnyGal garden photo - it has to be this one. I get mixed up on my rose names, and this one is possibly called Lipstick which seems like a great name. Luscious.

Lipstick rose Apr 2014

Tuesday, April 15, 2014

Vogue 8972 Dress in black wool crepe also known as "why you need a presscloth"

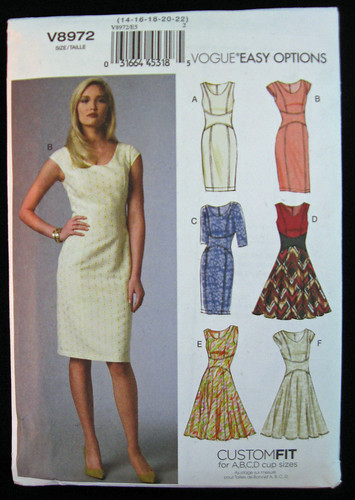
This week has found me doing some early morning sewing because I am making Vogue 8972 Dress in a black wool crepe. I love wool crepe and this one, imported from Italy, is particularly nice. I went last weekend with a sewing client to Stone Mountain, and despite my pointing out all the lovely spring colors she had her mind set on a basic black dress which will last for a while and be appropriate for lots of events. How could I argue with that?

However I really don't like sewing on black, particularly one that is very matte and makes it so difficult to see the stitches.  My habit of late night sewing and black wool crepe are not a good combo, thus the early morning bright spring daylight sewing. On a different note, I am not really liking this pattern, in terms of fitting on a woven fabric. I have seen some nice versions in ponte knit or other knits and that allows a bit of leeway in fitting that a woven does not. Anyway enough grumbling, huh?

Vogue 8972 pattern envelope

But let's return to my post subtitle: Why you need a presscloth.

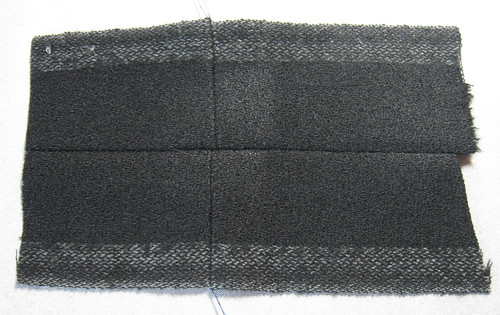
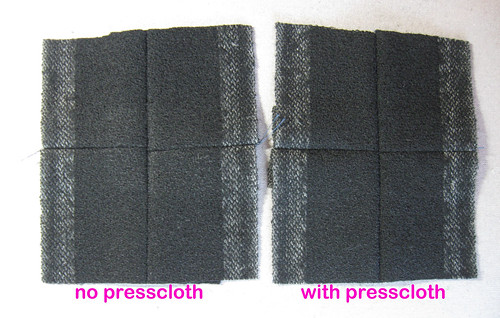
Wool crepe in any color but particularly the dark colors are very susceptible to getting a shine from pressing. And I think it looks terrible. I been known to recut sections of a garment if I erroneously touched iron to fabric without using a presscloth. So here I have made a few examples and brutally treated this first one, with no presscloth or trimming. Check out the result.

shine from pressing
Did you see how many seams and junctures this dress has? Then imagine every one with that shiny spot outlining the seams underneath. OK, I get very worked up about stuff like this but it is easily prevented.  First things first:

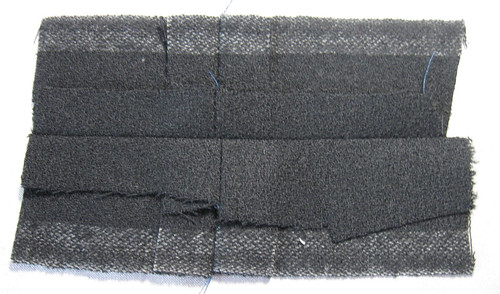
inside corner untrimmed
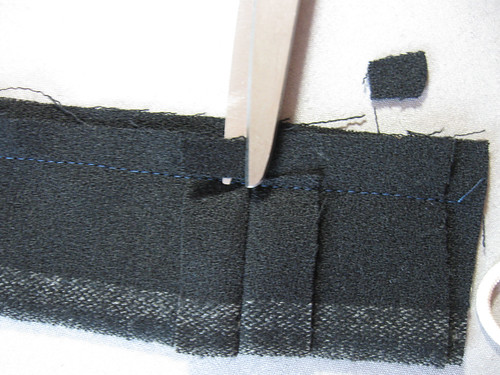
Trimming - my favorite little sewing task. I was saying to Elizabeth last weekend that I am a mad trimmer - every little junction and intersection is de-lumpified. Because as is, there are 4 layers of fabric at each corner there. On a waistband there can be up to 8 layers, so you can always remove some. Just like this until you have a nice little collection of 1/2 in squares littering your floor (if you are like me and let everything fall to be vacuumed later...much later).

trim example

The result is a nice un-shiny outside that is slightly flatter and blends in better with the rest of the garment. Also I was off a tiny fraction when I sewed the example on the left but you get the idea. This Vogue pattern calls for a lot of exactitude on the side seams so those diagonal lines meet up.  Stay tuned for my result. And fingers crossed. 
shine vs. no shine
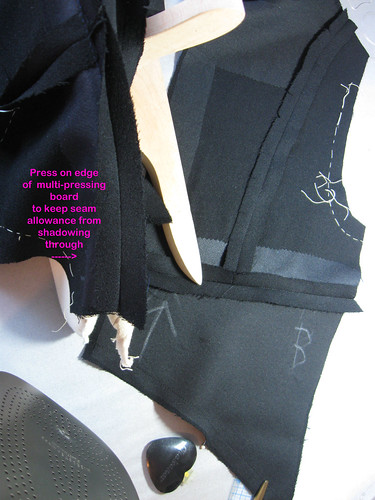
Another key to good pressing on this dress is to press these seams on the edge of the pressing board. See below where I have the waist seam over the padded edge of the multi-press board and am just flattening the center of the seam, taking care not to mash the edges of the seam allowance. 

edge pressing
You can also see that I label all the pieces with chalk, particularly when using a fabric that is SO the same on either side. I immediately put chalk marks on the opposing pieces even before I remove my pattern papers. Also on pieces that can be confusing, like this waist section I find it helpful to put arrows so I know which edge goes to the upper bodice etc.  
Another thing you can see is lots of fusible interfacing. I was reading an old post on Fashion Incubator the other day and she wrote that most home sewers do not use enough interfacing. If you take apart a dress you will see fusible everywhere, on most any edge. This Vogue 8972 has a lot of bias edges so I applied knit fusible everywhere, bottom edges, top of the skirt pieces, around the neckline etc. I also think it helps maintain a crisp press on the seams and if I want to catch stitch down the seam allowances I can sew to the fusible they they will be hidden.

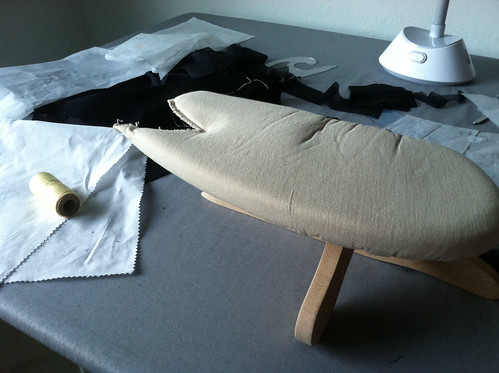
One last look at this multi-pressing board. It sits on any edge and has the little padded cover so it is really useful, curves, points etc. I never see them in stores but I do see them on Ebay and Etsy (look for June Tailor pressing board).  Also for this black wool crepe I did some test swatches for pressing, various press cloths, different fusible interfacings etc and found that the cotton presscloth gave the best result. The silk organza presscloth didn't keep the shine away. Interesting...
That is the cotton one on the left under the yellow spool.  I buy them at the big fabric store when they have the half off sale, they are pretty cheap and it is better than fooling around making something. 

Multi press board and cotton presscloth

That's all for now,  just a dress in pieces waiting to be put together for a fitting. When I mentioned above that I thought this dress was a bit tricky to fit, it was mostly the sleeves which are causing me trouble. But I have some ideas cooking so time and experimentation will hopefully solve this issue.

Happy spring sewing and watch your pressing!  Beth

Today's SunnyGal garden picture.  This Cecile Brunner rose bush lives next to the lemon trees and puts out masses of these tiny pink blooms, but I didn't realize it was a single bloomer or whatever they call these roses that only bloom once a season. Of course it grows like crazy, intertwines into the lemons, is full of thorns and it quite a challenge to prune. With the lemon and orange blossom scent plus the rose fragrance that side of the house is intoxicating this week.

Cecile Brunner rosebud

Tuesday, October 26, 2010

Grey wool crepe suit - sleeves and more

Sewing on the grey wool crepe suit from my previous post continues.  This fabric is a dream.  The jacket is almost finished, but I took a few pictures along the way.   If you notice the orange thread near the collar, I will explain that below.

Grey suit sleeve head

Grey suit shoulder stayTo stay the shoulders, instead of stay tape, I cut a piece of the selvedge from the lining, and used that in place of stay tape.  I think the commercial stay tapes are just a bit too stiff whereas the lining selvedge is thin and presses better but achieves the same effect and satisfies my fabric miser tendencies.


Since I almost always sew in linings by hand, I can do what I like with the seam allowances at the neck and collar so in this case I have sewn them down flat using a catchstitch.  
A catchstitch is kind of a criss-cross X pattern of stitching that is really useful.  If you want to see how to do it check out this Oliver + S blog post or there are a number of videos online.


Grey suit catchstitch

Getting back to the orange thread - this catchstitch will never be seen, so I went to my stash of silk thread and picked the most unlikely color that I will never need for any other project.
I found this little rack of threads at an estate sale and bought it along with a huge trove of other goodies.   See those beautiful little wooden spools of Belding and Corticelli silk thread.
I miss that company that seemed to disappear when I wasn't looking and always thought the thread colors were like little jewels.

Silk threads

Once the sleeves were attached I sewed on sleeve heads.  I think this is some kind of wool, not sure as I have a big piece and cut out the sleeve heads myself.  Bias strips 10" x 2" and then fold over about 1/3 and press lightly.    Hand sewn in place onto the seam allowance on the sleeve side.    The photo on the right shows the sleeve head in place on the sleeve on the right side of the photo, the left side sleeve does not have its sleeve head.  It may be subtle but there is a difference.   The sleeve with the sleeve head has not been pressed (and will not be)
but the sleeve cap is smooth and ever so slightly filled out.


Grey suit shoulder difference
Grey suit sleeve head

The last step I have finished on this jacket is to sew in the lining, here I have used a combination of machine sewing and hand sewing.   Then I got to try out a new technique called Ravel Grading that I learned from Pamela Emy on her blog, Off-The-Cuff.  Her blog is fantastic and I have learned so many great things since I discovered it.  Plus her interfacing is really superior and now my first choice for tailoring projects.


By doing the Ravel Grading, bulk is eliminated in the seam allowance without trimming.
On this wool crepe the technique works especially well, I am interested to see how it works on other fabrics.   Here I have removed threads for about 1/4" reducing the thickness of the seam allowance on the center front edges of the jacket.  

Grey suit ravel grade

Next up,  finish this jacket - started the pants last night.


Here is today's SunnyGal Garden photo, taken on Saturday in the rain.  Most years after the pink Jasmine on the back fence has finished blooming, I see the morning glories growing and they bloom in the late summer, so there is a scattering of these purple jewels across the green carpet of the jasmine vine.  But this year there have been no flowers until just the last week or so.  What a strange garden year it has been in N. Calif. 2010.   The first of the morning glories, when they should be ending!


morningglory

Tuesday, February 16, 2010

Vogue 1037 Badgley Mischka suit for Cathy


January settled in gloomy and rainy here in Northern California. OK, not like other parts of the country - but it wasn’t sunny. Perfect weather for some serious sewing, however I really didn’t have any projects on deck. Until my good friend and neighbor Cathy said she needed something to wear to a meeting. She was being inaugurated as this year’s president of the San Francisco Professional Food Society. Cathy has her own company which manufactures kits for making gourmet chocolate truffles and other goodies at home. www.thetrufflekit.com
She wanted a business look, something she can wear again on other occasions and also as separates. We had the idea of a suit in mind, but nothing specific. We shopped for fabric and inspiration at my favorite fabric store, Stone Mountain and Daughter in Berkeley CA, which is filled with fantastic silks, wools, cottons and so many other interesting choices that I have to be very disciplined when I step in the door.
We checked out all the wools and found a plum colored wool crepe. She chose Vogue 1037, a Badgley Mischka suit with pretty portrait collar and three-quarter sleeves.
She needed the suit for the meeting on Wednesday - so time was short.
I couldn’t start until Sunday - and then I went into speed mode. Making a tailored suit in about 3 days is definitely fast, but a nice challenge for a rainy week.

The pattern was one of their designer series - but not as difficult as some of their advanced patterns. I did a flat pattern measurement and cut out a size 16 jacket (which probably compares to a size 10 or 12 in a department store - more on this topic in a future post). The princess seams made it simple to make adjustments on the body after the jacket was basted together. The instructions called for lining all the jacket body pieces with fusible knit interfacing, which I did. I am not sure it was entirely necessary, in most wool jackets I use armo-weft fusible interfacing on the jacket and undercollar, and then fusible knit on the jacket front facings and upper collar. However since this was a different style - more like a 2 piece dress than a tailored jacket, I went with their instructions.

I have noticed that some fusible knit interfacing behaves better than others, perhaps it is the brand and I will be doing a test on some of the yardage I have on my shelf. I had to press and steam much more than I expected to get it to fuse properly. If you miss a little spot it can leave a slight bubble impression on the right side of the wool, which has to be repressed. I did get it all fused up and just about gave myself a steam facial in the process. The benefit of the fusible interfacing is that it gives the wool crepe a great weight and body, so that the jacket holds its shape nicely and doesn’t wrinkle at all.


Next I did the welt pockets with flap. For any welt pocket I never look at the pattern instructions, nor use their ridiculous little pattern pieces. I learned to make a welt pocket from Sandra Betzina at The Sewing Workshop in San Francisco some years ago and have used this method more times than I can count.


Next time I do one I will take photos and post. Suffice it to say that almost the LAST step is slicing open the pocket. I have seen a lot of instructions that call for cutting the pocket slit before applying the welt pieces, and that sounds dangerous and could lead to needing a new jacket front piece if it didn’t go well. Or at least a larger pocket than one planned to have. Possibly eliminating the need for a handbag but that is another story.

Once the welt pockets are done on any jacket I feel that I am home free. So the rest was just sew - sew - sew as fast as my little fingers could move. I made the lining from the jacket pieces instead of using the lining pieces in the pattern envelope as I was too lazy to pull them out and the jacket pieces were still at hand. Then I sewed the lining together, turned the jacket inside out on the dress form, and applied the lining, trimming as I pinned to give it the correct shape. Then hand sewed the lining in, and did the buttonholes with my handy-dandy Singer buttonhole attachment. Noisy little bugger but whew it makes great buttonholes. Maybe I could become a sewing hoarder as I bought 2 more of these gizmos last year at a garage sale for a couple of bucks which was a deal as I had seen them on Ebay for upwards of $ 20.


Next I sewed up the skirt. For this I used Simplicity 2564 which has no darts and a shaped waistband. This style is a lot smoother, falls over the waist and hips very nicely. The skirt included with the Vogue 1037 is a very traditional (shall I say old-fashioned) skirt, with front and back darts. So on a whim I used the different skirt pattern and Cathy was really happy with it.

Suit finished by Wednesday morning, with not that many minutes to spare.
She looked great and now has a nice suit that is ready for a lot of occasions.