Friday, March 28, 2014

Vogue 8904 Dress, fun with stripes

Possibly I am one of the last to join in the stripey fun that is Vogue 8904, a Marcy Tilton pattern. I bought this one last year when it was first released but never got around to it in the summer.

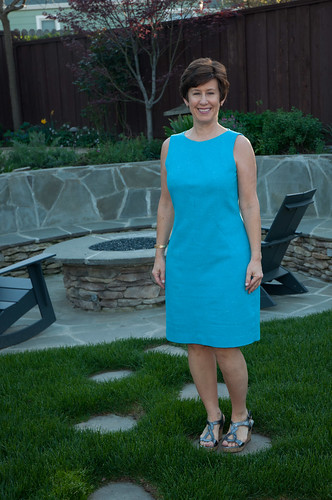
So a year later and I am getting a jump on my summer dresses. Like I need more, ha! I just was rummaging in the closet to find another dress, so that a friend of mine could try it on (V1351, blogged here) and I was thinking it was time to purge a few - but that is tough, if I like 'em enough to keep 'em upon completion then I don't want to do that, despite few wearings.

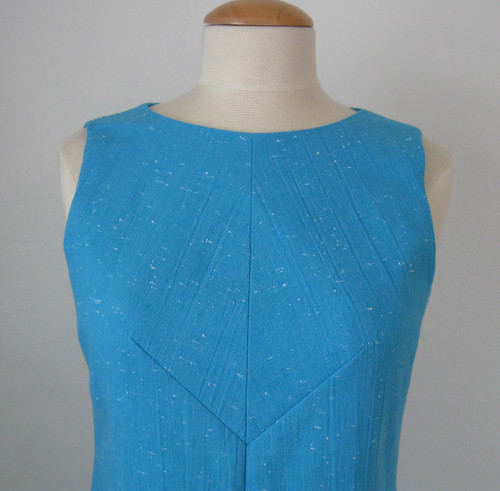
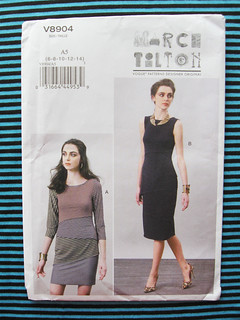
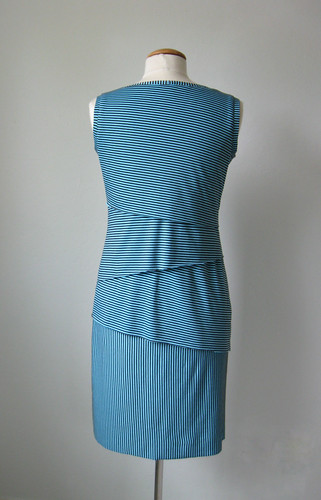
This is the pattern that my friend Shams named the "Shingle Dress" based on the overlapping pieces that run down the entire front and back.

My verdict:  Pattern love...although I had a few doubts along the way. But once completed I am ready to make another, or maybe a top.

V8904 stripe front

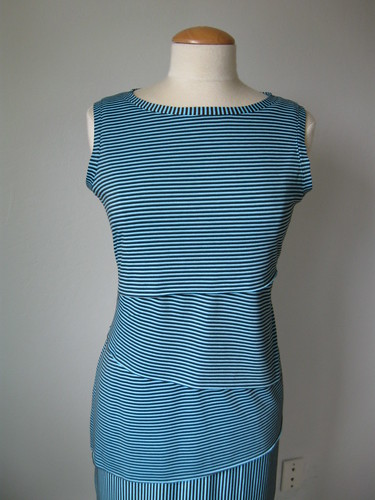
Not sure how the fabric looks on whatever device you are viewing but those stripes create quite the optical illusion effect on my screen. How about a closer look? That's a bit better.  The fabric is a cotton spandex blend from Girl Charlee, my absolutely favorite website for knits. I ordered 3 yards of this and have about 1.5 remaining, so I can experiment with some other t-shirt ideas.  The description said aqua and brown stripe but the brown is very dark. In any case, another item with aqua/turquoise. I do have some other colors in the queue.

V8904 dress close up on form

Here is a look at the pattern envelope, and the back of the dress which is the same as the front. I know I say this all the time but the examples on the pattern are not the most flattering, to me they are drab and droopy. Also note on the long sleeve version those strange drag lines at the inner arm. I started to make this with elbow length sleeves but they had a weird fit - perhaps because the sleeves are cut on the crosswise grain, and in doing the quick try-on in my sewing room I decided that sleeveless was much better. 

               V8904 pattern envelope       V8904 Stripe dress back

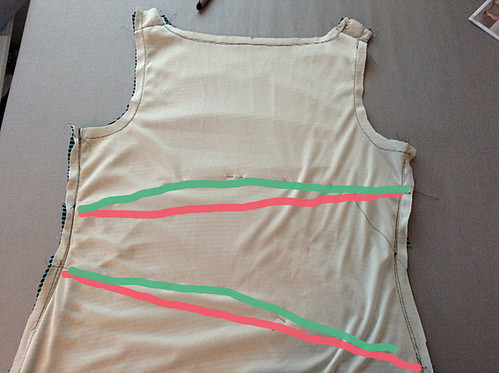
Some construction and fitting details. I made a few adjustments for circumference on my pattern pieces adding a bit on the sides (by grading up a size at the sides only). I am not a fan of negative ease, even though I like fitted styles. I prefer a bit of ease or perhaps a better description is that I like my garments to float or skim over the body instead of stretching to fit. Adding a little on the sides worked out fine (also had to add to each overlay piece).  I got the dress front and back machine basted together and the front looked fine but the back was ... not good.  The only way to describe it is to say that the 2nd overlay from the top landed on the top of my backside and crumpled there. The horror. No photographic evidence. I kept fiddling with it for a day or so, thinking about taking a tuck from the underlining piece or some kind of swayback adjustment but that would actually make it worse. In the end I carried this along to a meeting with some sewing friends and put it on for them to judge. My friend Kathryn called it  - the troublesome shingles needed to move upwards so the bottom edges didn't coincide with my bottom.
Better to show than describe.  Here I have highlighted the original attachment seam line in red and the new improved seam line in green. It may look a bit wonky but the center of each shingle just needed to move up. You can see on the dress form that the 2nd shingle is a bit looser looking but not when worn, it settles into the waist area nicely.  And I forgot to turn around when taking photos. Duh! So you will just have to believe me.

Vogue shingle dress inside back

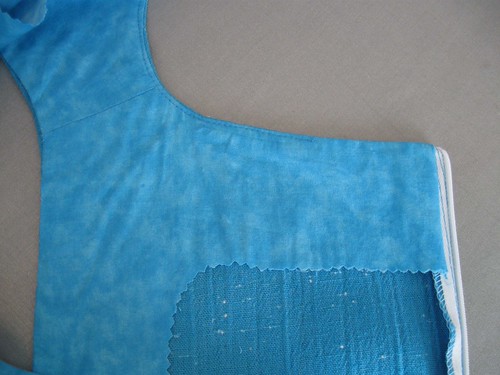
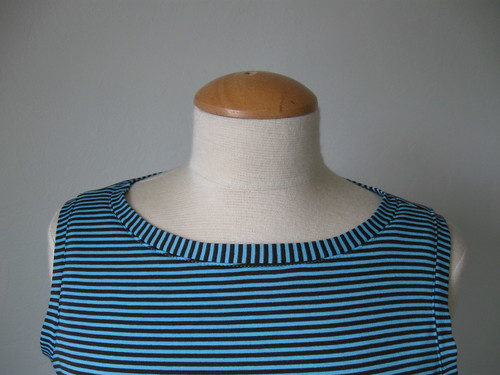
I used some poly knit lining that I had in my lining stash and I think the lining and the dress fabric had a slightly different degree of stretch, so that the pieces were fighting one another around the neckline and armholes. 
For the neckline and armholes I skipped the pattern piece and used my favorite knit neckline binding technique  from Threads magazine. It is kind of odd to use the lengthwise grain to make a neckline binding but it worked fine and the stripes look so good that way. Although the slight angle of the top piece is disturbing to a symmetry fanatic like me (that is intentional according to the pattern).

V8904Stripe dress neckline

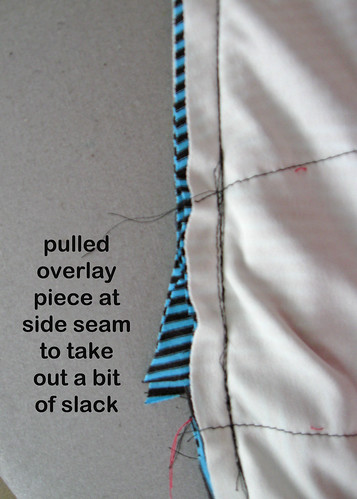
The only other oddball thing was that shingle pieces at the hip were a bit too loose where the pieces ended. Not sure how that happened but I attribute that also to the difference in stretch between the lining and the outer fabric. Fix seen below. Opened seam and pulled, then restitched.  I also confess that my stripe matching at the sides was nonexistent, I purposefully chose this tiny stripe so I would not have to match it. Way too difficult with a 1/8" stripe. Who is going to see it? 
V8904 fixing side seam

So now that this one is done I am sure there will be another.  But I always say that and then never get around to it.  However this one - maybe a brighter version, Girl Charlee has so many fantastic stripes. 

Despite the photo showing me posing in the garden surrounded by daffodils and jasmine blooming in the background it is not quite sleeveless dress weather. Not for a weather wimp like me. Very soon I hope. Tomorrow is forecast to have some much needed rain, so I will put away the summer dresses for a bit longer. 

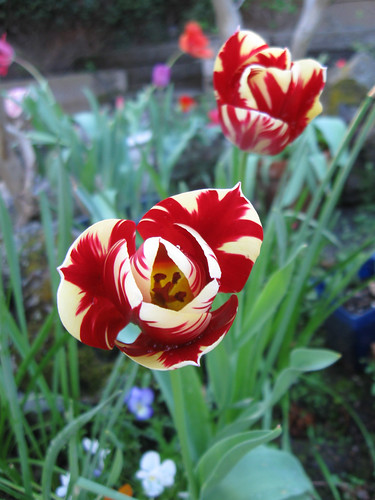
Today's SunnyGal garden photo - it has to be the striped tulip, right?  These are repeats from last year, hurray! 

Happy spring weekend sewing,  Beth 


red stripe tulip 2

Monday, March 17, 2014

The Brasilia Dress, completed

So yesterday I popped over to my friend Alice's house for some late afternoon dress photography and the first thing she said when I walked in the door was the following "That dress is really cute, turquoise is your color, I'd like one in that style,  the details don't show up until you are close up, what is that fabric?"  She manages to get in a lot of communication in rapid bursts plus she is almost always very enthusiastic about my creations. That makes her a great friend and perfect partner in my feeble attempts at photography. My attempts are feeble, hers are not.
So here is the finished dress, a very simple style that as mentioned has more detail than is apparent at first glance.  My previous post was all about the fitting on this free pattern which was designed by Rachel who writes the blog House of Pinheiro. Check that previous post for the diagram so you can see the seam shaping.

Brasilia dress finished 1

A few notes on this dress. I made a few changes for fit which are detailed in that previous post. This was sort of a test version and the fabric has no stretch whatsoever. The pattern is designed for a stretch woven, like a cotton sateen or denim with 2% lycra. With a fabric like that you can make it much more of a fitted dress and still be able to zip it, sit down etc.  So this version is not very fitted in the waist, more of a shift dress but perfect for summer. 

A closer look at the fabric. No idea of the fiber content, but probably some cotton. It has the weight of a denim and crinkles like gauze but is not that light. Plus there are the little white flecks. I bought it a while ago, at my secret thrift store where I bought a lot of other fantastic blue fabrics

Brasilia close up front

One other change I made in addition to narrowing the center front was to bring in the outside edge of the armhole at the shoulder, probably about 1/2 inch. I like a cut in shoulder in a sleeveless dress. The dress has triangular insets at the waist to create shaping in place of darts or princess seams and I kept toying with the idea of doing those in a different color but I am really glad I did not. But for a future version that is a possibility. 
I think the pattern suggests lining the whole dress but I just made some facings from the pattern pieces and had some quilting cotton that was a perfect color match so I went old school with sewn in facings, even using the pinking shears on the edge. Nothing wrong with pinking shears, after all this dress is kind of a 60's style so it goes along with that. Also I think serged edges can be a bit lumpy under certain fabrics so I avoid them most of the time. 

Facing

I didn't have a turquoise zipper in my zipper box - despite myriad other colors - so I used white which seems to blend fine.  Looking at the dress here on my form I can pinpoint one other alteration I would make if I sew it again, it is just a tiny bit big at the center back.

Brasilia back zip close up

I had to laugh when I was pulling a spool of thread from the rack, this is a small selection of the turquoise thread I have  - no doubt this is my favorite color. 

turquoise threads

While waiting on hold during a phone call today I jotted down all the items I want to sew in the next two months and it was 9 items including two dresses, a jacket, a skirt, several tops and shorts. Whew! Not to mention that I still want to recreate my swimsuit stolen by the racoon ( a story I will get to one of these days).  Hey,  I had better get busy. We are heading into my favorite time of year, summer ! Although you can see from the first picture that we have absolutely nothing to complain about here in Northern California. No polar vortex (and probably water rationing in a few months) but for now its time to get out my summer tees and sandals. 

Here is the proof. The daffodils are almost done and the tulips are going crazy. I am even thinking about tomatoes already.  
I hope the seasons are behaving wherever you are, Happy Sewing,  Beth


two red tulips

Monday, March 10, 2014

The Brasilia Dress, a fitting post

The bright yellow daffodils all over my garden are telling me that spring is here. So while I would like some stormy weather to relieve the current drought I am happy to turn to summer clothes. The most wonderful time of the year - at least to me. You can keep your wools and cozy sweater knits, I am happy to start thinking about some lightweight and floaty things for the hot months ahead. Which will include a pattern repeat from last year and you may be quite suprised to see it. But I have self-scheduled that for later, maybe May or June. Time now for Brasilia!
Did you see this dress a few months ago when Rachel of House of Pinheiro released her self-drafted dress pattern? I knew immediately that it was a dress for me.  A little bit retro reminding me of a 60's style shift dress but with a  modern fit and shaping.

Here is some info from Rachel's blog:
The pattern is free, available at one size only in a downloadable PDF format. The finished measurements are: Bust: 95cm Waist: 78.5cm Hips:103cm. The pattern has minimum ease and no seam allowances. Even if you have similar measurements, I advice you making a muslin as the pattern was design for 6ft tall ( 1.81cm)

Don't let the measurements strike fear into your heart  - this pattern is quite adaptable and even though I am not 6 feet tall I am quite near a finished dress.

So let's dive into to the alteration details - when I did a casual survey last December asking about blog post topics, fitting and pattern alteration was top of the list by far.  So this post is not filled with pretty pictures but for those of you who appreciate a good muslin analysis - get ready for some fun :)

Note that the finished measurements are listed: B: 95cm = 37.4"  W: 78.5cm = 31"  H:103cm = 40.5"
so these finished measurements are close to what is found on a size 12 Vogue pattern, at least in the ballpark. I was concerned about the 6 Ft. tall part of the equation.

Brasilia dress tech drawing
Looking at the tech drawing I thought that in addition to circumference changes - the major issue was the placement of the bust darts and the inside corner of the triangles, you want those to hit at the right spots on the body.
Here is my Muslin Version 1. I made it just as is with the pattern pieces as designed. This is my older adjustable dress form but it actually is the most similar to me in the upper body so it is useful to see how necklines will fit.  The first thing that jumps out is that the dress is way too wide across the upper body, shoulders, neckline etc. When I tried it on I thought the bust darts were way too wide, the points ended up too far away from the spot where they should be. The whole center front was too big. I suppose I should have taken a photo but use your imagination. The shaping in the back was a bit off for me, the darts are too long.  Also that slit in the lower front is where it was too tight in the hips and I was thinking I could add in the center front bottom half - but only thought that for a minute. Bad idea, as it would have put the skirt off grain and maybe caused other problems.  Another issue is the shoulder seams, they kind of wing out from the neckline and gape there also.

Brasilia muslin1frontBrasilia muslin1back

And Muslin Version 2.  Look at that nice neckline, no gaping there or at the shoulders. And no wardrobe malfunction down the skirt center front.  Back darts repositioned and shortened a bit.
The biggest change is that I actually took out from the center front making the center bust darts shorter and more proportional to my body.

Brasilia muslin2 frontBrasilia muslin2back

Here are the pattern alteration details.
1. Removed 1/2 inch from the center front piece all the way down that seam (= 1 inch total removal)
2. Added that 1/2 inch back to the side seam and then added a bit more at the waist and hip using a    TNT pattern of a fitted dress as a template.
3. Took off 1/2 inch at the shoulder on the back piece only.
4. Raised the armhole about 3/4 inch  (this is the main adjustment re: not being 6 ft. tall)

Note that I added a good bit at the hip as I don't like dresses to be super tight, I prefer to have a good 2-3 inches of ease at the hip, particularly  in a non-stretch fabric. If I made this in a knit or stretch denim I might make it smaller. It would be super cute in denim. To me everything is good in denim!

Pattern pieces adjusted Brasilia dress

Interestingly the waist of this dress was in about the right place, which just goes to show there are a lot of places on the body where you can be short and/or tall and that is why sewing is maddening at times.

In this picture of Version 2 you can see how the neckline is now smooth and laying flat. Also my handy dandy armhole fill-in patch where I pin some scrap piece in place and draw with a pen where I want the bottom of the armhole to be and then translate that back to the paper pattern. Also the remaining threads of my tailor's tacks on the bust darts, not a good look.
Brasilia muslin arm adj

Here is that change on the pattern. Slightly tricky as it overlaps the main front piece and the side piece. Also same adjustment is on the back piece, not shown here. And I rummaged through my garage sale fabric finds to come up with this textured turquoise mystery fabric, I like the color but it is not the greatest fabric in the world. All will be revealed in the next post but this may just end up being a test version. 

Brasilia dress armhole adjustment

And proof that it rained, just a little bit recently. Some groundcover Vinca that I confess I started with, ehem, cough...cuttings... yes that is what I will call them. This grows everywhere on the trails around here so some stems made their way to my retaining wall. They just flower for a few months but the purple contrast with green is so nice. 

Groundcover plants

Happy almost spring sewing, Beth