Showing posts with label Stone Mountain Fabrics. Show all posts

Sunday, February 9, 2020

Sew the Precious - Silk Crepe shirt

Is it spring yet? My February has started off at rock bottom as I caught the flu and have been mostly horizontal for the last week. After hearing about it on the news for months I thought it unlikely I would get sick, as I practically shriek and jump away when next to someone who coughs. But alas the germs got me, shall I blame the gym in January? why not. Anyway - an imposed rest for the last week and I'm finally feeling human again.

This post is heavy on sewing details and techniques and lacking any photos of me wearing this shirt - that will have to wait until I'm feeling better, plus I have a skirt in the works that goes with this so it will wait for the the full outfit.

Purple dot silk fabric

The last thing I had finished was a silk crepe de chine shirt in a purple leopard-y print. I would call this fabric "my precious" as I bought it over a year ago at Stone Mountain with not a real idea of what I would make but I just loved the color and feel of the fabric. I think at the time I had the idea of making a Bondi dress for my summer vacation but made this version instead, and set the silk aside, knowing I would wear it more often if it was a shirt or top.

Purple dot shirt front

The purple/magenta color is something I really like and the spots in white and navy blue make it so interesting. They still have this fabric at Stone Mountain - as you will see further down in this post.

So once I decided to make a shirt, after a few experiments with other patterns I returned to my favorite Simplicity 2339, which may be going on upwards of 20 uses of this pattern. I think a shirt is a shirt, and if this is the silhouette and detail I want then it's best to use a pattern that I know fits me perfectly.  Also when people say that standard tissue paper patterns are not very strong I just shake my head - I think they last forever - or at least a good long time. Although with this pattern I have modified it for various changes (covered button placket, popover version, darts rotated to gathers, etc) so I do have some pieces copied over onto other papers.)

Let's talk about yardage. Once I unfolded this fabric I saw that previous me only purchased 1.5 yards of this fabric which is 54" wide. Even for my bargainous nature that is a bit skimpy to make anything other than a sleeveless top or a very simple dress (which was my original plan).

Purple dot grainline change

Consequently I had to do a bit of creative cutting to get a long sleeve blouse out of 1.5 yards. Note the collar stand laid out at that jaunty angle. Not exactly on grain - but I figured with interfacing it would be stable enough to work, and it was.

Speaking of interfacing, this is the new-to-me method I read about in Threads magazine, and it works so well. Particularly for small pieces. You can cut out an interfacing piece in the general shape, and on the right grain, then place over the fabric piece on top of a silicone baking mat. Press/steam away and then trim the excess. The part of the interfacing that is overlapping to the mat does not stick at all. In fact it doesn't even seem to melt. So a win in terms of less precise cutting and placement of interfacing, and no sticky bits that just peek over the edge of your fabric and adhere to your pressing surface.

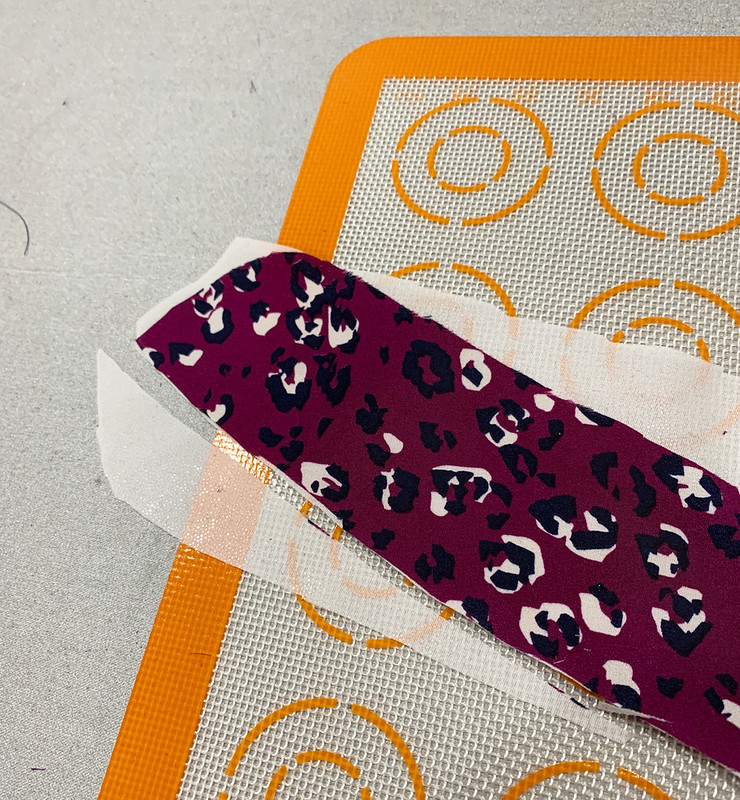
Purple dot band on mat before trim

Purple dot band pressing on mat

I trim it with scissors but I suppose if you are a wizard with a rotary cutter it would be a quick task. I think of all the things that make scissors dull the worst culprit is interfacing, so I do all cutting of interfacing with a specific scissors so as not to dull my nice ones. Paper I think has no effect on scissors but interfacing is a menace!

Lastly, I always use the paper pattern piece to verify the shape of my pattern pieces (usually I do this as I lay down the item prior to placing the interfacing on top. But I didn't take a photo of it that way - hopefully you get the idea. You would be surprised how much pieces distort with handling and it's just a bit of insurance to maintain the right shapes.
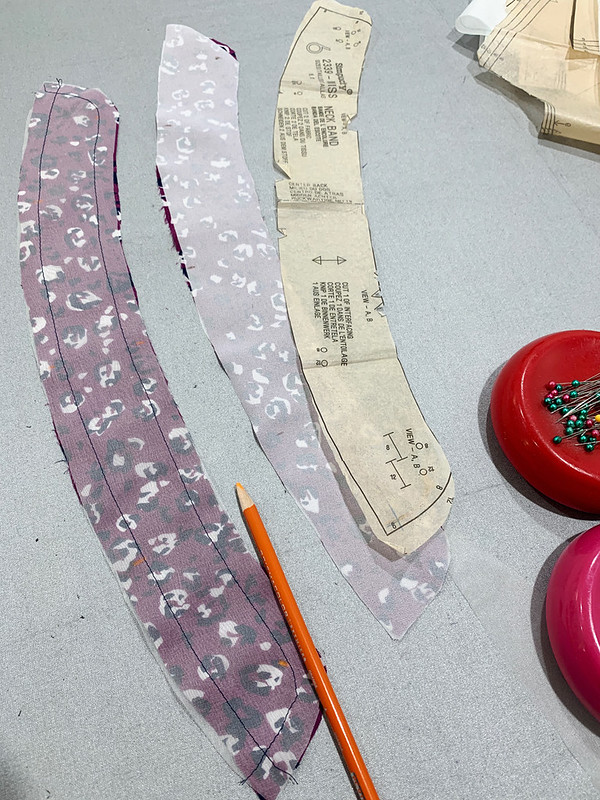

Purple dot collar bands

For silk shirts like this I have concluded that 2 types of interfacing work well, one one side I put a lightweight fusible (usually the Couture weight Sheer Elegance from Fashion Sewing Supply) and on the other side I use silk organza. Same for these three parts, collar, collar stand, and cuffs. On the button band just the fusible, no organza as I think it would be a bit too stiff, whereas I want some stiffness in those other three spots.

Another interfacing technique I use is to enclose the edge of a facing by sewing the interfacing and flipping it over, then fusing it. It's a bit of a tricky maneuver but I did take some photos and write about it in this old post. 

If you look closely at the edge of the shirt front facing you can see that the interfacing and the fusible are stitched together to make a completely clean finish. I love to use this on silk shirts and tops. But you have to clip the seam, and then carefully press that first 1/4" down to get it smooth and flat, then pressing the rest is not too bad.
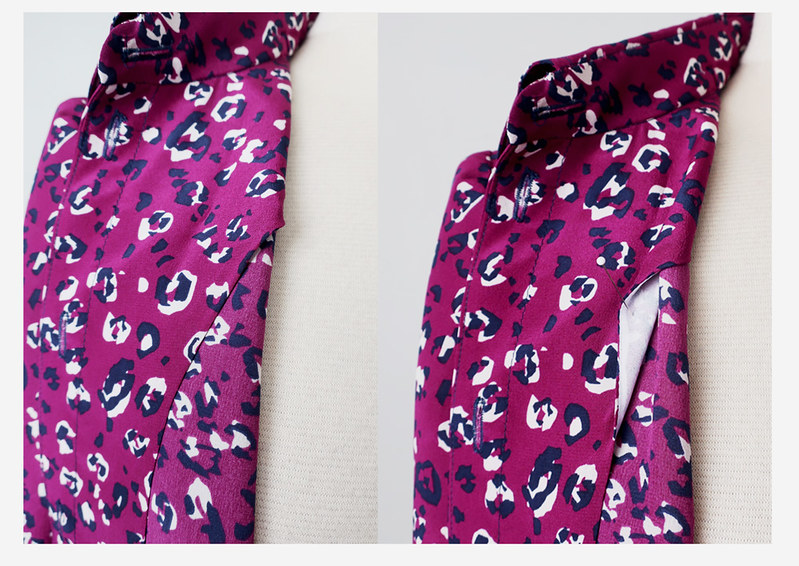
Purple dot facing 3

Purple dot collar construction

There are a couple of ways to sew the collar stand to the shirt, and I prefer to do it this way which is a bit fiddly but I think the end comes out nicer. I wrote an article for the Craftsy website which is still alive on the Bluprint website with color-coded details on how to do the collar/stand with both methods and I still think it's one of the best I wrote! (along with my favorite one, the hidden buttonhole closure :)
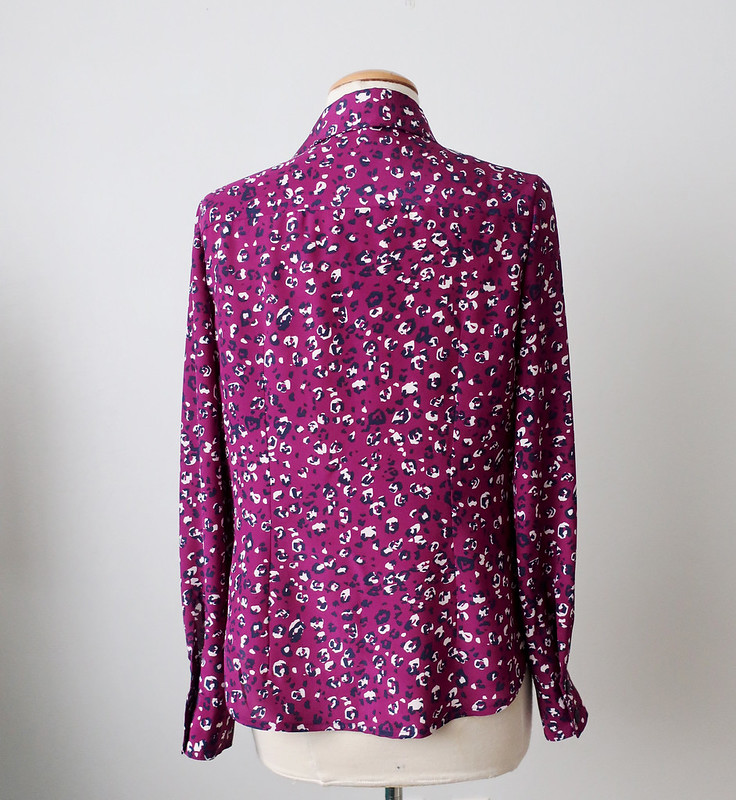
Purple dot shirt back on form

Onward to cuffs and buttons. I bought these buttons at Stone Mountain, they had the right about of blue to go with the shirt. I had a number of dark blue buttons in my stash, but they were all too shiny or too bright so for once I was patient and waited to finish until I could buy some nice buttons that complemented the fabric.


Purple dot close up cuff buttons

When I do cuffs on a silk blouse I most always sew a continuous lap which you can just see peeking out there. I think it looks more elegant on silk fabric.

I never use a cuff pattern, I just decide how wide I want it to be, and how long depending on the thickness of the fabric. Then I cut rectangles, interface, and add silk organza to make it a bit more structured.

Purple dot cuffs 1


Purple dot cuffs 2

The fusible keeps the seam allowances from showing through and the silk adds a bit of rigidity, you can see that cuff can stand up a bit on it's own there.

Lastly, how do I know they still have this fabric at Stone Mountain?

Purple dot sq with bow

Because when I went in to buy the buttons I succumbed to my urge to have a nice fat bow to wear with this blouse, so I bought another 1/4 yard which was used in it's entirety to make this fluffy bow.

Another silk blouse in my wardrobe - I think this will get worn a lot with all my purple and blue items. A little more costly than my usual sewing lately - not a remnant in sight. About $ 50 if you total fabric, buttons and interfacings. Considering I'm still wearing the first silk charmeuse shirt that I sewed from this pattern in 2011, I think it will get plenty of wear and use in my wardrobe.

So that's the latest - this weekend I've felt a lot better and started on a very cheery and suitably February red coat which I hope to complete to wear to Frocktails later this month. Plus I might start on some corduroy jeans as a warm up for my jeans class in a couple of weeks. And try to get outside to check what's survived the winter in the garden and even do a bit of prep for spring!

Happy Sewing
Beth

Today's garden photo is a pink camellia. These are so common around here in older houses, I think garden design has moved on to more interesting things but there are a few remaining at my place. This is pretty but it's so messy and I think this might be the year that it gets the chop to make space for something different.

pink camelia 2020


Thursday, July 19, 2018

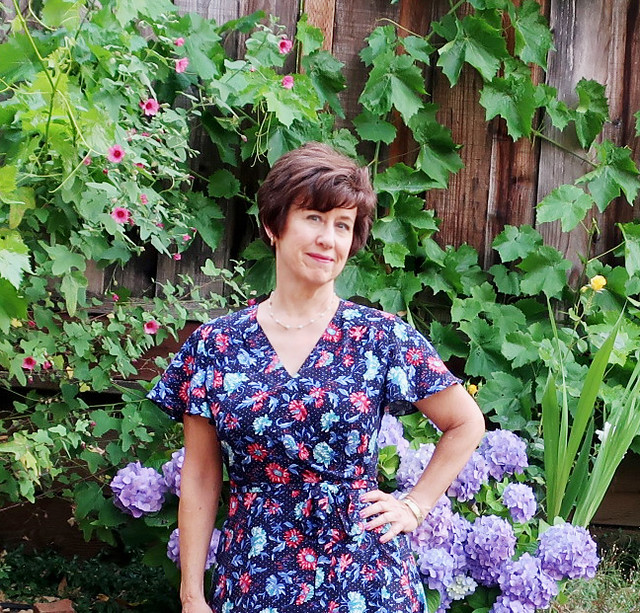
So Over It Eve wrap dress in rayon woven

Recently my sewing has been all about the wrap dress. Well, that is not entirely accurate, as I have about a zillion projects currently in progress. Sure, that is also an exaggeration but some days that's what it feels like. I just completed a dress from the May Burda magazine for myself, I made a pattern and from a pair of pants that I bought a while ago and liked the fit, I have several projects in the works for my friend Heather including a very sexy sleeveless black stretch denim version of this dress, AND then some wrap dress sewing in anticipation of a class I'm teaching in August at Hello Stitch.

I'm still regretting that I sewed up the knit wrap dress of the previous post in a slightly too small size for myself, but I will make up for that soon by sewing that vintage Vogue DFV dress pattern I snagged a few months back for the amazing sum of 25 cents. I'll revisit that one sometime, but in the meanwhile I also sewed up a dress to play around with another wrap dress pattern, and to have this example displayed at Stone Mountain Fabrics and promote the class.

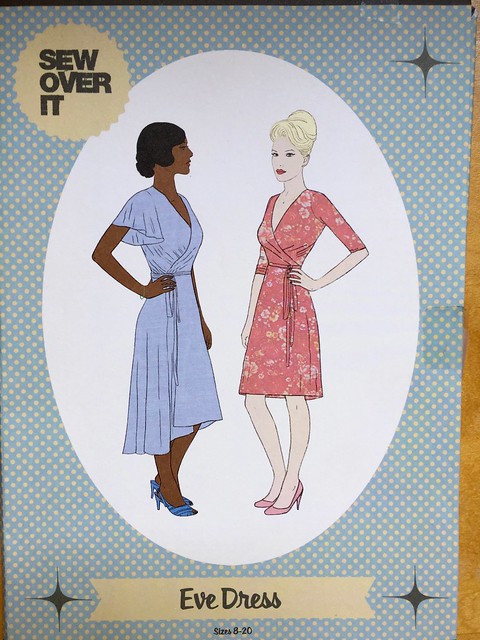
This is the  Eve wrap dress from Sew Over It patterns which is a UK pattern company. They stock the  paper patterns at Stone Mountain so you can buy in the US on their website or at the store.

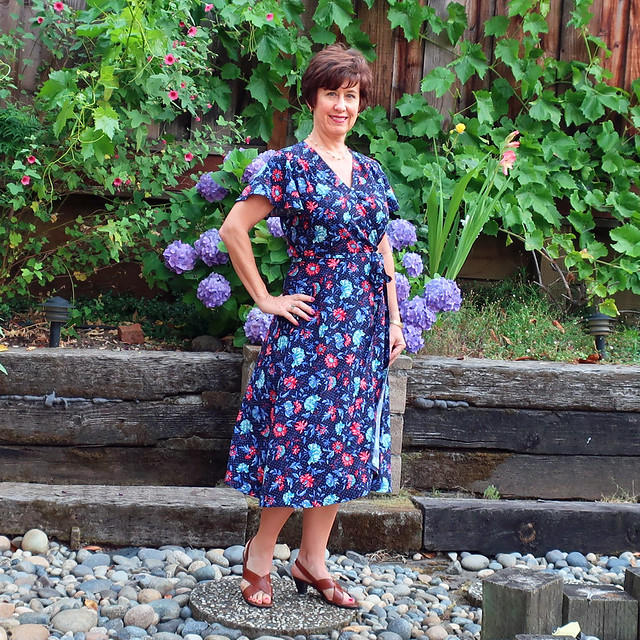
blue dress edit2

I made this dress in their size 10 with no adjustments and the fit was quite nice. I was really sewing it for a display item, but could you resist trying it on? not me! Plus it felt so unusual to have something at that hem length. If I were to make it for myself I would definitely shorten it as it feels like a lot of fabric. Perhaps I'm just not used to that length. And it does take a good bit of fabric.

However it does feel like the perfect dress for going to a tea party on a lawn somewhere, an event that I have never attended nor am likely to. (Also tea  - eek, I can't stand tea! do they serve coffee also at tea parties or perhaps something a bit stronger?)

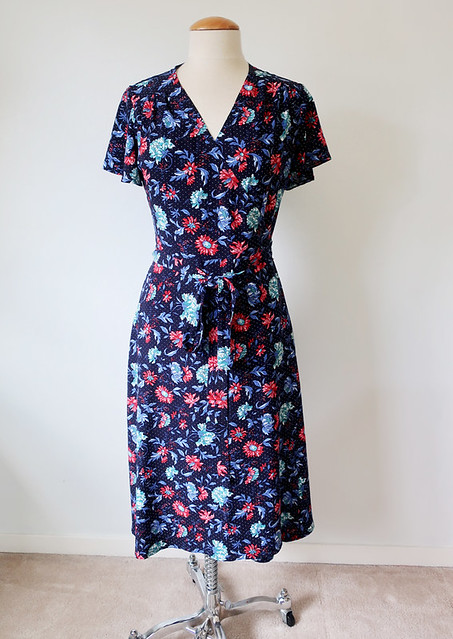
Here is the pattern envelope. Usually those flutter sleeves don't appeal to me but I think proportionally they work really well on this dress, and give it kind of a 1930's style. Fabric choice is critical for this dress, it needs something that drapes really well. I used a woven rayon from Stone Mountain. I'm not sure if they have the exact one still available but I see lots of woven rayon prints on their website that would work perfectly. I'm obsessed with fruit prints lately and now I want this one. 

IMG_4105


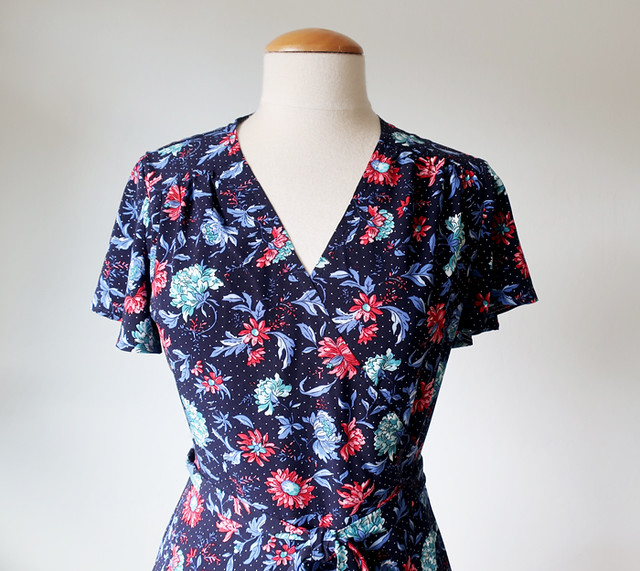
Here's a closer view, you can see that it has some shoulder yoke pieces in the front and there are gathers which create the shaping over the bust instead of darts.

eve wrap dress close up front

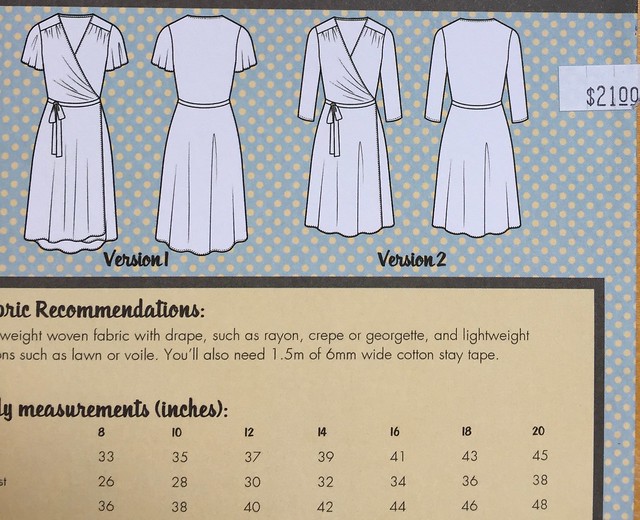
The pattern drawing shows it more clearly. There is also a waist seam front and back. In the drawing the wrap portions looks like it drapes at the waist but I didn't find that to be the case, neither on me or my dress form.

IMG_4106

Eve dress in blue rayon1 close up view

I was pleasantly surprised at how the wrap actually wrapped, in that the center front met properly, the V wasn't too low, and the neckline was just about right. I could even see making this in a jersey knit, it wouldn't really behave all that differently and the neckline edge is stabilized with tape so you would do that same step with a knit to keep it in shape.  I was trying to slightly more serious in the blog picture - just for variety - instead of my usual grin. There is something about having my photo taken, I just can't not smile - excuse the double negative. And I think it looks a bit like an odd smirk. Ok maybe it's the week for weak double negatives and odd smirks and that is my political comment for the week - yikes - what a weird week it has been. Is it 2020 yet? Hang in there RBG is my other fervent wish!

Back to sewing stuff.
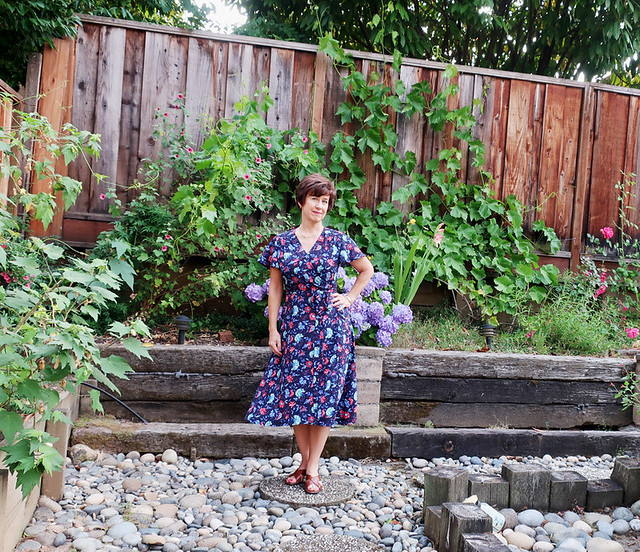
Note that I made the flutter sleeve version but used the skirt of the shorter version - and look how long it is on me. This is meant to be long I guess or just right for a tall person.

eve wrap dress front on form

So that's the scoop on this pretty wrap dress, and I'm looking forward to seeing what everyone makes in the upcoming wrap dress class at Hello Stitch.

Another fun class that is very soon (Sat. July 28)  Pattern Hacks: Add new elements to your existing patterns. I am really looking forward to this one, as you know I can't leave a pattern alone and I think it will be fun to show how to change darts, move seams, create color block elements and generally get more mileage from the patterns we already have. Sleeves! i almost forgot  - ways to redesign the sleeve. Next week I'll be combing through my files and photos to prep for this class.


And one more look at that flowy skirt moving ever so slightly in the breeze. Check out that grapevine behind me, it's making a run for it over the fence, adds a lot of greenery and has never put out as much as one little grape. I keep it because it's pretty.

Eve dress in blue rayon1

Up next, a few of those things mentioned in the first paragraph, and then maybe a t-shirt and another dress from the Burda magazine. or maybe I will spend many days in the pool because it has been really hot lately - and even with AC temps of 100℉ for days in a row really does start to wear. I know I love hot weather, but somehow the difference between 92 and 100 seems so much more than merely 8 degrees!

Happy Summer Sewing and stay cool wherever you are,
Beth

today's garden photo, when the heat sets in most of the roses get a bit limp and this one is a bit meager with the flowers, but that color makes up for it.

IMG_0118


Friday, February 9, 2018

Part 2: Hemisfèric Coat completed, Pauline Alice patterns

True to form, those of you who read my blog are interested seeing the insides of garments and construction details. Thanks for the nice comments on the previous post. I'm lucky to be able to pick and choose who I want to sew for, and the process of selecting patterns + fabric is maybe the most fun part of the process. That is definitely my view once I get near the end of a complex project, when the fun fades away and I just want it to be done!

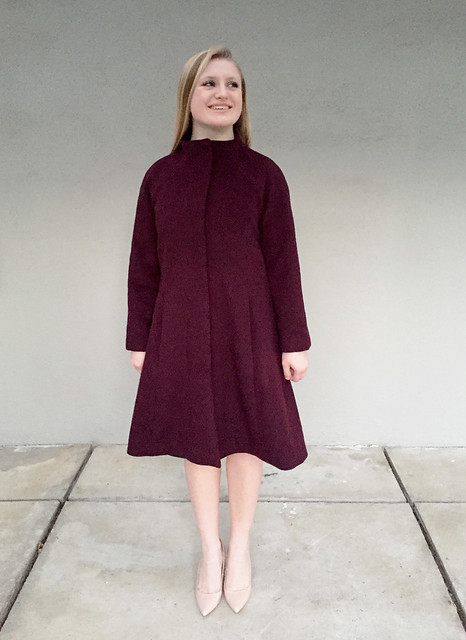
This project felt that way at times, mostly because of delays with all of us getting sick after the holidays. But it's complete and it's adorable.

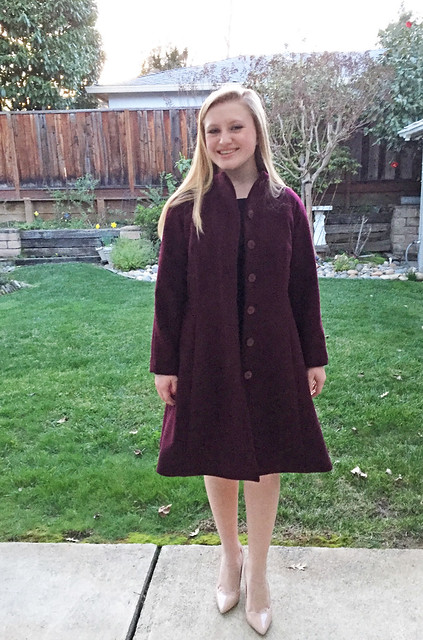
Coat unbuttoned view copy

Everything about this project was a time crunch, including taking the photos, so the lighting and sharpness is not quite what I would have liked and I have increased the brightness a bit so the details are visible. I made this coat for Sara, who is the daughter of my friend Heather (who I have sewn a lot of things for, including this coat). They were going to an evening wedding so Sara needed a coat, and I did sew a dress for Heather which is one of my favorite things I have done in a while, Burda 07-2017 # 124A. The dress is fantastic and I can't wait to blog about it. One thing at a time::)

I tested this Hemisfèric coat pattern for Pauline last fall. I really love her designs, Pauline Alice Patterns, and feel that she always thinks about creating a design that is unique, as in her Quart coat which I also tested and then sewed up for a friend. But she also has patterns that are for casual and fun wear as well. And now she has a book - although I think it's in French - not one of my better languages...yet.

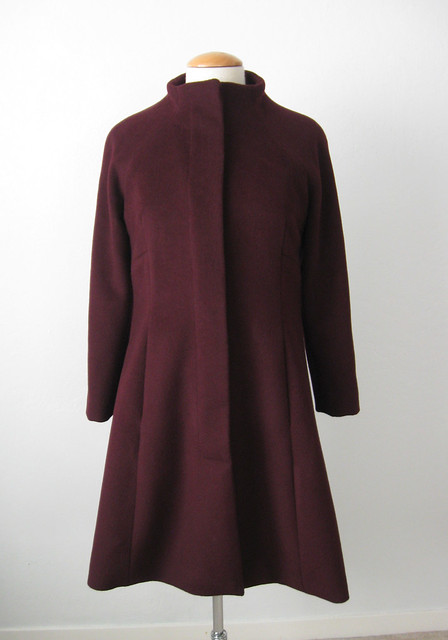
As mentioned in my previous post, I love the shape and seaming of this coat but I just don't like separating zipper, particularly a long one on a coat front so I changed the front closure from zipper to a hidden buttonhole placket.
All the details on how I did that are in my previous post. Also lots of info on interfacing. The fabric was from Stone Mountain in Berkeley, as well as the lining.

Merlot coat front full length

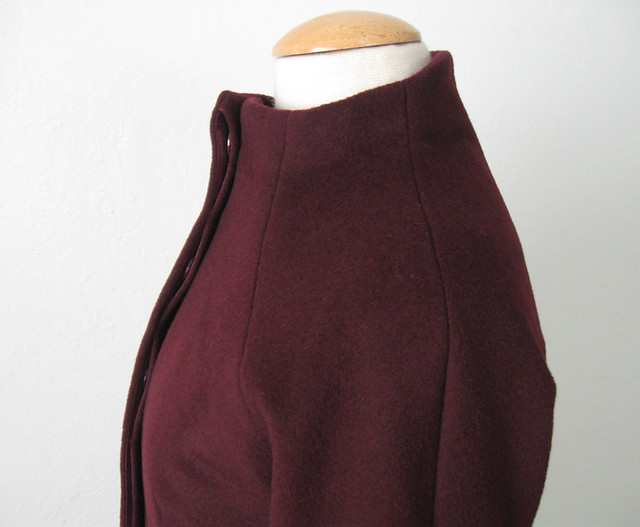
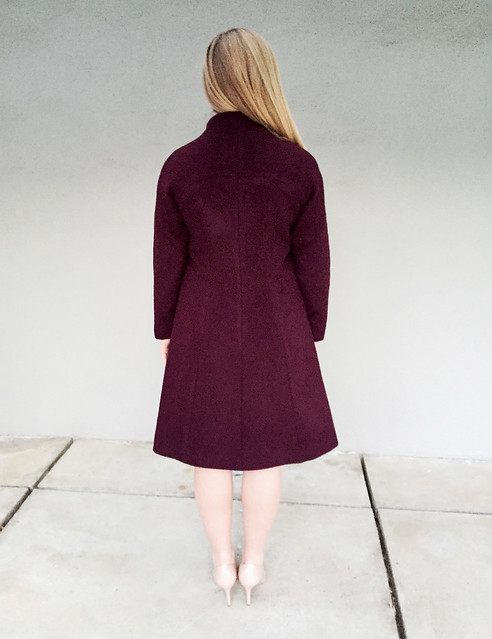
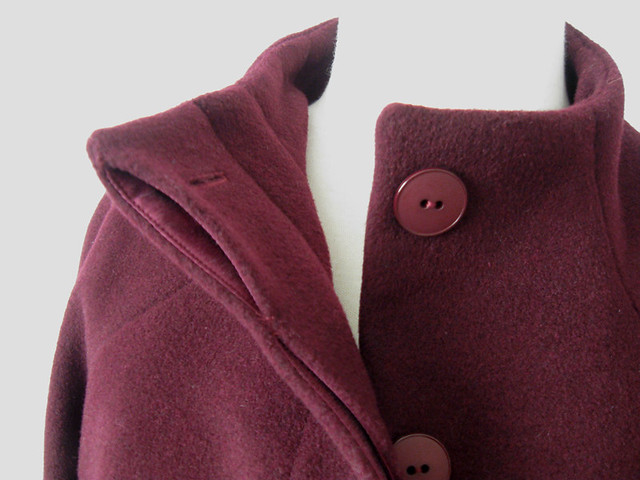
Here's a good look at the shoulder and neckline seaming which is unique. I love it when garments have interesting seaming and shaping, they are more entertaining to sew, to look at, and it's nice to make something that is new to you. The sleeves are raglan with a seam along the top of the shoulder, and the whole coat front and back rise up to create the funnel neck which stands up quite well in a coating fabric like this one.

H coat side shoulder seams

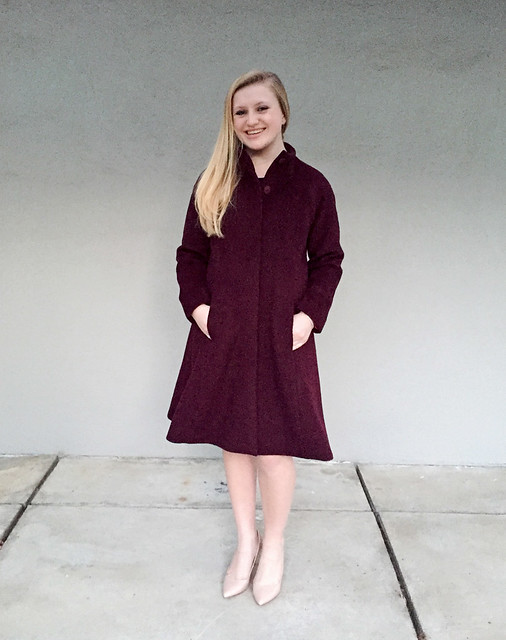
And pockets of course. The pattern calls for the pockets to be in the front princess seams and with my buttonhole changes there is just enough room for them. I suppose I could have put them in the side seams but I wasn't really thinking about it. And they work fine where they are. She doesn't really have her hands far down in the pockets but there is plenty of space. This image is a bit fuzzy but she has the coat buttoned about 2/3 of the way up, so the top two buttons are open and I expect that is how it will be worn. While it looks super sharp with the top buttoned it is probably more comfortable like this.

Coat S with pockets view
coat back view1


I am still so happy with the placket! Time to confess that with the thickness of the fabric I had fears that it would be a lumpy mess, but choosing that silk charmeuse to use as the inner layers of the placket really worked out beautifully, plus it feels so luxe.


H coat close up placket view

H coat lining view

The lining is bemberg rayon also found at Stone Mountain - they have a great selection of colors.
The pattern pieces for the lining are included in the pattern and are separate pattern pieces which is very nice.

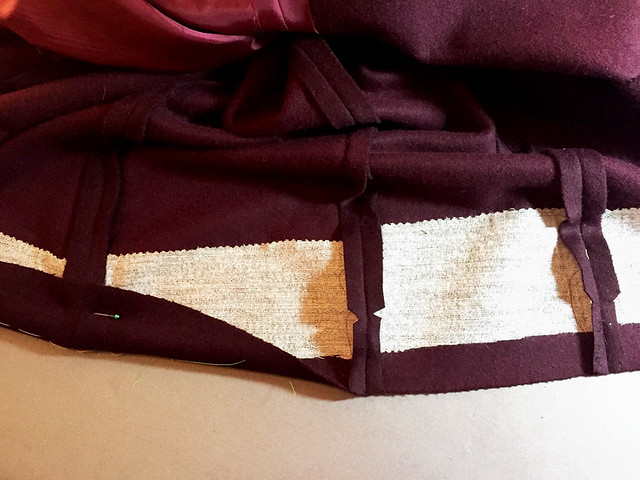
One construction photo that I didn't include in the previous post, the hem, I did lengthen this about 3 inches, and Sara is shorter than me. So this coat is short! Which I also found in the Quart coat. Anyway by adding length at the bottom I took away that shaping on each princess pattern piece which is necessary for the hem to fold up smoothly and not have excess fabric due to the angle of the seam at the fold.

H coat hem prep

So I did have to quickly stitch up and trim each seam so that it folded up without excess. In this blog post from 2014 I showed what I'm talking about. Scroll down the post for the photo with the pink and yellow lines marked on the picture.

Found the photo with the coat all buttoned up.

H coat buttoned up

Quick reminder, this is the pattern drawing and an example from the website.

Pauline Alice Pattern view Hemesferic Coat

Coat unbuttoned view square crop

So cute! One of these days I will have to make a Pauline Alice coat pattern for myself. We'll just have to see what she comes up with next year.

And sneak peek for my next post - this fantastic dress that I made for Heather. I am still raving over the quality of the blue wool crepe fabric.  Sorry for the grainy photo - it's cropped from full length one, and the light was really fading as we took the photos. But hey - it's documented and done. On to the next project!

H and S wearing wool outfits peek


What's in the works? I just finished something with mini-sequins. Easier than I imagined and kind of fun. I want to make a few pairs of jeans or pants now that I am happy with my pattern that I made via copying a RTW pair of jeans. Plus I have a lot of stuff to prep for some upcoming classes at Hello Stitch Studio.

So keeping busy here  - and now I'm off to repair some of my garden drip irrigation, because there is no rain in sight and we are getting worried about the drought again. Hope not but I think so.

Are you watching the Olympics? I am an Olympics fanatic - not that I have ever done any of those sports. Well plenty of skiing but other than that, nope. However I love watching everything and am a sucker for the human interest stories. (although no network is as good as ABC was back in the "thrill of victory, agony of defeat" days.)  But the Tara and Johnny skating coverage is very entertaining. Plus they dress  to coordinate!

Happy Sewing, Beth

Here's today's garden photo - so many daffodils already.

salvia