Showing posts with label Burdastyle. Show all posts

Wednesday, July 3, 2024

Sewn from Stash: Denim Skirt

Lately I have been trying to use up fabrics that are in my stash, so recently I noticed this remnant of dark denim that I bought at Stone Mountain Fabrics. They have a small remnant shelf and I often find something interesting there so I check first when I arrive at the store. This is a dark denim with gold sparkles, a 1 yard remnant, so initially I bought it with the thought to make a tank style dress.  But I don't need any more summer dresses so a denim skirt is way more useful in my wardrobe.

By the way - putting it here at the top of this post. I have a new online class starting next week, on Tues. July 9,  Fitted Dress Techniques. You can register at that link or see more details. I'll be talking about some bodice pattern adjustments, linings, invisible zippers, lots of ways that I sew in a different order than the pattern instructions, fitting as you sew, facings, necklines, sewing a clean finished sleeveless dress, and whatever else occurs to me as the weeks go. 

OK back to denim skirts.

Blue denim skirt1

I saw this pattern in a recent Burda Magazine and thought it looked familiar. So on a different quest through some old issues I noticed the twin pattern - or basically the same pattern, with different pockets. 

IMG_1528
They are both the same style. Faced waistband, front buttons, no center back seam, 3 darts in back. The difference is in the pocket options. I liked the pockets on the 2009 version which are actually large pockets and not just decorative. So I traced that one out. But you could use the one in the 2024 version and add whatever patch pocket you wanted. 

burda denim skirt drawing

I didn't do the sew-on front button band but instead used a foldover button band which is another option in that magazine issue. 
This skirt lends itself to one of my favorite sewing features, which is fit as you sew. (note I mentioned that above in talking about the new class. I do adjust patterns but I like to give myself some extra room and then fit as needed when the item is partially sewn together.) 
For this skirt I am about a Burda 42 in waist and 44 at hip. Since the pattern was up to size 44 I just cut out that size when I made the red version and then made some adjustments as I sewed it up. Then I noted those on my paper pattern pieces. However in the blue version I wanted it even slimmer so I took away a bit more of the ease and it still has plenty of room.  Below you can see the final stitching which is about 3/8" in from the original size 44 at the hip. 

IMG_1563


Red denim skirt
I like this red version although it lends itself to white tops - or maybe a navy blue? anyway I will have to look around and see if I have anything else I can wear it with or perhaps make something new.  The fabric in the red skirt is a remnant that has been hanging around a while, here are the 2 posts where I originally used it. Jacket  and Jacket Express Class.  2013! I still wear that jacket and still think that is one of the very best patterns I have ever seen, in terms of instructions and construction. 

blue denim skirt on hanger2

A better look at the skirts, with the photo lightened up a bit as it was too dark to see the details. I'm not so thrilled with the buttons but they were in my stash and will do for now. Perhaps some more interesting buttons to match the stitching? 

blue denim skirt2


IMG_1674

IMG_1675

A look at the details on the red one, which shows there is no waistband, it just has a smooth waist with a facing, and 3 darts across the back. I think I will make this pattern again changing the center front button to a zipper fly but otherwise with the same details. That will save on making all those buttonholes and I am always ever so slightly fearful about a button front skirt - if you lose a button when you are out and about then what? a long jacket :)  

blue denim skirt3

Hiding in the shrubbery. Not really, just wanted to show off the hydrangeas. That was the beginning and a week later they are absolutely covered in blooms. and then two more days later wilting in this heat. How hot is it?   See below.   That is under my patio cover so the hot air is trapped under there. Out in the real world it's only 106ºF today. ONLY!  And across the bay at the ocean it's about 70ºF right now. 
SF Bay area - every climate you could ever want :) 

thermometer 070324

Other classes with Hello Stitch Studio on my calendar. Check the links for details and to sign up. 

Sat. July 20      10am-3pm    Make a Knit Wrap Dress. A few spots left. 

Sun. Aug. 11   10am-3pm    Sew with Knits, Make a basic T-shirt. (2 spots left)

Up next, thinking about what to wear to Bay Area Frocktails at the end of this month. A new dress or not?
And I have some fall travel plans which might need a few capsule wardrobe additions. 

Stay cool and Happy 4th!
Beth

Last fall I pulled all the dahlia tubers from their pots and put them in the back half of the big vegetable planter. So evidently that was the right move as they are really blooming.

Dahlias July 2024

Wednesday, June 19, 2024

Remnants and Ruffles, a Summer Top

Recently I was rummaging through my fabric stash and came across a few small pieces that needed to get off the shelf and into my sewing machine. Whenever I go to Stone Mountain Fabrics in Berkeley my first stop is the remnant shelf. I found this rayon challis there last summer, I think it was labeled as 7/8 yard so I looked around my patterns to find something that didn't need much fabric.

Blue white top Burda 06-2020-106

This pattern is from the Burda June 2020 magazine. I think this same tank top shape is the basis for the jumpsuit and romper in that issue, as well as this top. I've made both the jumpsuit (link here) and the top  (link here)   That blue jumpsuit I've only worn once or twice - I think when the weather is suitable (warm) I tend to pick out one of summer dresses instead. As for the tops in the other post - when I made this ruffle one I think the ruffle was too narrow and it didn't really come out all that well. The other two tops shown in that post are long gone. That was in the first summer of the pandemic and I was just making any old thing to keep busy. Glad those days are behind us, hopefully for good. 

Burda ruffle top on form

I love this royal blue color and maybe I can find some matching solid cotton to make a skirt. For now I can wear it with a denim skirt or as shown above with my Pauline Alice Mirambell skirt, which has the eyelet hem. (I need to make a dress with that treatment :). I love that skirt, it has great pockets and looks dressed up but is very easy to wear. 

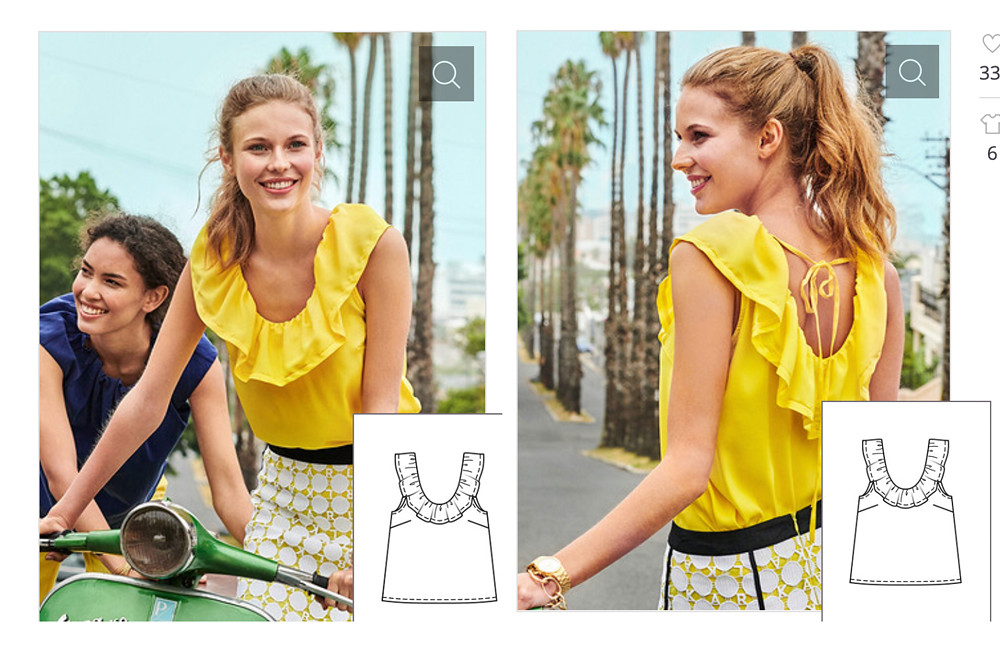
Burda ruffle top
Here's the images from the magazine. I think it needs the wider ruffle and also requires a soft fabric so that it drapes nicely instead of sticking out. Rayon challis is perfect and silk crepe de chine would be also. But how many of these tops do I need ?

Burda ruffle top back on form

Back view and also a look at my little Trader Joe's orchid which I bought last June as an accent for my newly remodeled bathroom. I decided it needed more light and so it now lives on this windowsill with morning light and is continuously blooming. Amazing to me, the first one I've ever had to bloom again. So I am not moving it!

Back ruffle top Burda 06-2020-106

So that's the latest on my recent sewing - I have made a lot of things in the last few months so I plan to do a few more blog posts. 

I have a couple of upcoming classes with www.hellostitchstudio.com 

Fitted Dress Techniques: ONLINE class starting on July 9.  In this class I will focus on princess seams, talk about some pattern adjustments, invisible zippers and how to painlessly add a lining which allowing you to fit as you go. 

Knit Wrap Dress:  IN PERSON class, July 20.  this one was by request and based on the popularity of the knit wrap dress patterns. Which are perfect for travel if you have a vacay planned. 

So all the details are in the links above and I hope to see you there. 

In other news, I bought my ticket for Bay Area Sewists Frocktails in July. And I can't decide if I should make a new dress (tempting!) or wear one of the zillions of dresses I already have. I think I'll wait a few weeks to decide.  

Blue white top front

Happy Summer Sewing,
Beth

Today's garden picture - everything is in full bloom now, May and June are the best time in the N. California garden. Especially when the pink jasmine is in full bloom, the scent is heavenly!

pink jasmine

Thursday, January 25, 2024

Upcycle Cashmere Sweater

This January I am in a mood to upcycle or at least repurpose a lot of the fabric and garments that I have held onto but not used. I've had an idea to use old cashmere sweaters as fabric and recombine them into new items. Over the the last few years I've put a few of my old sweaters in this category as well as some new to me ones found at thrift shops. However for my first project of this type I actually purchased something and remade it - also using remnants from the stash. 

sweater collar

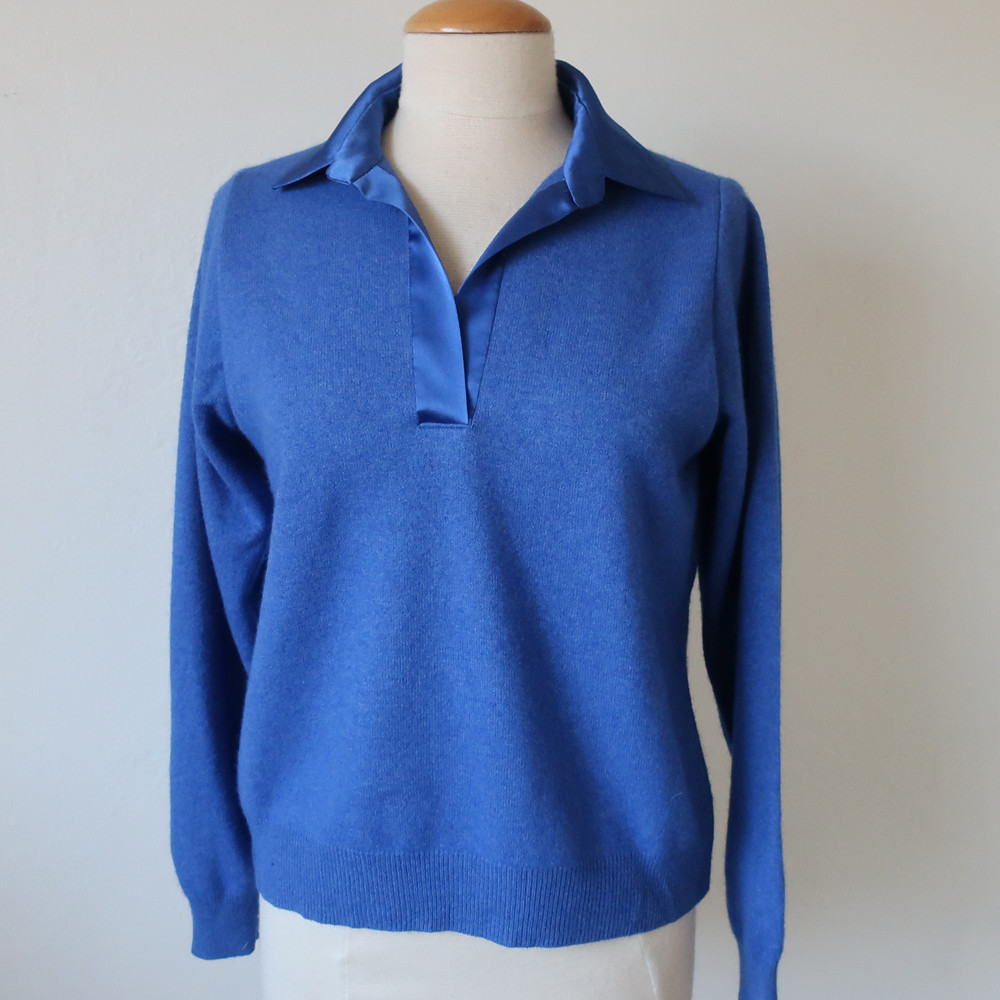
I was in my local Savers thrift store before Christmas, looking for puzzles and happened to walk by the rack of men's sweater where this blue beauty was hanging on the very end of the rack. That color! how could I resist. So I bought it for $9 and figured I could use it for something. Also being a men's size L it was quite roomy and great for cutting out me-sized pattern pieces.

blue sweater original

The sleeves, sides, shoulder seams and neckband were stitched on so I unpicked all that and was left with a good amount of sweater to work with.  I decided to make it a polo neck sweater and use a Burda pattern which I have successfully used on a summer stripe cotton t-shirt. Burda Feb 2023 # 108.  You can see the pattern and original shirt in that linked blog post. 

IMG_0797

I wasn't quite sure what I was going to use for the collar, at first I thought about a contrasting color harvested from another sweater but rummaging around in my stash I found a small piece of silk charmeuse and the color match was incredible, so it had to be that. 

test sleeve1

I put both lightweight fusible interfacing as well as some silk organza in the collar and collar stand to give them structure. Otherwise I just sewed it as I would with any knit fabric. The sweater held together well when cut so it was easy to sew. 

Blue sweater2


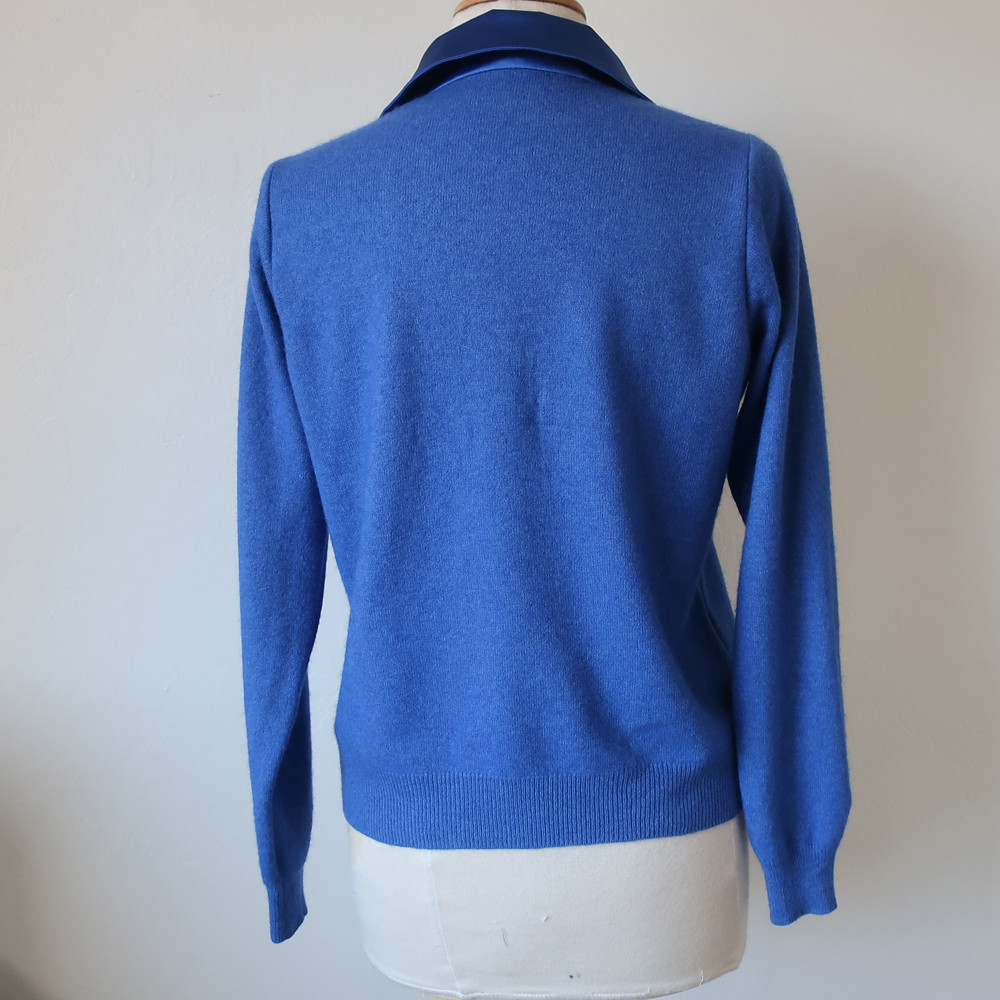
blue sweater back

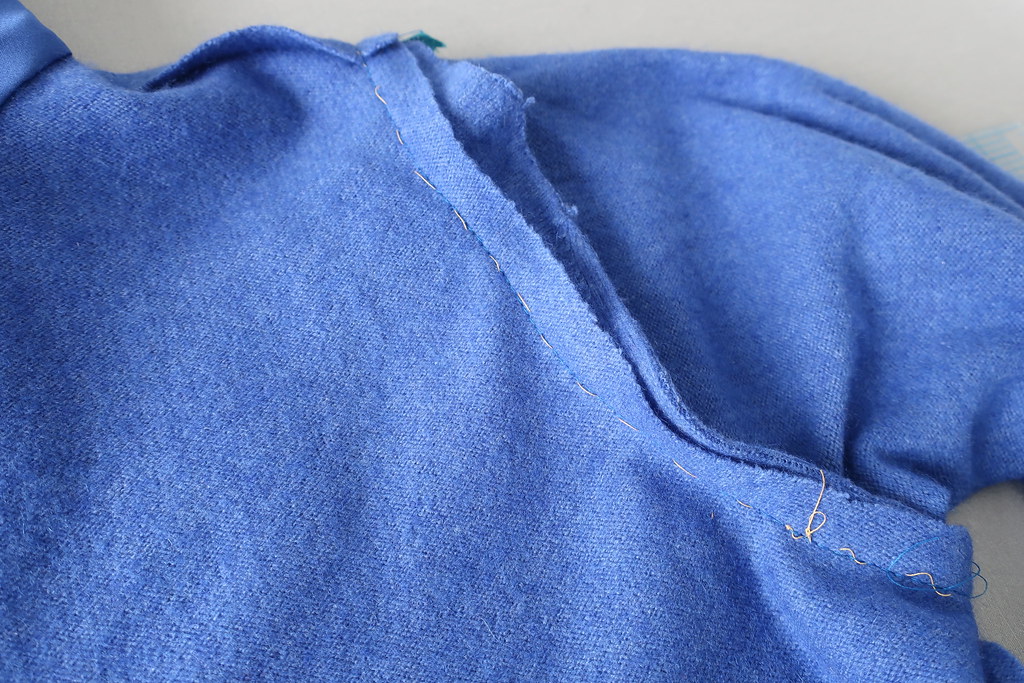
The sleeve were a bit tricky and I decide to just sew them back on as it, with some minor adjustment at the seam allowance of the armhole. So they are a bit long perhaps but I generally turn back the cuff on all sweaters so they are fine. 

test sleeve2

I hand basted them on first just to make sure they fit the armhole.  All in all I am really satisfied with my first cashmere sweater remake and there will definitely be more in my future. I've collected a few sweaters in plum, lavender, and purple shades so perhaps some kind of color-block combo.

blue sweater front


blue sweater4

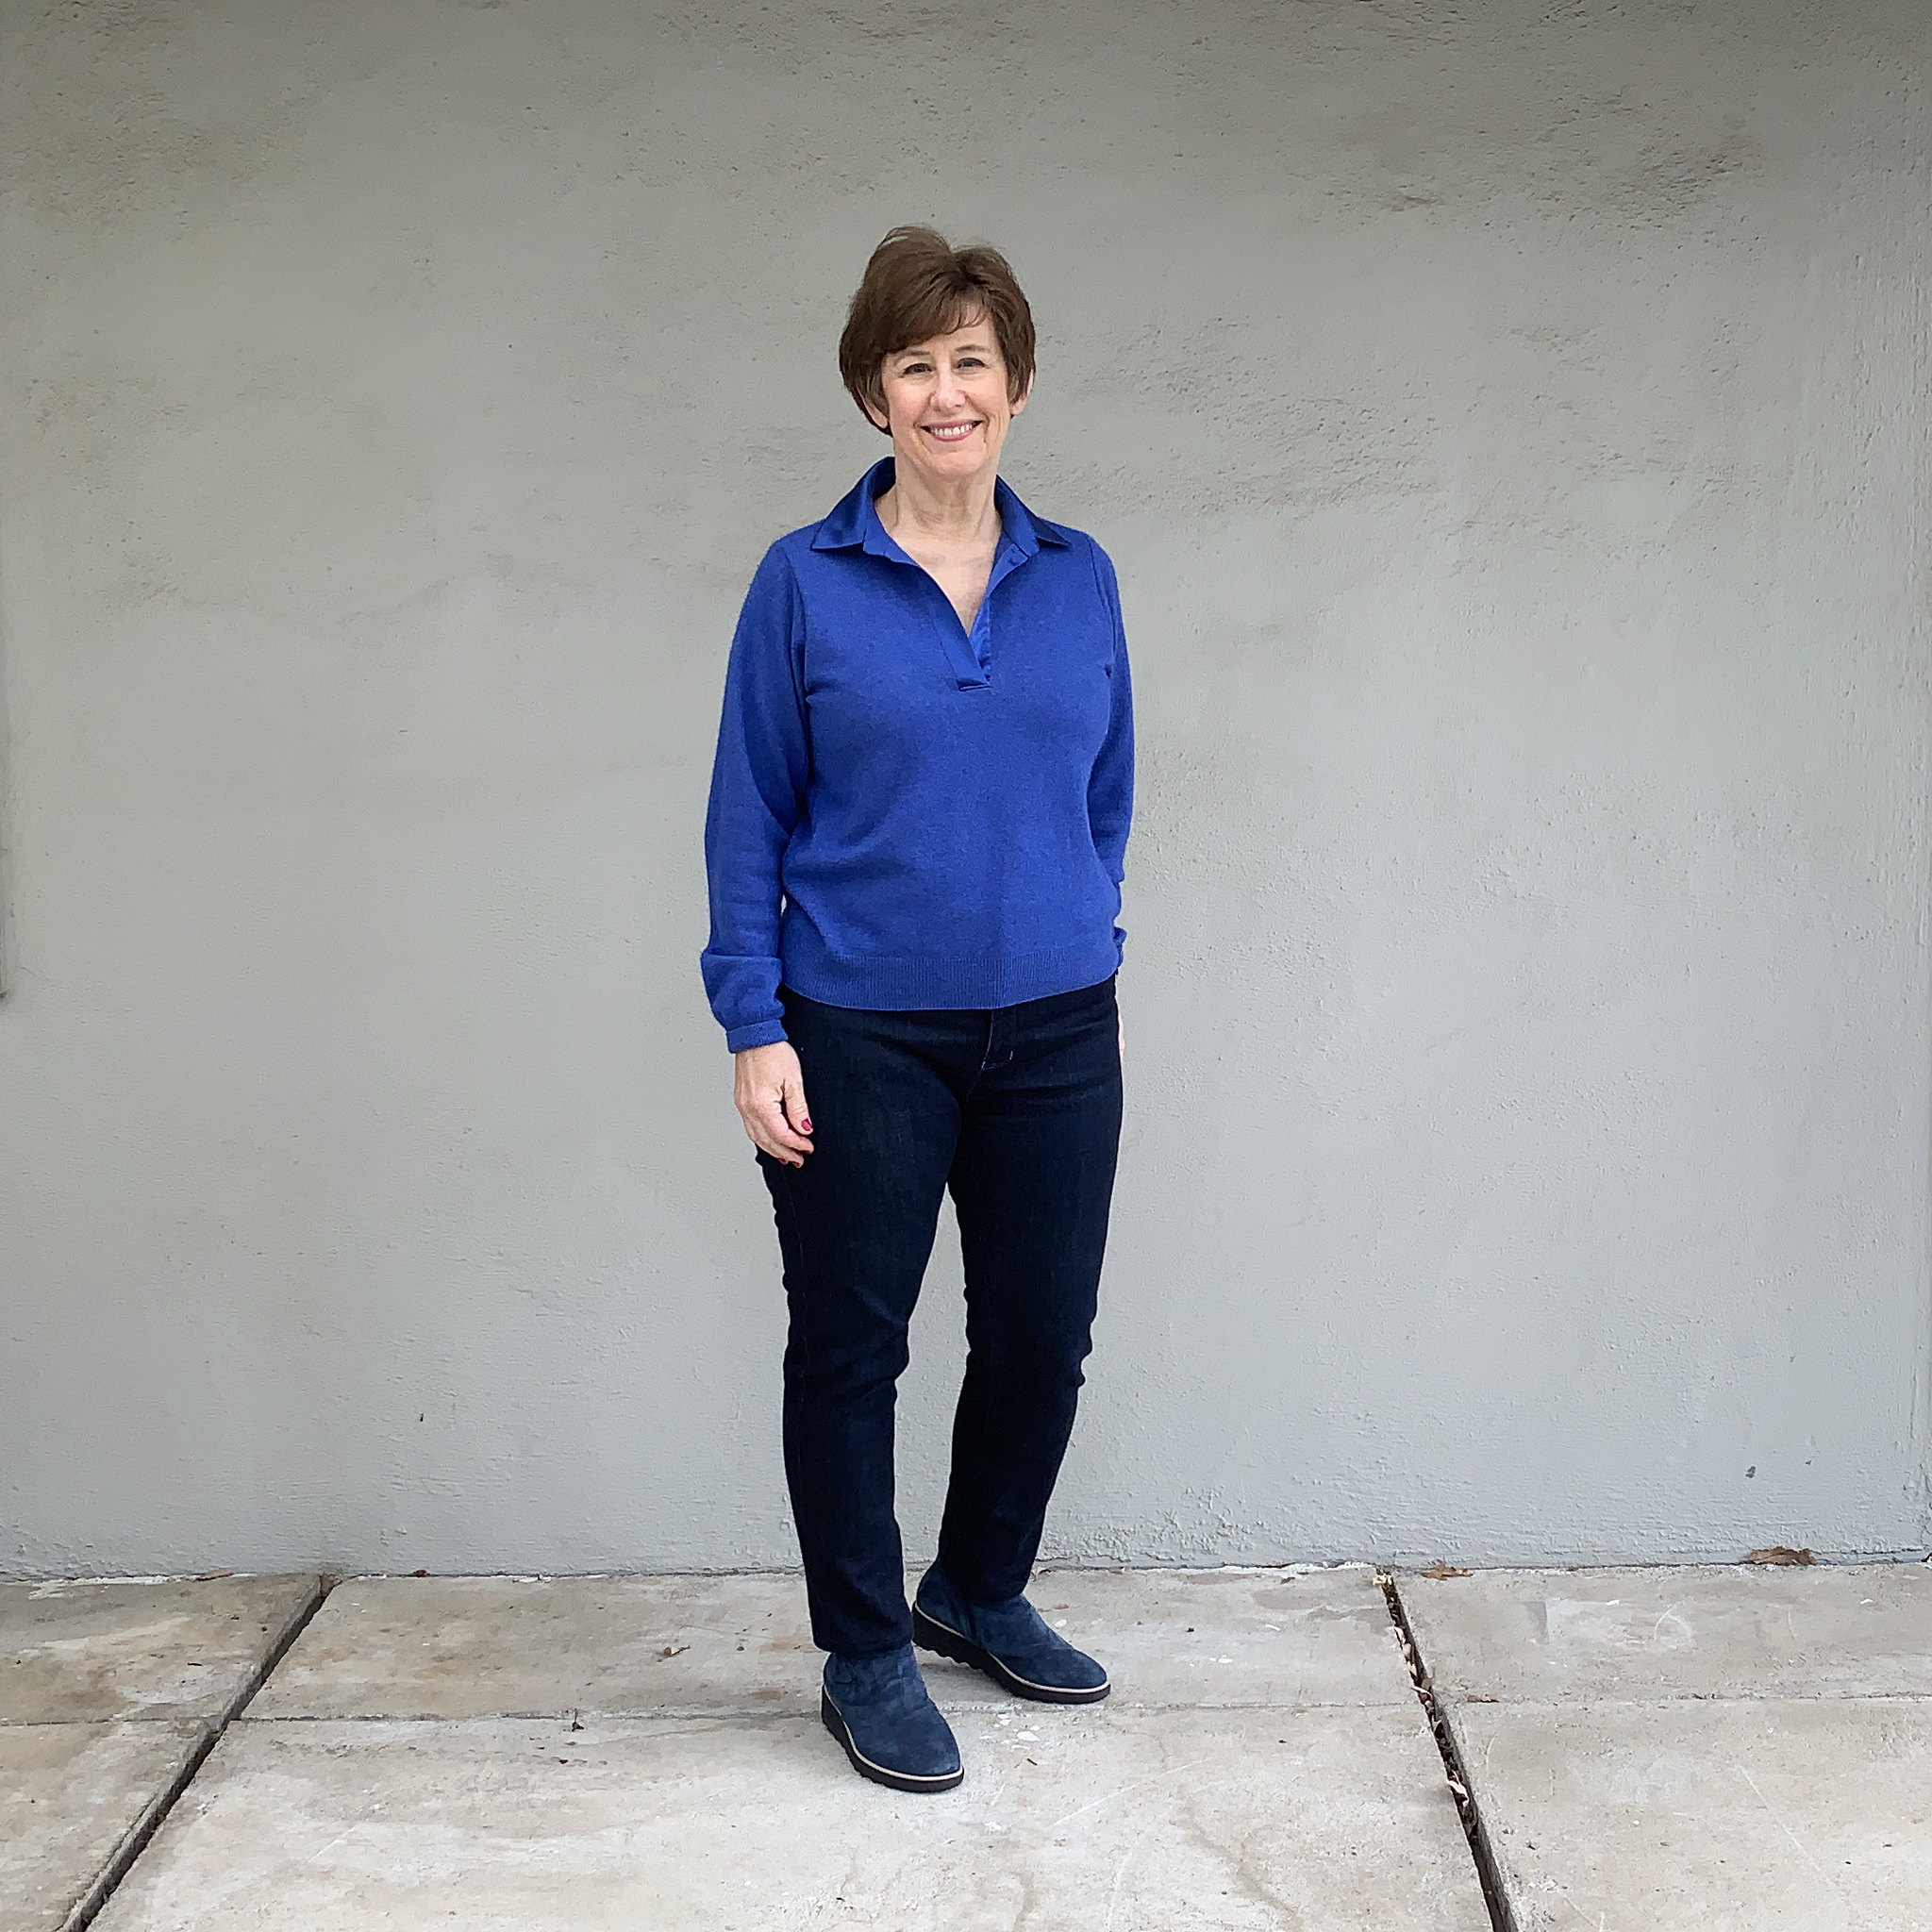
Worn with my favorite pair of Ash jeans. That pattern certainly has provided value as I think I have made 10 pairs at least and another corduroy pair is on the to-do list. 

I'm really happy with my slouchy, soft and very blue sweater remake. If you have been following me on Instagram you will know that I am doing another project that is in the reuse-recycle category. I'm making a coat only using remnants of wool from other projects. It started out just a personal challenge but is turning out to be one of my favorites and I will do a blog post soon on that. 

This weekend I'm teaching an in-person 2-day Chore Jacket class for Hello Stitch Studio. After that we are working on what to offer in the spring, any suggestions?

Happy January Sewing,
Beth

As you can see in the image above, the garden is pretty blah this time of year and involves a lot of weeding and raking of the never ending leaves. So here is an image of a summer dahlia to remind me of what's to come. Also I moved all my dahlia tubers to a planter box and I hope to have a nice concentration of blooms there in the summer.

red dahlia 2023

Wednesday, February 19, 2020

Red plaid wool coat Part 2, bound buttonholes and other details

Onward with my red wool coat that I started in the previous post. I need to finish it the next day or so as this upcoming weekend we have the Bay Area Frocktails event and I might as well wear it then. Because winter is fleeing fast, it's barely coat weather anymore. Just days of sunshine, which might sound nice and it is, but as usual we need the rain.

A downside of having the flu was that I certainly couldn't go out and buy buttons, so I boldly just made them and figured I would find an appropriately sized button later. Which might turn out to be easier said than done...I did stop by Stone Mountain on Sunday but didn't see anything that looked good with this coat. I have a specific thing in mind which is often trouble when shopping. In any case
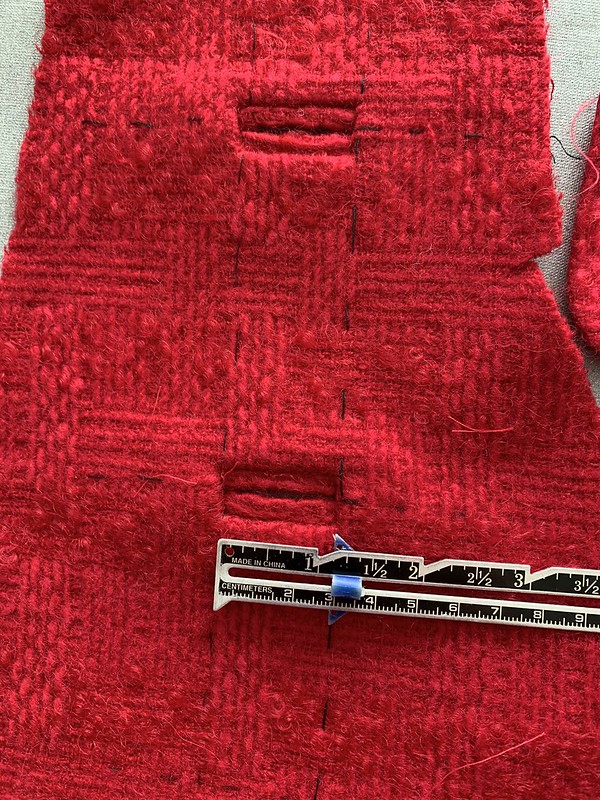
the buttonholes are done. I chose a dimension that I thought looked good with the proportions of the coat. They are 1 1/8" wide and the welts are 1/4" wide.
IMG_1989

Shown above is my tester. I always do two of them, spaced the distance apart that I'm planning for the coat or jacket so I can see proportions, how they look when completed. I'm a bit of a Goldilocks when it comes to details like this, never use the markings on the pattern and just play around with spacing until it looks juuuuuust right.

With a coat like this with a waist seam you have to take that into consideration, and also the collar area. So I start just under the collar, and also decide where near the waist I want a button, and then work my way from there.

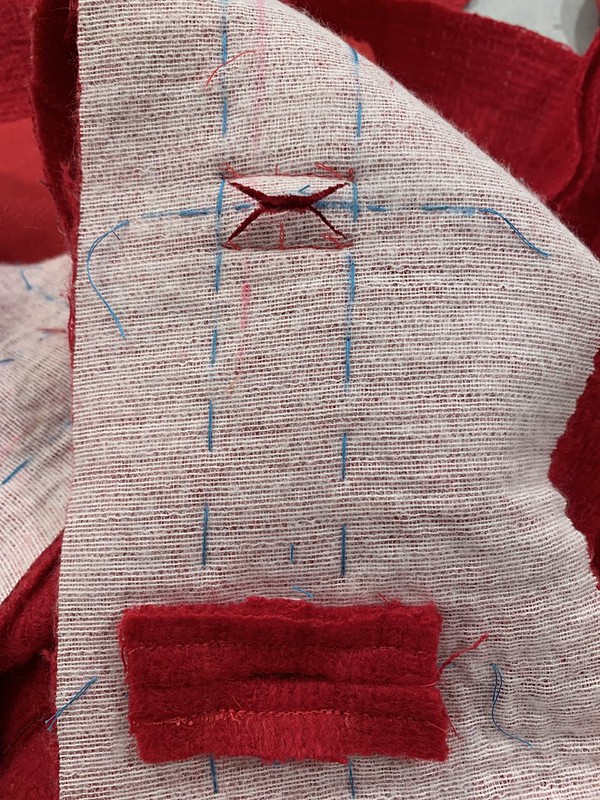
Once I've decided spacing, then it's time to mark the buttonholes. I do it very similarly to a welt pocket, additionally creating what I call a thread ladder so the placement is even from the edge all the way down. Note I've marked the edge seam allowance stitch line, which is 5/8" in from the edge, and then the second red line is the coat center front. The buttonholes should cross over the center front a bit, between 1/8" and 1/4". Depends on the size of button and the thickness of fabric.

IMG_1990

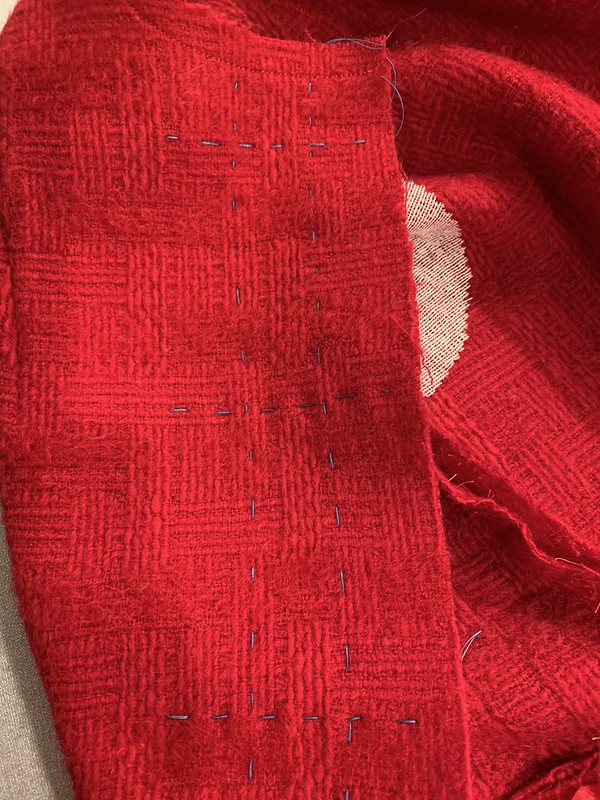
Once it is marked in pencil or chalk on the inside I go over each line with a thread trace. Using a very contrast-y thread color. This is going to be used on the right side so that's why the contrast is important. Mostly I use silk thread for this as it pulls out so easily. No knots, just running stitch along the lines.

Shown below, this is what you see on the right side, the blue thread ladder which makes it possible to place all the buttonholes accurately and evenly.
IMG_1991


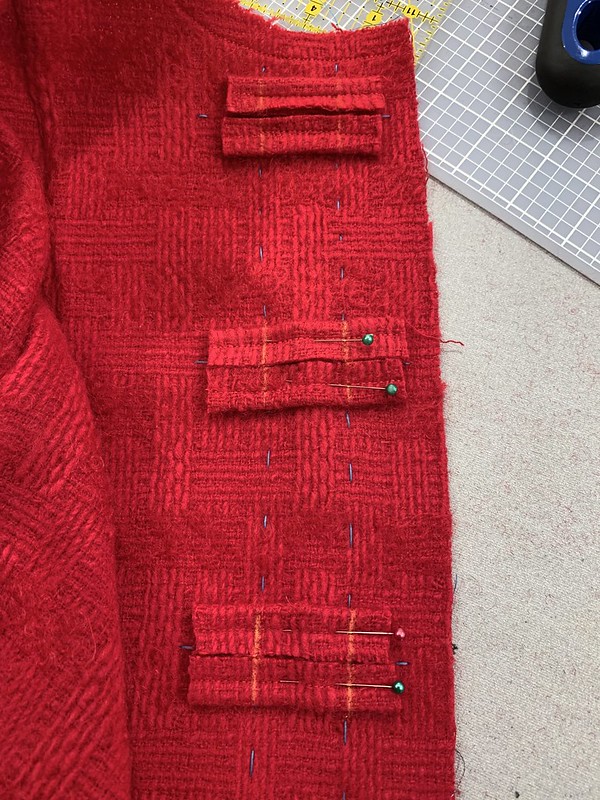
Next step is placing the welt pieces across the button placement marking. I neglected to take a picture when I sewed the welts. I've found that it's easier to start with a length of fabric, about 1.5" wide, press in half with a good crease, then stitch 1/4" in from the folded edge, and then use the rotary cutter to trim the other side so the finished welt is precisely 1/2" wide.
IMG_1992

The welt pieces are placed across the button markings, and then the ladder part of the thread trace is used to make the chalk marks which show where to start/stop stitching the welts.


IMG_1993

Then I stitch them down, right on top of the existing stitching, reversing at the ends and then tying off the threads in knots. (which may not be necessary but that's how I started doing it so I continue :)
Also I've found that using the open toe foot on my modern sewing machine is really helpful, the regular foot has a bit of plastic in the center that while clear, doesn't really let you see where the needle is going. On my old Singers I do love the straight stitch foot, you can always see exactly where you are stitching.

Next it's time to boldly cut open the buttonholes. I say boldly but I really mean carefully and precisely!

IMG_1994

They are cut just like a welt pocket, but in miniature. It's extremely important to make those little triangles big enough so that you can stitch them down at the sides of the buttonhole. I tend to mentally divide the length of the buttonhole into thirds and then have each triangle a third of the total length. With tightly woven fabrics you have to cut very accurately all the way to the stitching, with loosely woven fabrics such as this one it's better to cut where it looks correct, and then flip it over and see how it looks on the right side. Because the loosely woven fabric tends to unravel a bit so it's best not to overdo the cuts. At this point I give it a good press on the wrong side and would probably trim off the ends a bit although not necessary at this point.

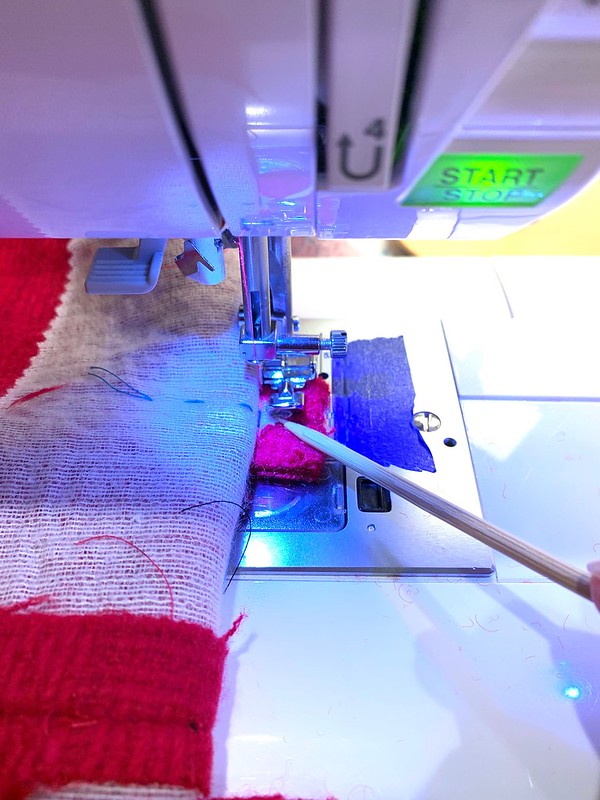
They were all finished, pressed, basted shut and I was feeling pretty satisfied with myself when I realized that I hadn't sewn down the edges. Duh! I blame the remnants of being sick for my brain fog. But fortunately I did remember, see below. A wooden kitchen skewer makes a good tool for holding that little triangle bit in place as you stitch, with the zipper foot to get close to the edge.
IMG_1998


Ready for more?  Now it's time to deal with the facing at the back of the buttonhole. I don't like the windowpane method, it seems like extra work plus how can you get it to match exactly to the buttonholes in the coat or jacket front? I see a lot of people using this method but I prefer to cut and hand stitch the facing.

Here's the coat with the collar sewn on, and the facing attached. But before I trimmed the seam edge along the front and on the collar.

IMG_2003

So here is how I do the back. Once the front facing is pressed I might baste that edge with silk thread just to keep that crease (which I did here).  Then the most important step is to baste around each buttonhole so that the facing is locked against the buttonhole and can't shift. (yellow thread circles below). This is the right side of the coat. Button welts are basted shut also.

Red wool buttonhole2

Then the fun (ha!) begins.
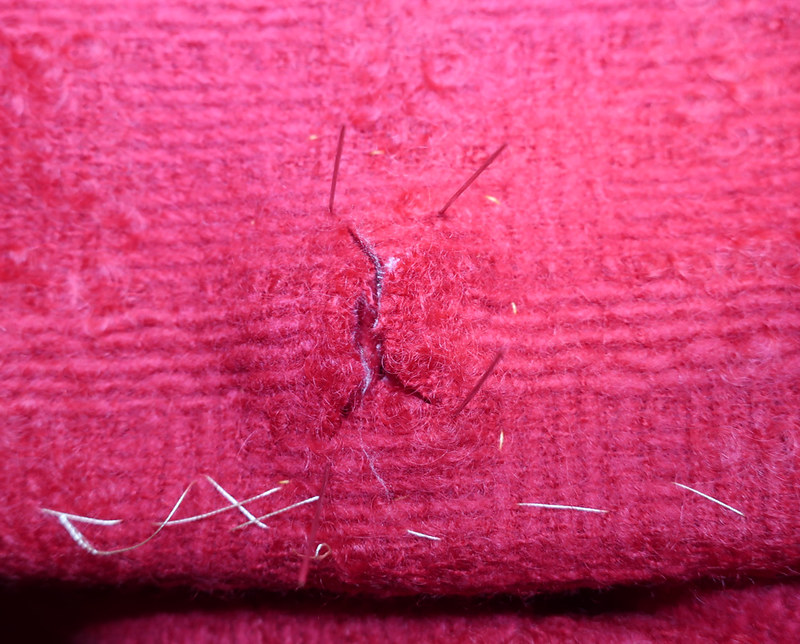
From the right side I poke a pin through each corner of the buttonhole. Then I snip a similar triangle cut on the facing, which will be turned under and hand stitched. Of course at this stage it's really important NOT to cut the button welts.
Red wool buttonhole4

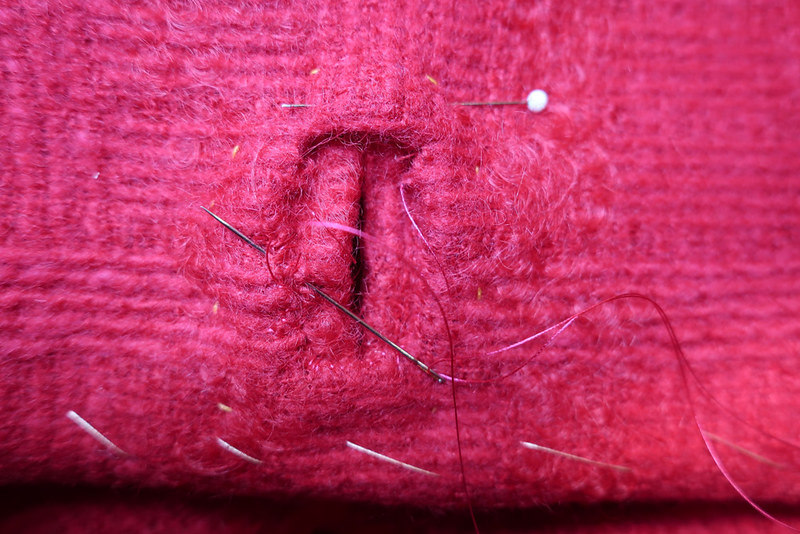
Once the facing is cut open I slip the four edges inside and hand stitch them down to the edges of the buttonhole. In this thick and loosely woven fabric the hand sewing doesn't show. I think hand sewing is something you get better at with practice, like anything else, over time you learn how loose or tight to pull the thread, a lot depends on the fabric you are working on. Also how to bury the stitches so they don't really show.

Red wool buttonhole5

Here's another look.  I think in this one the three sides but not the top are sewn. By the way it makes me crazy how every photo has a different color.
Once it's finished the sewing is robust and then with a good press it is nice and smooth.
Red wool buttonhole 1

So that's the latest on my red coat. This might be more than anyone wanted to know about bound buttonholes but since I took all the photos I figures I might as well write it up.

Another result of my being stuck in the house is that I rummaged through my lining stash and came up with this pink satin which is a perfect weight for a coat. And a bold color choice but I think that now I like it.

As usual, I kind of free-form the lining, using the coat pattern pieces, and trim away at the front in order to match it up with the facings. Hand stitched in as the facing is tacked down already. Plus I'm a  hand stitched lining fan.

Red wool coat lining1

That's Part 2 of this coat, onward to finishing the hem tonight and then time to move on to other things. In fact I also stitched up a pair of Ash jeans yesterday as I teach a class this upcoming weekend at Hello Stitch and wanted to refresh my tired brain on the zipper fly construction. Which always comes out perfect with that Ash jeans pattern/instructions.

Happy Sewing,
Beth

Today's garden photo is a throwback to 2018 when this red rose was in bloom. I just looked at it today and it has all kinds of new growth so I'm hoping for some great blooms again this year.

IMG_0167


Friday, January 24, 2020

Plaid flannel shirt and a fabric flub

Organizing my fabric stash can be blamed for this fabric pairing which didn't turn out quite how I expected. Along with a lot of other people I decided to reorganize my fabric, see what I actually had accumulated and perhaps get rid of some stuff. To my surprise I found this plaid flannel which I think was purchased last year at the same time, at Joann's when they had one of their typical super discount days. I do like the colors and it's really soft and cozy, however I think my pattern choice took me in the wrong direction. But I have rescued it somewhat and I will wear it.

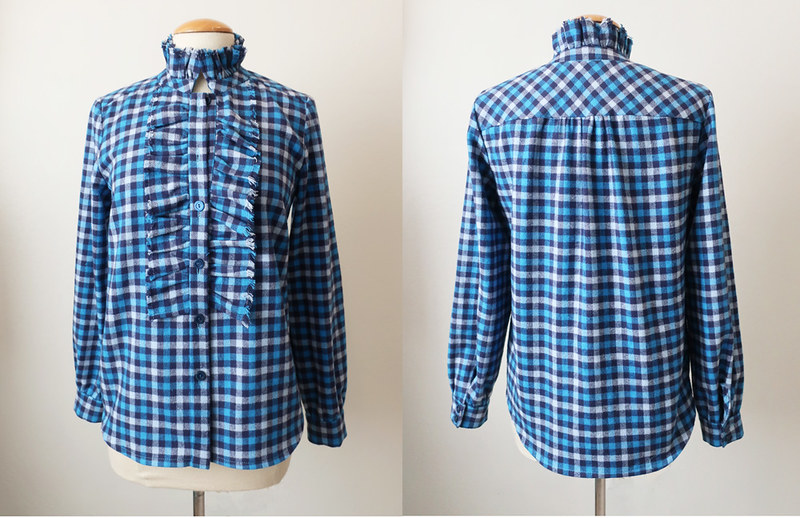
This is the final version but it started out with a bit more ruffle than you see.

plaid flanned shirt 2


Plaid flannel with neck ruffle1

This is how it looked on it's first "finish". I got the bright idea to use the fabric selvedge on the edge of the ruffle parts, so they didn't need hemming or finishing. Which was fine, but this fabric is quite thick so not really suitable for this pattern. The recommended fabrics are things like chiffon, silk, etc. lightweight fabrics that will gather softly.  While we are here let's not mention my wonky edge on the back where you can see the white stripe of the lower back peeking of the yoke bottom. I didn't notice the misalignment until it was all finished and I took the pictures. At that point I thought about opening the yoke and fixing that but at this point I am done. And maybe it's fine to have some imperfections (especially in the back where I don't have to see them :)


Here's the pattern photo, this is Burda December 2019 # 101.  Her hair is obscuring the neck ruffle detail (grrr, why with the poses that don't permit us to see details?). but it sure looks like a lightweight fabric, perhaps a voile.
Burda blouse Dec 2019

Anyway I tried it on and just was annoyed by the neck ruffle, it wasn't really itchy but kind of poking my neck if that makes sense. Also the front ruffle makes the front a bit stiff - not a deal breaker but noticeable.  So yesterday I just got out my snippy scissors and opened up the top seam of that neck band, removing the neck ruffle. I call those my snippy scissors - they probably have a real name but I cannot sew without them - I have about 5 pairs, all that type of squeeze snip. The new ones are super sharp, almost too sharp but I've learned to be more careful. I never use a seam ripper but just snip the threads with those if I have to remove stitching.

plaid flannel removing ruffle

And then once the ruffle was removed I pulled out all the stray threads with what I think is called a "self-locking forceps or hemostat"  Also indispensable  - can't sew without that either. (If I ever lose the 2 pairs that I have I will order more, there seem to be lots on Amazon.)  Then I hand stitched the top back closed, with a little artful adjustment at the center front. Which I'm not 100% pleased with but I've had enough with this shirt.

plain flannel close up front


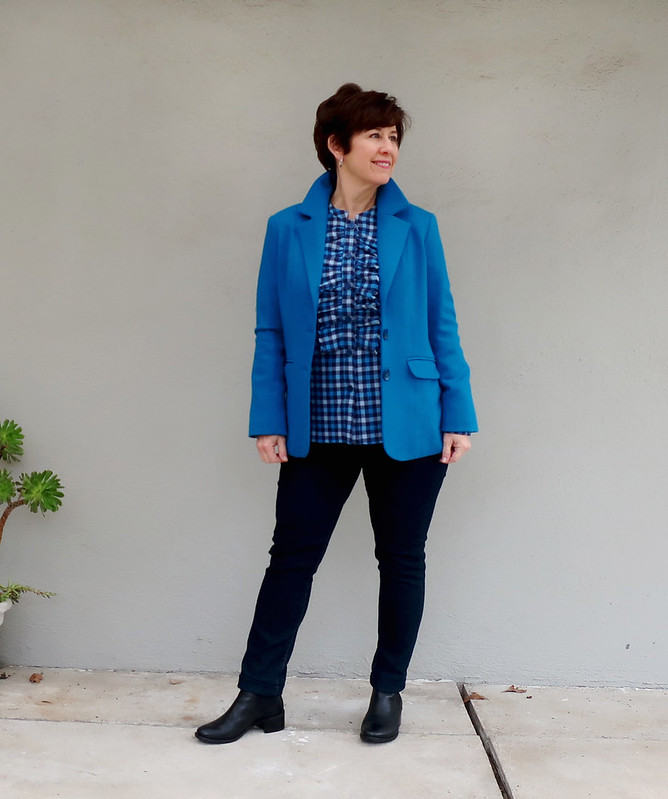
plaid flannel shirt with blazer

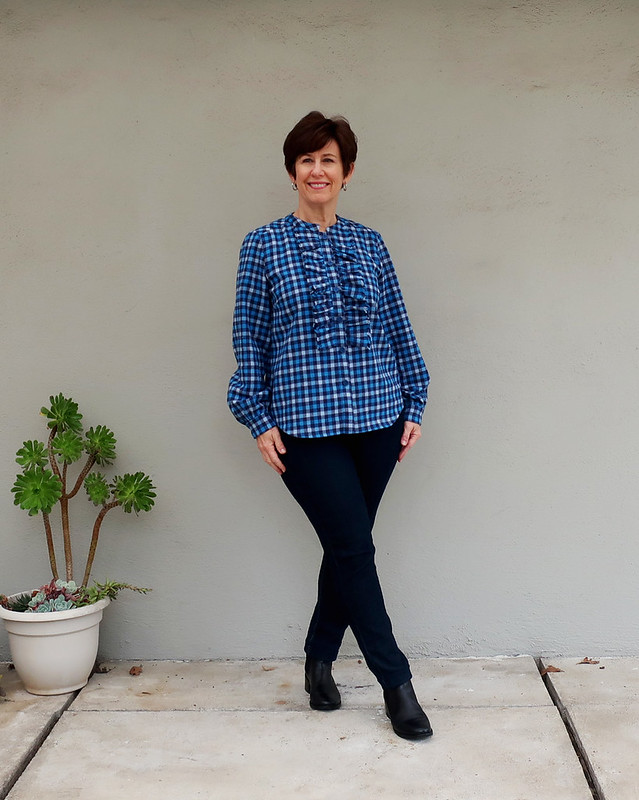
Now that I've taken the neck ruffle off it's way more comfortable to wear, feels like a tunic top really. Plus it coordinates with my new blazer so there is that.

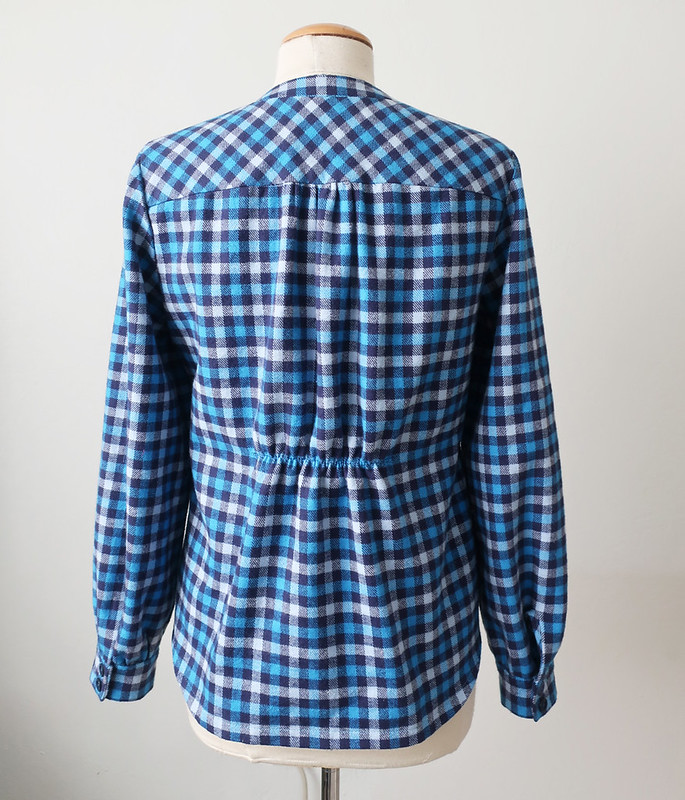
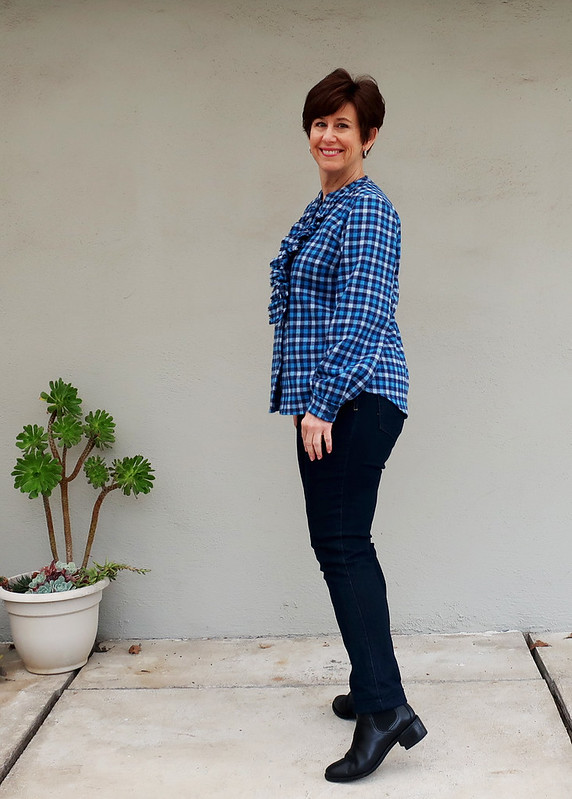
The other change I made was to add a strip of elastic at the waist in the back. It seemed really shapeless and due to the fabric didn't have the flowy look that might be better for a shirt like this. So I added the elastic to give a bit of shaping. I also took it in at the side seams about an inch at the waist tapering out to zero at the hip for a more fitted shirt.


plaid flannel shirt side view
plaid flanned back1

I gathered the sleeves into the cuffs which are a bit wider than the pattern specified. I never use pattern pieces for cuffs, I just make what feels right for the style and fabric. The sleeves are a bit long for my ultra short arms but I like cuffed sleeves to be on the long side, sometimes I wear with turned back cuffs.

plaid flannel shirt 4


plaid flanned button cuff

And buttons - they seem to be making me crazy lately. As I've mentioned they used to stock a nice selection at Joann's but now it's so may plastic-y crafty buttons. What do people do with those, glue them in scrapbooks or something? sheesh. Anyway, I needed 10 buttons and I had 9 matching. The one on the bottom is one of those 9 and then I just rummaged until I found a reasonably similar blue button, sewed it on and called it a day. I don't care that much about one small button and it's certainly not worth making a shopping trip for that. Plus use up what you have! that is definitely one of my sewing mottos.

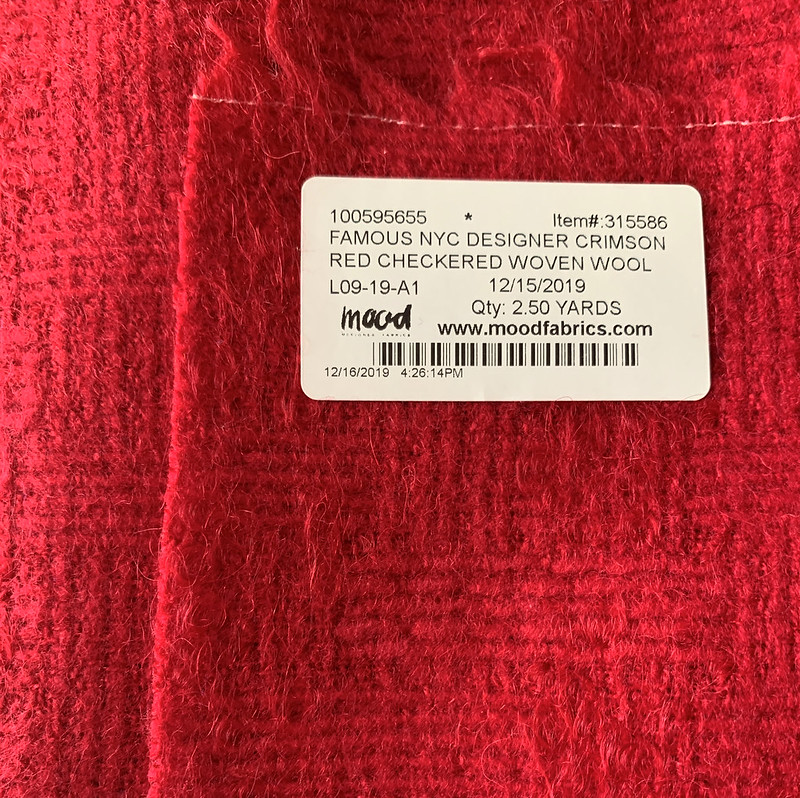
So that's one fabric out of the stash - not the best result but hey - it's wearable and it's warm! Up next I'm finishing that lovely silk shirt shown at the end of my previous post and then I think I will make a coat. I haven't made a coat for myself in a few years and I have some gorgeous cherry red wool from Mood that needs to be a coat by February!


Red wool from Mood

Next weekend is my Jacket Tailoring Workshop Fri pm and Sat/Sun. Which is always fun for me and I look forward to seeing what people make. Although we didn't know when we scheduled it that the SF 49'ers would be playing in the Super Bowl on Sunday!!  Being on the west coast the game starts late so I likely see most of it.

plaid flannel shirt 3

Happy January Sewing,
Beth

spring is coming - the first daffodil appeared this week 😀

First daffodil 2020