Friday, February 28, 2014

Burda 6990 raglan sleeve knit top

More pattern love for Burda. What is happening to me? I am becoming a convert to their patterns after using maybe 2 or 3 during my whole sewing lifetime. But after I made this blue coat from the BurdaStyle Sewing Handbook for myself and then made this coat using an envelope pattern, not to mention my Burda # 106 jacket I am starting to see the light regarding Burda. Who knows what will be next?  Although I do have quite a few Vogue patterns lined up in my queue so it will be a mix this spring.

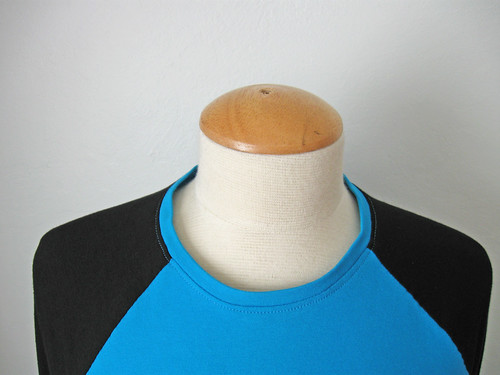
As for this one, it is a simple raglan sleeve knit t-shirt, kind of a baseball jersey style and the fit was great. I decided to use a couple of rayon jersey scraps to test out the pattern and the result was perfect.

raglan tee Burda

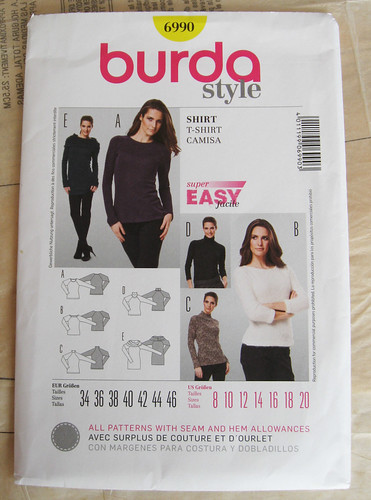
Here is the pattern envelope. I actually went to the store intending to buy a different pattern,  Burda 6910  which is a new pattern, very similar with a slightly wider neckline, and ruching on the side seams. It also has both dress and top versions which is nice. It was out of stock so I got this one instead, Burda 6990 which is very similar. Don't be surprised if I get that out of stock one sometime soon, once I get a pattern in my mind it is a compulsion, I must buy it!

Burda 6990 envelope
I used size 38, and changed the neckline finishing a bit. The instructions were quite weird as they have you turn and press a 3/8" edge, stitch and then sew a ribbon around that edge on the inside to finish. ?? I have never seen that before and I guarantee that will end up with a wonky neckline, plus how to get it over your head? Maybe I wasn't reading it right but in any case I saw no reason to fool around with that. I used my favorite t-shirt neckline method and cut a crossgrain strip to make the neck edge. My advice is to measure on the stitching line your neckline circumference, and then cut a strip that length, and plan on making a half inch seam at the center back. So you end up stretching it a tiny bit all around and have a neck band measuring one inch less than the opening.  Watch this video on the Threads website for a really good explanation and give it a try. 

Burda tee closeup neck

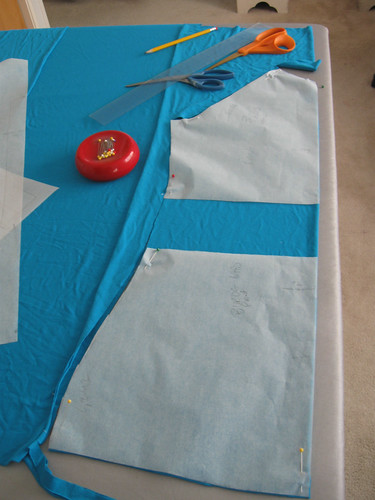
The top may look a little droopy on my dressform but I decided to try to add some ruching at the center waist rather like the pattern I had intended to buy. So I spread my pattern to add some to the front pattern piece only. It worked out OK, but I think I will add a bit more next time and run the gathers in a longer section. 

Burda raglan tee length change

We are in the midst of a big rainstorm, Finally!  and everyone is thrilled. Water water everywhere - although not anywhere enough to reverse our bad drought.  Big garden news, that fluffy white cat who has made a daytime home in my yard actually caught the gopher yesterday and I intervened to put the poor little thing out of its misery. Also my misery as I hope a gopher will not be depleting my flower beds for a while, at least until the next one finds its way here. 
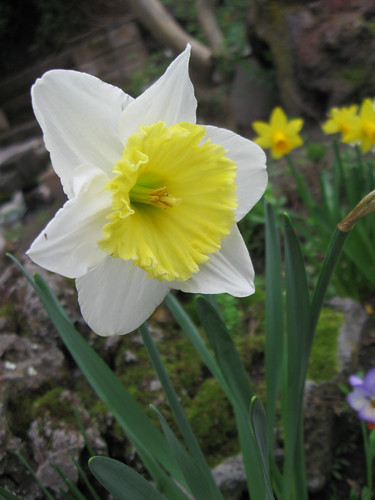
Today's SunnyGal garden photo, a lovely two-color daffodil to coordinate with my two-color top.

white daffodils

Happy weekend sewing, Beth

Saturday, February 22, 2014

Final version: V7975 wool jacket with Avoca handwoven fabric from Ireland

Hello and welcome to so many new readers this month. This project was finished a week ago but I have been slow with my blog posts despite intentions in 2014 to post more often. In any case here is Vogue 7975 made with vintage handwoven wool fabric from Avoca Mills in Ireland. (note: this jacket is not for me, for one of my sewing clients)

Looking at this photo I see a need for a bit more pressing which I have done after I took the pics. This is such a great pattern, very easy to fit and I recommend it if you are wanting to try a first lined jacket. I did stray from the pattern design a bit and lined to the edge instead of any facings, mostly because this wool has the potential to be so itchy and I prefer lining against the neckline.
jacket front4

Whew, it is hard to photograph this color and have it look the same in each image. I am basically a rotten photographer and also very impatient when it comes to taking photos. I have read lots of blog posts about improving your photography - and one recommendation is always to take many many pictures so as capture the one very best one. However I am way too impatient for that and usually snapping away at the end of a project where I want to be done!  After all taking photos reduces sewing time, right? 

Do you love these buttons?  I do, they are just right. Thanks again to Stone Mountain in Berkeley, and their lovely wall of buttons. I took the finished front piece with me so that I could actually see the buttons in the buttonhole and how they the shape and size worked with it. I had intended to make smaller buttonholes but this was as small as could be done in this very ravel-y and springy wool.

close up buttons pocket
I said ravel-y and yet it was a pain to get that fringe to separate. This is one tough wool. 

Inside of buttonholes. There are a lot of variation on bound buttonholes but I prefer the one with the least layers, if that makes sense. So no windows or squares cut. I sew on the welts, slice, turn, and then make the full lining. The very last step is to slice the lining and turn and hand stitch. Using this method you can control exactly were the lining is joined to the buttonhole, I think if you made little windows in the lining and they were not exactly centered over the buttonhole then what? I don't know as I have never tried it. Looking back through my previous blog posts I have not shown the step where I attach the lining so I will have to document that next time I do it. For more details on bound buttonholes here is a post with the steps shown. 

buttonholes both sides

View of lining. It does look a bit bigger but that is intentional in this very fitted jacket, I often make the lining with a smidge more room than the outer layer to allow for a bit of movement. 

inside jacket lining

Side and back view.  Please ignore that big crease in the lower back. Ok now I am chagrined but I did press after these photos. However also note the great lines in this pattern, such perfect fitting sleeves and the princess seams allow for so many fitting options. 

jacket side jacket back

One tiny tip for making patch pockets. As you may know I love my Chalkoner chalk markers and I like to make templates from pattern pieces, and then trace the seam line to make for super simple sewing.
So I made a template from the pocket pattern piece, including the seam allowance and them trace the line so I could attach the lining by sewing on the chalk line and get a smooth even balanced pocket.

pocket template


Here are links to the previous posts on this jacket:


I made this same Vogue 7975 pattern back in October in plaid for myself, so if you want to see a different version and some details on working with plaid, here is the post. I wore this version a lot back in the fall but it was eclipsed by my wool herringbone tweed Burda jacket which is more of a neutral color so can be worn with more outfits. 

Up next some simple and happy sewing, t-shirts and other separates which are so much more useful than a sparkly plaid jacket, right?  I just got an order of super cute knits from Girl Charlee so I am itching to get started on those.

There has been a woeful lack of garden photos and I fear that this year will be a low point for my garden. Despite a bit of storm last week it is dry, dry, dry. No rain and nothing but sunshine. Which may sound good if you are suffering in the latest polar vortex but we will be in trouble this summer. In any event there are daffodils and a few tulips just starting. Also I have a new pet. OK, not really as I am wildly allergic to cats and only like to see them from a distance but for the last month this guy has been putting in a 9-5 day on my garden furniture with occasional attempts at gopher hunting. I wish he would catch that darn gopher which has eaten all my pansies in the front yard. I just makes me laugh to see him out there snoozing on his apparently favorite chair and drink water out of the bird bath.

cat in daffodils

Happy almost spring sewing,  Beth

Sunday, February 2, 2014

Part 2: Vogue 7975 wool jacket with Avoca handwoven fabric from Ireland

Yes, this is part two. Despite my wish to move on to a new project I am crawling along with this jacket. Kind of odd, based on my end-of-year analysis I should be a jacket wizard by now or maybe I am reaching maximum jacket overload?  Which should not be blamed on this one at all, I just love this fabric and next winter will seek out a wool with this two-color weave effect.

Avoca jacket close up inside front

Actually the jacket body is finished, and separately the lining is sewn together so I just have to stitch them together, do the pockets, sew on the buttons and be done. Just that! ha. I spend an hour this afternoon fooling around fringe and patch pockets and finally have it figured out. 

Sleeve scrutiny also overcame me, and I decided there were some wobbles in my stitching so I had to fix those. Here is the sleeve with the wobble. About 2 inches down from the shoulder seam is a distinctive bump. I measure all around the seam allowance and see where it deviates from 5/8" and mark as needed, then re-stitch.
Seam wobble1seam wobble adjustment

this is how it should look, on the other sleeve it came out perfectly first try.

seam just right

And how about a note on hems?  Sometimes on a garment that is A-line, or flares out from the waist to the hip and you are working with a substantial fabric it can be really difficult to get the turned up hem to ease in and not show on the right side. I think the various methods include steam shrinking, or ease stitching but with a princess seamed garment there is the opportunity to take some of that width out of the hem allowance by sewing in at an angle below the hem. I did this on my recent Burda jacket and it worked well.
A little photo editing with colors will hopefully illustrate what I mean which is easier to show than explain. The seam on the left, with yellow is adjusted so that when the hem allowance is folded up it makes the opposite angle as the outside of the garment and takes the extra out of the hem there. The pink lines on the seam on the right show if I don't make that adjustment then the hem allowance will be larger than the garment by quite a bit and it will be difficult to get a nice smooth hem.  It is chalk marked in yellow but I have not sewn that one yet. 

Avoca jacket hem angle

Claire asked how my DYI table construction was going. Here it is, about 85% finished. I used two existing very heavy wood shelves turn on their sides to make the bottom portion. I put four casters on each one so it rolls nicely. Then I spaced them apart and attached a 12" wide piece of plywood to the tops, so that they are stationary in relation to each other. Next I tested out the top plywood to see if I liked the size which I did. Then I covered the big plywood with an old wool blanket which my mom was going to give to the dog rescue shelter  - sorry pups but it was perfect to cover the surface and great to iron on top of. (Idea which was filed away after reading La Sewista blog). I used the staple gun to attach the wool blanket (doubled for two layers) to the underside of tabletop. Next I used 6" angle brackets to attach the tabletop to the white rolling boxes and I have a DIY sewing table. The final cover is ironing board cloth which is actually partly stapled and partly taped as I have to do some trimming in the corners before the final staples. But it is so great, plus I can keep all my ironing accoutrements in the lower parts (sleeve boards, clappers, a small task lamp).

DIY Sewing table
Needless to say I am very happy with it. Total cost was about $90, plywood, casters, wood screws, angle brackets, ironing board cloth. But a bargain compared to buying something that was never going to be just right. The height is 36 inches. I spend most of my time standing so I was really specific on the height I needed. 

Next post will have a finished wool jacket. I swear! and then onward to something springlike. I have a few dress requests and for myself maybe a knit top. Plus I succumbed to spring fever and bought the same J.Crew voile fabric that many did when it was on sale recently at FabricMart. I had intended to order but never got around to it, then it was sold out.  A few days later I saw it at my local favorite store Stone Mountain, in red/white so I jumped on that. 

Happy DIY, whether with a screwdriver or sewing machine, 
Beth