Showing posts with label patternmaking. Show all posts

Wednesday, March 20, 2024

Cloning Ready to wear, copying an interesting top

Last year my friend Heather bought a top from Universal Standard which was really perfect for office wear and fit well.  I think it came in only two colors so she bought both.  One day she showed it to me and said she wished it came in other colors, and actually in different fabric. I took a look and said I thought I could make a pattern from the existing top - without taking it apart. So I did!

Before I forget - we just scheduled a Garment Copy Class with Hello Stitch on Sat. April 13. I haven't done this class in a while and it was really popular back in the day so I'm glad we found a spot on the calendar. 

H silk top front

It's an ideal top as a layering piece, under a blazer or sweater. This version is of a silk that I think I got at a stash sale - I originally made a blouse for myself and still had several yards remaining.  I don't wear much navy blue but as you know if you read this blog - Heather loves it so it was great to use it for this top.  
I will confess that I had to make about 3 test versions of my clone pattern to work out the details of the neckline area. 
Here's a look at the top from Universal Standard. Currently on their website they have a similar one with long sleeves. 
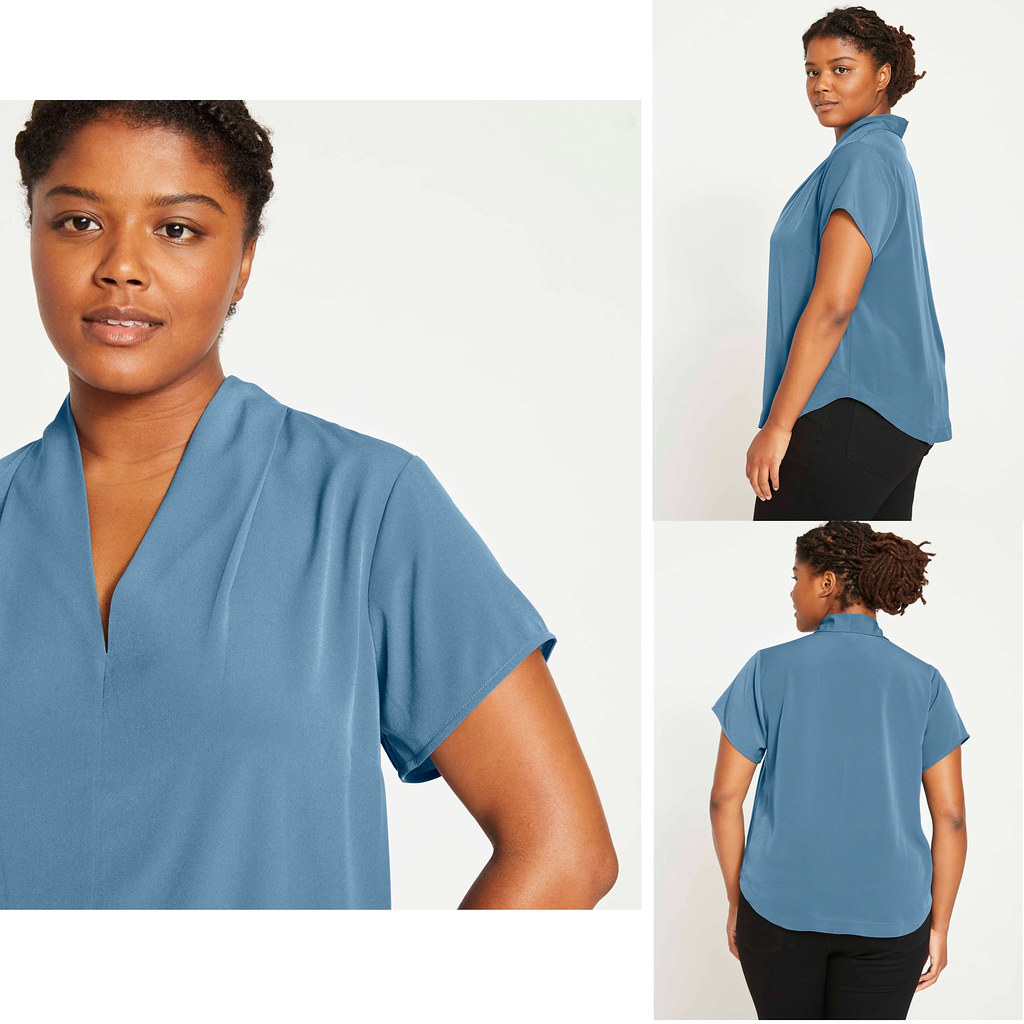
US top all views
Here are the pattern pieces after I find tuned them, made sure all the seams sewed together precisely and with the seam allowances added. I used 3/8" seam allowances on this as that is what the original had, and it makes it easier to recreate that color which is an all in one facing that folds back at the neckline.

US copy blouse pattern piece copy

I think in my test versions I worked out the placement and angle of the dart, which is drawn in in pink on the above image. 
This side view shows the pleat that is facing outward. In essence that pleat is another dart creating some fullness over the bust. At first when I started playing around with the pattern I thought it was similar to a top I made last summer but if you look at that blog post which has the diagram, on that top the pleat opens to the center of the neckline. I prefer this one, it lays on the body a bit better. 

silk dot 8

Here is a closer look at the pattern pieces with the folds at the neckline shown, that's what creates both the pleat and the self-facing which turns to the inside and covers up the back neck seam. 

front pattern piece copy

Here's a look at the inside of the neckline before I sewed the "facing" down to enclose the seam. I did undo the seam on the store-bought top so I could see what was going on in there, and to measure the depth of the pleat. I noticed they had some lightweight interfacing on the pleat section, going a bit past the shoulder seams so I did the same on mine. I think it supports the soft and slippery silk fabric and makes the back neckline lay nicely against the neck. I also put some interfacing at the center front where the center front seam ended, to reinforce that area. I alway worry about over the head tops like this - that is the point of all strain when you are putting it on and the fibers can fray and cause a tear at that spot. So a bit of interfacing is helpful to avoid that. 

silk dot inside neckline

The top inside out on the dress form, the front area folds back and is attached at the shoulder seam, but underneath is the fold that is creating the nice pleat on the outside. 

silk dot4

Another look at the original.

US top full view


H silk top back

Back view on Heather - you can tell she is not very tall as I made the length similar to the ready to wear, and it is a lot shorter on that probably 5'8" model. I actually made another version previously in a silk print we bought at Britex, here is that version. I think it works in solids and prints. 
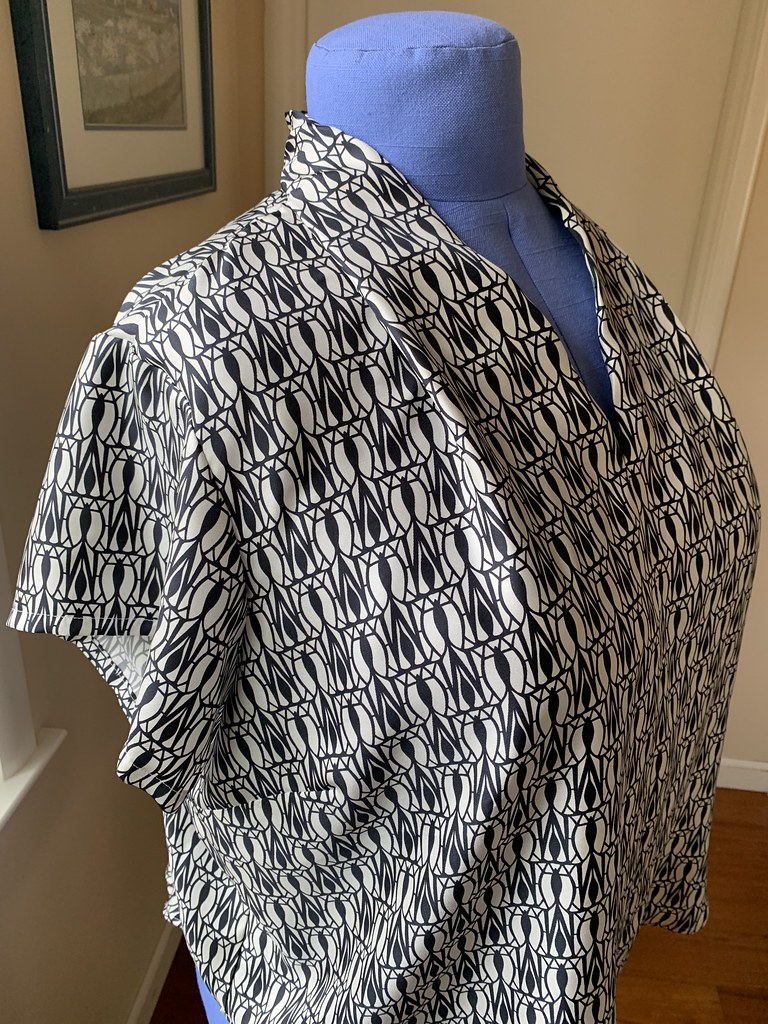
Clone top silk print

So that's the latest on garment copying - it's something I really like doing, it's very satisfying to copy an existing item, for one thing you know you already like the length and the fit. Here's something I copied quite a few years ago - a denim jacket for my mom. And when she wore this pineapple jacket on the plane to Hawaii the flight attendants went wild for it!

Another link to my upcoming Garment Copy Class, on April 13, sign up on that link to the Hello Stitch website. 

Happy Spring Sewing, 
Beth

Another look at Heather in her silk top. This will stand in for my usual garden photo - note that I took that picture on Dec. 12, 2023, and looking at it now I can't believe how much color remained in the garden through December. 
 
H silk top front

Saturday, October 12, 2013

The black denim jacket, final version, Part 2

Yesterday I did a post titled black denim jacket, final version however I ran out of time for blog writing so here is the real final version. In that post I have links to some of my previous posts with details on how to copy an existing garment and make a pattern. It is a really useful skill, particularly as it gives you a fitting shortcut since the original item usually has the fit you want. Even if you don't recreate exactly you can learn a lot by making a pattern from clothes you already own in terms of proportion and shape.

Denim jacket self-draft pattern on me
This is exactly what I wanted in a lightweight denim jacket, something to wear with black pants or prints that included black. I like that the fabric is not a solid but has slight charcoal grey tint and a linen-ish weave. Plus a touch of lycra which is nice as this style is very fitted so the lycra makes it very comfortable and not too tight across the shoulders. I wore this jacket on my vacation to Hawaii where you don't need a jacket in September but I always need something on the plane or airport since the AC is cranked up to ridiculous levels (to me who is always cold).
As I mentioned in the previous post, I made this pattern from an existing RTW jacket that I had in my wardrobe. I made the pattern from that jacket and actually sewed this very fast because the hem length, sleeves etc. were all done exactly as the original, so no measuring, no fitting, just quick sewing and a bit of topstitching. 

Denim jacket black with buttons finished front

Here is the original jacket that I used to create the pattern. The blue denim fabric is a bit heavier and so it holds its shape on the dress form but when worn they look pretty much the same. I never button it, not that type of jacket but it looks nice here so I did. 

Blue denim jacket front buttoned

Back view of new jacket. You can really see the fabric with all the slubs that make it different from plain denim. 

Back view black denim jacket
The original jacket had welt pockets and then pocket flaps that were sewn on above the welts. Which seemed like an odd way to do it, but actually is good because often with thick fabrics and a lot of layers, the pocket flap does not want to lay flat on a welt pocket. So the welt pocket is finished and then the flap is sewn about 1/4" above the welt. 
Pocket flap with button
I did have one oddball issue during construction. I put the sleeve on and it seemed kind of twisted, so I shifted the sleeve head, moving what I thought was the top of the sleeve about 1/2 inch forward. 
In image below, sleeve on left, not shifted and sleeve on right is shifted. Problem solved! I will chalk that up to slight issue with my patternmaking or marking. But happily not a big problem. 
Sleeve discrepancy
A look at the inside, unlined and all seams serged. I played around with the pockets on the inside and did a bit of improvisation, turning the seam allowances inside so there were no raw edges on the pocket bags.

black denim jacket inside out on form
Lastly the buttons. I think they cost more than the fabric for the jacket but that is OK, I am still under about $ 25 total. I brought my fabric swatch over to Stone Mountain and was looking at all the possible buttons but couldn't decide on anything. One of the women that works there came over and took a look at my choices, thought none of them were working and pulled out their latest shipment they had not even put on the shelf. She dug through the box for this exact button and insisted I use them (in the nicest possible way).  So almost $ 16 for buttons but I am very glad I bought these which are an interesting shade of brushed metal. 

Front pocket with buttons and hem
That is the last item for summer sewing, to me the weather is turning chilly (OK I know that is a relative term for all of you in the great northwest or east, not to mention Canada or parts of Europe). So time to change gears and pull out some wools. Confession: I just bought a nice wool tweed at Stone Mountain in a kind of pale plummy mixture, and so far have auditioned a number of patterns from my stash but so far no decisions. 

Happy weekend sewing, Beth

Today's garden photo is gardenias. A big planter box next to the front porch of my house holds 3 bushes so the smell is intoxicating as you come up to the front door. The gardenias in both the front yard and the few scattered around the back bloom profusely in the spring, kind of retreat in the super hot summer months and then go wild again in autumn.  More blooms to come, at least for the next month or so. Intoxicating!

Gardenias in October

Friday, October 11, 2013

The black denim jacket, final version in time for fall, Part 1

Have you ever felt like Goldilocks with your sewing?  I have been feeling a bit like that lately in my quest to make a lightweight jacket from an interesting black denim because nothing has been "just right." For my first version I tried a Simplicity pattern which seemed interesting and you can see the result here in this post. I even tried a new sorta fancy half-lining technique which was fine but not really worth the trouble. In the end I just didn't like the style or fit on me so I gave that jacket to my good pal Alice and it suited her very well.
Then I made the Jacket Express from Islander patterns, which is available via a Craftsy class. While I liked how it turned out that was mostly due to the red color and super soft denim fabric. You can see that jacket here in this post. I also did a review of the Craftsy class here.
But I still wanted a black denim jacket and every time I put on my old blue denim jacket I thought why isn't there a pattern just like it? That question bugged me and then one night around nine o'clock the proverbial lightbulb went off in my head and I realized the answer had been there all along. Right in my closet. So I grabbed that jacket and made a pattern from it.
Here is the original which is a Ralph Lauren dark blue denim jacket I bought at Macy's ages ago, maybe 7 years? and have worn so often. I like it because it is a shaped like a blazer, not a western style in the traditional Levi's blue jacket look (although I have one of those which is even older and I cannot part with, something so great about an old perfectly worn out Levi's jacket).
Blue denim jacket front buttoned
The fabric on on this original jacket is a little bit stiff, so you can see it holds its shape very well and give a nice curve at the waist. I realized that the latest version is much lighter fabric so doesn't have that shaping on the dress form but when worn looks just about the same. 
Here is the pattern I created using mostly the method described in this post. I use a combination of the rub-off method and a some educated guesswork, particularly for the sleeves which I find tricky but not impossible. You can see a fold in the main sleeve part where I had too much fabric on my tissue pattern piece so I folded it out.  Now can I say it, "Look Ma, no muslin". Yes, I confess I was in a giddy mood after I made this pattern and went directly to my fabric and cut it out. No testing at all :)
I do NOT recomend this but I just had a feeling it would be OK. Plus I did walk all the seams, and flat pattern measure against the original to check dimensions. At this point in my sewing life I can look at a pattern and judge that the dimensions look right, checking if the shape of the armhole or collar, the sweep of the princess seam seem correct. That is why I do a lot of adjusting on purchased patterns, in particular my pet peeve - dress patterns with a sleeved and sleeveless version, the sleeveless version is often so clunky and needs refinement. 
Self-made denim jacket pattern

When you make a pattern from an existing garment it is really important to give yourself a lot of guide marks for placement of things, all those notches and dots that we frequently ignore on a printed pattern are sorely missed when you do a self-made pattern. But it is easy enough to create them. Here is an example of the two front pieces and the collar.
Detail view self made jacket pattern

And this is the shoulder seam, I marked a dot where the front princess seam matched with the back shoulder seam, which may seem unnecessary but every little bit helps.
IMG_0008
For interfacing I used Pro-Sheer Elegance Fusible, not sure if it was the lightweight or the medium weight but either way that stuff is the best and pretty much all I use now.
My sewing tip for this jacket is to press all the seams open before you press them flat. I hope this photo shows what I mean. That is the collar where I have trimmed the seams down to about 3/8 inch and then press open before turning right side and pressing the flat collar. If this were a wool jacket I would grade the seams but on this type of thin denim it is not really necessary. 
Pressing collar seams
OK, I am going to do it again, leave off here with a sneak peek. I just looked at the clock and need to get moving. I will try to post the finished jacket tomorrow.
Front pocket with buttons and hem

happy sewing and I hope you can stay out of the fabric stores - Halloween is just around the corner and their are some frantic costume makers shopping this weekend and next!
Beth

Today's SunnyGal garden photo is the lonely apple. Just three or four on the tree this year, it barely bloomed which was a complete mystery. And there is the colony of bees living in it so it should have been covered in apples. However it is a good thing because the apples are terrible and make a big mess. Thus I can admire the lonely apple and appreciate its pretty color knowing there are not hundreds to pick up!

the lonely apple

Tuesday, May 22, 2012

Color Blocking, Part 2 of how to adapt your own pattern

The previous post showed how I take an existing dress pattern and make new pattern pieces to create a color block look. Now it's time to do some sewing. I will show the sequence only on the back of the dress, but sewing the front is the same as the back. Easier, as there is no zipper to match there!
Before you do any sewing, some preliminary steps.

  1. Interface all the band pieces.  I didn't do this on my first test dress, and found it really needs it.  
  2. Mark all the dots on the pattern pieces. Matching the dots on the band and dress insures that the band pieces lay smoothly and the curves fit together properly.
  3. Stay stitch all the edges of the band pieces and the dress pieces. Since we are going to clip the curve, this is necessary, plus it keeps the band pieces from losing their shape.
OK, finally some sewing!


Step 1: Clip the curve on the band piece (the convex curve). 


Color Block part 2 step 1

Step 2: Pin the band to the dress piece, matching the dots. Stitch the seam.

Color Block Part 2 step 2

Step 3: Trim and clip the seam, press seam allowance toward the band. Now it's starting to take shape.

Color Block Part 2 Step 3

Step 4: Similar method for the upper band.  Clip the band (convex curve). Here it is shown on the fabric right side, so you can see how the dots match up (marked with tailor's tacks, yellow thread)
Color Block Part 2 Step 5

Step 5: Same as Steps 2 and 3 above, pin and stitch seam, then clip and press toward band.
Color Block Part 2 Step 6

To finish, use the same process for the front of the dress, doing the side bands first and then the neck band.  Of course if you have designed a different color block it may be different.  Another color block look that I like is horizontal bands of color and that is a little easier to work with. To do that, divide your pattern into separate pieces, add seam allowances and sew together.

And now we come to a slightly less fun part of this project, the zipper. For any zipper that bisects pattern pieces you want the lines to match up, but it is so much more noticeable with the color block layout. I was pretty happy with the result, although I didn't get it on the first try.  My method for this type of zipper is to just sew the top 5 inches or so on each side of the zipper, get that intersection point just right, and then proceed with sewing in the rest of the zipper. No need to rip out the whole thing if it is not right. Definitely another reason I don't use an invisible zipper foot.  To see how I do the invisible zipper with a regular zipper foot, check out this post. 

Color Block Part 2 Step 7
Normally on a dress like this I would apply the facings (which are matching bands with no interfacing) however I wanted to put the zipper in right then. Once the zipper is in then you can't pull through the shoulder seams.  Here is a look at the facing.  I used the regular facing for the dress.

Color Block Part 2 Step 8
So here is the finished dress, side view and front view. That is another spot where the seam has to match, under the arm where the bands meet again. For a simple dress there are lot of little details to consider!

Color Block Side ViewColor block blue dress bodice view

Anyone interested in trying to adapt their TNT pattern with this style of color-blocking?
It's a great way to get more mileage out of a great fitting pattern with a whole new look.


Here is the previous post, on how to make the pattern pieces.

Here is today's garden photo, not really matching but a very nice spring color, gladioli in front of the pink jasmine. 

Pink gladioli

Saturday, May 19, 2012

Color Blocking, How to Adapt your own Pattern

A few readers have asked me to explain how I made the color blocked dress shown in a earlier post, so here is a look at how I adapt an existing pattern to create it. The great thing about adapting a pattern that you have previously sewn is you know how it will fit, the shape of the neckline, etc. so those variables are put aside and you can focus on designing the color blocking.


Color block blue dress bodice viewMy dress in black and turquoise was a bit of a dry run because I had a request to make a dress like this in shades of teal/turquoise.  I just completed it the other day, and took lots of photos during the patternmaking process, so here is the teal blue version.  My details below will show you how to do this style, with a contrast color band around the neck and armhole, but you can do just the neckline or change the width of the bands quite easily.  Lots of possibilities.


So here we go, and excuse the photography, I did edit the images as much as possible so you can see the details.  I will show the steps to make the pattern, and then my next post will give some sewing details.  I have only photographed the back pattern pieces, but the process is the same for the front and back.  I suggest using a very simple sheath dress pattern that has a nice fitting neckline.  This teal dress and my first version are in rayon-blend ponte knits, which are perfect for this and a good choice for testing this out.


Step 1:  Trace your pattern piece. Mark the straight of grain lines. Here I am just working with the upper part of the dress back, and then I will overlay it on the pattern when I cut out. I suggest you use the waistline on the pattern, draw that line horizontally across the pattern and then use the top part you create and the skirt portion of the dress.  Does that make sense?


Color Block dress step 1
Step 2: Draw in your seam allowances.  I find this is really helpful so I can visualize the width of the bands when it is finished.
Color Block dress step 2

Step 3:  Draw in the bands.  For this style, do the neckline band first, and then the armhole bands. I decided on 2" wide for the bands, it seemed to create the correct proportion.  If you can see on my notes, I adjusted the neckline band to be a smidge wider, 2 1/4 inches, as I didn't want it to end too close to the shoulder seam.  Draw in the straight of grain lines on the 2 band pieces (parallel to the original straight of grain line)
Color Block dress step 3

Step 4: Draw in the modified dress back, shown outlined in green. In this step,you are drawing the seam allowances, so the back dress piece will be stitched on the black pencil line, and cut out using the green line.  At this time I also make some marking dots, which really help when matching the pieces for stitching.

Color Block dress step 4

Step 4: Draw in the shapes for the bands.  Neckline band is shown in red, and side band is shown in turquoise.  So now it looks more like pattern pieces, you can see where they will match and be stitched together.

ColorBlockdress all 3 sections

Step 5: Trace off the separate pattern pieces.  Here I am tracing the neck band. Be sure an mark the dots.

Color Block dress step 6

Step 6:  Trace the remaining pattern pieces.  I find it helpful to trace in the colors I used to design the pieces.  Colored pencils are my new favorite sewing tool :) Be sure to trace your straight of grain lines on the band pieces.

Color Block dress step 7

Step 7:  Double check your pattern pieces.  I overlay them on my Step 4 tracing paper to verify that they fit and match. Here they are side-by-side so you can see the finished pattern pieces.

Color Block dress step 8

Step 8:  Repeat for dress front.   

Give it a try!   Next post I will show the steps for sewing.

And for this dress in shades of blue, a photo of something new in my garden, Delphinium.
I took this photo around 7pm, when the two tones of blue really pop.  It almost doesn't look real, but the flower petals are both blue and purple. Maybe a new color block idea?

Delphinium

Saturday, October 8, 2011

Liberty of London shirt - finished

I just realized today that I hadn't posted any pictures of the finished blouse.  I made this blouse for someone who bought the fabric when traveling in London earlier this year. To recreate her blouse, I made a pattern from a ready-to-wear shirt she had, and then made a test version in gingham.  After that I had my unexpected break from sewing - so this one has been in the works for a while.  Here is the finished blouse. This fabric is a dream to work with, so crisp and yet lightweight.  Now I see why these cottons are famous.


Liberty_blouse_done_1

I just noticed in the blog post title I called it a shirt, yet in previous posts I called it a blouse.
Which is it?  Is there a difference?  I always think of a shirt as a button-down or menswear style, with no darts.   Now I have to do some research on that.  Any ideas?  How do you distinguish between a shirt and a blouse?

Inside is all french seams except for the armholes which I serged.  The back yoke is clean finished on the inside, with no seams showing.  Difficult to see in the photo below as the fabric  is very similar inside and out, but a nice way to do a shirt which has a back yoke.
Liberty_blouse_done_insideLiberty_blouse_yoke_1Liberty_blouse_yoke_2

To do this, you sew the yoke facing to the yoke along the bottom seam, and then lay it open on that seam, as in the photo above right.   then roll the fronts and back of the blouse up, and sew the yoke shoulder seams.  Then you pull the front and backs through the center, basically turning the yoke right side out, and viola, your yoke is enclosed and no seams are showing inside.  Another 3-dimensional puzzle for sewers.  There are a lot of those in garment making, aren't there?


Another view, of the collar and the front pocket, where I matched the stripe effect so it disappears into the print.

Liberty_blouse_done_3

All in all, I am glad to have made a blouse and/or shirt, it has been years.  Inspired by this project  I just made one for myself, different pattern, which I will post soon.


IMG_2109Today's garden photo, a penstemon which is still flowering, and the hummingbirds are still coming around to enjoy its purpley goodness. 


Happy October sewing,
Beth