
So lately we have been trying to work through the collection of blouse weight silks she bought at Britex last fall. They mostly coordinate with the 2 blazer jackets I made for her in the winter, using McCalls 6172 which you can see here and here.
This blouse is Vogue 1412 by designer Rebecca Taylor. Here it probably looks just like the version on the pattern envelope but I did make a substantial change, in that it now buttons down the center front. The pattern is designed as a popover, which goes over the head and has no opening at the center front.


I sewed View B which has gathers at the shoulder and center back neckline. The front V-neck does have some buttons but it is all one piece across the front and then a fold creates the overlap which is buttoned. I can't even remember if it actually opens in the pattern instructions. OK I just looked at them and you do make a working buttonhole closure there but the front is cut on the fold so I think it is just a lot of work for not a real opening. In any case, Heather likes a top that actually opens at the front instead of pulling over the head, and she wanted a hidden buttonhole closure. Well as you might know I LOVE a hidden buttonhole front shirt so that was a challenge I was ready to accept.
Here it is in the finished version and then I'll show you how I got there.

Here's the technical drawing for this pattern. It has two completely different tops in the pattern, which is one of the things I love about Vogue patterns (and this applies to Simplicity, McCalls and New Look as well). Often there are multiple garments in one pattern envelope, sometimes an outfit and sometimes just more than one garment. In any case, for this one I was making ViewB.

Here's the image of the pattern piece from the instruction sheet. It's pattern piece 10 for the front, and it is cut on a single layer and then marked with the fold/pleat lines. However it did have the center front marked so I used that as a starting point to figure out how to change it up.

First I cut the piece 10 in half keeping track of where the center front line was, as that would be where the buttonholes would be.
Then I added seam allowance from the garment edge. Lastly I adjusted the neckline facing (piece 12) which I made continue as a long facing for the center front edge. I changed the grainline on that as well, cutting it on the straight grain of the long section (ignoring the existing grain line).

For pattern size alterations, I did add a bit on the side seams and added length which would have been taken up with a dart, but in trying on a sample garment I determined that a dart was not needed, there was adequate fullness due to the shoulder gathers. (which pattern making-wise is really a bust dart manipulated into shoulder gathers, I just looked through my old posts and I thought I had done a post on this but I guess not, so that will go on the to-do list).
The bust dart was removed on the final version, but I did add 1/2' in extra width vertically that you can see above, just a tiny insurance policy for a full bust.
Here is the hidden buttonhole closure after I made the buttonholes. Actually I sewed them before I attached the facing, they go on the facing and then that facing is sewn to the shirt front, stopping and starting where the opening is to allow it to button. I've done a number of posts that show this and how to do it, the best one if you want to se it step by step is this post where I changed the coat closure to have the hidden buttonholes. I also wrote a post on the Craftsy sewing blog (now Bluprint) and all those articles and tutorials are still there. Here's the link to that post, complete with a color-coded example which makes it easier to follow.

The one thing that kind of stopped me in my tracks was the final line of stitching that closes up the buttonhole closure and attaches it securely to the shirt front.
While I was happy with the way the print aligned across the front (it's not really a stripe or a plaid but the print has something of a horizontal and vertical pattern), I noticed that where I needed to sew down the buttonhole placket was right in the middle of a row of black and cream segments. So using either black or white thread, or one of the other colors would have been noticeable in a way that I didn't like.
To solve that issue I changed the thread on each segment from black to cream, and then back again. It was about 8 changes and it was accomplished about 10 minutes, so not all that much trouble and worth it to get this look. If you examine closely you can see the cream color thread and the black thread. I pulled the tails through and knotted each one so it would stay stitched in place. Yeah, kind of fussy but I was happy with it.
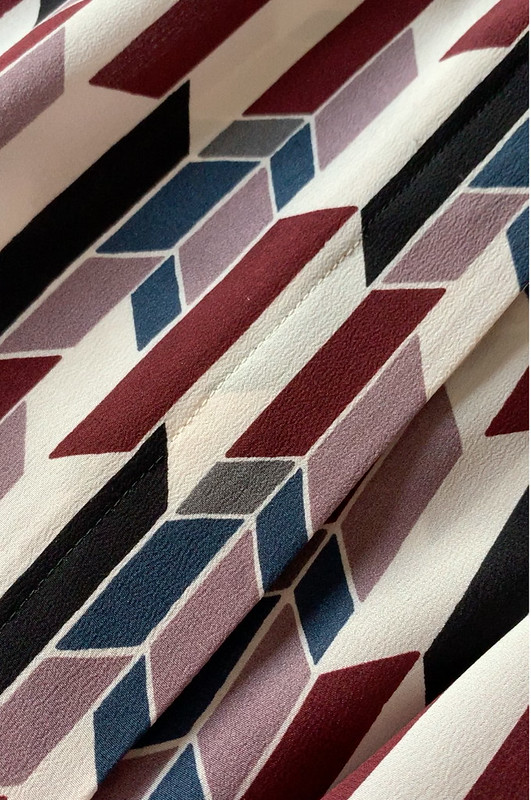
Back view of this top. I really like how the front neck section continues and you seam it in the center back to create the back of the collar. With all this gathering the pattern really requires a very flowy and soft fabric, so silk crepe de chine is ideal and a lightweight rayon woven would be great as well.
And I notice - all my dress forms are so crooked! I think because I'm moving them all the time and am not particularly gentle so perhaps the insides get bent a bit.

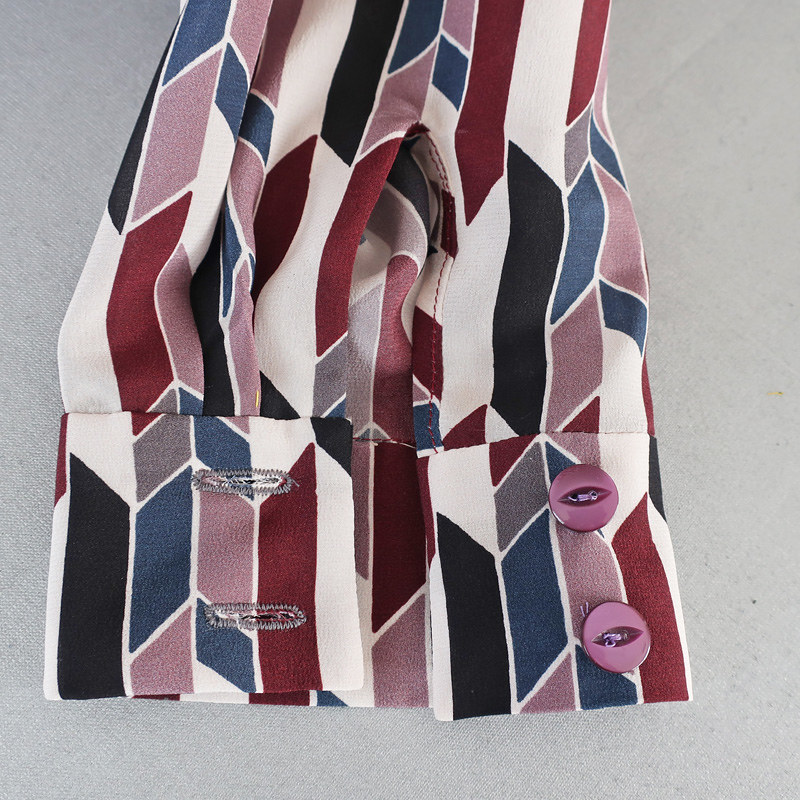
The way the top of the center front curves meant that I couldn't get the top button as close as I would like to the top so I put a tiny snap there to keep it shut. Since the buttons are hidden I used some that matched well enough for the center closure.

For the sleeve cuffs I found 4 other buttons in my stash that coordinated a bit better, and I used grey thread for the buttonholes to make it mostly neutral. I made the buttonholes on my Singer Quantum machine, and they are just OK. Nothing will make buttonholes as well as my old Singer 404 which I could have busted out for this but didn't. On a soft silk blouse I like to use the continues bias binding in self fabric for the cuff opening.


So that's the latest on this Vogue pattern. I so appreciate the emails and comments I receive here and on Instagram saying that you like reading about things I sew for Heather so I will certainly continue. This summer might be about the pattern repeats for her as we have a few things in mind that will reuse patterns. After going to the trouble to fit a pattern I always want to reuse it and see how I can make it look differently by changing up the fabric or styling.
Up next at Hello Stitch, tomorrow will be my Lander pants class (again, I think this is the 5th session?) and we are doing some new classes this summer, including two others that use True Bias patterns (Ogden cami top on Sat. June 2 and Emerson Pants on Sat. June 29). With the Mother's day and Memorial day weekend in May we don't have as many classes scheduled that month. And then some new ones in June, July and August. Here's the link to the Garment Sewing Classes page where these are all listed. Most all of our classes are selling out so if you are interested sign up soon!
May 4: Copy a Garment Class, a few spots still available.
June 1 and June 8: Make your own Jeans, Ash jeans pattern
June 2: Sew the Ogden Cami
June 9: Knit T-shirt class
June 22: Fit Lab: morning, pattern fitting basics, measuring, common adjustments
afternoon, fit your own pattern
June 29: True Bias Emerson pants class, a wide leg pant that works as culottes or shorts
July 14 Deer and Doe Myosotis Dress, including learn to set in a sleeve
July 28: Zadie Jumpsuit from Paper Theory (I'm looking forward to trying this one)
Update: Jacket weekend workshop will be the weekend of Sept 14-15 and we will be making the Jasika Blazer from Closet Case Patterns (however as usual if you have a different jacket blazer pattern you want to do that is OK with me).
What have I been sewing? I just finished another pair of Ash jeans from Megan Nielsen patterns, in a questionable sparkly denim which I will show you soon. Although I will confess I've been wearing them plenty. I want to sew up that ruffle hem dress from the Burda mag and then I just got some great striped cotton for a new T-shirt (Girl Charlee fabric, which I have had great luck with as long as I stick to the cotton/lycra jerseys).
Time to get outside now on this gorgeous spring Saturday. The tomatoes are planted, the roses are blooming and if I could just get the drip irrigation to work properly all would be right with my garden world (the perpetual spring problem!).
Happy Sewing, Beth
This yellow one wins the race for the first rose bloom in my garden. Since I took this picture there are plenty of other blooms as well. They do best this time of year, once the July heat arrives they get a bit tired, as well all do 😊.


Beautiful work. Heather is so lucky to have you sew for her.
ReplyDeleteI learn so much from these posts where you share your process! Thank you; hope you will continue to share.
ReplyDeleteI'm always changing patterns here and there too. Sometimes to suit my own whims or because as we all know, no pattern fits perfectly - uneven shoulders here, a longer arm there, bust darts to high or too low, etc. And I don't think you're picky about thread colors in the front! The result creates an elegant garment, and I love how you used grey for the sleeve buttonholes. Any of the other colors in the blouse would have been a glaring contrast. The grey just subtly "melts" in.
ReplyDeleteBEA-U-TIFUL rose <3
ReplyDeleteAnd I love Heather's top. I remember seeing the start of this on IG. That fabric is amazing and I like the new, functional button front.
I was just looking at lodging options for the workshop. I am so there!!
Stunning! A very nice fit of pattern and fabric. Your garments for Heather are an inspiration because you make complicated garments that fit beautifully which is not often so easy.
ReplyDeleteFabulous blouse Beth! I love everything you make, and your sewing is so perfect!:)
ReplyDeleteThank you for making this a button down and for the instructions on how to do that. I made a test of this blouse and the front is very low on me. So I need to raise it and wasn't sure how to do that. You are very generous with information and it is much appreciated.
ReplyDelete