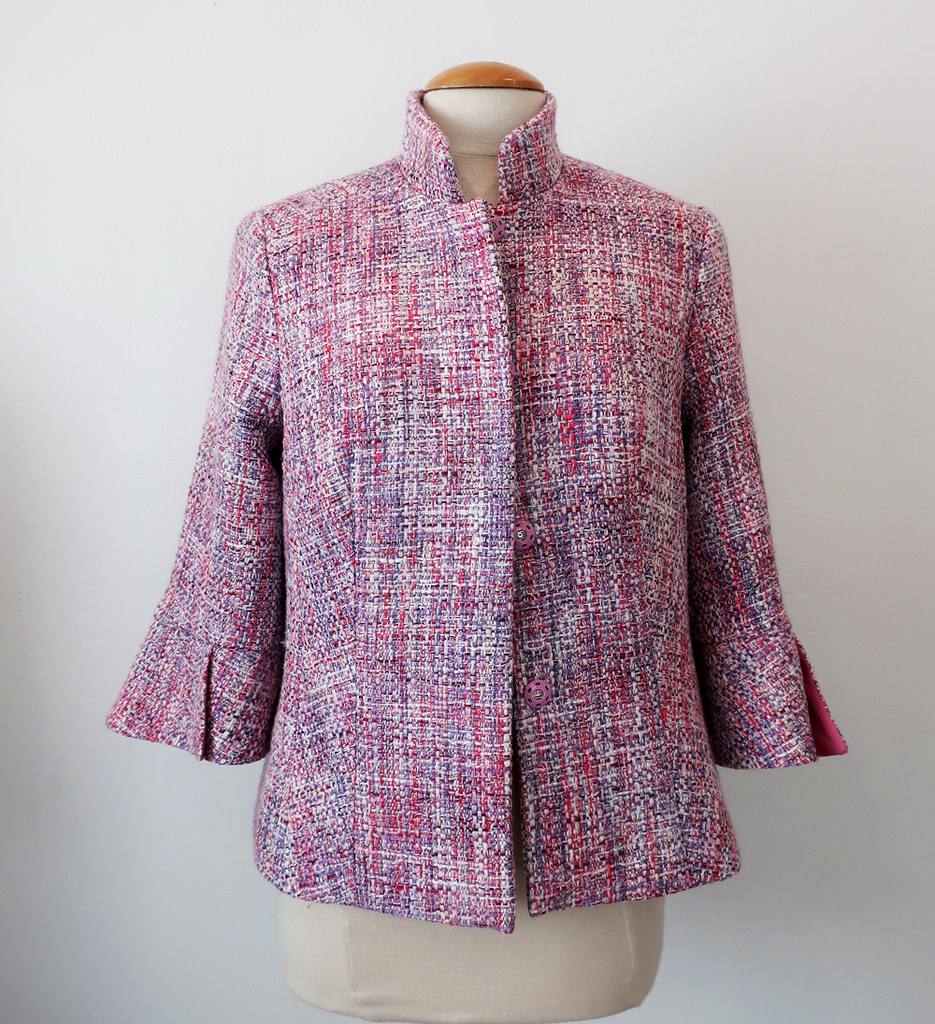
Do you ever have a sewing idea in your head and it comes out exactly as you imagined? I don't really plan my sewing very much, I see a pattern or a fabric and then I figure out what to make. I'm not really a wardrobe planner - that doesn't seem very fun to me, I just go where my mood takes me. But ever since I found this vintage Vogue pattern I knew just the look I wanted and it came out perfectly.
Once we get out of lockdown you might see me wearing this dress all the time! (actually probably not because by then I will have even more random and unnecessary new garments to wear :)
Here is the treasure that I found at a sewing guild stash sale. They often sell patterns for 25 cents so if I see any old Vogue designer patterns I snap them up, more for the fun of a vintage pattern than for any intention of sewing them. But this one I definitely knew I would sew up.
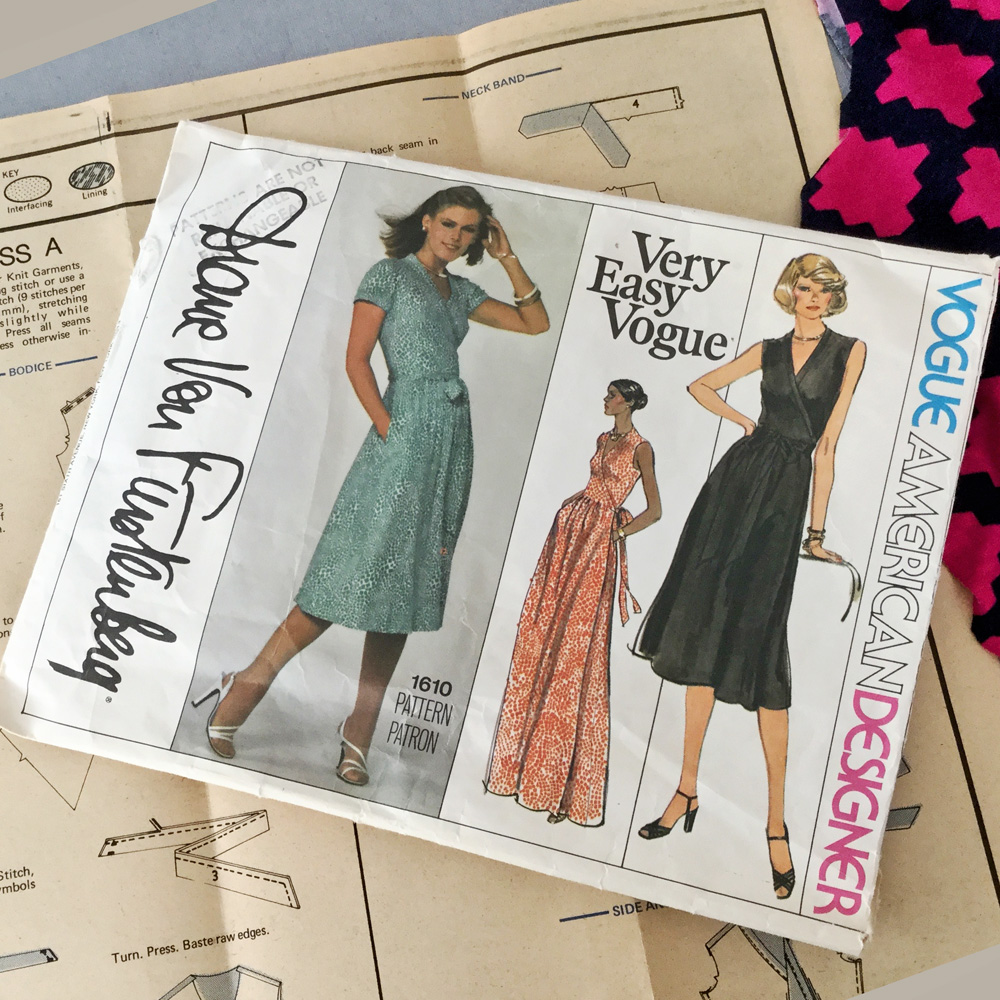
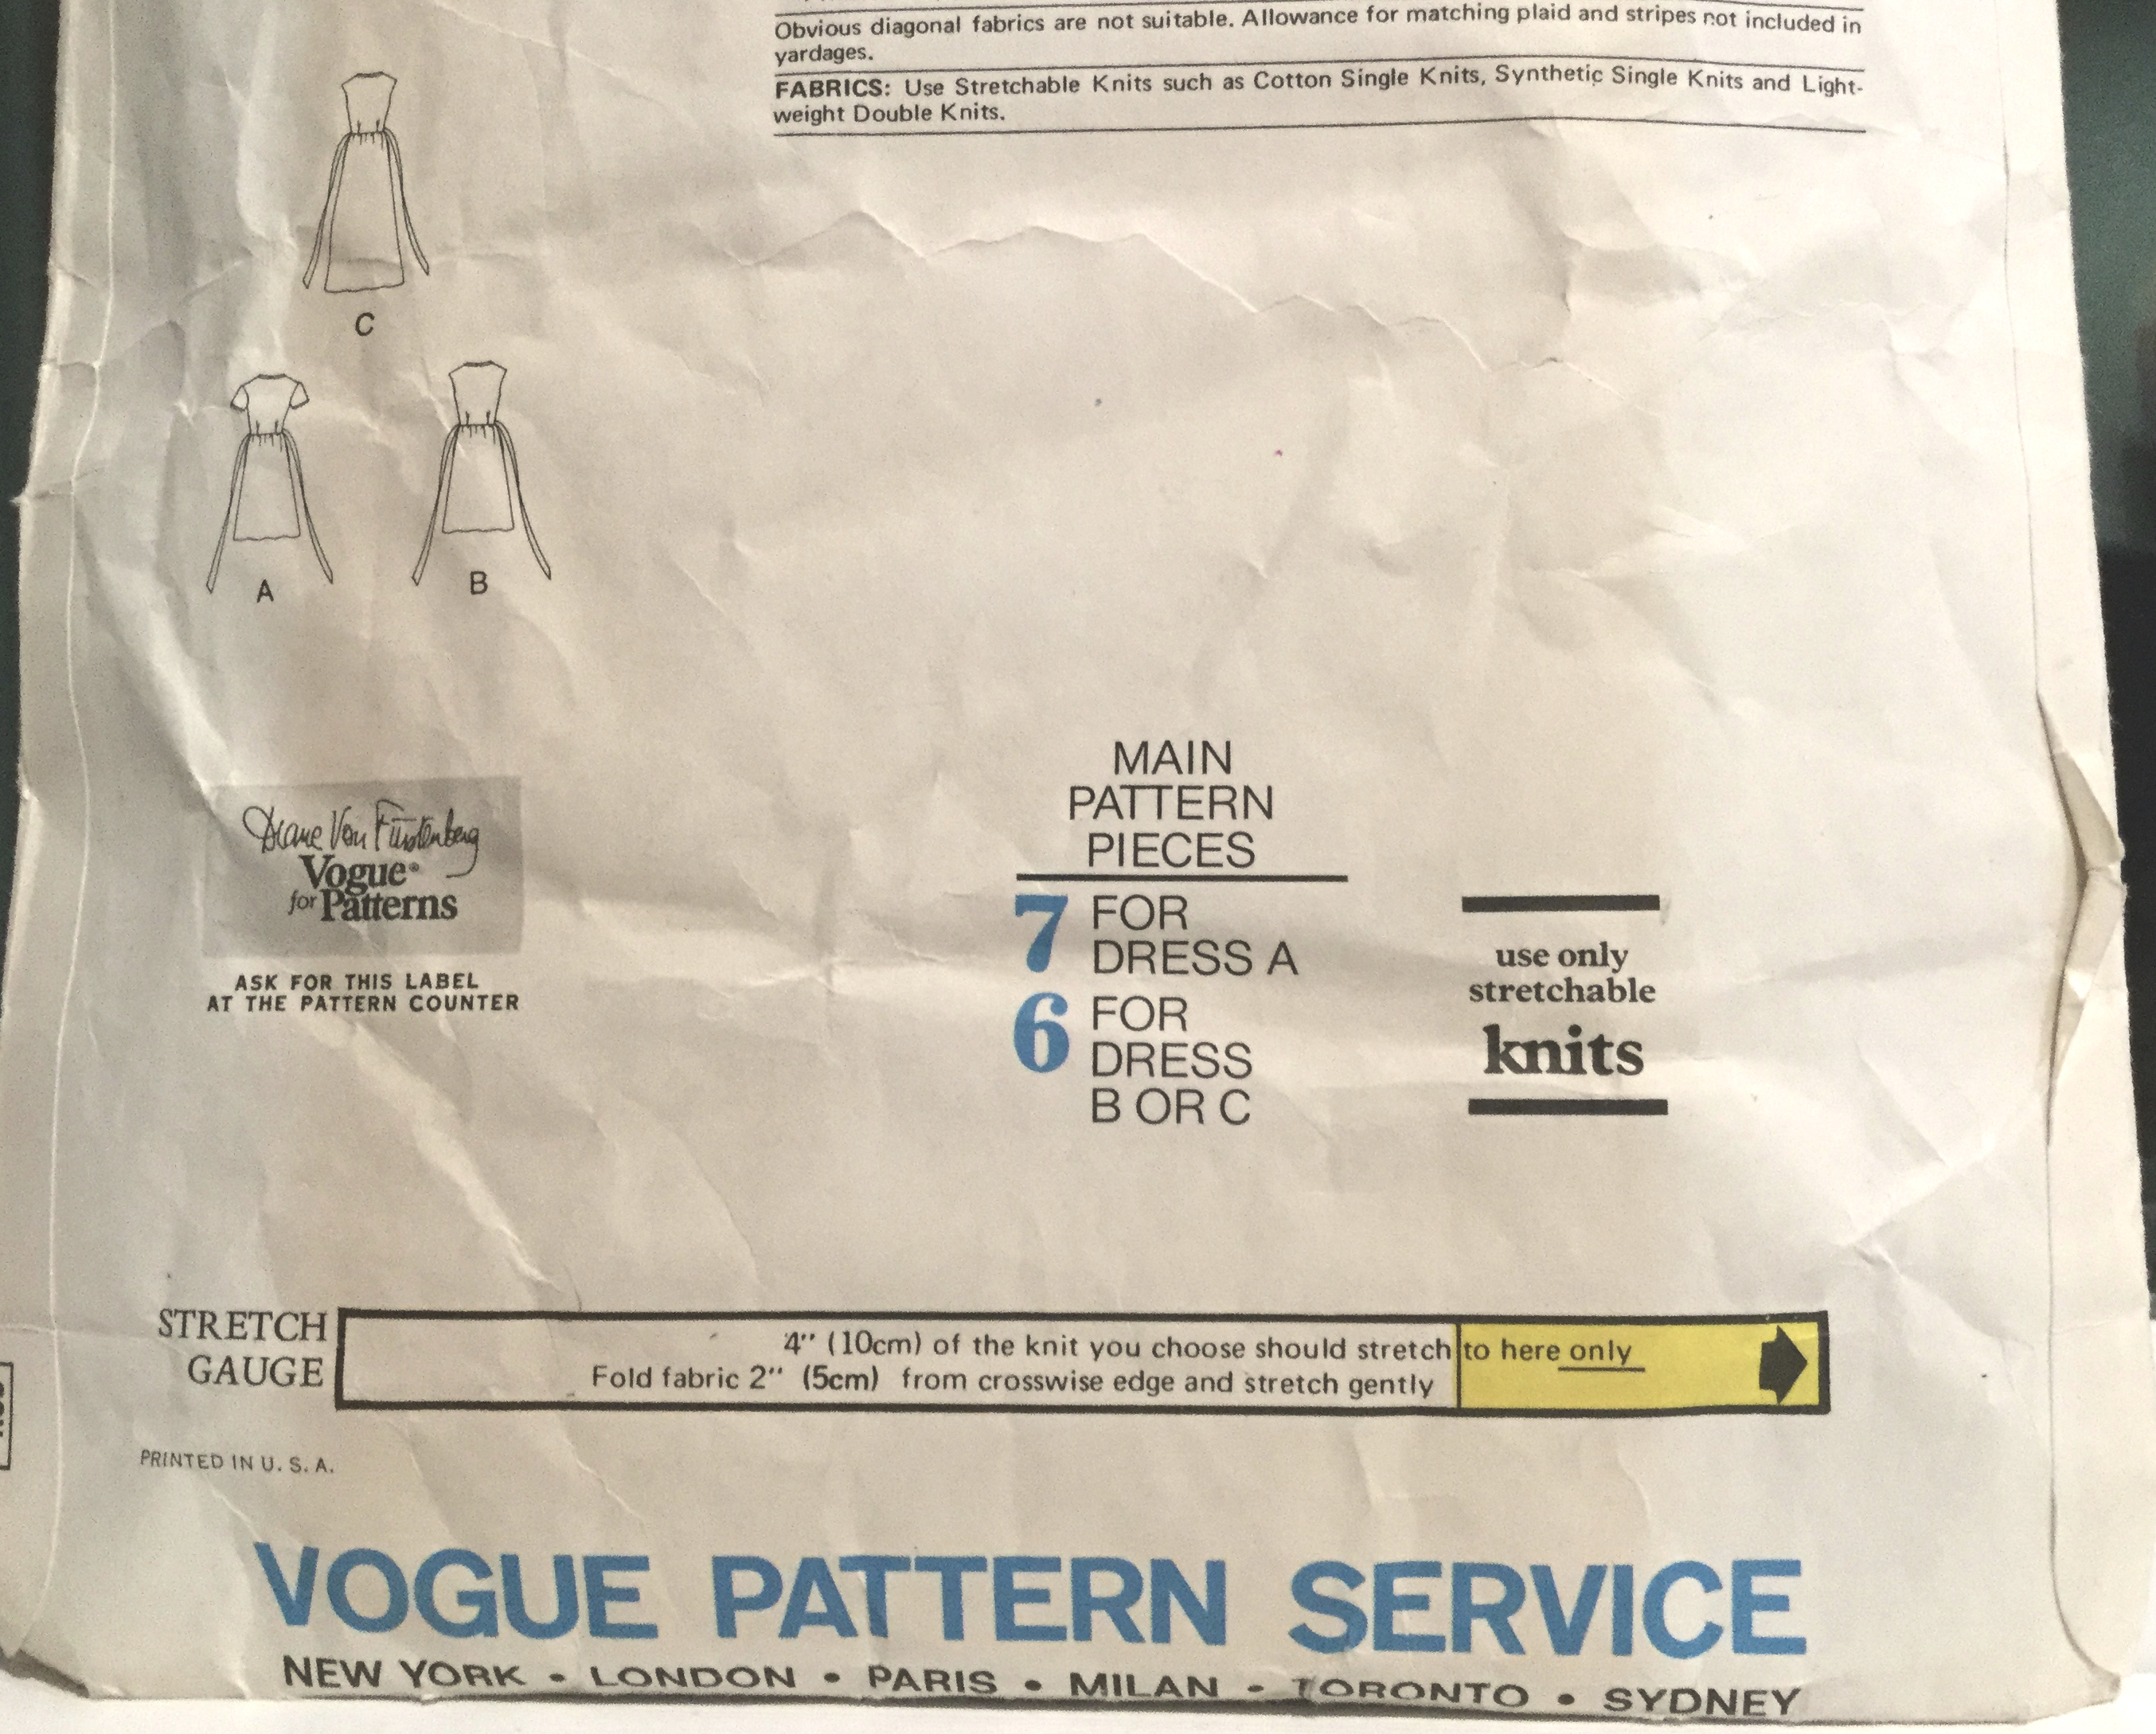
To me there is something delightful about these old Vogue American Designer patterns - they are just so casually chic and stylish. And look - this is a Very Easy Vogue, that's interesting that it was categorized as easy. According to the Vintage pattern Wiki its from Jan/Feb 1977. Vogue 1610 Diane Von Furstenberg wrap dress, for stretch knits only. Do you ever look at that Vintage pattern Wiki? lots of interesting stuff there.
And this is not THE DVF wrap dress, which is Vogue 1549 but this is a slightly different design, with a gathered skirt and a neck band with no collar.
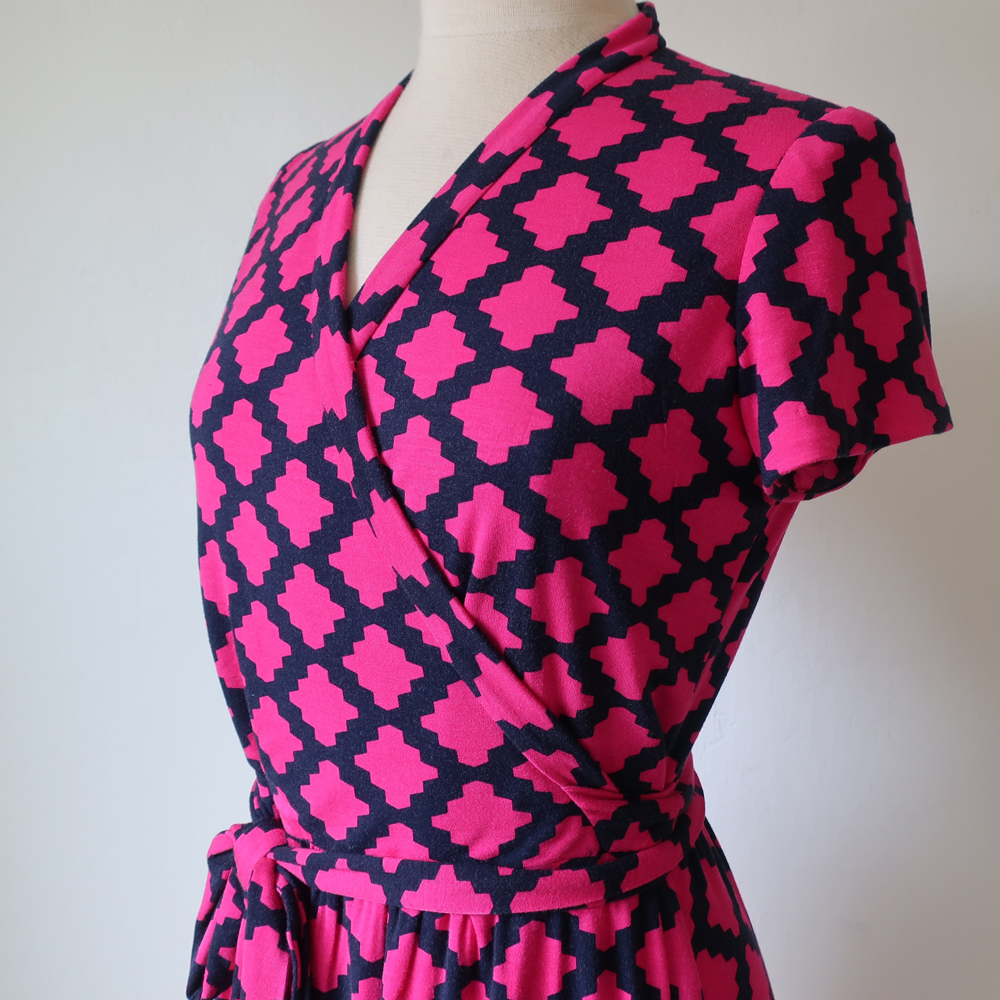
This fabric is from Girl Charlee, they still have some in stock. I used another of their pink/navy knits for a top which I wear a lot.
Let's talk a little about fit, and knits now versus back in 1977. I think back then the knits were less stretchy, think of more like a cotton interlock and perhaps the fabrics were even only a single stretch direction (crossways grain) instead of the more common printed knits we find now which have 4 way stretch (and sometimes too much).
Check out the stretch guide at the bottom of the pattern envelope. It says the knit should stretch "to here only". I don't think I've seen that on a pattern recently but it explains the issue with this dress and using a 4-way stretch knit.
When I bought this pattern I wanted to make it up right away, and to try it out I bought some truly terrible knit fabric at Joann, on a super sale couple so the investment was minimal.
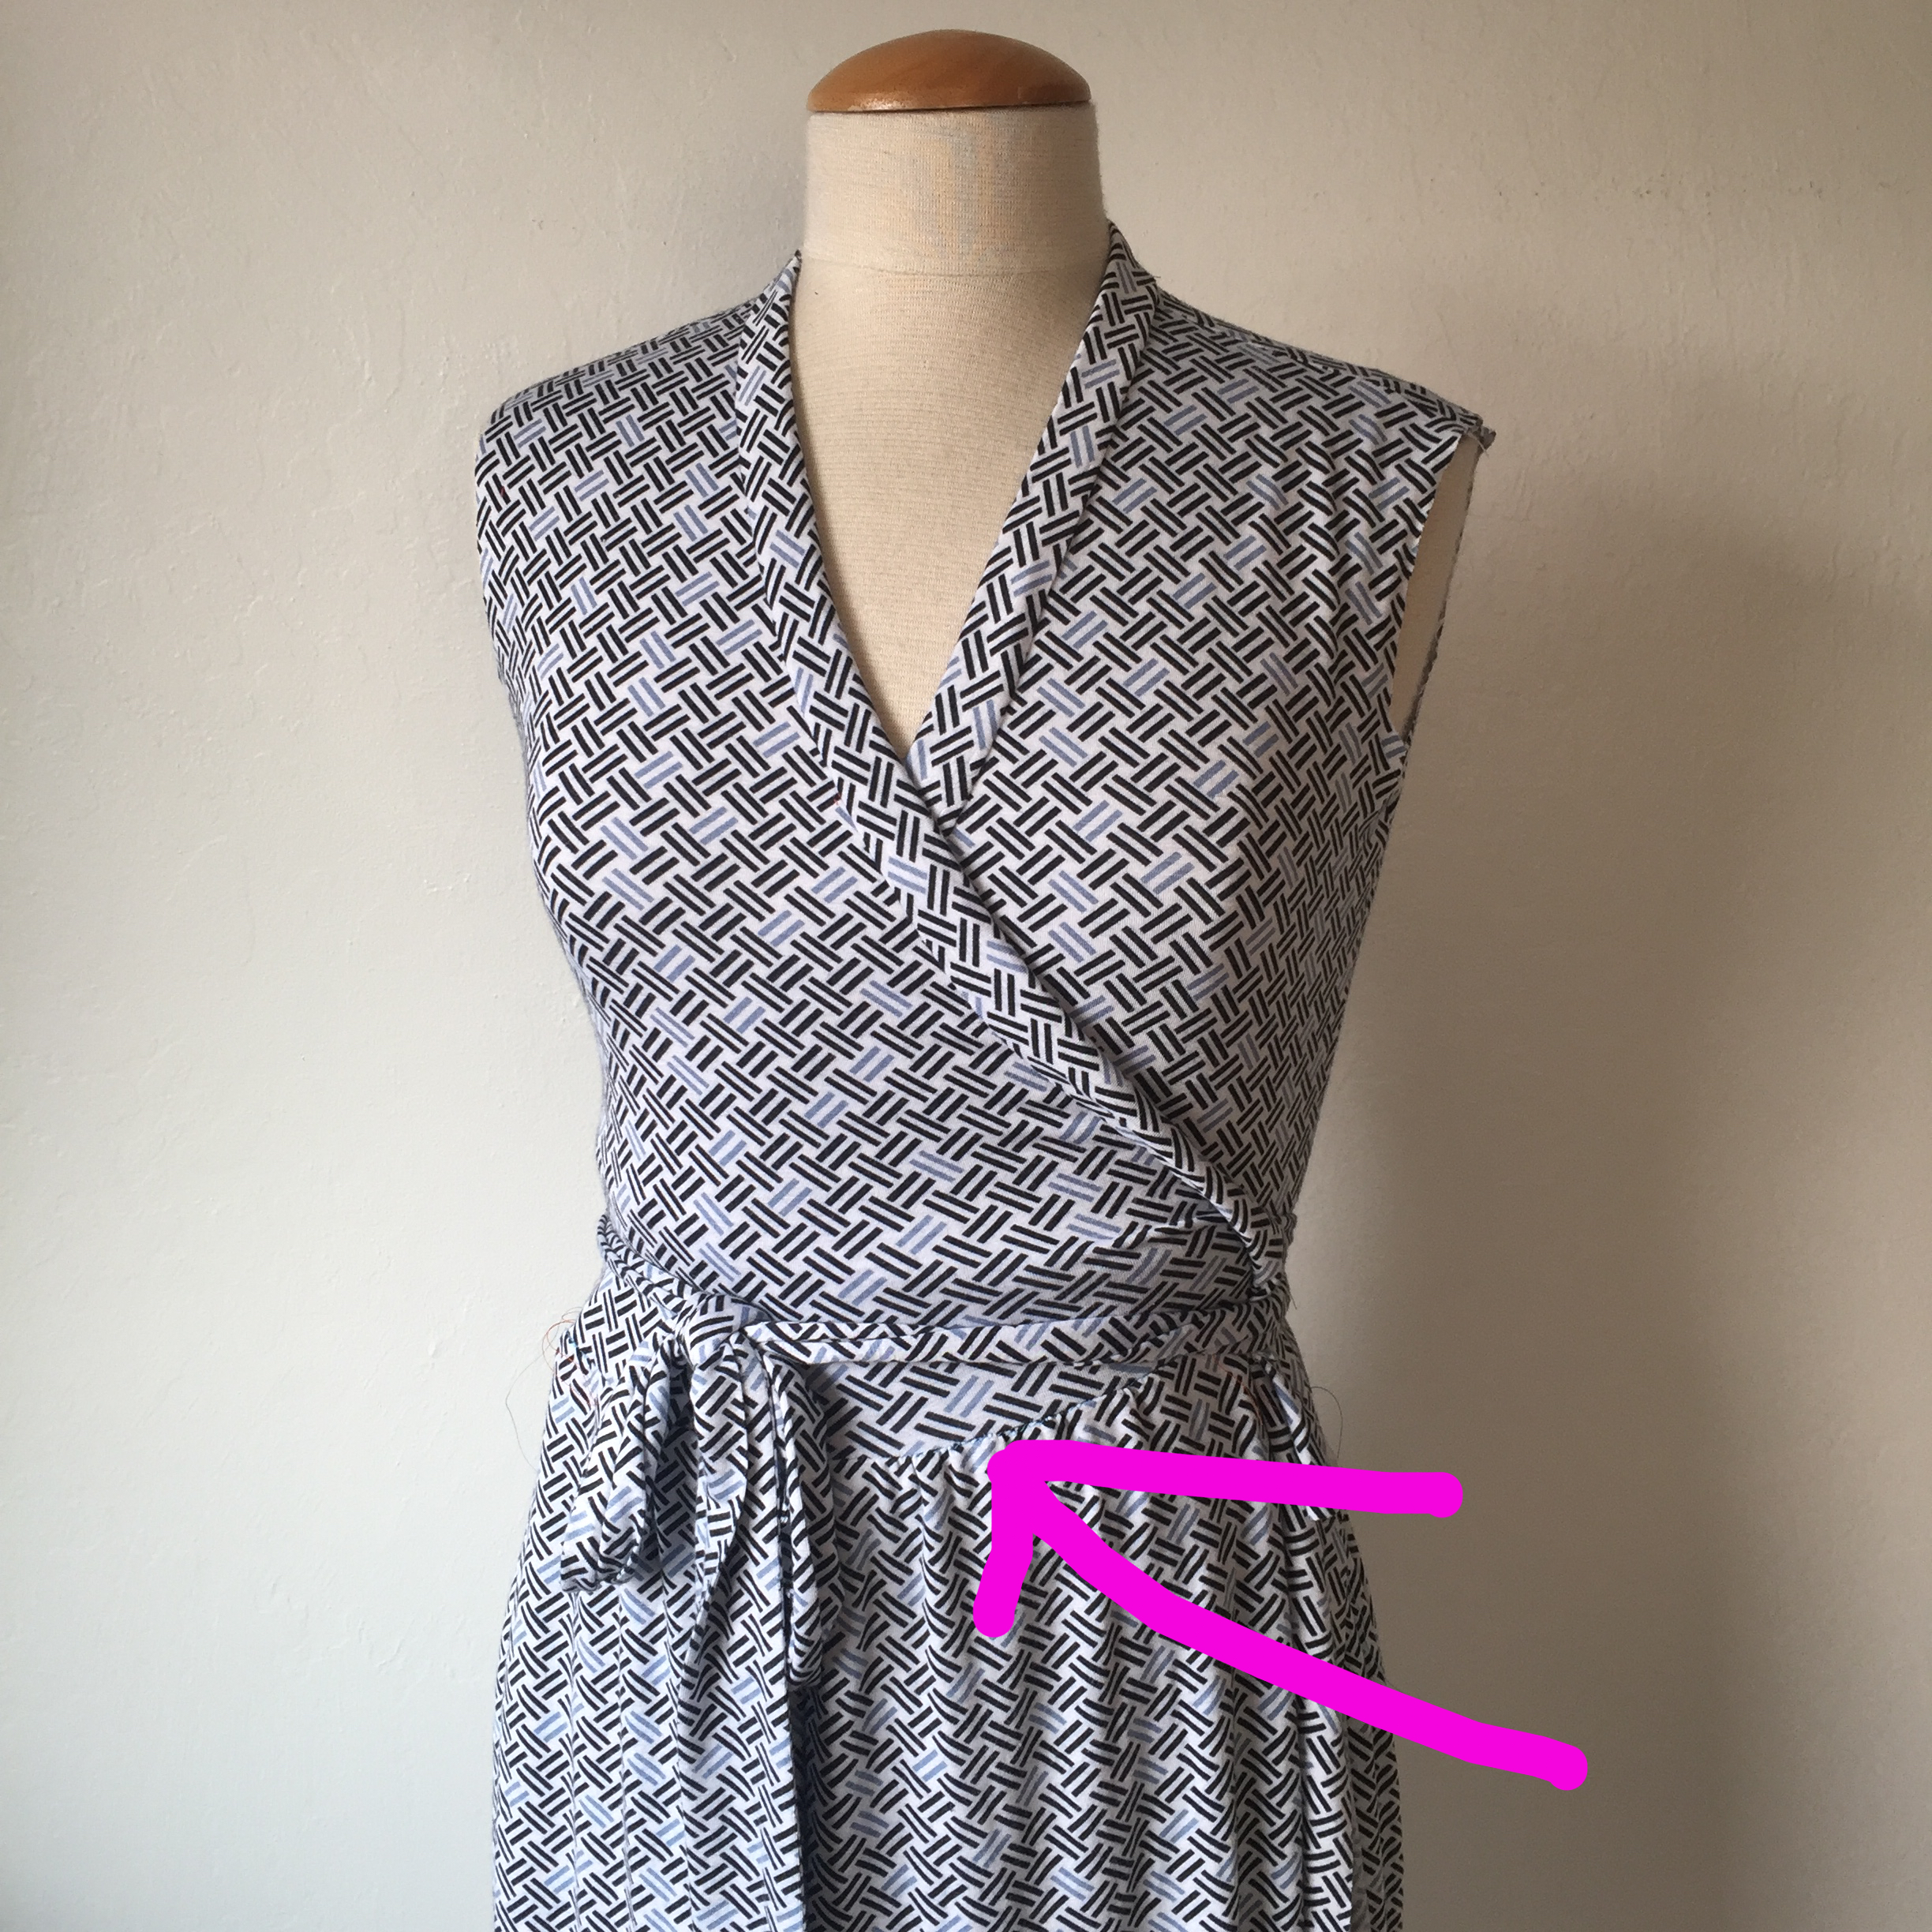
I sewed it up and you can see what happens on my dress form, the waist seam migrates downward due to the stretch of the fabric. It might not seem bad here but putting in on it was atrocious. Also this fabric had a weird fuzzy feel that made me dislike it even more. Out!
Flash forward to this year when I REALLY wanted the bright pink and navy fabric to work for this dress, and the answer as usual with knits is to line the bodice in a lightweight knit fabric with no lengthwise stretch. I've mentioned doing this before in other posts. The fabric I use to line knits is something I get at Joann's called Jet Set knit. I have no idea what it's for, I usually find it in the aisle with the dance wear knits. It comes in white, black, navy, beige although the stock is hit or miss. Also in purple as evidenced by my use of that color here. Which I found in my lining bin. Thank goodness for my lining bin which sometimes seems like Mary Poppins' travel bag as I seem to find all kind of magic in it which I have no recollection of putting in there. Note - when I go to fabric swaps or stash sales and I see some bargain which has lining potential I spend the $ 2 or $5 or whatever and stash it away. Look how useful these things are! (red coat with hot pink lining)
So the answer to the issue of too much length in the cotton jersey is to underline the front and back bodice with this stable lightweight knit fabric. Problem solved, the bodice now will not stretch from the weight of the skirt and the seam stays at the waist.
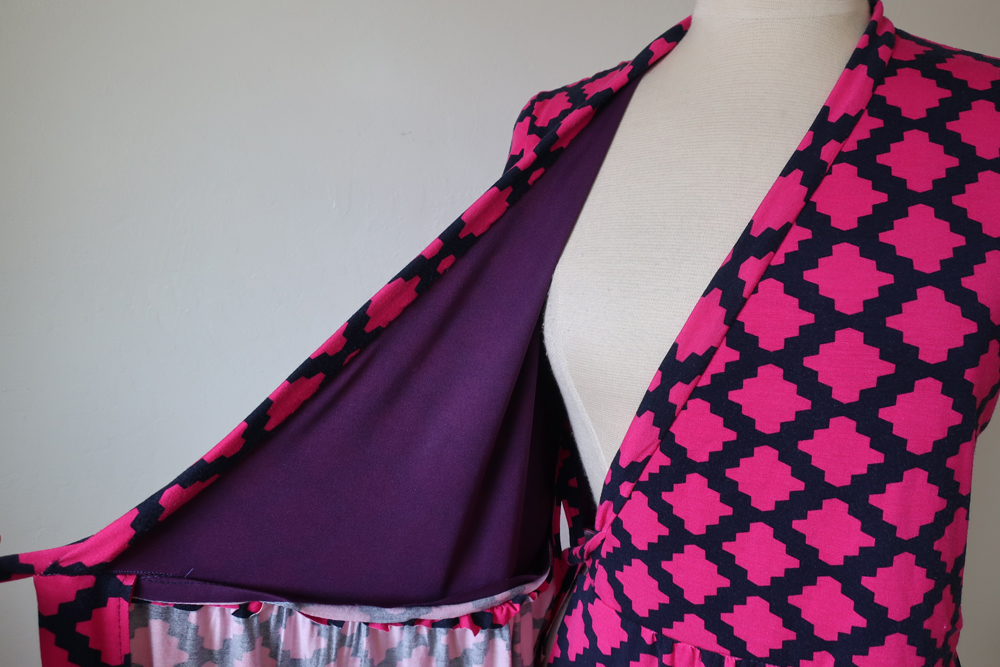
I treated the knit lining pieces and the bodice front and back as one, and only put the lining there, not in the sleeves. The goal was to change the degree of vertical stretch for the bodice pieces. I could tell that the bodice length was OK, it was just the stretch that was the problem.
To double check that I overlaid a pattern piece from a different knit wrap dress and saw that the length was very similar. I like the fit of that Butterick pattern so I determined that the Vogue would be fine if I could reduce the vertical stretch. Note that a number of the modern Vogue designer patterns I've sewn have lining in knit dresses, probably to control the stretch although some are to add a framework for the twisty details on the outer fabric, such as this dress.
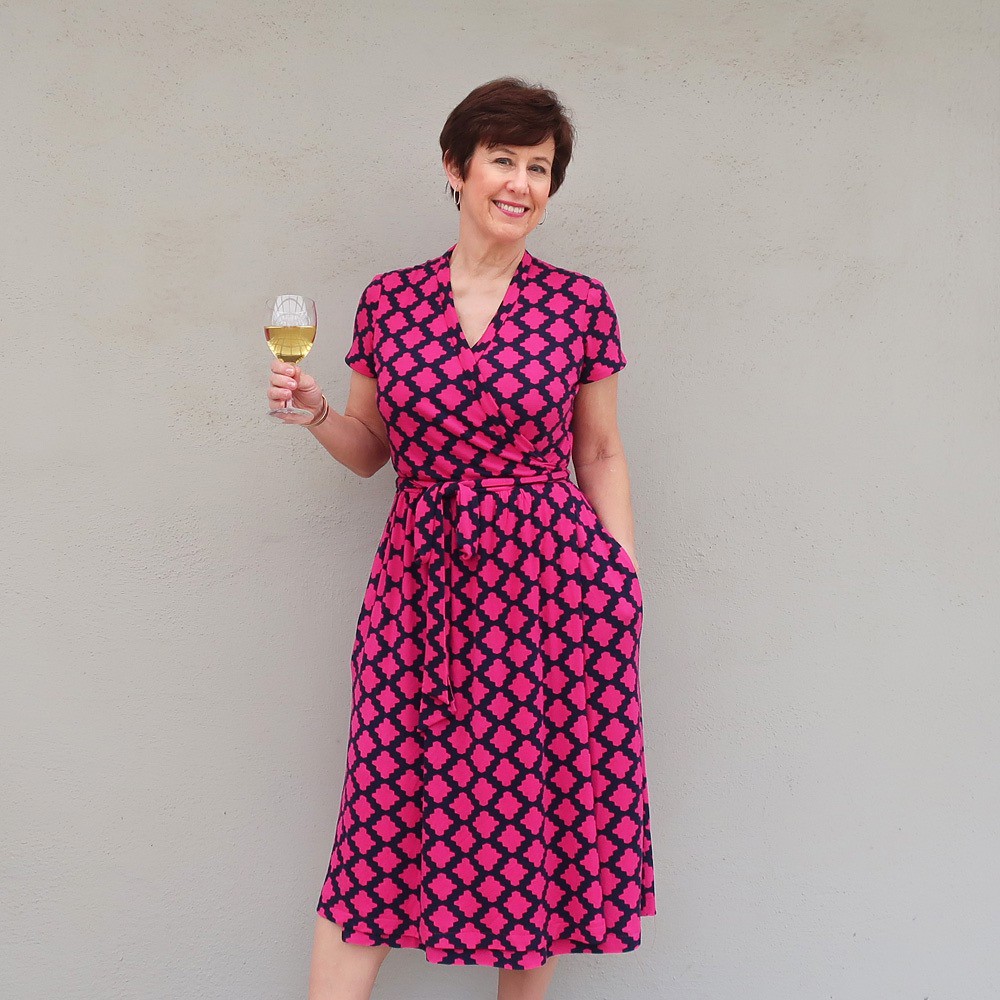
Why the glass of wine? I finished this dress on the first weekend of the lockdown and posted this on my Instagram on April 4, for #virtualfrocktails. Looking back now I see that we were fortunate in the SF bay area to have had our Frocktails event in the end of Feb - which I almost missed due to having that nasty flu bug. But I will take that instead of this current virus.
Back to sewing details. Unusual for me I made almost no changes to this pattern, I think I shortened it by maybe 2 inches? and then once I finished it I thought the sleeves were just a tiny bit too long so I turned them up another 1/2".
As you can see in the photo with the wine glass, this dress does have pockets. Which are probably useless for putting anything into, since a pocket in a knit dress is going to be a bit saggy. But they are perfect for putting your hands in. Although they are maybe the tiniest pocket pattern pieces I've ever seen. For pockets in almost anything, if I'm going to use the fashion fabric for the back pocket piece I like to use some lining fabric for the front, so that as the pocket bag lays against the front skirt it is slippery and doesn't stick to the outer fabric. Not the cutest picture below but you get the idea.
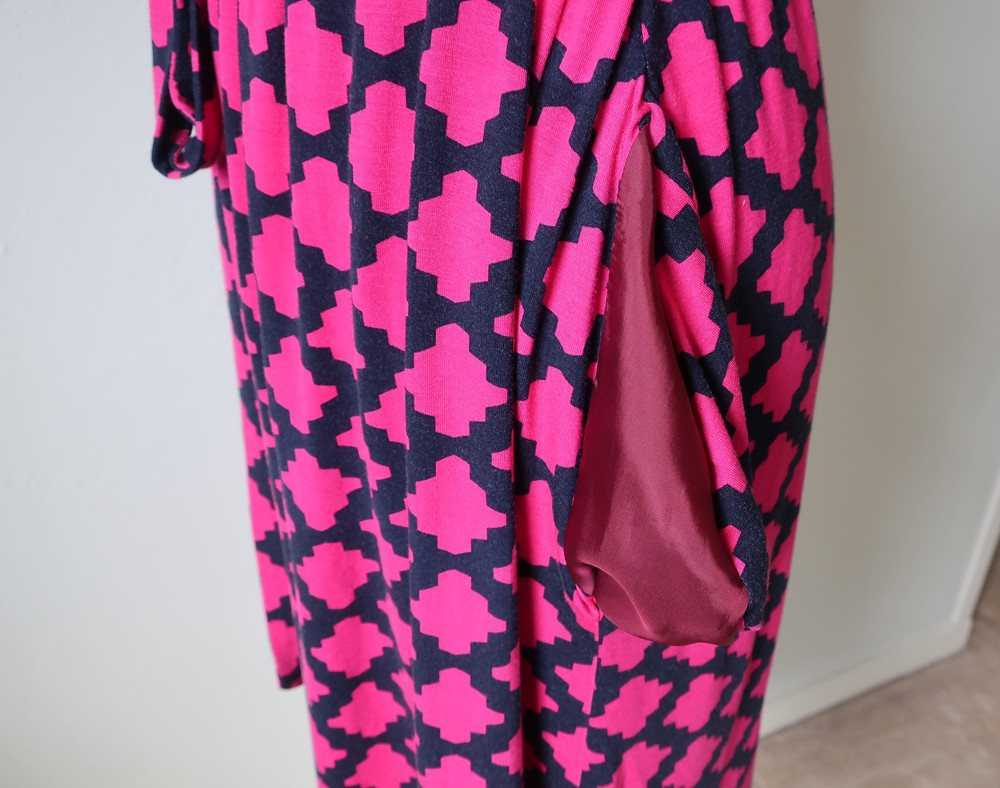
Let's talk inside finishing. I am far from a stickler about how things look on the inside, and I find using the serger to finish seams on knits completely useless. The fabric is never going to unravel and to me it just adds bulk and more steps in the sewing.
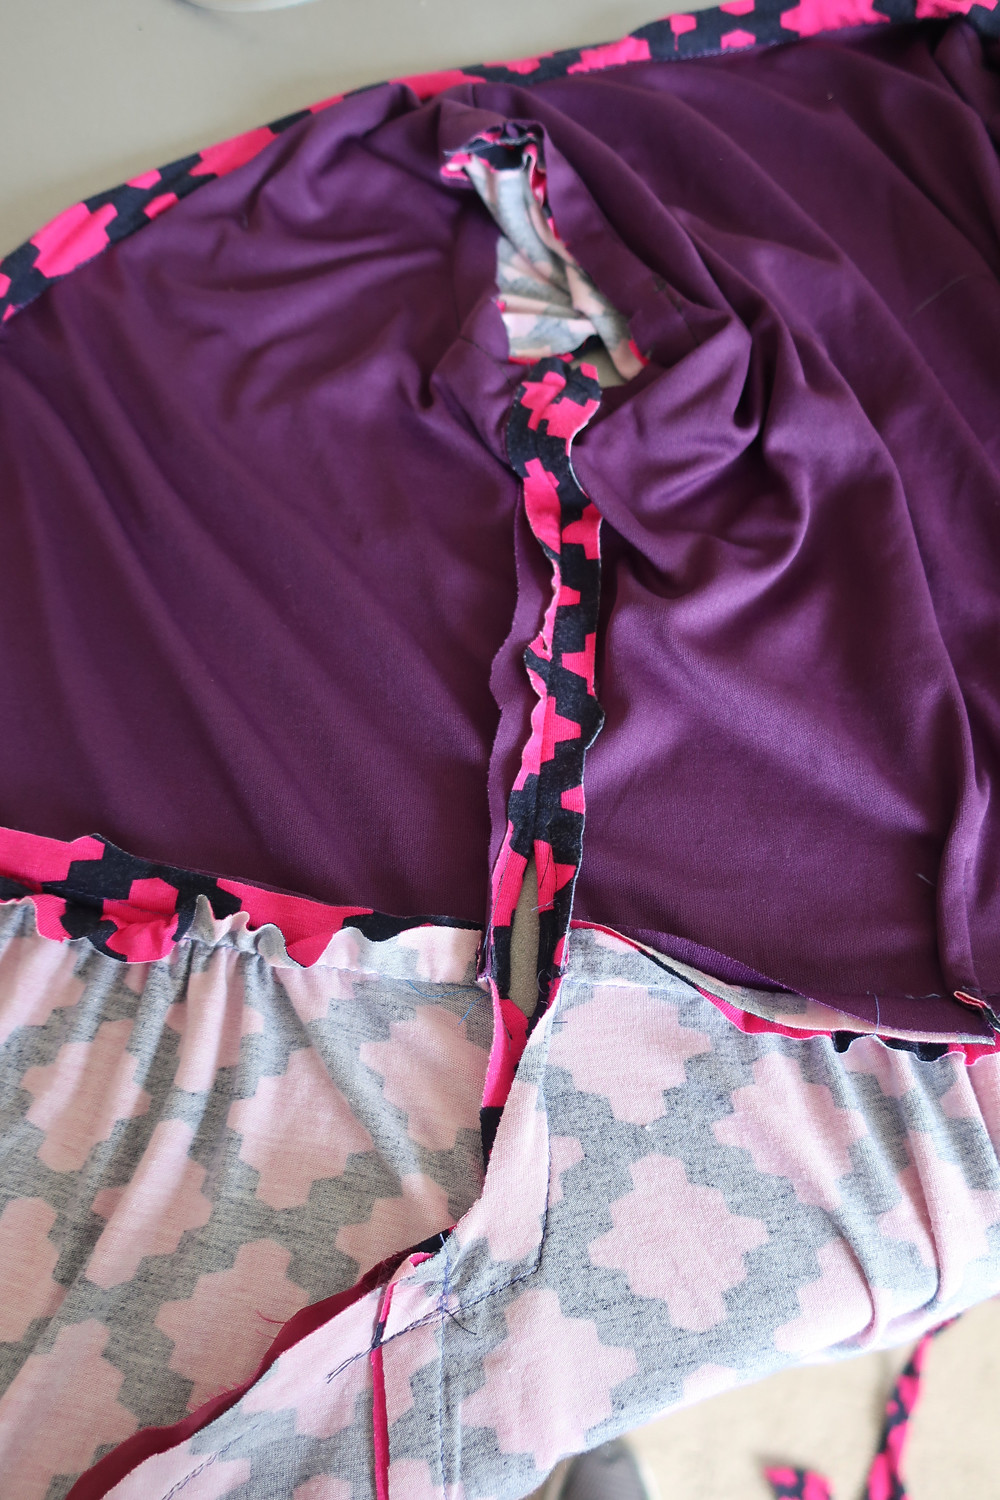
Yep - that's how I leave it. After this I did trim the seam allowances of the sleeves at the underarm but otherwise nothing else.
In all these pictures I must confess that my eye goes straight to the hem, where the skirt under layer is sticking out a bit below the top layer. So I'll have to fix that before I wear it out and about. It was actually freezing when I ran outside to take these pictures - and fussing about perfection was not in the cards. Thankfully spring has arrives since then and the weather is glorious. On the down side, I've had to start watering the plants - no spring rain for us and I think it will be another terribly dry summer.
When it comes to hems on knits I don't have a coverstitch machine and I've never found the twin needle thing to work for me. My go-to method for hems on knits is to put a small strip of fusible knit interfacing in the hem allowance, so that the machine stitching is going through both the fashion fabric as well as one layer of interfacing. This gives the hem just the right amount of weight and avoids the ripply situation you can get on knit hems. Then I hand stitched the corner so that nothing was sticking out below the hem edge.
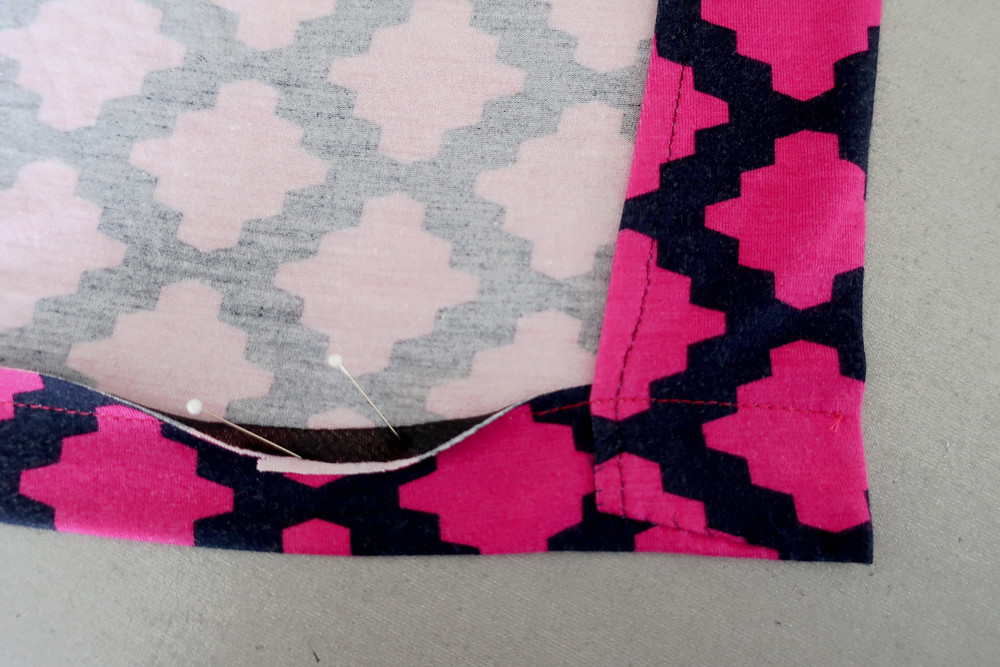
So that's the scoop on this vintage Vogue pattern. I might even sew it up again, the sleeveless version is calling my name as well. Liking the longer length is something that surprised me, I usually don't make my dresses much past mid-knee as I think the longer length makes me look short but perhaps this works. I'll have to see how I like it with flat sandals.
Item # 2 of my quarantine sewing completed and documented. Up next, I finished a silk top from a New Look pattern that I saw somewhere and had to have. And then my denim blazer, almost done except for the buttonholes however that reveal will have to wait until I complete the jeans and have the full pantsuit. (having doubts about the outfit potential but will make the whole suit just for the fun of it).
I hope everyone is well and doing OK with the current situation. Stay safe and keep sewing!
Beth
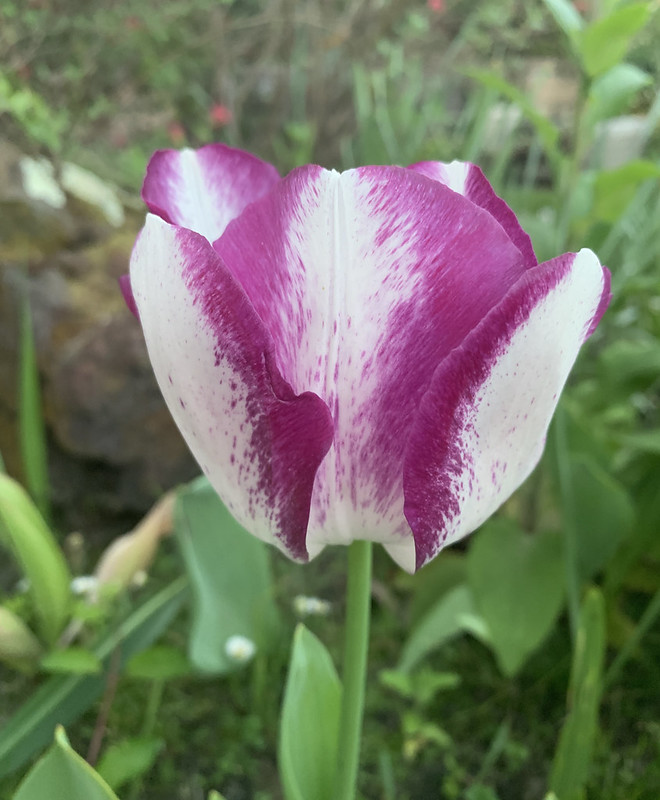
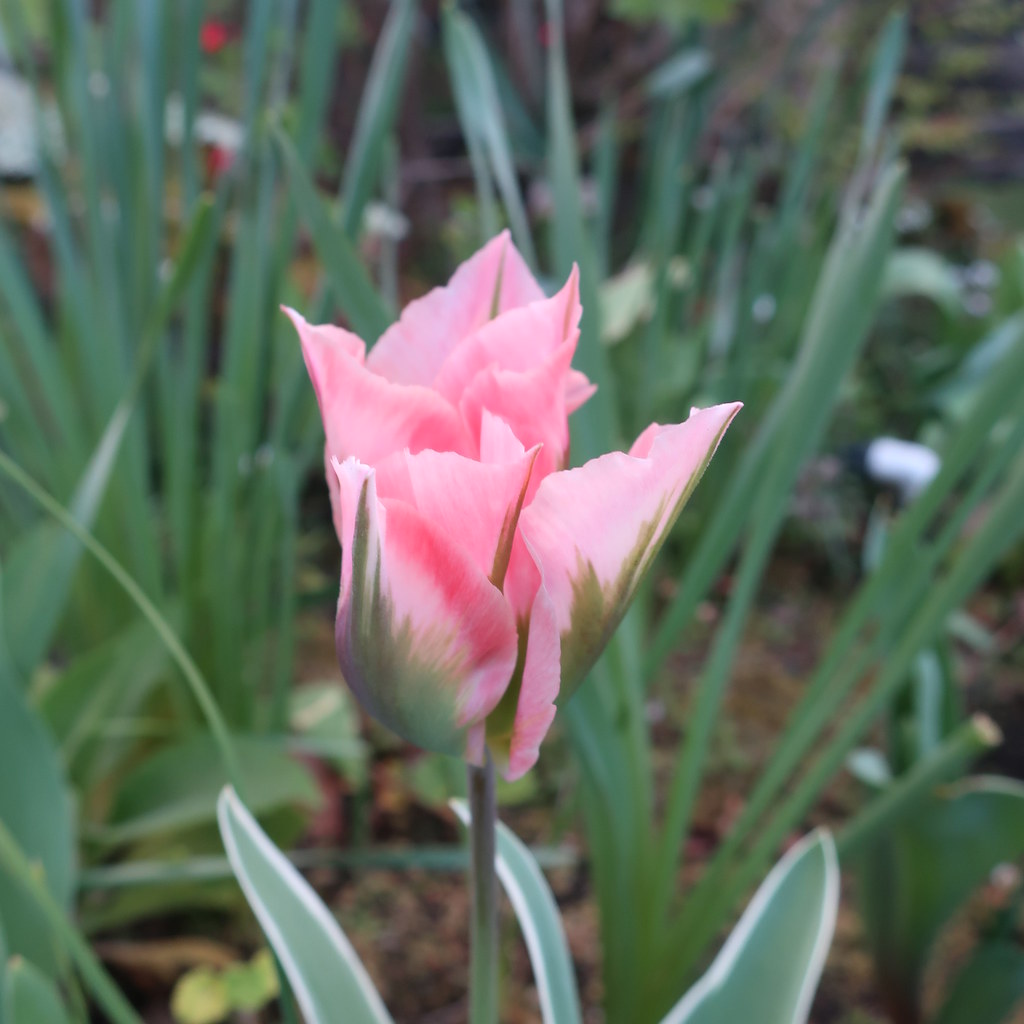
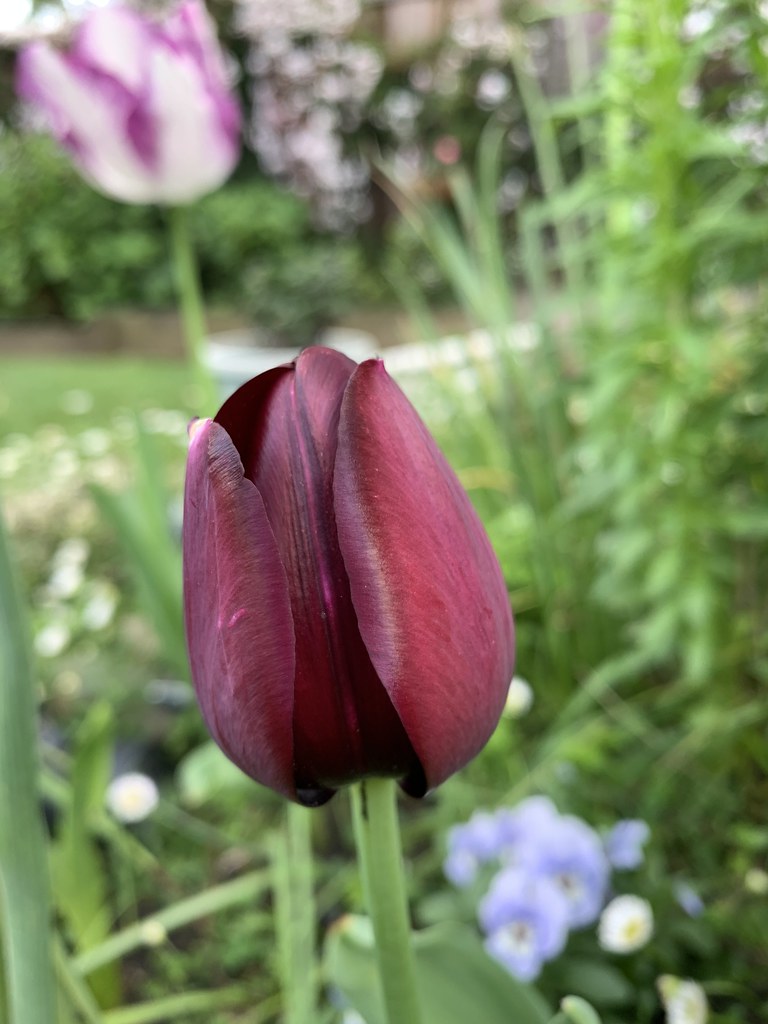
Today's garden photo is this fantastic tulip - it's so dark and saturated in color. A nice surprise among the mystery tulip bulbs that were planted last fall.
Tuesday, April 28, 2020
Sunday, April 19, 2020
Part 2: Boucle Jacket with statement sleeves, completed
Sometimes it's hard to figure out what to say in a blog post - but the current situation makes any previous writer's block seem so trivial. I hope everyone is doing well and getting through this crisis with family, health and jobs intact. Focusing on something like sewing might seem less than useful but as we've seen on thousands of IG posts and on news stories, sewing is a valuable skill that is more than just a fun pastime but actually a critical activity.
I think it's something that also helps to keep the mind occupied - who ever thought we would in this stay-at-home situation. But that fabric and pattern stash is looking good right now, isn't it?
This morning I did a virtual class and it was really fun! It was an abbreviated version of my How to Read a Pattern class that I teach at the studio and then some good Q&A time. I think that's a nice advantage of doing the live classes - it gives the opportunity to ask questions and get answers in real time, as opposed to perhaps leaving a DM or an email. The back and forth conversation is something we all need more of right now! I'm going to do it again this upcoming Thursday (4/23 10:30am PST). To add to the challenge next Sunday (4/26) I'm going to do a virtual class on pattern fitting, "Quick Quarantine Fit Tips" because sometimes it's nice to make a quick and easy adjustment to make a pattern fit better, be wearable and comfortable. Plus time for Q&A then as well. Sign up here on the Hello Stitch website. I'm also available for private lessons to help with fit or answer any other questions such as how to decipher the pattern instructions - you can book that on the same webpage or email me to arrange.
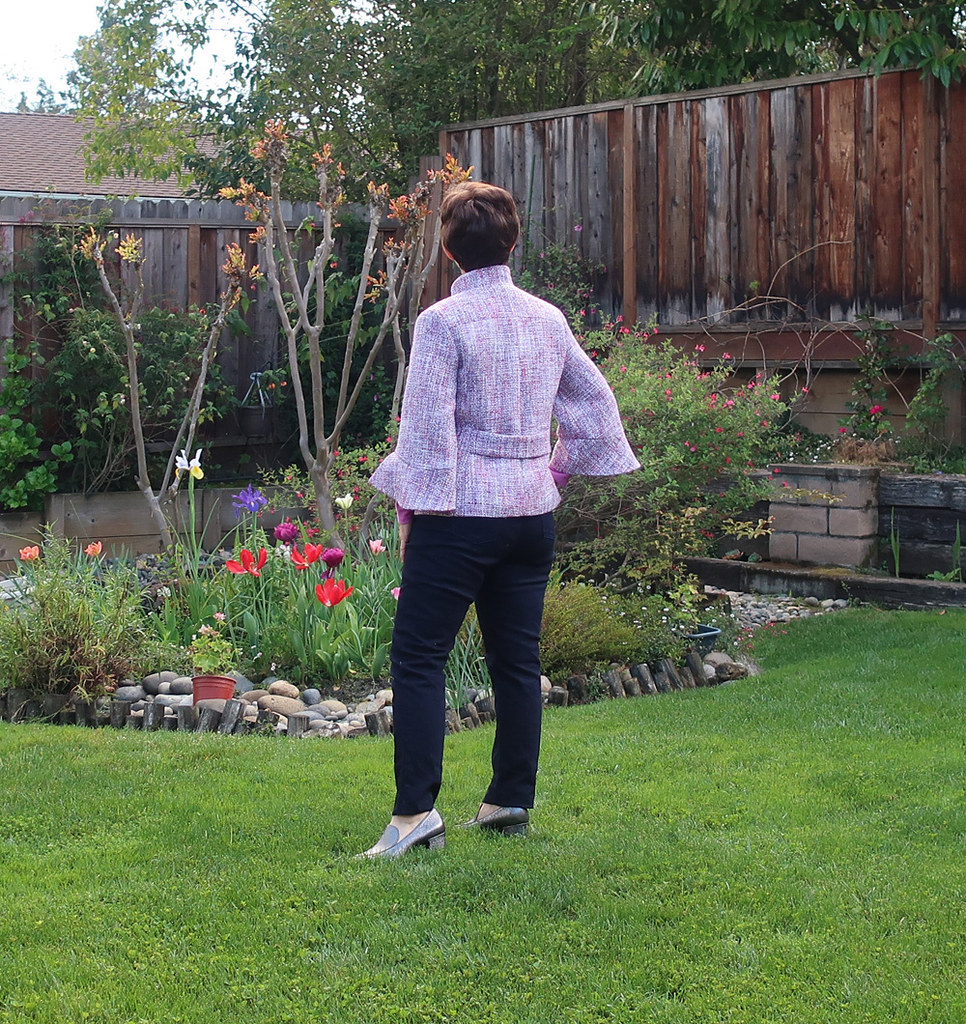
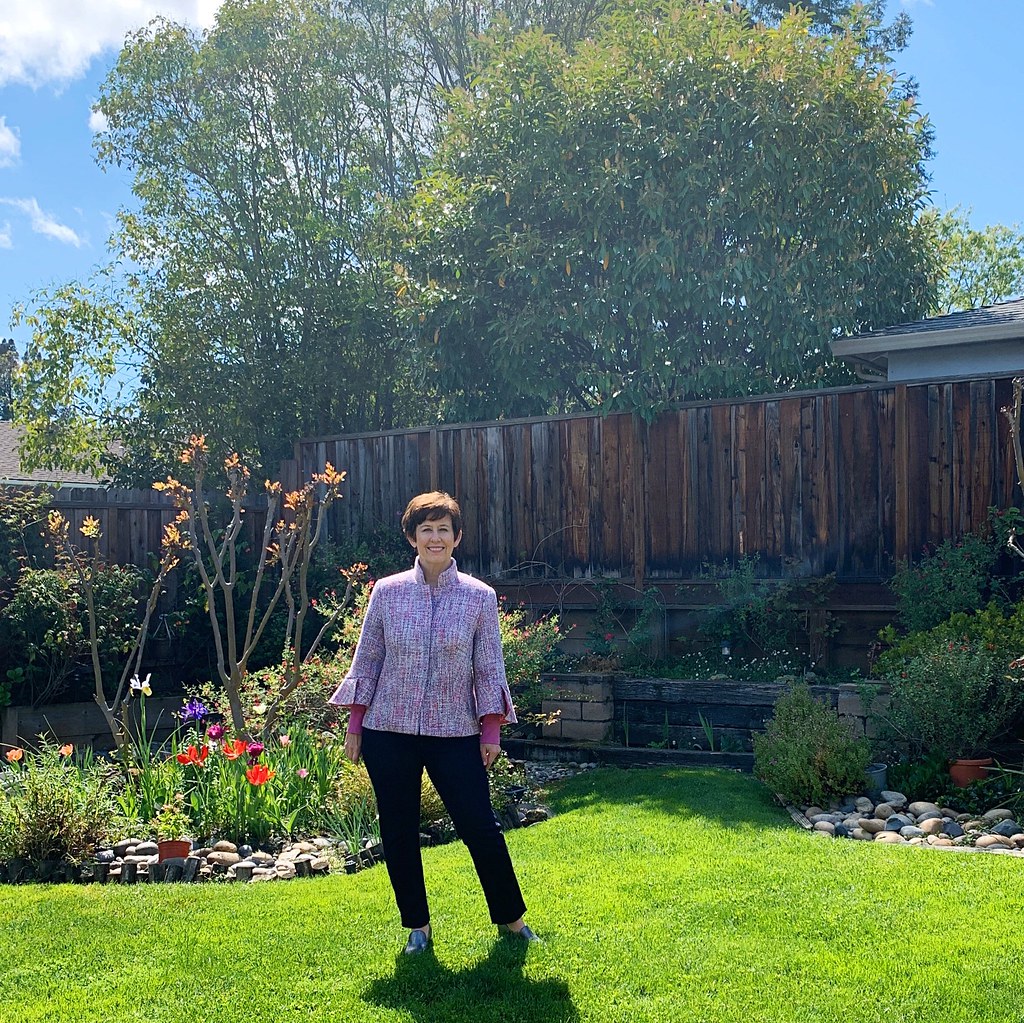
And now for some finished garment photos.
My last post was more on the construction details of this boucle jacket which perfectly complements the flowering pink jasmine on the back fence. If only you could smell that fragrance, it is heavenly.
Somebody is going to need a haircut soon :) although since I took these photos I've given myself about a 1/4" trim. This jacket is surprisingly comfortable to wear, very soft and the sleeves are roomy and the full cuffs don't bother me as they are short. Although I can only say that having worn it around the garden for 10 minutes so who knows in the real world.
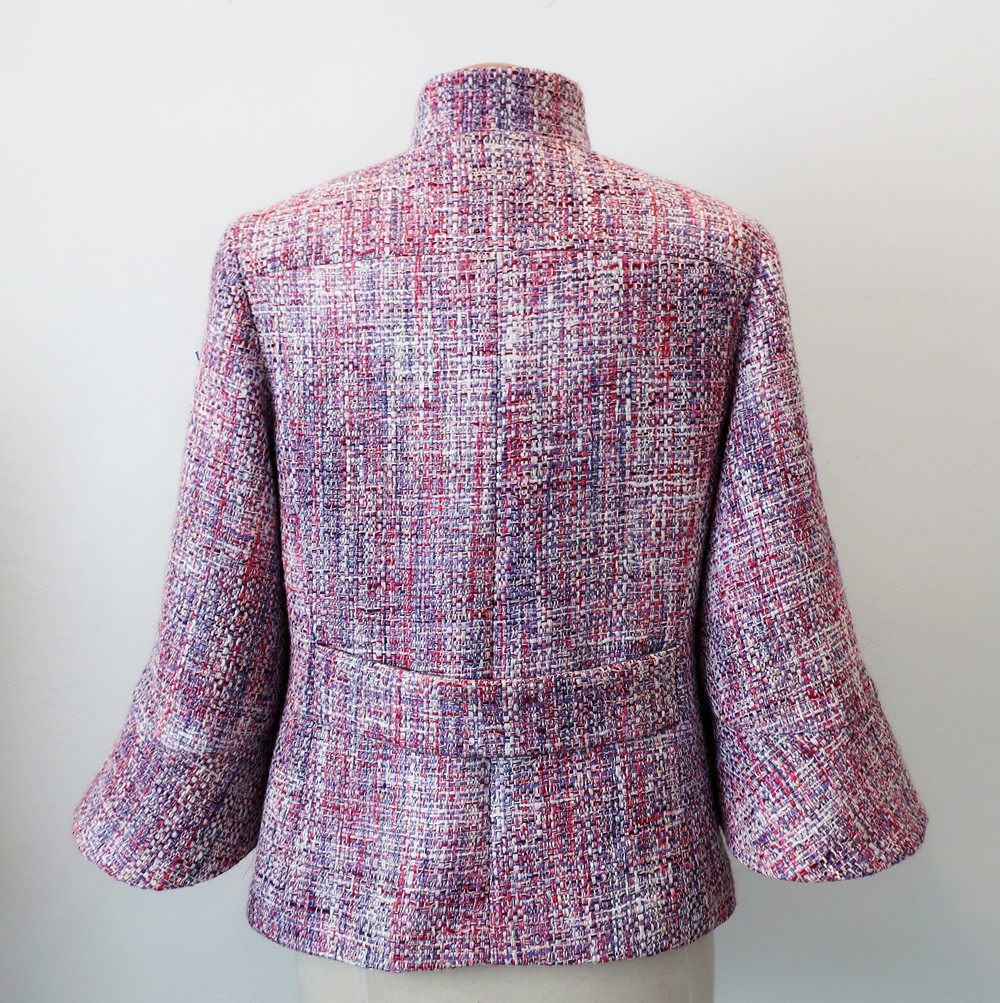
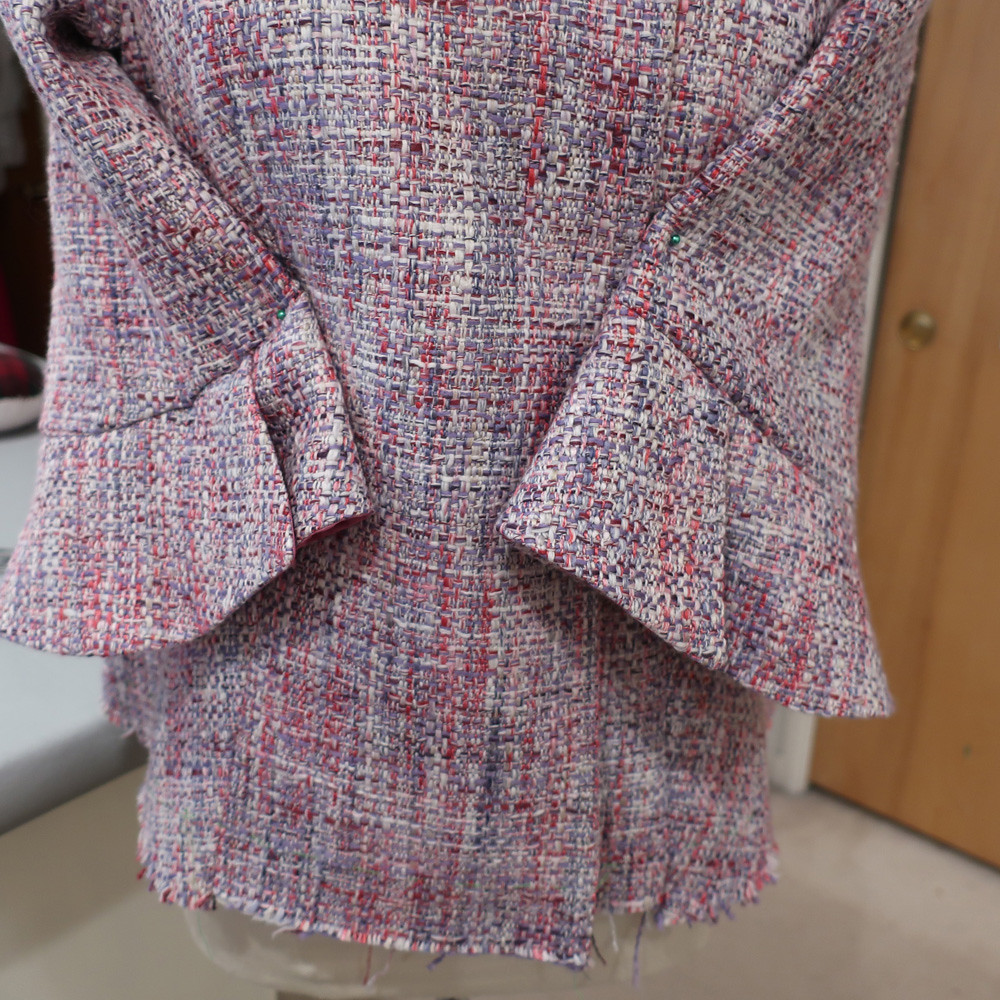
Now a series of dress form pictures so you can see it a little better.
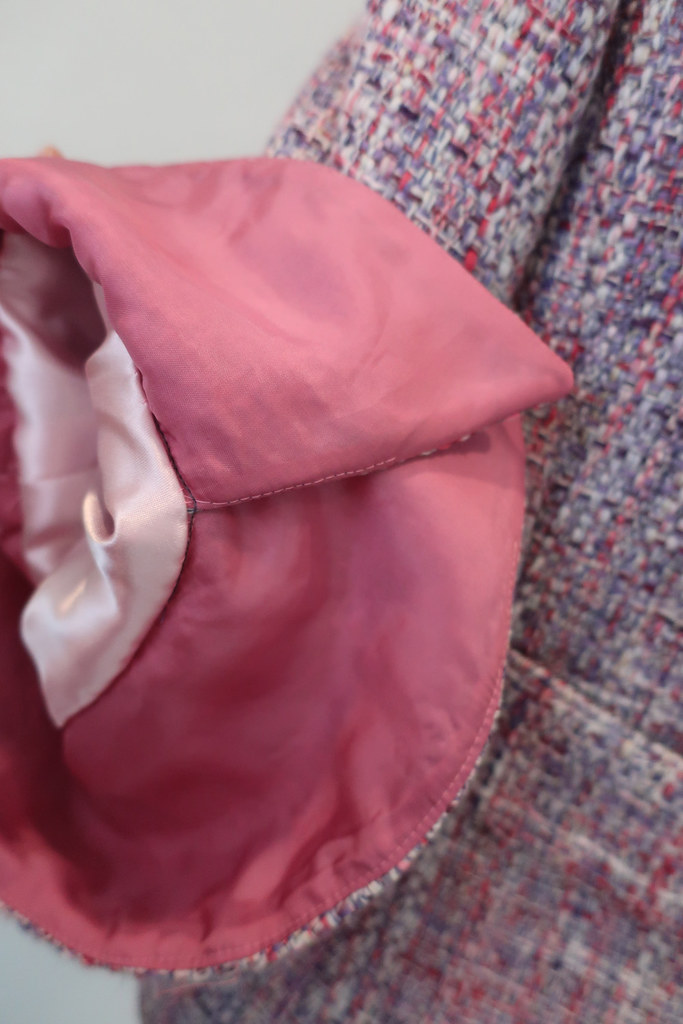
Rummaging in my lining bin came up with quite a few good chunks of lining that I could use for the various lining pattern pieces. I have no qualms about mixing colors of lining - and yet I really don't like printed or novelty fabric linings. We all have our little quirks, right?
The sleeve cuff lining is a scrap leftover from a dress I made for Heather, and then the pale pink was just found in the bin. I think the pale color goes well in the front, as it complements the boucle the best and won't be jarring if it peeks out when the jacket is not snapped in the front.
The belt detail really add some interest to the back of the jacket and I'm glad I didn't omit it.
The jarring element in this lining mishmash is the back, which is the last remaining scrap of this hot pink satin lining. It's the same lining I used in my recently made red coat.
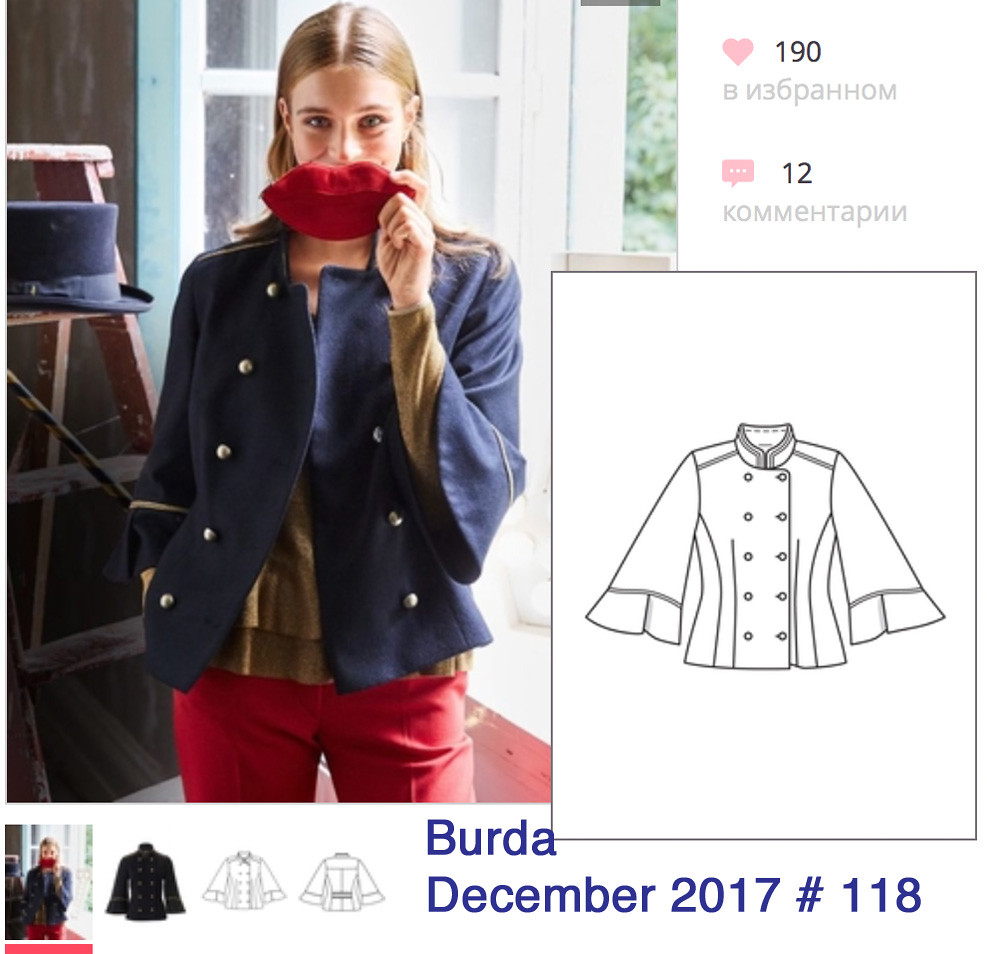
Just to review, this pattern is No. 118 from Burda December 2017. In my previous post I wrote about some of the sewing and construction details, including painting the snaps to match.
It doesn't really merit it's own post but I made a knit top to wear with this jacket and you can see I have it on in the photos. I've made this pattern several times before, this is the first long sleeved version. It's an envelope pattern, Burda 6329. I absolutely love this knit top pattern. Here's the post on my first version. I found this purple orchid color at Stone Mountain the day before all stores were shut down.
So that's the latest on my boucle jacket, I still have loads of this fabric and think about what else I can use it for. But I'm in no rush to return to it.
Up next, I sewed up a vintage pattern that I've been longing to do, and it exceeded my expectations in every way. So that will be my next post, and then I will show you what else is in progress. Which I may have mentioned here? or on Instagram, it's my wacky suit which is turning out well also. Lest you think I never have some serious failures, I've collected a couple from this last year and will do a post on the things that have gone into the bin or the deep recesses of the closet. We all have those, right?
Happy Sewing and Stay well!
Beth
Today's garden photo, these tulips continue to surprise me. Each year I buy a different bag and keep chucking them into that same island, so what blooms any year is a grab bag of color.
I think it's something that also helps to keep the mind occupied - who ever thought we would in this stay-at-home situation. But that fabric and pattern stash is looking good right now, isn't it?
This morning I did a virtual class and it was really fun! It was an abbreviated version of my How to Read a Pattern class that I teach at the studio and then some good Q&A time. I think that's a nice advantage of doing the live classes - it gives the opportunity to ask questions and get answers in real time, as opposed to perhaps leaving a DM or an email. The back and forth conversation is something we all need more of right now! I'm going to do it again this upcoming Thursday (4/23 10:30am PST). To add to the challenge next Sunday (4/26) I'm going to do a virtual class on pattern fitting, "Quick Quarantine Fit Tips" because sometimes it's nice to make a quick and easy adjustment to make a pattern fit better, be wearable and comfortable. Plus time for Q&A then as well. Sign up here on the Hello Stitch website. I'm also available for private lessons to help with fit or answer any other questions such as how to decipher the pattern instructions - you can book that on the same webpage or email me to arrange.
And now for some finished garment photos.
My last post was more on the construction details of this boucle jacket which perfectly complements the flowering pink jasmine on the back fence. If only you could smell that fragrance, it is heavenly.
Somebody is going to need a haircut soon :) although since I took these photos I've given myself about a 1/4" trim. This jacket is surprisingly comfortable to wear, very soft and the sleeves are roomy and the full cuffs don't bother me as they are short. Although I can only say that having worn it around the garden for 10 minutes so who knows in the real world.
Now a series of dress form pictures so you can see it a little better.
Rummaging in my lining bin came up with quite a few good chunks of lining that I could use for the various lining pattern pieces. I have no qualms about mixing colors of lining - and yet I really don't like printed or novelty fabric linings. We all have our little quirks, right?
The sleeve cuff lining is a scrap leftover from a dress I made for Heather, and then the pale pink was just found in the bin. I think the pale color goes well in the front, as it complements the boucle the best and won't be jarring if it peeks out when the jacket is not snapped in the front.
The belt detail really add some interest to the back of the jacket and I'm glad I didn't omit it.
The jarring element in this lining mishmash is the back, which is the last remaining scrap of this hot pink satin lining. It's the same lining I used in my recently made red coat.
Just to review, this pattern is No. 118 from Burda December 2017. In my previous post I wrote about some of the sewing and construction details, including painting the snaps to match.
It doesn't really merit it's own post but I made a knit top to wear with this jacket and you can see I have it on in the photos. I've made this pattern several times before, this is the first long sleeved version. It's an envelope pattern, Burda 6329. I absolutely love this knit top pattern. Here's the post on my first version. I found this purple orchid color at Stone Mountain the day before all stores were shut down.
So that's the latest on my boucle jacket, I still have loads of this fabric and think about what else I can use it for. But I'm in no rush to return to it.
Up next, I sewed up a vintage pattern that I've been longing to do, and it exceeded my expectations in every way. So that will be my next post, and then I will show you what else is in progress. Which I may have mentioned here? or on Instagram, it's my wacky suit which is turning out well also. Lest you think I never have some serious failures, I've collected a couple from this last year and will do a post on the things that have gone into the bin or the deep recesses of the closet. We all have those, right?
Happy Sewing and Stay well!
Beth
Today's garden photo, these tulips continue to surprise me. Each year I buy a different bag and keep chucking them into that same island, so what blooms any year is a grab bag of color.
Wednesday, April 15, 2020
Now offering Virtual Sewing Lessons: sign up via Hello Stitch Studio links
Hi all - times are weird and I guess my mantra is just keep sewing. Well, not all the time but I've definitely gotten into some fun projects and will have a very wild jacket and jeans suit to wear when we bust out of isolation.
The studio is a small business that obviously had to shut their doors during this pandemic, and I really want them to succeed - after 2 and half years the momentum was fantastic, classes were filling up and the place has become such a warm and welcoming place to stitchers of any level.
Right now we have two listings, one for private lessons and one for a class.
Private lessons: You can register and pick a time slot on the Hello Stitch website. Here's the link to the registration . When you click on the Book Now button it takes you to a calendar page where you can choose a time slot. Note the calendar lists a few days that I'm available and I can add others. If you need a different time email me and we will figure out a time.
I'm ready to help with any garment sewing questions. I know we are all stuck at home working with the supplies we have so questions about construction techniques may be on your mind. If you need some pattern hacking advice to get the look you want, troubleshooting with unclear instructions or even fitting help I can do that.
I think you can also include a message when you book to let me know what your focus is. I will email you prior to get more specifics. But don't feel you have to have a specific project - if you need general sewing advice or encouragement I'm happy to talk sewing any time.
I'm doing an online version of my How to Read a Pattern class.
Sunday April 19 10:30am - 11:15am (Pacific Time)
Here's the link to register.
If you are looking for a bit of sewing camaraderie or want to hear me talk about patterns, how to choose your starting size, a quick overview of how to match the right fabric with a particular pattern and then some group chat on these topics.
Hope to see you online! I think those of us who sew have quite the advantage - no desperate need to fill the hours of #stayhome. It's time to pull that precious fabric or challenging pattern out and get going on a project we've been dreaming about.
Happy Sewing,
Beth
In the meanwhile I've received some messages and emails asking if I could do on-line lessons, and the answer is yes!
You can register, select a time and pay for lessons on the Hello Stitch website. The lessons will most likely be conducted via Zoom, although if that doesn't work for you let me know and we will figure something out. (also if Zoom isn't an option let me know and we'll see if we can use something else).The studio is a small business that obviously had to shut their doors during this pandemic, and I really want them to succeed - after 2 and half years the momentum was fantastic, classes were filling up and the place has become such a warm and welcoming place to stitchers of any level.
Right now we have two listings, one for private lessons and one for a class.
Private lessons: You can register and pick a time slot on the Hello Stitch website. Here's the link to the registration . When you click on the Book Now button it takes you to a calendar page where you can choose a time slot. Note the calendar lists a few days that I'm available and I can add others. If you need a different time email me and we will figure out a time.
I'm ready to help with any garment sewing questions. I know we are all stuck at home working with the supplies we have so questions about construction techniques may be on your mind. If you need some pattern hacking advice to get the look you want, troubleshooting with unclear instructions or even fitting help I can do that.
I think you can also include a message when you book to let me know what your focus is. I will email you prior to get more specifics. But don't feel you have to have a specific project - if you need general sewing advice or encouragement I'm happy to talk sewing any time.
I'm doing an online version of my How to Read a Pattern class.
Sunday April 19 10:30am - 11:15am (Pacific Time)
Here's the link to register.
If you are looking for a bit of sewing camaraderie or want to hear me talk about patterns, how to choose your starting size, a quick overview of how to match the right fabric with a particular pattern and then some group chat on these topics.
So if you have some Sewing and Pattern questions in your #sewisolation I will discuss how to choose your pattern size and explain how different brands handle sizing differently. I'll also review what I think is one of the most important things in sewing success - the right fabric choice. Then we will have a Q&A so you can ask questions and get advice on fabric pairings.
Plus you will get to meet (virtually) other stitchers 😊 I think the class is limited to 5 people.
Hope to see you online! I think those of us who sew have quite the advantage - no desperate need to fill the hours of #stayhome. It's time to pull that precious fabric or challenging pattern out and get going on a project we've been dreaming about.
Happy Sewing,
Beth
Saturday, April 11, 2020
Part 1 for Boucle jacket with statement sleeves Burda 12-2017-118
It does feel a bit odd to discuss my latest sewing project but I appreciate all the comments and emails saying you are enjoying reading about sewing when we need a distraction from our own four walls. I hope everyone is well and not going too nutty during this stay at home time. Things must be getting to me because I'm also baking (like the rest of the country). As I type I have a batch of cinnamon rolls doing their second rise and ready to pop in the oven. A request from my family, we may have watched too many episodes of the British Baking show as I'm now worried about over-proving! (ps I always find it weird when they say prove as we say proof. Also puddings? no thanks, they never look as good as any other things, particularly the steamed ones!) Now, back to sewing😊
Here's a close up view of my latest jacket project. After a winter of teaching jackets classes, and then sewing a new coat plus some other jackets I figured it was time to turn to other items. In fact I did finish two pairs of Ash jeans and some tops which should appear here one of these days. But right before my state went into forced hibernation a friend of mine gave me a whole bolt of this fabric. Couple that with my recent project of organizing my traced Burda patterns and I decided to jump into another jacket.
Turns out I had traced this pattern quite a while ago, and came across it when organizing. I think I was looking for something a bit different and ready to participate in the statement sleeve trend.Their example version is more of a military look with the gold buttons. And it almost looks like she is wearing a mask which is something we are done with soon!
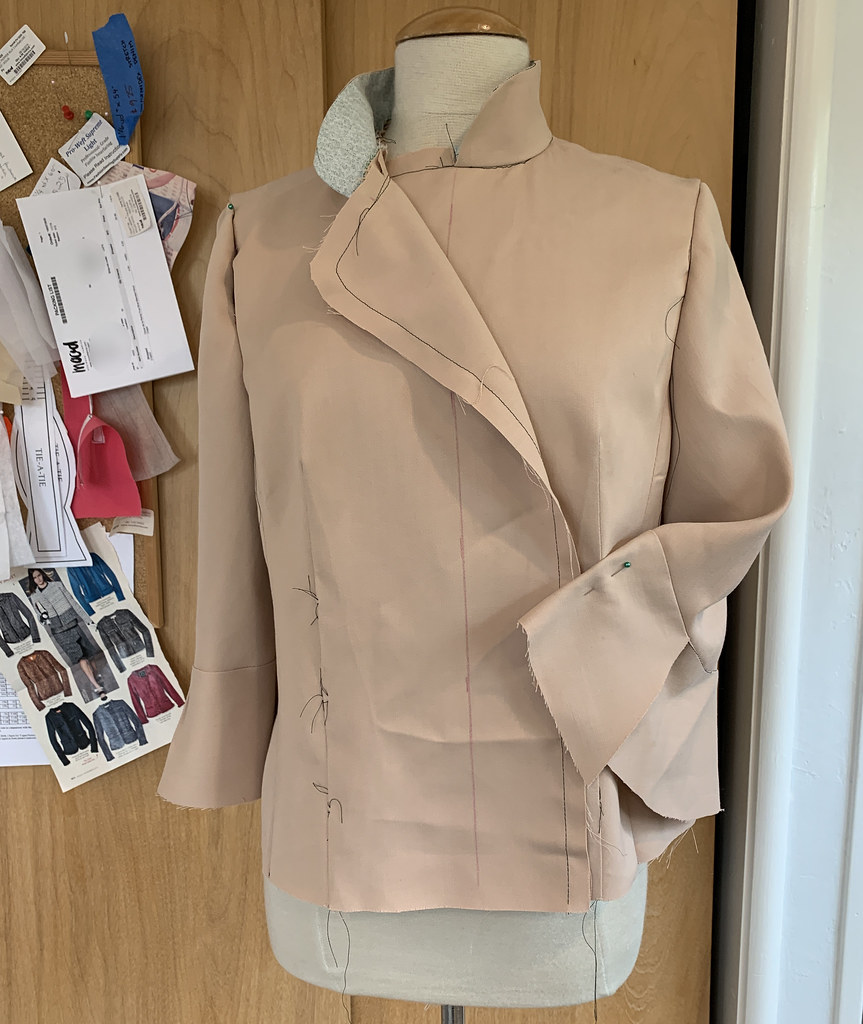
I did make a muslin because I really didn't want to cut into this fabric and end up disliking the shape. Even in this yucky color I liked the shape so onward with cutting out.
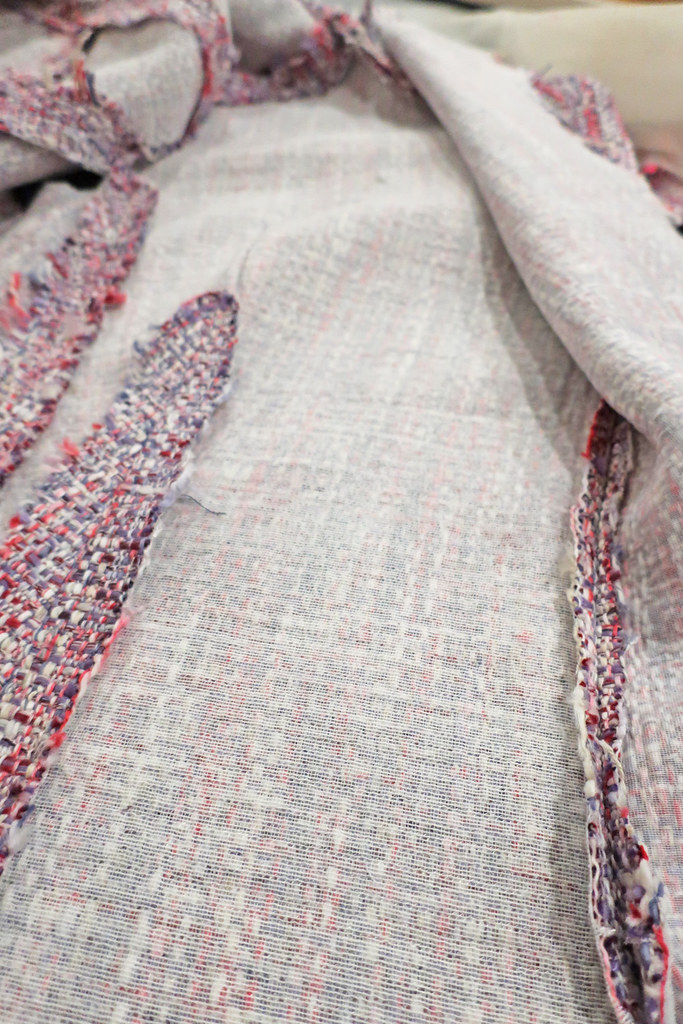
This fabric is very loosely woven and it seemed like it needed a bit of help to retain shape and not fall apart in wearing.
I decided to fully interface all the pieces with lightweight fusible. In this case I used the Pro-Sheer Elegance Light from Fashion Sewing Supply. Although in the front I did use the Pro-Weft Supreme Light (from the same supplier). Those are the two interfacings I use the most, plus their Pro-Sheer Elegance Couture which is perfect for silk shirts and tops.
As you can see, for a lined jacket I leave all the edges raw, I don't see any point in serging the edges for things that are going to be inside the lining. I think it adds bulk on the seam allowances which is the very spot where you are trying to reduce bulk showing on the outside.
Let's talk about those sleeves. I was sure I was sewing them correctly based on the drawing but after finishing them and looking again I realized I had overlapped them in reverse as to how they were supposed to be. So the one on the right is how I originally did it, and the one on the left is unstitched and just pinned into place before sewing. But that's how the pattern is designed. Now that I changed them to be as the pattern I'm not sure it makes any difference or is any better.
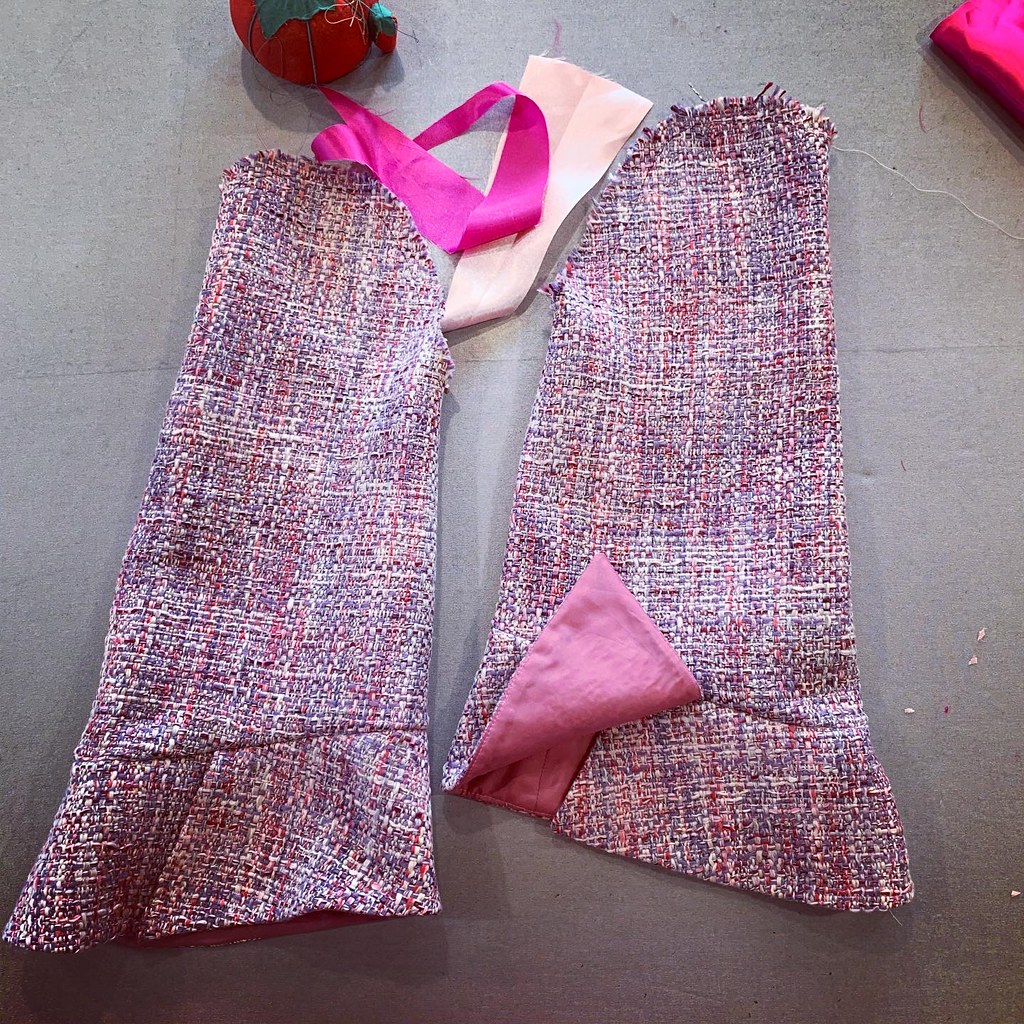
I took this picture before I changed the overlap of the bottom piece, just to show how they are fully lined at the cuff. Those two pink scraps are examples of what I used for the jacket lining. Use what's in the stash is the motto of these days, right? I later sewed the jacket body and sleeve lining together as on a typical jacket construction, and hand stitched the bottom of the sleeve lining to the top of the cuff.
I under stitched the cuff lining so that it would have a good edge and stay inside. This fabric is probably some kind of poly or blend but it pressed surprisingly well and resulted in nice sharp edges which I didn't expect.
More scrap usage, the back has a belt feature so I lined that with a scrap of grey bemberg. Use all the scraps! After seeing it mentioned in their newsletter I decided to make a pouf for my sewing room with scraps and I'm kind of amazed how much I've accumulated since the lockdown - at this rate my cushion will be filled soon.
I think having this little belt band on the back gives it an extra bit of style, I was thinking of leaving it off but decided to add it and now I think it makes the back more interesting.
If you look at the first photo in this post you can see that this jacket is no longer double breasted as the pattern is designed. I generally don't like jackets that are double since I often wear things unbuttoned and then you end with with a lot of extra fabric in the front. I tried it on a few times and just came to the conclusion that I would like it better if it buttoned in the center front. In addition, I started doing some test buttonholes on scraps and they weren't great. So I decided to change the front and to achieve that just sewed the same edge about 2 inches in and cut off the extra.
This resulted in a nice piece that simulated the front edge of the jacket, so I tried a variety of buttonholes on that. Due to the thickness of the fabric I just couldn't get a good machine buttonhole and decided to abandon that idea. And I was so glad that I hadn't done bound buttonholes which I would later have cut off as well!
Large snaps seemed like a good solution so I painted them with nail polish and they blend it very well. Don't ask me the color because I am the person that pours the dregs of one bottle into another one to make a slightly lighter or darker color as led by my mood and miserly tendencies. I put 3 coats plus a clear topcoat, only on one side of the snaps as the other side which would be on the upper part of the inside jacket wouldn't show.
For the lining, I typically never use any of the lining pieces that come with a pattern, but make up my own after the item is sewn together. Here I've overlaid the front facing on the front jacket, and drawn a red line where I want the lining edge to come to.
Then I use the serrated wheel to make that line on the front jacket piece, add a bit more for a seam allowance, cut off the extra and use the jacket front (minus the cut away part) to make the front lining. If it's too much I trim it away when I pin the lining on.
This red coat project post shows how I drape the lining on and fine tune where it folds back and is hand stitched to the inside of the coat.
So that's a few of the details on this Burda Jacket, pattern 12-2017-118 and my next post will be the finished jacket. But here's a little peek from a sunny day about a week ago. This would be the perfect jacket to wear on Easter - however with all the news I'm just glad to say my family and friends are all healthy and I hope the same for everyone reading.
Happy Sewing, Beth
Here's today's garden photo, these stripey pink tulips were a bit of a surprise - I never remember which tulips I plant so it's always a treat to see what comes up.
Saturday, April 4, 2020
Random Threads #38: quarantine sewing, virtual frocktails and pattern packaging
Let's face it - that fabric stash is coming in very handy right now! It's been a long time since I've written a Random Threads post, the pace of my life was quite busy the last few months and then for a lot of us most activities have come to a screeching stop.
I want to express my appreciation for all who continue to show up and work during this time of social distancing. Medical and emergency personnel, grocery staff, the folks who keep the lights on, the water running, the mail and packages delivered and the garbage picked up. Everyone who has an essential job. They are the strong ones and the rest of us need to do our part to stay home so we can kick this thing. We're starting our third week of shelter at home here in California and it seems to be working.
I've received some very kind emails of appreciation for blogging - heaven knows we all need something to take our mind off the situation and sewing can be that for a lot of us. I expect we will all come out of this with some interesting new wardrobe additions and maybe even no wish to look at a sewing machine when we can be outside doing other fun things.
But until then, let's talk about sewing, patterns and all things that made it to my notebook pages since my last Random Threads.
First up: Virtual Frocktails I think we were lucky here in the SF bay area as we had a great Frocktails in late February, which is put on by the Bay Area Sewists Meetup group. Perhaps the biggest attendance yet. Take a look here and here on the group's Instagram. That was when I had a chance to wear my red coat, which is now put away until probably December!
Now that we are all sheltering and some of the notable Frocktails are cancelled due to Covid, I think Sydney, Twin Cities and Portland might have been scheduled for this month but it will all be virtual which means everyone can join in. I need no excuse to make a new dress and this pattern has been on my to-do list for ages.
This isn't THE DVF Vogue pattern, for the iconic wrap dress, but perhaps this is the #2 version of the DVF wrap dress. I see this pattern currently listed on Ebay for between $ 29 - $ 189. My copy I found at where else, a local fabric rummage sale for maybe $1. (believe me I'm always on the lookout for Vintage Vogue patterns of this type) but this one was a real find. So I'm making the short sleeve version in a pink/navy knit. See you at Virtual Frocktails this upcoming Saturday.
A Modern Pattern: Some words are overused and I think this is the one that drives me crazy, when applied to anything. I see so many new sewing patterns that are described as "a modern version" of whatever it is, top, pants, dress, etc. When everyone uses the same word it loses any meaning, plus I want to say NO it's not. It could actually be an exact copy of an existing pattern from a variety of decades. One of my favorite Instagram accounts is Paperbagwaist, where she shows a "modern" version of a garment juxtaposed with a not so new pattern that is just about the exact same style. Modern has become one of those marketing words that almost cease to mean anything, as we can see that what is described that way is virtually identical to something seen before. So what exactly makes it modern? Is their some other descriptive word that you find overused or just annoying?
Should I put in the work to size down this pattern? Another older pattern in my stash is this Butterick pattern which I keep looking at. It actually looks kind of "modern". Aside from that bit of sarcasm I like this top, it has raglan sleeves, interesting gathers around the neckline and then a flat neckband with front opening. It's just about the exact pattern for a woven fabric I've been looking for lately. It's a size 16 which is two sizes up from my usual size 12 so I would have to adjust the neckline etc. Not all that much fun to do - I always urge people to start with the pattern size that fits the neck and shoulders and then grade as needed in bust, waist and hips. But with time on my hands I will give it a go.
Benefit of these older patterns, those nice thick printed lines - the downside for some may be that patterns were just one size per envelope. I think this one might have just prior to the change to multisizes. Vintage pattern wiki says this is circa 1977 as well (just like the Vogue pattern above). I also notice in this pattern that the cutting layout is in the instructions next to the item, so it is like 3 separate instructions in one, for the 3 garments. I'll work on it and report back!
Pattern Packaging: I think I've talked about this one before, but pretty pattern packaging does not impress me. I want efficient packaging - so that the instructions are laid out well, there isn't a lot of wasted space in the printed material so that when I go to store it later it takes up as little space as possible. I'm still on the fence as to my opinion on instruction booklets. I think I prefer the large sheet (such as in Vogue/ McCalls etc) partly because I'm used to it, and partly because at a glance you can see where you are going in the process, as opposed to flipping through a booklet to see what a particular step is leading you to. I do work with a few patterns at the studio in my classes where the cutting layout is on the pattern tissue - and yet there are pages in the instruction book with pretty photos of the garments. Which don't get you through the process and every time I see those pages I get kind of annoyed - the pattern cutting layouts could have been included in the instruction booklet. Then there wouldn't be a need to retain a piece of pattern tissue. Especially for beginners, they don't know to look for the cutting layout and don't expect this vital piece of information to be on the pattern tissue. Because they don't even know what it is! I have another peeve about the way the right/wrong side of fabric is shown but I will save that for a future random threads!
Hanging chains in Jackets: Whenever I see a chain used for this element in a coat or jacket I want to ask - doesn't that chain there on the back of your neck bug you when you wear it? It would drive me crazy to have a bit of metal there, and sometimes the chains are quite chunky. I guess if you live somewhere with a cold winter you are wearing a quite heavy coat and then need to hang it up when you go into a restaurant or cafe. A phenomenon which I am unfamiliar with here in mostly sunny Calif. In fact our restaurants or cafes rarely have any spot to put your coat so you end up leaving on the back of your chair. My feeling on this item, the coat hanging chain, is the same as most labels - out they go :)
Mostly Burda: this is a question I've been meaning to ask. For the past year I've sewn mostly from my Burda magazine subscription, to the exclusion of just about any other pattern company. Do you find it interesting to read about this Burda sewing? It seems there is a loyal subset of garment sewers that swear by Burda but they are not exactly the most popular in the sewing world. Previously I sewed with mostly Vogue/McCalls/Simplicity/NewLook. I've made a few indie patterns, usually for Hello Stitch projects, and haven't sewn any new Vogue patterns in a while. The patterns in the Burda magazine are so varied and I always seem to find 2 or 3 per issue that I want to make. Right now I have a specific type of blazer in mine, with sharp peak lapel and quite amazingly that is exactly the jacket pattern in the February issue. (Feb 2020 # 102) I have a printed denim for the blazer plus jeans for a suit - could be great or tragic. Either way I have time to make it now.
Anyway - I hope it's still interesting for readers of this blog, hopefully so. After all as I often say - there are no new patterns so what appears in Burda now may be in Vogue or New Look next year and vice versa.
What are you sewing now that the shelter-at-home is upon us? Here in N. California we started on March 16 and I think it will go through April at the very least. Time enough to get a LOT of sewing done. It's pouring here today with much needed rain and I have a pot of braciole simmering in tomato sauce on the stove - enough for a family meal plus more to put in the freezer. And I found a new bag of bread flour in my cupboard so perhaps some baking tomorrow. It's hunker down and cook or sew time. I hope the sunshine returns soon as I need some get out and exercise time! All this staying at home I think will lead to some extra inches and I don't want to be adjusting patterns when we can go out and wear all the stuff we have sewn!!
Hope you are all well and we'll get through this,
Happy Sewing, Beth
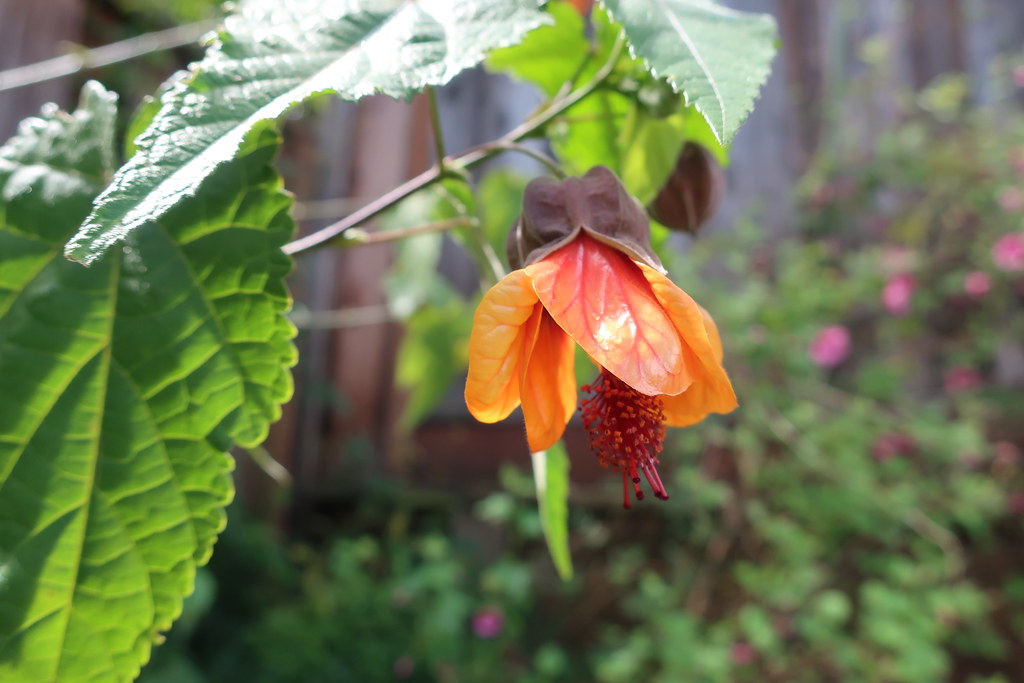
Today's garden photo, this albutilon which I bought last year ? at the local junior college horticultural department sale. Such great finds there. I hope they will be open for their May sales.
Subscribe to:
Posts (Atom)